
Chapter 5
Creating Images
IN THIS CHAPTER
![]() Understanding the
Understanding the System.Drawing namespace
![]() Determining where the drawing classes fit
Determining where the drawing classes fit
![]() Creating a simple game application using
Creating a simple game application using System.Drawing
No one is going to write the next edition of Bioshock using C# directly (although, you might do so using third-party products like Unity Gaming Services, https://unity.com/). It just isn't the kind of language you use to write graphics-intensive applications like shoot-’em-up games.
Still, C# packs a fair amount of power into the System.Drawing classes. (This chapter focuses on the Windows Forms method of creating graphics — the WPF method is different.) Though these classes are somewhat primitive in some areas, and using them might cause you to have to write a few more lines of code than you should, there isn’t much that these classes can’t do with sufficient work.
The drawing capability provided by the .NET Framework is divided into four logical areas by the namespace design provided by Microsoft. All the general drawing capability is in the System.Drawing namespace. Then there are some specialized namespaces:
System.Drawing.2Dhas advanced vector drawing functionality.System.Drawing.Imagingis mostly about using bitmap graphic formats, like.bmpand.jpgfiles.System.Drawing.Textdeals with advanced typography.
This chapter focuses on the base namespace and covers only the basics of drawing in C#. (Discussing every aspect of drawing could easily fill an entire book.)
 You don't have to type the source code for this chapter manually. In fact, using the downloadable source is a lot easier. You can find the source for this chapter in the
 CSAIO4D2EBK03CH05 folder of the downloadable source. See the Introduction for details on how to find these source files.
Getting to Know System.Drawing
Even at the highest level, graphics programming consists of drawing polygons, filling them with color, and labeling them with text — all on a canvas of some sort. Unsurprisingly, this leaves you with four objects that form the core of the graphics code you write: graphics, pens, brushes, and text.
Graphics
Generally speaking, the Graphics class creates an object that is your canvas. All the methods and properties of the Graphics object are designed to make the area you draw upon more appropriate for your needs.
Also, most of the graphics- and image-related methods of other classes in the framework provide the Graphics object as output. For instance, you can call the System.Web.Forms.Control.CreateGraphics method from a Windows Forms application and get a Graphics object back that enables you to draw in a form control in your project. You can also handle the Paint event of a form, and check out the Graphics property of the event.
Graphics objects use pens and brushes (discussed later in this chapter, in the “Pens” and “Brushes” sections) to draw and fill. Graphics objects have methods such as these:
DrawRectangleFillRectangleDrawCircleFillCircleDrawBezierDrawPolygonDrawLine
These methods accept pens and brushes as parameters. You might think, “How can a circle help me?” but you must remember that even complex graphic objects such as those found in Halo Infinite (https://www.halowaypoint.com/) are made up of circles and triangles — thousands of them. The trick to useful art is using math to put together lots of circles and triangles until you have a complete image. The sample application described later in this chapter is a simple example of just that.
Pens
You use pens to draw lines and curves. Complex graphics are made up of polygons, and those polygons are made of lines, and those lines are generated by pens. Pens have properties such as
ColorDashStyleEndCapWidth
You get the idea: You use pens to draw things. These properties are used by the pens to determine how things are drawn.
Brushes
Brushes paint the insides of polygons. Though you use the pens to draw the shapes, you use brushes to fill in the shapes with gradients, patterns, or colors. Brushes are usually passed in as parameters to a FillWhatever method of the pen objects. In most cases, the fill for the object comes first so that it doesn't overlap the object edges; then the pen draws the outline. The filling and the outlining use two different methods. (The brush object always stays inside the lines, though.)
Don’t look for the Brush class (which is a base class), however. It’s a holding area for the real brushes, which have kind of strange names. Brushes are made to be customized, but you can do a lot with the brushes that come with the framework as is. Some of the brushes include
SolidBrushTextureBrushHatchBrushPathGradientBrush
Although the pens are used to pass into the Draw methods of the Graphics object, brushes are used to pass into the Fill methods that form polygons and other shapes.
Text
Text is painted with a combination of fonts and brushes. Just like polygons, the Font class uses brushes to fill in the lines of a text operation.
System.Drawing.Text has collections of all the fonts installed in the system running your program, or installed as part of your application. System.Drawing.Font has all the properties of the typography, such as
- Bold
- Size
- Style
- Underline
The Graphics object, again, provides the writing of the text on the canvas.
How the Drawing Classes Fit into the Framework
The System.Drawing namespace breaks drawing into two steps:
- Create a
System.Drawing.Graphicsobject. - Use the tools in the
System.Drawingnamespace to draw on it.
It seems straightforward, and it is. The first step is to get a Graphics object. Graphics objects come from two main places — existing images and Windows Forms.
To get a Graphics object from an existing image, look at the Bitmap object. The Bitmap object is a great tool that enables you to create an object using an existing image file. This gives you a new palette that is based on a bitmap image (a JPEG file, for example) that is already on your hard drive. It's a convenient tool, especially for web images.
Bitmap currentBitmap = new Bitmap(@"c:imagesmyImage.jpg");
Graphics palette = Graphics.FromImage(currentBitmap);
Now the object palette is a Graphics object whose height and width are based on the image in currentBitmap. What's more, the base of the palette image looks exactly like the image referenced in the currentBitmap object.
You can use the pens, brushes, and fonts in the Graphics class to draw directly on that image, as though it were a blank canvas. It's possible to use a font to put text on images before showing them on web pages and to use other Graphics elements to modify the format of images on the fly, too.
Another way to get a Graphics object is to get it from Windows Forms. The preferred method is to catch the Paint event and use its Graphics object. However, you can also use the System.Windows.Forms.Control.CreateGraphics() method, but this approach means that the drawing could disappear when the control needs to refresh. This method gives you a new palette that is based on the drawing surface of the control being referenced. If it's a form, it inherits the height and width of the form and has the form background color. You can use pens and brushes to draw right on the form.
When you have a Graphics object, the options are endless. Sophisticated drawing isn’t out of the question, though you would have to do a ton of work to create graphics like you see in Halo using Visual Studio. (There isn’t a Master Chief class that you can just generate automatically.)
Nonetheless, even the most complex 3D graphics are just colored polygons, and you can make those with the System.Drawing namespace. The following sections build a cribbage board with a Graphics object, pens, brushes, and fonts.
Using the System.Drawing Namespace
Good applications come from strange places. Many people enjoy games, and one favorite in the United States (and many other places) is the card game cribbage (see some instruction on the basics at https://www.dummies.com/games/card-games/cribbage/the-basics-of-cribbage/). Say that you're on vacation and have the urge to play. You have the cards, but not a cribbage board.
You do have your laptop, Visual Studio, and the System.Drawing namespace. After just a few hours of work, you could build an application that serves as a working cribbage board! The Cribbage example in the following sections isn't quite complete (which would require a whole lot of code), but it does include enough code to get you started, and it’s operational enough to let you play a game.
Getting started
Cribbage is a card game where hands are counted up into points, and the first player to score 121 points wins. It’s up to the players to count the points, and the score is kept on a board.
Cribbage boards are made up of two lines of holes for pegs, usually totaling 120, but sometimes 60 holes are used and you play through twice. Figure 5-1 shows a typical cribbage board. Cribbage boards come in a bunch of styles — check out www.cribbage.org if you’re curious; it has a great gallery of almost 100 boards, from basic to whimsical.
In this example, you create the board image for an application that keeps score of a cribbage game — but it wouldn’t be beyond C# to write the cards into the game, too! So the board for this application has 40 holes on each of three pairs of lines, which is the standard board setup for two players playing to 120, as shown in Figure 5-2. The first task is to draw the board and then to draw the pegs as the players’ scores — entered in text boxes — change.

FIGURE 5-1: A traditional cribbage board.
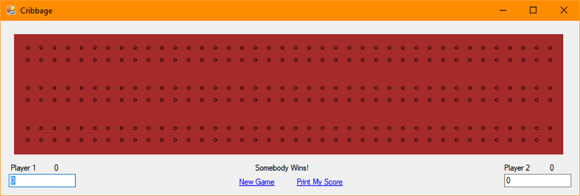
FIGURE 5-2: The digital cribbage board.
The premise is this: The players play a hand and enter the resulting scores in the text box below their respective names (refer to Figure 5-2). When the score for each hand is entered, the score next to the player’s name is updated, and the back peg is moved on the board (making the current front peg, the back peg). The next time that same player scores a hand, the back peg is moved forward past the front peg the number of points scored, and the front peg becomes the back peg. The inventor of cribbage was paranoid of cheating, and the back peg makes this less likely. If you’re unfamiliar with cribbage, you may want to check out the rules at http://www.cribbage.org/.
Setting up the project
To begin, create a playing surface. You set up the board shown in Figure 5-2 without drawing the board itself — you see later how to paint it with System.Drawing objects. Your board should look like Figure 5-3 when you're ready to start creating business rules. The various controls, from left to right (top to bottom), are named Player1Points (Label), Player1 (TextBox), WinMessage (Label), StartGame (LinkLabel), PrintMe (LinkLabel), Player2Points (Label), and Player2 (TextBox). (It also helps to set the FormBorderStyle property to FixedSingle.)

FIGURE 5-3: The basic board.
Handling the score
The following method, which handles score changes, is called from the text boxes' LeaveTextChanged event handler is that you want to be sure that the user has fully entered the score before you process it. Otherwise, each digit entered would count as another score addition. The method is purposely generic to make it easier to use the same code for both players.
// Fields used to keep track of score.
private int Player1LastTotal = 0;
private int Player2LastTotal = 0;

private void HandleScore(TextBox scoreBox, Label points,
    Label otherPlayer, ref Int32 lastScore)
{
    try
    {
        if (0 > Int32.Parse(scoreBox.Text) |
            Int32.Parse(scoreBox.Text) > 27)
        {
            // Display an error message and ensure the errant
            // score textbox has focus.
            scoreBox.Focus();
            WinMessage.Text = "Score must be between 0 and 27";
        }
        else
        {
            // Clear any error message.
            WinMessage.Text = "";

            // Update the last score.
            lastScore = Int32.Parse(points.Text);

            // Add the score written to the points
            points.Text = (Int32.Parse(points.Text) +
                Int32.Parse(scoreBox.Text)).ToString();

            // Reset the score text.
            scoreBox.Text = "0";

            // Change the focus to the next player.
            if (scoreBox.Name == "Player1")
                Player2.Focus();
            else
                Player1.Focus();
        }
    }
    catch (System.FormatException ext)
    {
        // Something other than a number
        if (scoreBox.Text.Length > 0)
        {
            scoreBox.Focus();
            WinMessage.Text = "Score must be a number";
        }
    }
    catch (Exception ex)
    {
        // Eek!
        scoreBox.Focus();
        MessageBox.Show("Something went wrong!  " + ex.Message);
    }

    // Check the score
    if (Int32.Parse(points.Text) > 120)
    {
        // Make it possible to print the score.
        PrintMe.Visible = true;

        if (Int32.Parse(points.Text) /
            Int32.Parse(otherPlayer.Text) > 1.5)
        {
            WinMessage.Text = scoreBox.Name + " Skunked 'em!!!";
        }
        else
        {
            WinMessage.Text = scoreBox.Name + " Won!!";
        }
        WinMessage.Visible = true;
    }
}
The code begins by creating two variables to hold the player score totals. HandleScore() accepts the current score, as found in the current player's TextBox, and the totals for both players. It then checks the current score to ensure that it’s in the right format and within the correct value range. Instead of using Int32.Parse() and an exception handler, you could also use Int32.TryParse(), which doesn't produce an exception, but also requires additional handling because now you have to check whether the conversion is successful. After the new score is verified, its value is added to the correct player’s score and then the new score is reset to 0. The next player’s TextBox then receives the focus.
Now that the scores are updated, it's time to check the totals. When the total for a particular player exceeds 120 points, the game is over. The game displays one of two messages depending on how much the one player tromped the other.
Creating an event connection
Of course, if you have something that’s associated with an event, you must have event handlers. Select each of the player TextBox controls in turn, click the Events button, and then double-click the Leave event to produce an event handler, as shown in Figure 5-4.
Now that you have the required event handlers, you can add the following code to them:
private void Player1_Leave(object sender, EventArgs e)
{
    // Handle the score.
    HandleScore(Player1, Player1Points, Player2Points,
        ref Player1LastTotal);

    // Update the board.
    Form1.ActiveForm.Invalidate();
}

private void Player2_Leave(object sender, EventArgs e)
{
    // Handle the score.
    HandleScore(Player2, Player2Points, Player1Points,
        ref Player2LastTotal);

    // Update the board.
    Form1.ActiveForm.Invalidate();
}
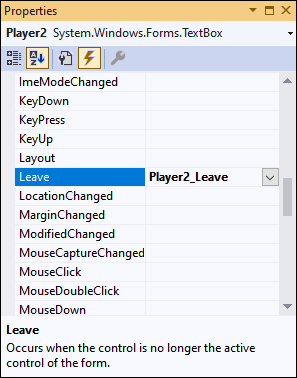
FIGURE 5-4: Add a Leave event handler for each of the TextBox controls.
Note that you must pass the private field used to hold the player’s previous score by reference. Otherwise, the fields won’t update.
In addition, you must call Form1.ActiveForm.Invalidate(). Otherwise, the board won't redraw, which means that you won’t see the pins move.
Drawing the board
The application needs to paint right on a form to create the image of the board for the cribbage application. This means gaining access to the Graphics object through the PaintEventArgs object passed to the application during each redraw event. From there, you need to complete these tasks:
- Paint the board brown using a brush.
- Draw six rows of little circles using a pen.
- Fill in the hole if that is the right score.
- Clean up your supplies.
The following method redraws the board every time it gets called. To make the method purpose more understandable, the code calls it CribbageBoard_Paint().
private void CribbageBoard_Paint(object sender, PaintEventArgs e)
{
    // Obtain the graphics object.
    Graphics g = e.Graphics;

    // Create the board
    SolidBrush brownBrush = new SolidBrush(Color.Brown);
    g.FillRectangle(brownBrush, new Rectangle(20, 20, 820, 180));

    // Paint the little holes.
    // There are 244 little holes in the board.
    // Three rows of 40 times two, with the little starts and stops on
    // either end.
    // Let's start with the 240.
    int rows = 0;
    int columns = 0;
    int scoreBeingDrawn = 0;
    Pen blackPen = new Pen(Color.Black, 1);
    SolidBrush blackBrush = new SolidBrush(Color.Black);
    SolidBrush redBrush = new SolidBrush(Color.Red);

    // There are 6 rows, then, at 24 and 40, 80 and 100, then 140 and 160.
    for (rows = 40; rows <= 160; rows += 60)
    {
        // There are 40 columns. They are every 20
        for (columns = 40; columns <= 820; columns += 20)
        {
            // Calculate score being drawn
            scoreBeingDrawn = ((columns - 20) / 20) +
                ((((rows + 20) / 60) - 1) * 40);

            // Draw Player1
            // If score being drawn = Player1 fill, otherwise draw
            if (scoreBeingDrawn == Int32.Parse(Player1Points.Text))
            {
                g.FillEllipse(blackBrush, columns - 2, rows - 2, 6, 6);
            }
            else if (scoreBeingDrawn == Player1LastTotal)
            {
                g.FillEllipse(redBrush, columns - 2, rows - 2, 6, 6);
            }
            else
            {
                g.DrawEllipse(blackPen, columns - 2, rows - 2, 4, 4);
            }

            // Draw Player2
            // If score being drawn = Player2 fill, otherwise draw
            if (scoreBeingDrawn == Int32.Parse(Player2Points.Text))
            {
                g.FillEllipse(blackBrush, columns - 2, rows + 16, 6, 6);
            }
            else if (scoreBeingDrawn == Player2LastTotal)
            {
                g.FillEllipse(redBrush, columns - 2, rows + 16, 6, 6);
            }
            else
            {
                g.DrawEllipse(blackPen, columns - 2, rows + 16, 4, 4);
            }
        }
    }

    // Perform the required cleanup.
    g.Dispose();
    brownBrush.Dispose();
    blackPen.Dispose();
}
Aside from the math, note the decision making. If the score being drawn is the score in the label, fill in the hole with a black peg. If it's the last score drawn, fill in the hole with a red peg. Otherwise, well, just draw a circle.
To make the CribbageBoard_Paint() event handler work properly, you must associate it with the form. In Design View, select Form1. Click the Events button at the top of the Properties window to display the list of events associated with Form1 (see Figure 5-4 as an example). Click the drop-down list box for the Paint event and choose the CribbageBoard_Paint entry.
Printing the score
You may decide that you really need evidence as to how the game really went. Fortunately, you can print the game board when you're done. The PrintMe link, combined with a PrintDocument component, will allow you to do just that with a minimum of fuss. Just drag and drop the PrintDocument component to your form and you see it appear at the bottom in its own area as printDocument1. This component doesn't have a visual interface. You need event handlers for both PrintMe and printDocument1, which you can create by double-clicking them. Then you add the following code to the event handlers:
// Define a variable to hold the bitmap to print.
private Bitmap memoryImage;

private void PrintMe_LinkClicked(object sender,
    LinkLabelLinkClickedEventArgs e)
{
    // Create a graphics object.
    Graphics thisPage = this.CreateGraphics();
    Size thisSize = this.Size;
    memoryImage = new Bitmap(thisSize.Width, thisSize.Height, thisPage);

    // Copy the form image to memory.
    Graphics memoryGraphics = Graphics.FromImage(memoryImage);
    memoryGraphics.CopyFromScreen(this.Location.X, this.Location.Y,
        0, 0, thisSize);

    // Print the document.
    printDocument1.Print();
}

private void printDocument1_PrintPage(object sender,
    System.Drawing.Printing.PrintPageEventArgs e)
{
    // Ensure the image will fit on the paper by
    // resizing it.
    e.Graphics.DrawImage(memoryImage, 0, 0,
        memoryImage.Width/2, memoryImage.Height/2);
}
Two processes are happening in PrintMe_LinkClicked(). First, you create a bitmap to hold the image that you want to print in memory. Second, you fill that image with the form graphic onscreen. When you have the form image in memory, you can print it.
The printDocument1_PrintPage() method simply takes the memory image and draws it on the printer canvas. You see the result as a copy of the printed form.
Starting a new game
The last thing you need to do is create some method for starting a new game, which is where the LinkLabel, StartGame, comes into play. The following code sets everything up for a new game:
private void StartGame_LinkClicked(object sender,
    LinkLabelLinkClickedEventArgs e)
{
    // Set the scores to zero.
    Player1.Text = "0";
    Player2.Text = "0";
    Player1Points.Text = "0";
    Player2Points.Text = "0";
    Player1LastTotal = 0;
    Player2LastTotal = 0;

    // Reset the text and hide the print link.
    WinMessage.Text = "";
    PrintMe.Visible = false;
}
It's tough to fathom, but this is exactly how large-scale games are written. Admittedly, big graphics engines make many more If-Then decisions, but the premise is the same.
Also, large games use bitmap images sometimes, rather than draw all the time. For the cribbage-scoring application, for example, you could use a bitmap image of a peg rather than fill an ellipse with a black or red brush!