
Chapter 3
The Basics Behind macOS Monterey
IN THIS CHAPTER
![]() Introducing the macOS Monterey Desktop
Introducing the macOS Monterey Desktop
![]() Launching and quitting applications
Launching and quitting applications
![]() Mastering Finder windows, icons and shortcuts
Mastering Finder windows, icons and shortcuts
![]() Manipulating your Desktop with Mission Control and Spaces
Manipulating your Desktop with Mission Control and Spaces
![]() Customizing the Dock and Desktop
Customizing the Dock and Desktop
![]() Getting help while learning about Monterey
Getting help while learning about Monterey
Ah, the Finder. Many admire its scenic beauty. But don’t ignore its unsurpassed power or its many moods. And send a postcard while you’re there. Okay, so the Monterey Finder might not be quite as beautiful as the city it’s named after, but it’s the basic toolbox you use every day while piloting your iMac. The Finder includes the most common elements of macOS: window controls, common menu commands, icon fun (everything from launching applications to copying files), keyboard shortcuts, and even emptying the Trash. In fact, you could say that if you master the Finder and learn how to use it efficiently, you’re on your way to becoming a power user!
This chapter is your Finder tour guide, and we’re ready to roll. I satisfy your curiosity about your new playground and introduce you to the basic elements of the Monterey Desktop, and I outline the resources available if you need help with macOS.
Oh, and I promise to use honest-to-goodness English in my explanations, with a minimum of engineer-speak and indecipherable acronyms. (In return, promise that you will boast about Monterey to your family and friends. Aunt Harriet might not be as technologically savvy as we are.)
Your Own Personal Operating System
Monterey is a special type of software called an operating system (or OS, as in macOS). This means that Monterey essentially runs your iMac and allows you to run all your other applications, such as Music and Adobe Photoshop. It’s the most important computer application — or software — that you run.
 Think of a pyramid, with Monterey as the foundation and other applications running on top.
You’re using the OS when you aren’t running a specific application, such as these actions:
- Copying files from a USB flash drive (also called a thumb drive) to your internal drive
- Navigating through files and folders on your drive
- Choosing a different screen saver
Sometimes, Monterey even peeks through an application while it’s running. For example, macOS controls application actions such as these:
- The Open, Save, and Save As dialogs you see when working with files in Photoshop
- The Print dialog that appears when you print a document in Pages (Apple’s desktop publishing application)
In the following sections, I escort you around the most important hotspots in Monterey, and you meet the most interesting onscreen thingamabobs you use to control your iMac. (I told you I wouldn’t talk like an engineer!)
The Monterey Desktop
The Monterey Desktop isn’t made of wood, and you can’t stick your gum underneath. However, this particular desktop does work much like the surface of a traditional desk. You can store things there, organize things into folders, and take care of important tasks such as writing and drawing (using tools called applications). Heck, you even have a clock and a trash can.
Gaze upon Figure 3-1 and follow along as you venture to your Desktop and beyond. I discuss each of these Desktop elements in more detail later in this chapter.
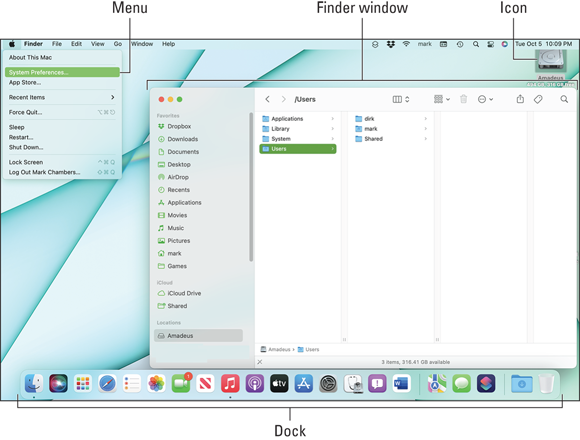
FIGURE 3-1: Everything Monterey starts here — the macOS Desktop.
Meet me at the Dock
The Dock is a versatile combination: one part organizer, one part application launcher, and one part system monitor. From the Dock, you can launch applications — for example, the postage stamp icon represents the Apple Mail application, and clicking the spiffy compass icon launches your Safari web browser. Icons in the Dock also allow you to see what’s running, and display or hide the windows shown by your applications.
Each icon in the Dock represents one of the following (many of which are proudly displayed in Figure 3-2):
- An application you can run (or that is running)
- An application window that’s minimized (shrunk)
- A web page URL link
- A document or folder on your system
- A network server, shared document, or shared folder
- Applications you’ve recently launched
- Your Trash

FIGURE 3-2: The Dock can contain all sorts of exotic icons.
The Dock is highly configurable:
- It can appear at different edges of the screen.
- It can disappear until you move the pointer to the edge to call it forth.
- You can resize it.
Check out that Control Center
Let’s face it: Even with two decades of excellent design behind it, your macOS Desktop can be a somewhat confusing landscape! Your iMac may need a quick settings change from time to time, especially during a day spent working with many different apps. With Monterey, Apple delivers the macOS Control Center to round up all those stray options and present them in a single, convenient spot.
The Control Center is easily customized, too — after all, this is macOS — so that you can decide what goes where! Some settings can either appear on your Finder menu bar or the Control Center. You can learn all the details in the section titled “Taking Control of Your iMac,” later in this chapter.
Dig those crazy icons
By default, Monterey always displays at least one icon on your Desktop: your iMac’s internal drive. To open a drive and view or use the contents, you double-click the icon. Each icon is a shortcut of sorts that represents something, including:
- CDs and DVDs (if you have an optical drive)
- External drives and USB flash drives
- Applications and documents
- Files and folders
- Network servers you access
Note that an icon can represent applications you run and documents you create. Sometimes you single-click an icon to watch it do its thing (as in the Dock), but usually you double-click an icon to make something happen.
There’s no food on this menu
The menu bar isn’t found in a restaurant. You find it at the top of the Desktop, where you can use it to control your applications. Virtually every application you run on your iMac has a menu bar.
To use a menu command, follow these steps:
- Click the menu title (such as File or Edit).
- Choose the desired command from the list that appears, as shown in Figure 3-3.
When you click a menu, it extends down so that you can see the commands it includes. While the menu is extended, you can choose any enabled menu item (just click it) to perform that action. You can tell that an item is enabled if its name appears in black (or white, if you’re using the Dark Mode color scheme). Conversely, a menu command is disabled if it appears grayed out. Clicking it does nothing.

FIGURE 3-3: Clicking a menu displays a list of menu commands.
 When you see a menu path printed in this book (such as File ⇒ Save), it’s just a visual shortcut that tells you to click the File menu and then choose Save from the drop-down menu that appears.
Virtually every Mac application has some menus, such as File, Edit, and Window. You’re likely to find similar commands within these menus. However, only two menus are in every macOS application:
- The Apple menu, which is identified with that jaunty Apple Corporation icon (
 ). This is a special menu because it appears in both the Finder menu bar and the menu bar in every application you run. It doesn’t matter whether you’re in Music or Photoshop or Word. If you can see a menu bar, the Apple menu is there. The Apple menu contains common commands to use no matter where you are in Monterey, such as Restart, Shut Down, and System Preferences. Figure 3-3 proudly displays the Apple icon at the upper left.
 - The Application menu, which always bears the name of the active application. For instance, the DVD Player menu group appears when you run the Monterey DVD Player, and the Word menu group appears when you launch Microsoft Word.
You can also display a context or shortcut menu — which regular human beings call a right-click menu — by right-clicking the Monterey Desktop, an application, a folder, or a file icon with your mouse. (If your iMac is equipped with a trackpad, you can right-click by tapping the trackpad with two fingertips. I explain more on clicking and tapping later, in the section, “Wait a Second: Where the Heck Are the Mouse Buttons.”)
The Finder menu bar is your friend
Whenever the Finder itself is ready to be used (or, in Mac-speak, whenever the Finder is the active application), the Finder menu bar appears at the top of the screen. You know the Finder is active and ready when the word Finder appears at the left of the menu bar.
There’s always room for one more window
You’re probably already familiar with the ubiquitous window itself. Both Monterey and the applications you run use windows to display things such as:
- The documents you create
- A web page
- Your photographs
- The contents of your drive
For example, the window shown in Figure 3-1, earlier in the chapter, is a Finder window, where Monterey gives you access to the applications, documents, and folders on your system. You use Finder windows to launch applications, to perform disk chores such as copying and moving files, and to navigate your drives.
Wait a Second: Where the Heck Are the Mouse Buttons?
Monterey takes a visual approach to everything, and what you see in Figure 3-1, earlier in the chapter, is designed for point-and-click convenience. That’s because the mouse (or trackpad) are your primary navigational tools while you’re using your iMac. Of course, you move the body of the mouse and the pointer follows like an obedient pup. Likewise, you move your finger over the surface of the trackpad to move the pointer. (The faster you move your finger, the farther the pointer goes.) When your pointer is over the desired item, you tap it (or click it, if you prefer the more familiar term), it opens, you do your thing, and life is good.
But wait! If you’ve grazed on the other side of the fence — one of Those Who Were Once Windows Users — you’re probably accustomed to using a mouse with at least two buttons. This brings up the nagging question: “Hey, Mark! Where the heck are my mouse buttons?” Or perhaps you’re thinking even farther out of the box, and you ordered a Magic Trackpad 2 as your pointing device of choice. Again, no buttons!
In a nutshell, the “buttons” on your iMac’s Magic Mouse 2 (or Magic Trackpad 2) are the entire top surface! Although you won’t see any separate buttons for clicking, your Magic pointing device can tell when you tap with one finger (to single-click). iMac owners using the Magic Trackpad 2 should think “tap” whenever they read “click” in the Apple world. If you’ve used an iPhone or iPad, the idea of tapping something onscreen makes perfect sense. (In this book I refer to the pointer whether you’re using the trackpad or a mouse.)
To configure everything Magic Mouse 2 — including all your buttons and your double-click/tracking/scrolling speeds — visit the Mouse pane within System Preferences. You can also configure your wireless mouse from here as well. Similarly, you can configure your wireless Magic Trackpad 2 using the Trackpad pane.
Speaking of right-clicking, you can easily configure your Apple pointing device to recognize a right-click (also called a secondary click) within System Preferences. Tapping the top-right corner (of a Magic Mouse 2) or tapping with two fingers (on the Magic Trackpad 2) performs the same default function in Monterey that clicking the right mouse button does in Windows. Namely, when you right-click most items — icons, documents, even your Desktop — you get a number of additional actions. That is, you get more commands specific to that item. (To keep familiar things familiar, I call it the “right-click menu,” and I promise to refer to it as such for the rest of the book.)
Figure 3-4 shows a typical convenient right-click menu in a Finder window. I have “extra” cool items at my disposal on this menu because of the applications I’ve installed that make use of a right-click menu.
Shortcuts can generate their own right-click menu items, called Quick Actions, that allow you to perform tasks on the selected item. (More on Shortcuts and creating Quick Action items in a few pages.)
 If you’re using a Magic Trackpad 2 with your iMac, never use any object other than your finger (or a trackpad stylus) on the trackpad surface! That means no pencils (no, not even the eraser end), pens, or chopsticks; they can damage your trackpad in no time at all. And no, that doesn’t bode well for long fingernails.
But that’s not all. Apple’s series of Multi-Touch gestures for your Magic Mouse 2 and Magic Trackpad 2 include all sorts of handy time-saving commands! Depending on the changes you make within the Mouse and Trackpad panes in System Preferences, these gestures can include:

FIGURE 3-4: Welcome to your right-click menu!
- Select the Tap to Click check box: Now, when you tap once quickly anywhere on the mouse, your Mac counts that as a click. Tap twice quickly, and your iMac recognizes that as a double-click.
- Select the Secondary Click check box: A single tap with two fingers displays the right-click menu (which I cover in more detail in a page or two).
- Enable the Look Up check box: Tap the trackpad with three fingers to look up a selected word in the Dictionary.
- Enable the Three Finger Drag check box: (Sounds like a dance from the ’60s, doesn’t it?) By using three fingers, you can drag around windows on your Desktop to reposition them.
- Adjust your tracking speed: Click and drag the Tracking speed slider to speed up or slow down the rate at which the pointer moves.
In this book I refer to the pointer whether you’re using the trackpad or a mouse. I also use the term button from time-to-time for clarity — even though I’ve already pointed out there aren’t physical buttons on either of these devices, it’s an easy concept that we all recognize.
Launching and Quitting Applications with Aplomb
Now it’s time to pair your newly found mouse or trackpad acumen with the Monterey Finder window. Follow along with this simple exercise. Move the pointer over the Music icon in the Dock. (This icon bears the symbol of a musical note.) Then tap the surface of your mouse or trackpad once (see the preceding section for how to set this preference). Whoosh! Monterey launches (or starts, or runs) the Music application, and you see a window much like the one shown in Figure 3-5.
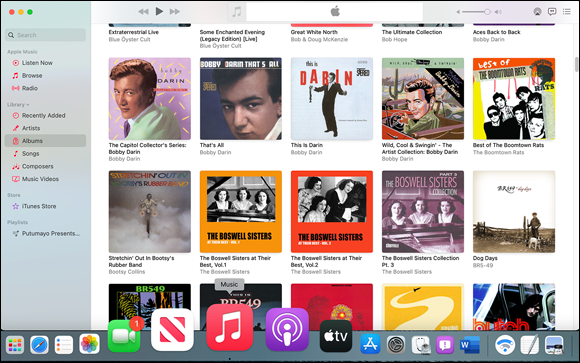
FIGURE 3-5: Click a Dock icon to launch that application.
If an application icon is already selected (which I discuss later in the chapter), you can simply press ⌘ +O to launch it. The same key shortcut works with documents, too.
Besides the Dock, you have a plethora of other ways to launch an application or open a document in Monterey:
- From the Apple menu (): You can launch a number of applications from anywhere in Monterey using the Apple menu. Click System Preferences to change all sorts of settings, such as your display background and how icons appear. Click App Store to launch the macOS App Store and display software that you can download for your iMac. (Most are commercial applications that you have to pay for, but many great free applications are available as well.) You can also use the App Store to see whether update patches are available for your Apple software.
- From the Launchpad: Arrange all your application icons in a full-screen display. (The Launchpad icon in the Dock bears a spiffy rocket.) If you have more than one screen (or page) worth of applications, press the arrow keys to move between Launchpad pages. To launch an application, just click the icon. (If you’re the proud owner of an iPhone or iPad, the Launchpad is familiar, because it corresponds directly to the iOS Home screen on those devices.) The Magic keyboard sports a Launchpad button — press F4 to display or hide the Launchpad.
From the Desktop: If you have a document you created or an application icon on your Desktop, you can launch or open it from the Desktop by double-clicking that icon (tapping the surface of the mouse or trackpad twice with one finger in rapid succession when the pointer is on top of the icon).
Double-clicking a device or network connection on your Desktop opens the contents in a Finder window. This method works for CDs and DVDs you’ve loaded, as well as external drives and USB flash drives. Just double-click ’em to open them and display their contents in a Finder window. Applications and documents typically launch from a CD, a DVD, or an external drive just like they launch from your internal drive (the one that’s typically named Macintosh HD). So you don’t have to copy stuff from the external drive just to use it. Note, however, that running an application directly from your optical or external drive usually causes the application to run significantly slower. (Oh, and don’t forget that you can’t change the contents of music CDs and DVDs you buy; they’re read-only, so you can’t write to them.)- From Siri: Click the Siri icon at the right side of the Finder menu bar. When you see the Siri box appear (with the words What Can I Help You With? and the waveform), say “Launch” and the name of the application. For example, you can open Pages by saying “Launch Pages” — you’ll see Siri display the words it hears.
- From the right-click menu: Click the right side of your mouse (or tap your trackpad with two fingers) to display the right-click menu and choose Open.
- From the Recent Items selection: When you click the Apple menu and hover the pointer over the Recent Items menu item, the Finder displays all the applications and documents you used over the past few computing sessions. Click an item in this list to launch or open it.
- From the Recent Applications group in the Dock: If you enable the Recent Applications check box within the Dock pane in System Preferences, you’ll see the icons for the last three applications you used at the right side of the Dock. Click one of these icons to launch that application.
- From a Shortcut: macOS can launch an application as part of a Shortcut, which I discuss later in this chapter.
- From the Login Items list: Login items are applications that Monterey launches automatically each time you log in to your user account. I cover login items in detail in Chapter 10.
- From the Finder window: You can also double-click an icon within the confines of a Finder window to open it (for documents), launch it (for applications), or display the contents (for a folder).
The macOS Quick Look feature can display the contents of just about any document or file — but without actually opening the corresponding application! Sweet. To use Quick Look from a Finder window, click a file to select it, and then press the spacebar. (Quick Look is also incorporated into Gallery view, which I discuss in a page or two.)
After you finish using an application, you can quit that application to close its window and return to the Desktop. Here are a number of different ways to quit an application:
- Press ⌘ +Q. This keyboard shortcut quits virtually every Mac application. Just make sure that the application you want to quit is currently active first (the application name should appear immediately to the right of the Apple menu).
- Choose the Quit command from the application’s menu. To display the Quit command, click the application’s named menu from the menu bar. As I just mentioned, this menu is always to the immediate right of the Apple menu. For example, Safari displays a Safari menu, and that same spot in the menu bar is taken up by Calendar when Calendar is the active application. Refer to Figure 3-3, and look for the App Store menu, right next to the Apple menu () at the very top of the figure.
Choose Quit from the Dock. You can right-click an application’s icon in the Dock and then choose Quit from the menu that appears.
A running application displays a small dot under its icon in the Dock.- Click the Close button in the application window. Some applications quit entirely when you close their window, such as the System Preferences window or the Apple DVD Player. Other applications might continue running without any window, such as Safari or iTunes; to close these applications, you have to use another method in this list. (More on window controls like Close in the next section.)
- Choose Force Quit from the Apple menu. This is a last-resort measure! Use this method only if an application has frozen and you can’t use another method in this list to quit. Force-quitting an application doesn’t save any changes to any open documents in that application!
Performing Tricks with Finder Windows
In the following sections of your introduction to macOS, I describe basic windows management in Monterey: how to view the contents of your iMac, move things around, close windows, and make windows disappear and reappear like magic.
Viewing your stuff
The default appearance of a Finder window in macOS uses the familiar large-format icons that have been a hallmark of the Mac since Day One. You can display the contents of a Finder window in Icon view by clicking the Icon View button on the Finder window toolbar. Figure 3-7 illustrates a Finder Window in Icon view.
List view displays the folders in a hierarchical fashion, with each subfolder appearing indented underneath its parent folder. You can expand and collapse each folder by clicking the disclosure triangle next to the folder name. (Thanks, Apple, for such a unique name.) You can change to this view by clicking the List icon in the Finder toolbar.
Column view is my favorite — thanks, Apple! It’s efficient and fast as all get-out. Click the Column icon in the Finder toolbar, and drives on your Monterey system are displayed on the left. Each column on the right represents a lower level of subfolders. When you click to select a file or program (rather than a folder), the Finder displays a preview, a quick summary of the selected item and any Quick Actions in the right-most column. The Finder window shown in Figure 3-1, earlier in the chapter, is using Column view.
Each column has its own, individual scroll bar (for those really big folders), and you can drag the column handle at the bottom of the separators to resize the column width to the left. When you hold down the Option key and drag a column handle, all columns are adjusted at one time.
Gallery view allows you to browse visually — click the Gallery View icon in the Finder toolbar to display a row of thumbnails at the bottom of the screen, which you can scroll through with the scroll bar at the bottom of the window. A click on any item displays a preview of the item that fills most of the window, along with file information (or metadata, if the item is an image) and any Quick Actions associated with the item.
Scrolling in and resizing windows
Can you imagine what life would be like if you couldn’t see more than a single window’s worth of stuff? Shopping would be curtailed quite a bit — and so would the contents of the folders on your iMac’s drives!
That’s why Monterey includes scroll bars that you can click and drag to move through the window’s contents. (By default, scroll bars don’t appear in Monterey until you move the pointer close to them.) You can:
- Click the scroll box and drag it. For the uninitiated, that means clicking the darker portion of the bar and holding down your finger on the mouse or trackpad surface while you move your finger in the desired direction.
- Click anywhere in the empty area above or below the scroll box to scroll pages one at a time.
- Hold down the Option key and click anywhere in the empty area above or below the bar to scroll to that spot in the document.
Figure 3-6 shows two vertical scroll bars in a typical Finder window, as well as the Sidebar and three Finder Tabs.
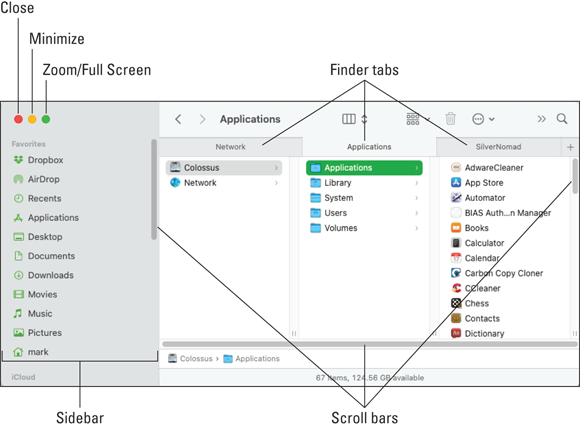
FIGURE 3-6: A plethora of helpful window controls.
Often, pressing the Page Up and Page Down keys moves you through a document one page at a time. Also, pressing the arrow keys moves the insertion cursor one line or one character in the four compass directions.
You can also resize most Finder and application windows by enlarging or reducing the window frame itself. Move the pointer over any corner or edge of a window, and then drag the edge in any direction until the window is the precise size you need. (More information on dragging pops up later in this chapter.)
Minimizing and restoring windows
Resizing a window is indeed helpful, but maybe you simply want to banish the doggone thing until you need it again. That’s a situation for the Minimize button, which also appears earlier, in Figure 3-6. A minimized window disappears from the Desktop but isn’t closed; it simply reappears in the Dock as a miniature icon. Minimizing a window is easy: Move the pointer over the Minimize button (the second of the three buttons at the upper-left corner of the window) — a minus sign appears in the button to tell you you’re on target — and then click.
You can set your Dock & Menu Bar preferences so that double-clicking the window’s title bar (the top frame of the window, which usually includes a document or application name) minimizes the window. (I cover Dock preferences in Chapter 5.)
To restore the window to its full size (and its original position on the Desktop), just click its window icon in the Dock.
Moving and zooming windows
Perhaps you want to move a window to another location on the Desktop so that you can see the contents of multiple windows at the same time. Click the window’s title bar and drag the window anywhere you like. Then release the button. (Don’t click the icon in the center of the title bar, though. You’ll move just the icon itself, not the window.)
Many applications can automatically arrange multiple windows for you (examples include Microsoft Word and PowerPoint). Choose Window ⇒ Arrange All (if this option appears).
To see everything a window can show you, use the Zoom feature to expand any Finder or application window to its maximum practical size. Note that a zoomed window can fill the entire screen, or, if that extra space isn’t applicable for the application, the window might expand to only a larger part of the Desktop.
To zoom a window, move your pointer over the third button at the top-left corner of the window. Again, refer to Figure 3-6, which struts its stuff and illustrates the position. (Man, that is one versatile figure.) A double-arrow icon appears on the Zoom/Full-Screen button. Click to expand your horizons to full-screen, or hold down the Option key while clicking to zoom the window to maximum size.
Speaking of full-screen mode, it comes in very handy on your iMac’s beautiful widescreen display — that’s where a single application fills the entire screen, without displaying a window frame or traditional Finder menu bar. The method you use to switch to full-screen mode varies depending on the application, so there’s no One Menu Command or One Keyboard Shortcut that will always do the deed. Most of the applications included with macOS Monterey use View ⇒ Enter Full Screen, and many applications have a button you can click in the window to switch back and forth. A click on the Zoom/Full-Screen button switches most Apple applications into full-screen. Finder windows can also be switched to full-screen mode in Monterey! To exit full-screen mode, just press Esc.
So how do you switch between applications if they’re all in full-screen mode?
- Move your pointer to the bottom of the screen to display the Dock, where you can click another application to switch to it.
- Invoke Mission Control and choose another application from there. (More about Mission Control later in this chapter.)
- If you’re using a trackpad, swipe three fingers to the left or right across the trackpad surface.
- From the keyboard, use the ⌘ +Tab shortcut to cycle through the applications you have running.
Closing windows
When you’re finished with an application or you no longer need to have a window open, move the pointer over the Close button at the upper-left corner of the window (it’s the first of the three circular buttons). When the X appears in the button, click it. And yes, I can make one more reference to Figure 3-6, which I’m thinking of nominating as Figure of the Year.
Perhaps you have more than one window open in the same application, and you want to close ’em all in one fell swoop. Hold down the Option key while you click the Close button in any of the windows.
If you haven’t saved a document, and you try to close that application’s window, the application gets downright surly and prompts you for confirmation. “Hey, human, you don’t really want to do this, do you?” If you answer in the affirmative — “Why, yes, machine. Yes, indeed, I do want to throw this away and not save it.” — the application discards the document you were working on. If you decide to keep your document (thereby saving your posterior from harm), you can cancel the action and then save the document within the application.
Juggling Folders and Icons
Finder windows aren’t just for launching applications and opening the files and documents you create. You can also use the icons in a Finder window to select one or more specific items or to copy and move items from place to place within your system.
A field observer’s guide to icons
Not all icons are created equal. Earlier in this chapter, I introduce you to your iMac’s drive icon on the Desktop. Here’s a little background on the other types of icons you might encounter during your travels:
- Hardware: These icons are your internal storage devices (such as your drive) as well as external peripherals — like an external DVD drive or a USB flash drive.
- Applications: These icons represent the applications (or programs) you can launch. Most applications have a custom icon that incorporates the company’s logo or the specific application logo. Double-clicking an application usually doesn’t load a document automatically; you typically get a new blank document or an Open dialog box from which you can choose the existing file you want to open.
- Documents: Many of the files on your internal drive are documents that can be opened in the corresponding application. Double-clicking a document automatically launches the associated application (that is, as long as macOS recognizes the file type).
- Files: Most of the file icons on your system are mundane things such as preferences and settings files, text files, log files, and miscellaneous data files. Yet most are identified with at least some type of recognizable icon that lets you guess what purpose the file serves. You’ll also come across generic file icons that look like a blank sheet of paper (used when Monterey has no earthly idea what the file type is).
Aliases: An alias acts as a link to another item elsewhere on your system. For example, to launch Adobe Acrobat, you can click an Adobe Acrobat alias icon that you can create on your Desktop instead of clicking the actual Acrobat application icon. The alias essentially acts the same way as the original icon, but it doesn’t take up the same amount of space — only a few bytes for the icon itself, compared with the size of the actual application. Plus, you don’t have to go digging through folders galore to find the original application icon. (Windows switchers know an alias as a shortcut. The idea is the same, although Macs had it first. Harrumph.) You can always identify an alias by the small curved arrow at the base of the icon, and the icon might also sport the tag
aliasat the end of its name.You have two ways to create an alias. Here's one:
- Select the item. (More on selecting items in the next section.)
- Choose File ⇒ Make Alias, or press ⌘ +L.
Here's another way to create an alias:
- Hold down ⌘ +Option.
- Drag the original icon to the location where you want the alias.
Note that this funky method doesn’t add the aliastag to the end of the alias icon name unless you drag the icon to another spot in the same folder.
So why bother to use an alias? Two good reasons:
- You can launch an application or open a document from anywhere on your drive. For example, if you occasionally need to use another application while working on a Pages project, you can add an alias and launch the other application directly from the folder where you store those Pages documents. Speed, organization, and convenience. Life is good.
- You can send an alias to the Trash without affecting the original item. When that school project is finished, you can safely delete the entire folder without worrying about whether Pages will run the next time you double-click the application icon!
Selecting items
Often, the menu or keyboard commands you perform in the Finder need to be performed on something. Perhaps you’re moving an item to the Trash, getting more information on the item, or creating an alias for that item. To identify the target of your action to the Finder, you need to select one or more items on your Desktop or in a Finder window. In the following sections, I show you just how to do that.
Selecting one thing
Monterey gives you a couple of options when selecting just one item for an upcoming action:
- Move the pointer over the item and click. A dark border (or highlight) appears around the icon, indicating that it’s selected.
- If an icon is already highlighted on your Desktop or in a window, move the selection highlight to another icon in the same location by using the arrow keys. To shift the selection highlight alphabetically, press Tab (to move in order) or press Shift+Tab (to move in reverse order).
Selecting items in the Finder doesn’t actually do anything to them by itself. You have to perform an action on the selected items to make something happen.
Selecting a whole bunch of things
You can also select multiple items with aplomb by using one of these methods:
- Adjacent items:
- Drag a box around them. If that sounds like ancient Sumerian, here’s the explanation: Click a spot above and to the left of the first item. Keep holding down your finger on the mouse or trackpad surface and then drag down and to the right. (This is called dragging in Mac-speak.) A box outline like the one shown in Figure 3-7 appears, indicating what you’re selecting. Any icons that touch or appear within the box outline are selected when you release the button.
- Click the first item to select it, and then hold down the Shift key while you click the last item. Monterey selects both items and everything between them.
- Nonadjacent items: Select these by holding down the ⌘ key while you click each item.
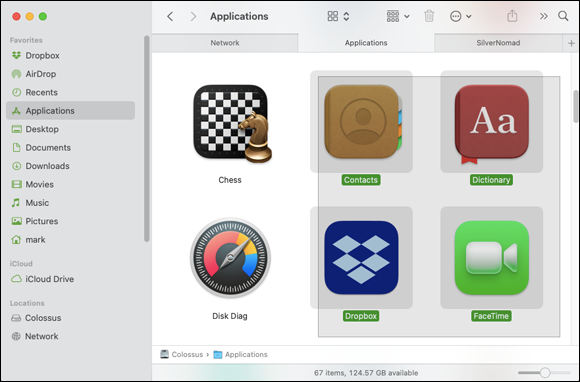
FIGURE 3-7: Drag a box around icons to select them.
Check out the Status bar (which can appear at the top or bottom of a Finder window, depending on whether the toolbar is hidden). It tells you how much space is available on the drive you’re working in, as well as how many items are displayed in the current Finder window. When you select items, it shows you how many you highlighted. (If you don’t see a Status bar, choose View ⇒ Show Status Bar.)
Copying items
Want to copy items from one Finder window to another, or from one location (like a flash drive) to another (like your Desktop)? Très easy. Just use one of these methods:
- On the same drive
To copy one item to another location: Hold down the Option key (you don’t have to select the icon first) and then click and drag the item from its current home to the new location.
To put a copy of an item in a folder, just drop the item on top of the receiving folder. If you hold the item you’re dragging over the destination folder for a second or two, Monterey opens a new window so that you can see the target’s contents. (This is called a spring-loaded folder. Really.)To copy multiple items to another location: Select them all (see the preceding section), hold down the Option key, and then drag-and-drop one of the selected items where you want it. All the items you selected follow the item you drag. (Rather like lemmings. Nice touch, don’t you think?)
To help indicate your target when you’re copying files, Monterey highlights the location to show you where the items will end up. (This works whether the target location is a folder or a drive icon.) If the target location is a window, Monterey adds a highlight to the window border.
- On a different drive
To copy one or multiple items: Click and drag the icon (or the selected items, if you have more than one) from the original window to a window you open on the target drive. (No need to hold down the Option key while copying to a different drive.) You can also drag one item (or a selected group of items) and simply drop the items on top of the drive icon on your Desktop.
The items are copied to the top level, or root, of the target drive.If you try to move or copy something to a location that already has an item with the same name, you see a dialog that prompts you to decide whether to replace the file or to stop the copy/move procedure and leave the existing file alone. (Heck, you can even keep both — macOS performs the copy or move, but also appends the word copy to the item being copied.) Good insurance, indeed.
Moving things from place to place
Moving things from one location to another location on the same drive is the easiest action you can take. Just drag the selected item or items to the new location. The item disappears from the original spot and reappears in the new spot.
Duplicating in a jiffy
If you need more than one copy of the same item in a folder, use the Monterey Duplicate command. I use Duplicate often when I want to edit a document but want to ensure that the original document stays pristine, no matter what. I just create a duplicate and edit that file instead.
To use Duplicate, you can:
- Click an item to select it and then choose File ⇒ Duplicate.
- Right-click the item and choose Duplicate from the menu.
- Hold down the Option key and drag the original item to another spot in the same window. When you release the button, the duplicate file appears like magic!
The duplicate item has the word copy appended to its name. A second copy is named copy2, a third is copy3, and so on.
Duplicating a folder also duplicates all the contents of that folder. Therefore, creating a duplicate folder can take some time if the original folder was stuffed full (or contained files several hundred megabytes or larger in size). The duplicate folder has copy appended to its name, but the contents of the duplicate folder keep their original names.
Using Finder Tabs
Monterey includes a powerful feature you can use to display multiple locations in the same window. Finder Tabs work just like the tabs in Safari (as well as other popular browsers for both Macs and PCs), allowing you to switch between multiple locations on your Mac instantly by clicking a tab to switch to that location. You can even drag files and folders from tab to tab!
To open a new tab in a Finder window, you have a wealth of choices:
- Click the desired location and press ⌘ +T.
- Right-click the location and choose Open in New Tab.
- Select the location and click the New Tab button (which bears a plus sign) at the right side of the window.
- Click the Action icon (which bears a gear icon) in any Finder window toolbar and choose Open in New Tab.
For example, suppose that you're working on an iMovie project. You might create tabs using the Applications item in the Finder window Sidebar and a folder (or even a DVD or shared drive) named Work that contains your video clips. The location appears as a new tab immediately under the toolbar. You can open as many tabs as you like, and you can also drag the Finder Tabs themselves to reorder them. To switch between tabs using the keyboard, press Ctrl+Tab. To close a tab, hover the pointer over it and click the X button that appears. That hardworking Figure 3-6 (shown earlier in the chapter) shows three Finder Tabs at work.
You can also set new folders to open in tabs instead of windows. Just click the Finder menu at the top of the Desktop, choose Preferences, click the General tab, and then click the Open Folders in Tabs Instead of New Windows check box to enable it.
Keystrokes to Fame and Fortune
Your iMac's keyboard might not be as glamorous as the mouse, but any Mac power user will tell you that using keyboard combinations are usually the fastest method of performing certain tasks in the Finder, such as saving or closing a file. I recommend committing these key sequences to memory and putting them to work as soon as you begin using your iMac so that they become second nature to you as quickly as possible.
Note that the 24″ M1-powered iMac may be ordered with a Magic Keyboard that includes the same fingerprint-reading Touch ID sensor that’s featured on MacBooks, allowing you to unlock your iMac, use Apple Pay, and identify yourself to secured applications — all with the touch of your finger. If you have one of these stellar input devices, you’ll see the Touch ID sensor at the top-right corner of the keyboard.
Special keys on the keyboard
The Apple standard keyboard has a number of special keys that you might not recognize — especially if you’ve made the smart move and decided to migrate from the chaos that is Windows to macOS! Table 3-1 lists the Apple keyboard’s function keys and describes what they do.
TABLE 3-1 Too-Cool Function Keys
Action/Key Name | Symbol | Purpose |
|---|---|---|
Audio Mute |
| Mutes (and restores) all sound produced by your iMac |
Volume Up |
| Increases the sound volume |
Volume Down |
| Decreases the sound volume |
Ctrl | Ctrl | Displays the right-click/Control+click menu with the trackpad |
Command | ⌘ | Primary modifier for menus and key sequences |
Delete | Delete | Deletes selected text |
Option | Option | Modifier for key sequences |
Using the Finder and application keyboard shortcuts
The Finder is chock-full of key sequences that you can use to take care of common tasks. Some of the handiest combinations are listed in Table 3-2, along with the locations where the corresponding menu entries appear in Monterey.
TABLE 3-2 Monterey Keyboard Sequences of Distinction
Key Combination | Location | Action |
|---|---|---|
⌘ +A | Edit menu | Selects all items (works in the Finder, too) |
⌘ +C | Edit menu | Copies the selected items to the Clipboard |
⌘ +H | Application menu | Hides the current application window |
⌘ +M | Window menu | Minimizes the active window to the Dock (also works in the Finder) |
⌘ +O | File menu | Opens or launches an existing document, file, or folder (also works in the Finder) |
⌘ +P | File menu | Prints the current document |
⌘ +Q | Application menu | Exits (quits) the application, and prompts you to save any changes |
⌘ +T | File menu | Opens a new Finder tab with the currently selected location |
⌘ +V | Edit menu | Pastes the contents of the Clipboard at the current pointer position |
⌘ +X | Edit menu | Cuts the highlighted item to the Clipboard |
⌘ +Z | Edit menu | Reverses (undoes) the effect of the last action you took |
⌘ +? | Help menu | Displays the Help system (works in the Finder, too) |
⌘ +Tab | Finder | Switches between open applications |
⌘ +Option+M | Finder | Minimizes all Finder windows to the Dock |
⌘ +Option+W | Finder | Closes all Finder windows |
But wait; there’s more! Most of your applications also provide their own set of keyboard commands. While you’re working with a new application, display the application’s Help file and print a copy of the keyboard commands as a handy cheat sheet.
If you’ve used a PC before, you’re certainly familiar with three-key sequences. The most infamous is Ctrl+Alt+Delete, the beloved reboot/Task Manager combination nicknamed the Windows three-finger salute. Three-key commands work the same way in Monterey (but you’ll be thrilled to know you don’t need to reboot by using that notorious Windows combination!). If you’re new to computing, to use a three-key command, hold down the first two keys and then press the third key.
You’re not limited to the keyboard sequences I’ve listed. In System Preferences, visit the Keyboard pane and then click the Shortcuts tab to list them (as well as change an existing command or add a command).
Speeding Things Up with Shortcuts
How about yet another new macOS feature that originated on your iOS devices? Monterey adds Shortcuts to macOS, and they’re quite powerful. With Shortcuts, you can quickly and easily create a series of automated actions that can be assigned to an icon on your system. For example, a Shortcut can track your time performing a task, display a map of where a specific photo was taken, or create a GIF from a video clip — all with a single click, and without launching any applications! If you’ve used the Automator application in previous versions of macOS, you’ll feel right at home with Shortcuts.
Shortcuts can appear on your Dock or Finder menu bar. You can also search for and run Shortcuts using Spotlight.
To create a new Shortcut (or browse the prebuilt Shortcuts offered by Apple), launch the Shortcuts application from the Launchpad (or type the word shortcuts into a Spotlight search box and launch it from there). Click the Gallery entry in the Sidebar to view Apple’s suggested Shortcuts that you can use immediately (shown as tiles that are separated into categories like work, lifestyle, music, and your Apple Calendar). Click the See All link to display a short description of each Shortcut in that category. To add a Shortcut to your collection, just click the Add icon in the desired tile (which carries a plus sign). You see the new Shortcut added under your All Shortcuts heading in the Sidebar. To run any Shortcut in your collection, hover your pointer over the tile and click the Play button that appears.
You can build your own Shortcuts by clicking the New Shortcut button in the toolbar, which carries a plus sign. The Shortcuts application displays the Edit window, where you can drag actions from the Sidebar on the right and drop them into the main section of the window. Actions may have criteria that you preset, or they may allow your input at the time you run the Shortcut. Each action is processed in order from top to bottom when you run the Shortcut.
Click the Suggestions label in the Sidebar to display possible actions that may appear next in your Shortcut, based on what you’ve already added.
Usually you can add a Shortcut to your collection and simply run it immediately, but what if you have to make adjustments? Click a Shortcut tile to select it and press Command+O to display the actions that the Shortcut will take in the Edit window. From here, you can fine-tune the Shortcut by adding or deleting actions, changing timings or file locations, or choosing different search criteria. To run the Shortcut with your edits, click the Run icon in the Edit window toolbar. Any changes you make are automatically saved to the Shortcut when you close the Editor window.
After you’ve added a new Shortcut to your collection, it’s easy to add it to the Dock. Within the Shortcuts application, click the All Shortcuts heading, click the tile for the desired Shortcut, and then choose Add to Dock from the File menu.
To add a Shortcuts icon to the Finder menu bar, drag the desired tile to the Menu Bar heading in the Shortcuts window Sidebar. Clicking the Shortcuts icon in the Finder menu bar will display a list of the Shortcuts that you’ve added to this heading.
Shortcuts can also appear in the right-click menu for a selected item under a separate heading named Quick Actions (as shown in Figure 3-4). To add a Shortcut as a Quick Action, open the desired Shortcut in the Edit window and click the Settings icon in the Edit window toolbar; then click the Details tab. Click the Use as Quick Action and Finder check boxes to enable them, and close the Editor window. Now enjoy your superpowered right-click menu!
Shortcuts can be created on your iMac and shared automatically through iCloud with your iPhone and iPad, or you can create Shortcuts on your Apple devices and run them on your Macs (running macOS Monterey or later).
Home, Sweet Home Folder
Each user account you create in Monterey is actually a self-contained universe. For example, each user has a number of unique characteristics and folders devoted to just that person, and Monterey keeps track of everything that user changes or creates. (In Chapter 10, I describe the innate loveliness of multiple users living in peace and harmony on your iMac.)
This unique universe includes a different system of folders for each user account on your system. The top-level folder uses the short username Monterey assigns when that user account is created. Naturally, the actual folder name is different for each person. Mac techno types typically call this folder your Home folder. (On the Sidebar, look for the teeny house icon under the Favorites heading, marked with your account name.)
When you’re on the hunt for your Home folder, don’t look for a folder that’s actually named Home. Instead, look for the short username that was assigned when you created the user account.
Each account’s Home folder contains a set of subfolders, including:
- Movies
- Music
- Pictures
- Downloads (for files you download by using Safari or through Apple Mail attachments)
- Public (for files you want to share with others on your network)
- Documents (for files created by the user)
Although you can store your stuff on your Desktop, that gaggle of files, folders, and aliases can get crowded and confusing quickly. Here’s a Mark’s Maxim to live by:
 Your Home folder is where you hang out and where you store your stuff. Use it to make your computing life much easier!
Create subfolders within your Documents folder to organize your files and folders even further. For example, I create a subfolder in my Documents folder for every book I write so that I can quickly and easily locate all the documents and files associated with that book project.
I discuss security for your Home folder and what gets stored where in Chapter 10. For now, remember that you can reach your Home folder easily, because it appears in the Finder window Sidebar. One click on the Sidebar entry for your Home folder, and all your stuff is within easy reach. (If your Home folder doesn’t appear in the Sidebar, that’s easy to fix: Choose Finder ⇒ Preferences, click the Sidebar tab, and then select the check box to display your Home folder.)
In addition to using the Finder window Sidebar, you can reach your Home folder in other convenient ways:
- From the Go menu: Choose Go ⇒ Home to display your Home folder immediately from the Finder window. Alternatively, you can press ⌘ +Shift+H to accomplish the same thing.
- From the Open dialog: The Monterey standard File Open dialog also includes the same Home folder (and subfolder) icons as the Finder window Sidebar.
- In any new Finder window you open: If you like, you can set every Finder window you open to automatically display your Home folder:
- Choose Finder ⇒ Preferences and click the General tab.
Click the arrow button at the right side of the New Finder Windows Show pop-up menu.
A menu pops up (hence the name).
- Click the Home entry (with the house icon and your short username) in the menu.
Click the Close button at the upper-left corner of the dialog.
You’re set to go. From now on, every Finder window you open displays your Home folder as the starting location!
Here’s another reason to use your Home folder to store your stuff: default locations! Monterey expects your stuff to be there when you migrate your files from an older Mac to a new iMac, and all Apple applications can use your Home folder when loading and saving projects.
Working with Mission Control
For those power users who often work with a passel of applications, allow me to turn your attention to one of the sassiest features in Monterey: Mission Control. Figure 3-8 shows off the Mission Control screen:
- Press F3 to show all open windows using Mission Control, grouped by application; then click the one you want. Figure 3-8 illustrates the tiled All Windows display on my iMac after I press F3. Move the pointer on top of the window you want to activate — the window sports a blue border and its name is displayed when it’s selected — and click once to switch to that window. You can specify which keys you want to use in the Mission Control pane in System Preferences.
- Press Ctrl+F3 to show all open windows from the application that you’re currently using; click the one you want to activate. This Mission Control function is great for choosing from all the images you’ve opened in Photoshop or all the Safari web pages populating your Desktop!
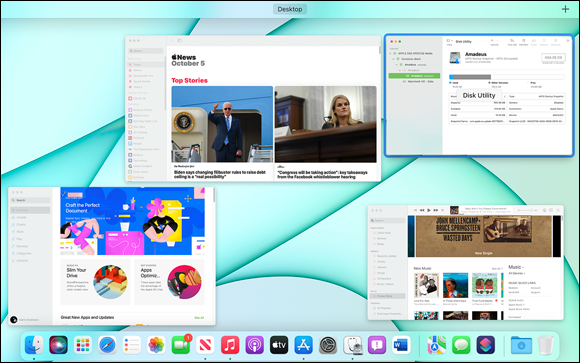
FIGURE 3-8: Mission Control is the desktop manager in Monterey.
Astute observers will notice that the application menu bar also changes to match the now-active application.
Besides the F3 and Control+F3 hot keys that I just discussed, Mission Control provides one more nifty function: Press ⌘ +F3, and all your open windows scurry to the side of the screen. Now you can work with drives, files, and aliases on your Desktop — and when you’re ready to confront those dozen application windows again, just press the keyboard shortcut a second time.
Naturally, these key combinations can be viewed and customized. Visit the comfortable confines of System Preferences and click the Mission Control icon to choose what key sequence does what.
Although the Mission Control screen appears automatically when necessary, you can launch it at any time from your iMac’s Launchpad display or by pressing the Mission Control key on your keyboard. From the trackpad, display the Mission Control screen by swiping up with three fingers.
Switching Desktops with Spaces
Ah, but what if you want to switch to a different set of applications? For example, suppose that you’re slaving away at your pixel-pushing job — say, designing a magazine cover with Pages. Your page design Desktop also includes Adobe’s Photoshop and InDesign, which you switch between often using one of the techniques I just described. Suddenly, however, you realize that you need to schedule a meeting with others in your office, using Calendar, and you want to check your email in Apple Mail. What to do?
Well, you could certainly open Launchpad and launch those two applications on top of your graphics applications and then minimize or close them. But with Mission Control’s Spaces feature, you can press the Control+← or Control+→ sequences to switch to a different “communications” Desktop, with Calendar and Apple Mail windows already open and in your favorite positions. (I’ve also created a custom “music” Desktop for GarageBand and Music.)
After you set up your meeting and answer any important email, simply press Control+← or Control+→ again to switch back to your “graphics” Desktop, where all your work is exactly as you left it. (And yes, Virginia, Spaces does indeed work with full-screen applications.)
To create a new Desktop for use in Spaces, click the Launchpad icon on the Dock and then click the Mission Control icon. Now you can set up new Spaces Desktops. Move your pointer to the top right of the Mission Control screen and click the Add button (with the plus sign) that appears. (If you relocated your Dock to the right side of the screen, the Add button shows up in the upper-left corner instead.) Spaces creates a new empty Desktop thumbnail. Switch to the new Desktop by clicking the label at the top of the Mission Control screen, and then open those applications you want to include. (Alternatively, you can drag the applications from Mission Control onto the desired Spaces label.) That’s all there is to it!
To switch an application window between Spaces Desktops, drag the window to the edge of the Desktop and hold it there. Spaces automatically moves the window to the next Desktop. (Applications can also be dragged between Desktops within the Mission Control screen.) You can also delete a Desktop from the Mission Control screen. Just hover your pointer over the offending Spaces label to display the thumbnail; then click the Delete button (with the X) that appears.
You can jump directly to a specific Spaces Desktop by clicking its thumbnail in your Mission Control screen or by holding down the Control key and pressing the number corresponding to that desktop. Finally, you can always use the Control+← or Control+→ shortcuts to move between Desktops and full-screen applications.
Personalizing Your Desktop
Many folks put all their documents, pictures, and videos on their Monterey Desktop because the file icons are easy to locate! Your computing stuff is right in front of you … or is it?
Call me a finicky, stubborn techno-oldster — go ahead, it’s true — but I prefer a clean macOS Desktop without all the iconic clutter. In fact, my Desktop usually has just three or four icons even though I use my iMac several hours every day, often on multiple book projects. It’s an organizational thing; I work with literally hundreds of applications, documents, and assorted knickknacks daily. Sooner or later, you’ll find that you’re using that many, too. When you keep your stuff crammed on your Desktop, you end up having to scan your screen for a particular file, alias, or type of icon. You end up taking more time to locate it on your Desktop than in your Documents folder! And don’t forget, open windows hang out on your Desktop, too. To find anything, you have to close or move those windows!
Plus, you’ll likely find yourself looking at old icons that no longer mean anything to you, or stuff that’s covered in cobwebs that you haven’t used in years. Stale icons — yuck.
I recommend that you arrange your Desktop so that you see only a few icons for the files or documents you use the most. Leave the rest of the Desktop for that cool image of your favorite actor or actress.
Besides keeping things clean, I can recommend a number of other favorite tweaks that you can make to your Desktop:
- Keep Desktop icons arranged as you like.
- From the Finder menu, choose View ⇒ Show View Options.
From the Sort By pop-up menu, choose the criteria that Monterey uses to automatically arrange your Desktop icons, including the item name, the last modification date, or the size of the items.
I personally like things organized by name, but many iMac owners prefer to see things organized by date (putting the most recently modified item at the top, for example).
- Choose a favorite background.
Right-click any open spot on your Desktop and choose Change Desktop Background.
The Desktop & Screen Saver pane appears, as shown in Figure 3-9.
- Browse through the various folders of background images that Apple provides, open a folder of your own images, or use an image from your Photos library.
- Display all the peripherals and network connections on your system.
- Choose Finder ⇒ Preferences.
Make sure that all four of the top check boxes are selected: Hard Disks; External Disks; CDs, DVDs, and iPods; and Connected Servers.
If you’re connected to an external network, or if you’ve loaded an external drive or device, these external storage locations show up on your Desktop. You can double-click that Desktop icon to view your external stuff.
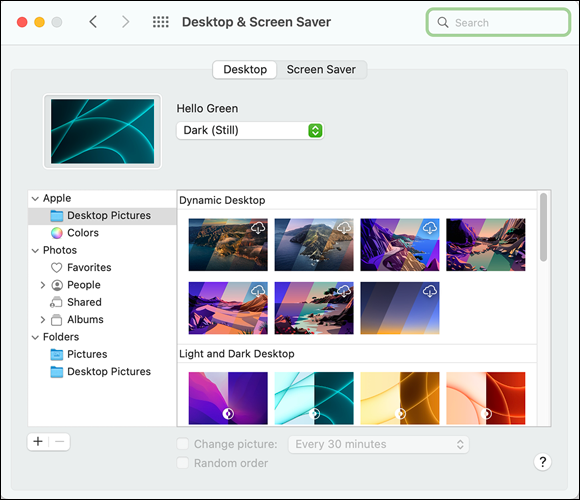
FIGURE 3-9: Choose a Desktop background of more interest.
Taking Control of Your iMac
Another source of “customization glee” (yes, I am honestly that much of a computer nerd) is the new macOS Control Center, which adds a welcome level of convenience when changing system settings. To display the Control Center anywhere within Monterey, click the Control Center icon in the Finder menu bar. (It looks like two horizontal sliding switches.) The Center appears, as shown in Figure 3-10, at the right side of the Desktop.
Most of the tiles you see displayed in the Control Center are simple switches for macOS features, like the Display and Sound sliders, which you can click and drag directly to adjust the display brightness and sound volume. The Wi-Fi tile is different (offering a submenu of multiple settings), allowing you to not only enable or disable your iMac’s Wi-Fi but also switch networks or display the full Network pane within System Preferences.
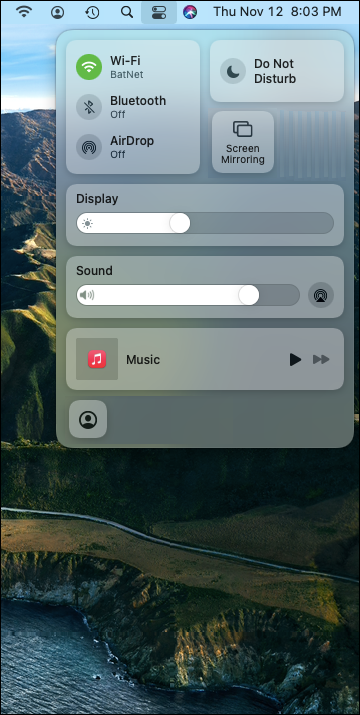
FIGURE 3-10: The Control Center makes it easy to quickly change global settings.
You can specify what features are shown within the Control Center and which features remain on the Finder menu bar. Click the System Preferences icon in the Dock; then click the Dock & Menu Bar icon. This pane displays the available features in a list on the left. Click a feature to select it, and then click to enable (or disable) the Show in Control Center check box at the right side of the pane. Note that the icons for the Clock, Spotlight, Siri, and Time Machine can appear only in the Finder menu bar, so they can’t appear within Control Center.
Customizing the Dock
In terms of importance, the Dock — the quick-access strip for applications and documents that appears on your Desktop — ranks right up there with the cockpit of a modern jetliner. As such, it had better be easy to customize, and naturally, macOS doesn’t let you down.
Adding applications and extras to the Dock
Why be satisfied with just the icons that Apple places on the Dock? You can add your own applications, files, and folders to the Dock as well:
Adding applications: You can add any application to your Dock by dragging its icon into the area to the left side of the Dock (that’s to the left side of the vertical line on the Dock). You’ll know when you’re in the proper territory because the existing Dock icons obligingly move aside to make a space for it.
Attempting to place an application directly on the right side of the Dock sends it to the Trash (if the Trash icon is highlighted when you release the button), so beware. Note, however, that you can drop an application icon inside a Stack (more on that in a bit) or a folder that already exists at the right side of the Dock. (If you’ve repositioned the Dock to the left or right side of the screen, consider the top of the Dock as the “left side” and the bottom of the Dock as the “right side.”)Adding individual files and volumes: Individual files and volume icons can be added to the Dock by dragging the icon into the area to the right side of the Dock. (Attempting to place these to the left side of the Dock opens the application associated with the contents, which typically isn’t what you intended.) Again, the existing Dock icons move aside to create a space when you’re in the right area.
To open the Dock item you’ve added in a Finder window, right-click the icon to display a Dock menu, where you can open documents, run applications, and have other assorted fun, depending on the item you choose.
- Adding several files or a folder: Monterey uses a feature called Stacks, which I discuss in the next section, “Keeping track with Stacks,” to handle multiple files or add an entire folder to the Dock.
- Adding websites: You can drag any URL from Safari directly into the area at the right of the Dock. Clicking that Dock icon automatically opens your browser and displays that page.
If you see two vertical lines in the Dock, you’ve turned on the Dock’s Recent Applications feature, which displays icons for the last three applications you’ve recently launched. (You can change this setting in the Dock & Menu Bar pane of System Preferences.) With Recent Applications turned on, consider the vertical line farthest to the right to be the right side of the Dock when adding items to the Dock.
To remove an icon from the Dock, just click and drag it off the Dock. Note, however, that the original application, folder, or volume is not deleted — just the Dock icon itself is permanently excused. If you like, you can delete almost any of the default icons that macOS installs on the Dock; only the Finder and Trash icons must remain on the Dock.
Keeping track with Stacks
Monterey offers Stacks, which are groups of items (documents, applications, and folders) that you want to place on the Dock or your Desktop for convenience — perhaps the files needed for a project you’re working on, or your favorite game applications. For example, I have a Stack named Wiley on my Dock that holds all the project files I need for the book I’m currently writing.
Using Desktop Stacks
To create Stacks on the Desktop, you first need to enable them. From the Finder menu, click View ⇒ Use Stacks. Monterey automatically moves all the items on your Desktop into Stacks grouped by file type. Once Desktop Stacks are turned on, you can change the grouping criteria by clicking View ⇒ Group Stacks By (or by right-clicking on the Desktop Stack and selecting the same option). Items that you copy or move to your Desktop are added to the appropriate Desktop Stack (if it exists), or a new Desktop Stack is created to hold them.
To display the items in a Desktop Stack, click it to open the Stack. The contents appear on your Desktop as individual icons again, while the Stack itself remains selected (and gains a down arrow icon to indicate that it’s open). To close a Desktop Stack, click the Stack icon again. Note that individual Stacks cannot be removed from your Desktop; you must completely disable the feature by choosing View ⇒ Use Stacks from the Finder menu, which returns all the individual items to your Desktop.
To open a document or folder from a Desktop Stack, display the contents and double-click the desired icon.
Using Dock Stacks
To create a Stack in the Dock, just select a folder containing the items and drag the folder to the right side of the Dock. As always, the Dock opens a spot on the right side of the Dock to indicate you’re in the zone.
To display the items in a Dock Stack, just click it:
- If the Stack holds relatively few items, they’re displayed in a really cool-looking arc that Apple calls a fan, and you can click the item you want to open or launch. Figure 3-11 illustrates a typical Stack on the Dock unfurled as a fan.
- If the Stack is stuffed full of many items, the Stack opens in a grid display, allowing you to scroll through the contents to find what you need.

FIGURE 3-11: Stacks make it easy to access your stuff from the Dock or Desktop.
You can open a document or folder from a Dock Stack by displaying the contents and clicking the desired icon.
Monterey provides a number of options for an individual Dock Stack, as well. Right-click the Stack icon, and you can choose to sort the contents by name, date created or added, date modified, or file type. If you’d prefer a grid display for a Dock Stack (no matter how many items the Stack contains), you can choose Grid view mode. Choose List to display the Stack’s contents in much the same way as List view in a Finder window. List view mode also allows you to view folders in a Dock Stack as nested menu items. Choose Automatic to return to the default view mode. When set to Display as Stacks, the Stack icon is displayed using icon images from the contents of the folder; if security is an issue, however, choose Display as Folder from the right-click menu to display the Dock Stack as a plain folder icon instead.
You can remove a Stack from the Dock by right-clicking the Stack icon and choosing Options from the menu that appears. Choose Remove from Dock from the submenu that appears. Alternatively, just drag that sucker right off the Dock.
You can also display the contents of a Dock Stack in a Finder window. Right-click the Stack icon and choose the Open item at the bottom of the pop-up menu.
If you add a folder full of items to the Dock, the Stack is named after the folder; otherwise, Monterey does the best job it can in figuring out what to name the Stack.
Apple provides a Dock Stack already set up for you: The Downloads folder, situated next to the Trash, is the default location for any new files that you download using Safari or receive in your email. Monterey bounces the Download Stack icon to indicate that you’ve received a new item.
Resizing the Dock
You can change the size of the Dock from the Dock settings in System Preferences — but here’s a simpler way to resize the Dock, right from the Desktop.
Move your pointer over the vertical solid line that separates the left side of the Dock from the right side; the pointer turns into a funky vertical line with arrows pointing up and down. This is your cue to click and drag while moving up and down, which expands and shrinks the Dock, respectively.
You can also right-click when the funky line pointer is visible to display a menu of Dock preferences. This allows you to change your Dock preferences without the hassle of opening System Preferences and displaying the Dock settings.
What’s with the Trash?
Another sign of an iMac power user is a well-maintained Trash can. It’s a breeze to empty the discarded items you no longer need, and you can even rescue something you suddenly discover you still need!
The translucent Monterey Trash icon resides in the Dock, and it works just like the Trash has always worked in macOS: Simply drag selected items to the Trash to delete them.
Note one very important exception: If you drag a Desktop icon for an external device or a removable media drive to the Trash (such as an iPod, DVD, or external drive), the Trash icon turns into a giant Eject icon, and the removable device or medium is ejected or shut down — not erased. Repeat, not erased. (That’s why the Trash icon changes to the Eject icon — to remind you that you’re not doing anything destructive.)
Here are other ways to chuck items you select to go to the wastebasket:
- Choose File ⇒ Move to Trash.
- Click the Action button on the Finder toolbar and choose Move to Trash from the list that appears.
- Press ⌘ +Delete.
- Right-click the item and choose Move to Trash from the menu that appears.
You can always tell when the Trash contains at least one item, because the basket icon is full of crumpled paper. However, you don’t have to unfold a wad of paper to see what the Trash holds. Just click the Trash icon in the Dock to display the contents of the Trash. To rescue something from the Trash, drag the item(s) from the Trash folder to the Desktop or any other folder in a Finder window. (If you’re doing this for someone who’s unfamiliar with Monterey, remember to act like it was a lot of work, and you’ll earn big-time DRP, or Data Rescue Points.)
When you’re sure that you want to permanently delete the contents of the Trash, use one of these methods to empty the Trash:
- Choose Finder ⇒ Empty Trash.
- Press ⌘ +Shift+Delete.
- Right-click the Trash icon in the Dock and choose Empty Trash from the menu that appears.
All You Really Need to Know about Printing
Because the end of this chapter is near, I turn now to a task that most folks need to tackle soon after buying their iMac or installing Monterey: printing documents. Because basic printing is so important (and in most cases, so simple), allow me to demonstrate how to print a document.
Most of us have a Universal Serial Bus (USB) printer — the USB being the favored hardware connection in macOS. As long as your printer is supported by macOS, setting it up is as easy as plugging it into one of your iMac’s USB ports.
Before you print, preview! Would you jump from an airplane without a parachute? Then why would you print a document without double-checking it first? Most applications now have their own built-in Preview thumbnails in the Print sheet, as shown in Figure 3-12 — and this is definitely A Good Thing because you see what the printed document will look like, possibly saving you both paper and some of that hideously expensive ink or toner.
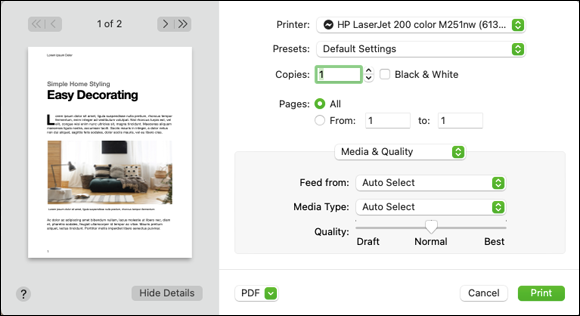
FIGURE 3-12: The Print sheet is available from any application with any real guts.
To print from any application using the default page characteristics — standard 8½ x 11-inch paper, portrait mode, no scaling — follow these steps:
In your application, choose File ⇒ Print or press the ⌘ +P keyboard shortcut.
In most applications, macOS displays the simple version of the Print sheet. (To display all the fields you see in Figure 3-12, click the Show Details button at the bottom of the sheet.) Some applications use their own custom Print dialogs, but you should see the same general settings.
Click in the Copies field and enter the number of copies you need.
You can also enable or disable collation, just as you can with those oh-so-fancy copiers.
- Decide what you want to print.
- The whole shootin’ match: To print the entire document, use the default Pages radio button setting of All.
- Anything less: To print a range of selected pages, select the From radio button and enter the starting and ending pages (or, if the application allows it, a selection of individual pages).
(Optional) Choose application-specific printing parameters.
Each macOS application provides different panes so that you can configure settings specific to that application. You don’t have to display any of these extra settings to print a default document, but the power is there to change the look dramatically when necessary. To display these settings, open the Layout pop-up menu in the center of the Print sheet and choose one of these panes. For example, if you’re printing from Contacts, you can choose the Contacts entry from the pop-up menu and elect to print a phone list, an envelope, mailing labels, or an email list.
When everything is go for launch, click the Print button.
Of course, there are more settings and more functionality to the printing system in macOS. However, I can tell you from my experiences as a consultant and hardware technician that this short introduction to printing will likely suffice for 90 percent of the Mac owners on Earth. ’Nuff said.
And Just in Case You Need Help …
You can call on the resources described in this section if you need additional help while you’re discovering how to tame Monterey.
Some of the help resources are located on the Internet, so your Safari web browser will come in handy when you search for answers.
The Monterey built-in Help system
Sometimes the help you need is as close as the Help menu on the Finder menu bar. You can get help for either of the following:
- A specific application: From the application, just click Help. Then click in the Search box and type a short phrase that sums up your query (such as startup keys). You see a list of help topics on the menu. Just click a topic to display more information.
- General topics: Click a Finder window and then click Help on the menu bar. Again, you see the Search box, and you can enter a word or phrase to find in the Help system. To display the Help Center window, click the Help Center item under the Search box.
The Apple web-based support center
Apple has online product support areas for every hardware and software product it manufactures. Visit www.apple.com and click the Support link at the top of the web page.
The Search box works just like the macOS Help system, but the knowledge base that Apple provides online has a lot more answers.
Magazines
Many magazines and publications (both in print and online) offer tips and tricks on using and maintaining macOS Monterey.
My personal online favorites are Macworld (www.macworld.com) and the Wiley For Dummies website (www.dummies.com).
Local Mac user groups
I’d be remiss if I didn’t mention your local Mac user group. Often, a user group maintains its own website and discussion forum. If you can wait until the next meeting, you can even ask your question and receive a reply from a real live human being. This is quite a thrill in today’s web-centric world!
To locate a local user group using your Internet connection, launch Safari, click in the Address box, and type
Mac User Group location
Instead of location, type the desired spot on the map, like
Mac User Group Columbia Missouri
Don’t forget to press Return!