Chapter 23
PowerActions
In this chapter, you will learn to:
- Requirements
- Installation and Initial Configuration
- Software Download
- Installation
- Configuration
- PowerCLI Console
- Using the Console
- Running Scripts in the Console
- PowerCLI Scripts
- My Scripts and Shared Scripts
- Adding a Script
- Running a Script
- Further Use Cases
- List the Default PSP for SATPs
- Change the Default PSP for an SATP
- Final Thoughts
Since the release of vSphere 5.1 it has been possible to embed functionality provided by vRealize Orchestrator (vRO) workflows into the vSphere Web Client to extend out-of-the-box functionality available with the Web Client. PowerActions for vSphere Web Client, a downloadable Fling available from VMware Labs, brings that same ability to extend the Web Client functionality to PowerCLI scripts, as well as adding a fully fledged PowerCLI console to the Web Client. VMware Labs Flings are technology previews of projects worked on by VMware engineers, often on their own time. As a consequence, they often provide functionality that might eventually make it into an official VMware product—there are no guarantees and Flings are not supported by VMware.
We will examine how to get up and running with PowerActions and provide some sample use cases.
Requirements
The following is a list of prerequisites for using PowerActions:
- PowerShell v1–v4
- VMware vSphere 5.1, 5.5, or 6.0
You will also need a Windows PowerShell host machine for the PowerActions installation. The requirements for this machine are as follows:
- Windows Server 2003 or later
- .NET Framework 4.0 or 4.5
- PowerCLI version supporting the previously stated VMware vSphere versions
- Administrative privileges (registering a service with the VMware vCenter Lookup Service and creating a user for SSO) are required for installation, but not for use of the product.
- Prior to installation, ensure that the PowerShell host machine and the machine hosting the VMware vCenter Lookup Service are synced via the same time source.
Installation and Initial Configuration
To get up and running with PowerActions, first download the software, it needs to be installed and configured.
Software Download
You can download PowerActions from VMware Labs at the following site:
https://labs.vmware.com/flings/poweractions-for-vsphere-web-client
Installation
Install the PowerActions software onto the PowerShell host machine and accept all the defaults. There are two pages of the Install wizard where you’ll have to provide information in order to successfully complete the wizard:
- Running Port On the Running Port page, supply the Port and PowerShell Host FQDN; the port defaults to 9091 (Figure 23-1).

Figure 23-1: PowerActions Installation—Running Port
- Lookup Service Information On the Lookup Service Information page, supply the following (Figure 23-2):
- Lookup Service URL: typically the vCenter server where PowerActions will be used:
https://vCenterFQDN/lookupservice/sdk - SSO Administrator Username
- SSO Administrator Password
- Lookup Service URL: typically the vCenter server where PowerActions will be used:

Figure 23-2: PowerActions Installation—Lookup Service Information
Once the Install wizard is complete, the install can be verified by checking for the presence of the PowerActions for vSphere Web Client Windows Service on the PowerShell host machine. (The service should be in a Started state, as shown in Figure 23-3).

Figure 23-3: PowerActions for vSphere Web Client Windows Service
Configuration
Ensure that the PowerShell execution policy on the PowerShell host machine is set to an option that permits running scripts; typically, it would be set to the value RemoteSigned. Open a PowerShell session with administrative privileges and run the command Set-ExecutionPolicy RemoteSigned.
PowerCLI Console
The PowerActions tool adds a full-fledged PowerCLI console right into the vSphere Web Client. Not only is this extremely convenient—all users have the functionality right at their fingertips—but Mac and Linux users can use PowerShell from their desktop without needing to make an RDP connection into a Windows jump box or run a Windows VM on their workstation.
Using the Console
To access the PowerActions PowerCLI console, open the vSphere Web Client and navigate to the PowerCLI Console menu item from the list of items within the Navigator. Selecting this option opens the PowerCLI session, as shown in Figure 23-4.

Figure 23-4: PowerActions PowerCLI Console
The first thing that experienced PowerCLI users may notice is that there is no need to use the Connect-VIServer cmdlet to establish a connection with a vCenter server. Instead, a PowerCLI session is already available with the vCenter that the vSphere Web Client is connected to. Consequently, it is possible to dive straight in and run some interactive commands. Figure 23-5 demonstrates sample results displayed in the console from running the Get-Cluster cmdlet.

Figure 23-5: Get-Cluster output in the console
Other familiar PowerShell console features, such as Tab-completion and Copy & Paste functionality to and from the console, are also available.
Running Scripts in the Console
A nice feature of PowerActions is the ability to run a script stored on the local workstation using the vSphere Web Client. By using the Open Script toolbar button in PowerActions, it is possible to read in the contents of a PowerShell script file, execute it, and view the results in the console. Listing 23-1 contains a straightforward example that illustrates this in action by creating 10 clusters in the HQ datacenter.
Listing 23-1: Create Ten Clusters in the HQ Datacenter
$Location = Get-Datacenter HQ
10..19 | ForEach-Object {New-Cluster -Name "Cluster$_" -Location `
 $Location -HAEnabled:$true -DRSEnabled:$true}
Save the contents of Listing 23-1 into a PowerShell script file on a local workstation. Then, from the PowerActions PowerCLI console, use the Open Script toolbar button to navigate to that file and select it for use (Figure 23-6).

Figure 23-6: Selecting a script to use in the PowerActions PowerCLI Console
The contents of the script file will be listed in the PowerCLI console (Figure 23-7).

Figure 23-7: Script file contents in the PowerCLI Console
Click the green play (Execute) toolbar button to execute the contents of the script file. Figure 23-8 displays the results of creating the 10 clusters.

Figure 23-8: Script output in the PowerCLI Console
PowerCLI Scripts
Aside from the interactive console, it is also possible to extend the standard vSphere Web Client functionality to PowerCLI scripts. This is similar to adding vRO workflows into the Web Client, which has long since been available as a standard feature with vCenter.
My Scripts and Shared Scripts
To access the PowerActions script repository, open the vSphere Web Client and navigate to the PowerCLI Scripts menu item from the list of items under the Navigator. Figure 23-9 shows the two locations where it is possible to store the scripts: My Scripts and Shared Scripts.
My Scripts is the area for storing scripts that will be available only for your use. Shared Scripts is the area for storing those scripts that you wish to share with other users of the vSphere Web Client and PowerActions.

Figure 23-9: My Scripts or Shared Scripts
Adding a Script
To add a script to either of the repositories, choose the desired repository and click the Create Script button, and the Add Script wizard will begin (Figure 23-10). Using the wizard, you will
- Identify an argument type.
- Name and describe the script.
- Enter the script body.
- Confirm the details and click Finish.
For the purposes of this example, we used the code from Listing 23-1 to create 10 clusters.

Figure 23-10: Starting the Add Script wizard
Setting the Target Type option determines which vCenter object the script can be run against. For example, creating a PowerActions script with a Cluster Target Type results in the script being available from the context-sensitive menu when a Cluster object is right-clicked in the Web Client. The valid possibilities for Target Type are: Cluster, Datacenter, Datastore, Distributed Virtual Portgroup, Distributed Virtual Switch, Folder, Host, ResourcePool, Snapshot, vApp, and Virtual Machine. In this example, we chose Datacenter for our Target Type (Figure 23-11).
You will also need to decide if the script needs to support multiple objects—in this example, support for multiple objects is not required. When you are finished, click Next.
On the next page, specify a name and enter a brief description for the script. Then, specify whether the script is report or action based. Ask yourself: will the script be created in the form of Get-Something or New- / Add- / Set- / Remove-Something? If it is Get-Something, then select Report. If it is New- / Add- / Set- / Remove-Something, then select Action. Your selection here determines the output behavior of the script in the Web Client. In this example, we created new clusters, so our script is action based (Figure 23-12). When you are finished, click Next.

Figure 23-11: Add Script Wizard—selecting Target Type

Figure 23-12: Add Script Wizard—setting Script Name, Script Description, and Output Format
When the Script Body page of the wizard opens, you’ll see that it is prepopulated with some code for the $vParam parameter (Figure 23-13). Notice that the type of the $vParam parameter is already defined as VMware.VimAutomation.ViCore.Types.V1.Inventory.Datacenter, which matches the selection we made on the Target Type page of the wizard. $vParam is the object that will be passed through when we eventually use this script on an object that a user executed the script against.

Figure 23-13: Add Script Wizard—Script Body initial code
To make the code from Listing 23-1 suitable for use as a PowerAction, we eliminated the need to specify a datacenter in the $Location variable by defining and using the $vParam variable (Listing 23-2).
Listing 23-2: Create Ten Clusters PowerAction Script
param
(
   [Parameter(Mandatory=$true)]
   [VMware.VimAutomation.ViCore.Types.V1.Inventory.Datacenter]
   $vParam
);
10..19 | ForEach-Object {New-Cluster -Name "Cluster$_" -Location $vParam `
 -HAEnabled:$true -DRSEnabled:$true}
Add the last two lines of code shown in Listing 23-2 on the Script Body page of the wizard and click Next. Feel free to enter it as a single line of code, as shown in Figure 23-14.
When the Ready To Complete page opens, confirm the details and click Finish to create the executable script (Figure 23-15).

Figure 23-14: Add Script Wizard—Script Body final code

Figure 23-15: Add Script Wizard—Ready To Complete
Once the script is created, the Create Ten Clusters script and the Target Type it supports (Datacenter) is displayed in the list of PowerCLI Scripts under My Scripts (Figure 23-16).

Figure 23-16: My Scripts listing
Running a Script
When you are ready to run a PowerActions script from within the vSphere Web Client, navigate to a vCenter object, right-click the object, and select PowerCLI ⇒ Execute Script (Figure 23-17).
When the list of possible scripts for that object type opens, select the script you want to run and click OK. For this example, we used the Create Ten Clusters script (Figure 23-18).

Figure 23-17: PowerCLI ⇒ Execute Script

Figure 23-18: Selecting the script to execute
Figure 23-19 displays the view during script execution with a familiar PowerShell-style console on display.
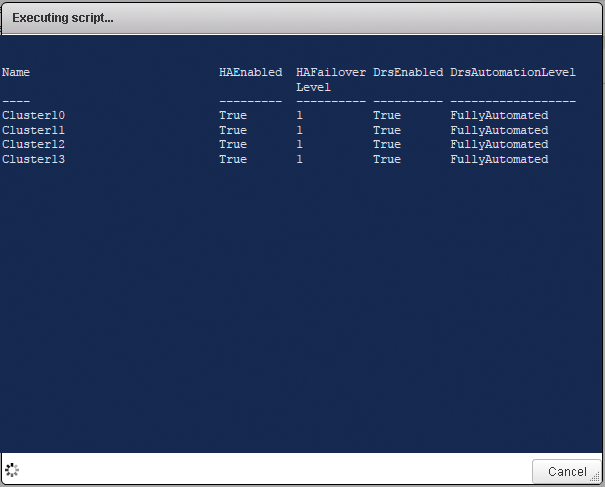
Figure 23-19: Executing the script
Figure 23-20 displays the results of the script creating the additional clusters.

Figure 23-20: Script successfully executed
Further Use Cases
The possibilities with PowerActions scripts are limited only by your imagination. In this section we will give you a taste of what is achievable and some ideas for how you can extend the functionality of the Web Client.
List the Default PSP for SATPs
Chapter 4, “Automating Storage,” contains a section on working with ESXi multipath policies and using a combination of standard PowerCLI cmdlets and esxcli via PowerCLI to complete tasks that are not possible with the out-of-the-box cmdlets. Listing 23-3 shows the code we created to use in a PowerAction script to list the Default Path Selection Policies (PSP) for all Storage Array Type Plugins (SATPs) on an ESXi host.
Listing 23-3: List the Default PSP for SATPs - PowerActions
<#
.MYNGC_REPORT
#>

param
(
   [Parameter(Mandatory=$true)]
   [VMware.VimAutomation.ViCore.Types.V1.Inventory.VMHost]
   $vParam
);
$esxcli = Get-EsxCli -VMHost $vParam
$result = $esxcli.storage.nmp.satp.list() | Select-Object Name,DefaultPSP
Write-Output $result
To create the script, navigate to Home ⇒ PowerCLI scripts in the Web Client. Click the Create Script button to begin the wizard and select Host for Target Type. Click Next (Figure 23-21).

Figure 23-21: Create List Default PSP Script—Argument Type
Set the following (Figure 23-22):
- Script Name: List Default PSP for SATPs
- Script Description: List Default PSP for SATPs
- Output Format: Report
Click Next.

Figure 23-22: Create List Default PSP Script—specifying Name Description, Output Format
Paste the code from Listing 23-3 into the script body. Click Next (Figure 23-23).

Figure 23-23: Create List Default PSP Script—Script Body
Click Finish to create the script (Figure 23-24).

Figure 23-24: Create List Default PSP Script—Ready To Complete
Navigate in the Web Client to an ESXi host. Right-click the host and choose PowerCLI ⇒ Execute Script (Figure 23-25).

Figure 23-25: Preparing to execute the script
Select the List Default PSP for SATPs script and click OK (Figure 23-26).
The results are presented in the Web Client (Figure 23-27).

Figure 23-26: Selecting the List Default PSP for SATPs script

Figure 23-27: List Default PSP for SATPs script results
Change the Default PSP for an SATP
On a similar note, you can also set the Default PSP for an SATP. Listing 23-4 contains code modified from Listing 4-14 in Chapter 4 to make it suitable for use in PowerActions. Given the GUI-based nature of the PowerActions tool, we’ve added some interactivity to make it more user friendly.
Listing 23-4: Setting the Default PSP for an SATP
param
(
   [Parameter(Mandatory=$true)]
   [VMware.VimAutomation.ViCore.Types.V1.Inventory.VMHost]
   $vParam,

   [Parameter(Mandatory=$true)]
   [String]
   $SATP
);

$Title = "Select Default PSP"
$Message = "Select the Default PSP to set the SATP to:"

$VMW_PSP_MRU = New-Object `
 System.Management.Automation.Host.ChoiceDescription "VMW_PSP_&MRU", `
 "Most Recently Used."
$VMW_PSP_FIXED = New-Object `
 System.Management.Automation.Host.ChoiceDescription "VMW_PSP_&FIXED", `
 "Fixed Path."
$VMW_PSP_RR = New-Object `
 System.Management.Automation.Host.ChoiceDescription "VMW_PSP_&RR", `
 "Round Robin."

$Options = [System.Management.Automation.Host.ChoiceDescription[]]`
 ($VMW_PSP_MRU, $VMW_PSP_FIXED, $VMW_PSP_RR)

$Result = $Host.ui.PromptForChoice($Title, $Message, $Options, 0)

switch ($Result)
{
    0 {$DefaultPSP = "VMW_PSP_MRU"}
    1 {$DefaultPSP = "VMW_PSP_FIXED"}
    2 {$DefaultPSP = "VMW_PSP_RR"}
}

$esxcli = Get-EsxCli -VMHost $vParam
$esxcli.storage.nmp.satp.set($null,$DefaultPSP,$SATP)
To create the script, navigate to Home ⇒ PowerCLI scripts in the Web Client. Click the Create Script button to begin the wizard and select Host for Target Type. Click Next (Figure 23-28).

Figure 23-28: Set Default PSP Script—specifying Argument Type
Set the following (Figure 23-29):
- Script Name: Set Default PSP for an SATP
- Script Description: Set Default PSP for an SATP
- Output Format: Action
Click Next.

Figure 23-29: Set Default PSP Script—specifying the name, description, and output format
Paste the code from Listing 23-4 into the script body. Click Next (Figure 23-30).

Figure 23-30: Set Default PSP Script—pasting code into the script body
Click Finish to create the script (Figure 23-31).
Navigate in the Web Client to an ESXi host, right-click the host, and choose PowerCLI ⇒ Execute Script (Figure 23-32).

Figure 23-31: Set Default PSP Script—clicking Finish
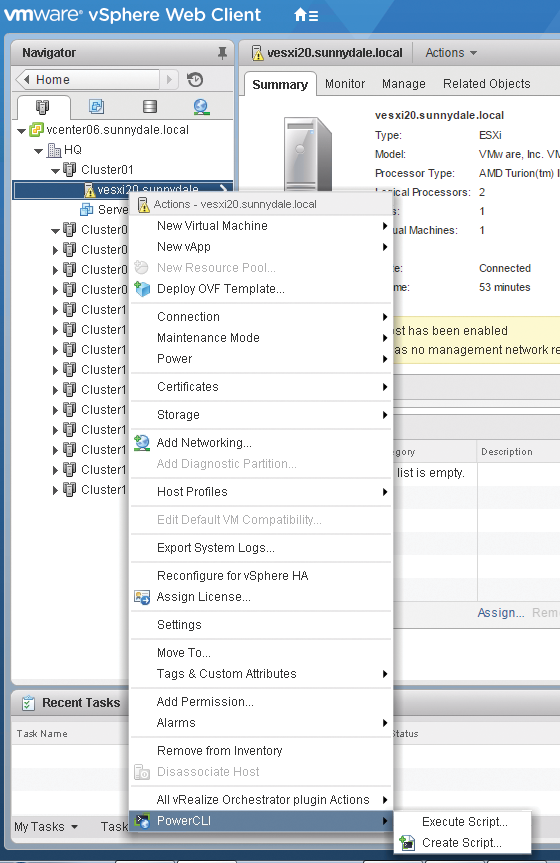
Figure 23-32: Choosing Execute Script
Select the Set Default PSP for an SATP script and click OK (Figure 23-33).

Figure 23-33: Executing the Set Default PSP for an SATP Script
Enter the value for an SATP to modify. In this example, we used VMW_SATP_MSA (Figure 23-34).

Figure 23-34: Entering the SATP value
Select the Default PSP value from the list of prompted choices. For this example, we used VMW_PSP_FIXED (Figure 23-35).

Figure 23-35: Selecting the PSP value
The results of the change are shown in Figure 23-36.

Figure 23-36: Set Default PSP results
Final Thoughts
There is potential with PowerActions to bring almost any functionality to the vSphere Web Client that you think is missing and would be useful—either for yourself or maybe colleagues who are not able to write PowerShell code themselves. We have demonstrated that it is not difficult to take existing code, either your own or from this book, and modify it to make it suitable for use in PowerActions. The limit with the tool is confined only to your imagination.