
Chapter 13
Reporting
Configuration Manager reports are now fully enabled for role-based administration. The data for all reports included with Configuration Manager is filtered based on the permissions of the administrative user who runs the report. As such, reporting in Configuration Manager has grown from being a feature mainly used to view inventory information to become one of the primary features. Reporting helps you to gather, organize, and present information such as the following:
- Administrative security
- Inventory information
- Software update compliance data
- Migration information
- Audit information
- Power management information
- Alert information
- User data
- Mobile device
- Client health
- Compliance and settings
- Replication traffic
- Operating system deployment
- Virtual applications
- Endpoint protection
In Configuration Manager 2012, the Reporting feature has changed from earlier releases of the product. Gone are the ASP web reports, and the only supported reporting solution left is SQL Server Reporting Services (SSRS). Using SQL Server Reporting Services gives you as an administrator several benefits compared to the classic web reports, such as these:
- Fully enabled for role-based administration
- Schedule reports to render during non-business hours
- Execute reports from a cache
- Create snapshots
- Subscribe to reports and have them mailed to you based on a schedule
- More easily modify existing reports with custom logos, text, and chart objects
- No 10,000-row limitations
- Standard reporting engine used by other Microsoft applications like SharePoint and the other Microsoft System Center applications
Another great feature of using reports is that you can allow users outside the IT department to view part of the rich information that is being gathered through Configuration Manager 2012. Viewing reports does not require access to the Configuration Manager administrative console, only membership in the appropriate groups. With that in mind, in this chapter you will learn skills that will help you install and manage Reporting Services as well as modify and create reports.
In this chapter, you will learn to
- Install the Reporting Services point
- Manage reporting security
- Create and manage report subscriptions
- Create custom reports
Installing SQL Server Reporting Services
Prior to installing the SQL Server reporting services role you need to ensure that you have installed SQL Server Reporting Services. SSRS can be found on the SQL DVD media you used to install SQL Server.
Before you install SSRS, you need to make sure that the server meets the minimum requirements:
- SQL Server 2008 with Service Pack 1 (SP1) Reporting Services
- .NET Framework 4
For a list of recommended hardware and software requirements for SQL Server 2008, see http://technet.microsoft.com/en-us/library/ms143506(SQL.100).aspx#SEx64.
Considerations for Installing SQL Server Reporting Services
There are several considerations prior to installing SQL Server Reporting Services, such as which extra tools to install, security, where to place the site system role, and SQL instance support. This section will try to answer what are considered to be the most common considerations.
With the installation of SSRS you not only install a reporting engine, but you also install the following:
- The report server web service
- Report Builder
- Reporting Services configuration tool
- Command-line utilities, such as rsconfig.exe, rs.exe, and rskeymgmt.exe
Besides the core tools and services, you should consider installing these features:
Business Intelligence Development Studio When you select to install Business Intelligence Development Studio (BIDS) using the SQL media, it will install Visual Studio and provide you reporting and report model design tools. This tool comes in very handy for creating more advanced reports and report models.
SQL Server Management Studio The client tools feature on the SQL media gives you SQL Server Management Studio, which is another tool often used in the report-creation process. SQL Server Management Studio is also used to configure SQL maintenance jobs, configure SQL security, and provide a GUI for maintaining the databases.
You also choose modes and instances:
Installation Mode During setup you can choose between Native mode or SharePoint mode. Configuration Manager 2012 supports only Native mode.
Instance You can install SQL Server Reporting Services in either the default instance or a named instance. Additionally, the instance you use can be shared with other System Center products as long as the other System Center products do not have restrictions for sharing the instance of SQL Server.
WHERE TO INSTALL THE REPORTING SERVICES
The reporting site system can be installed on any primary site or the Central Administration Site. It is considered best practice to install the site system on the Central Administration Site. At the Central Administration Site you will have access to all global data and all site data. Installing the site system on a primary site will allow you to display only global data and site data that are local to the corresponding site. Installing the site system on a secondary site is not supported.
You can install the site system on the site server or on a remote server. For performance reasons it is often best to have a specific server acting as a reporting server. However, this all depends on several factors such as hardware and number of resources. Some IT professionals claim that splitting SQL services from the Central Administration Site leaves a server with very little work to do.
SECURITY
Unlike SQL Server Reporting Services integration in Configuration Manager 2007 R2, Configuration Manager 2012 will connect to SQL and set the necessary permissions in Reporting Services. This eliminates the need to go into Reporting Services Configuration Manager and manually configure security. The security settings will be Credentials Stored Securely In The Report Server and Use As Windows Credentials When Connecting To The Data Source.
Installation of the Reporting Services Site System
The reporting site system role is one of the first roles you should install. Prior to installing the site system, you should verify that SQL Server Reporting Services is installed correctly and works as expected.
For installation and configuration information, read this TechNet article: http://technet.microsoft.com/en-us/library/gg712698.aspx.
For detailed information about SQL Server Reporting Services, read this TechNet article: http://technet.microsoft.com/en-us/library/ms159106.aspx.
The account that you use to install the site system role must have Read access to the database. To retrieve information about named instances, the user must also have Read access to WMI on the site system. To install a SQL Server Reporting Services point, take the following steps:
- In the Configuration Manager administrative console, select the Administration workspace and navigate to Overview
 Site Configuration Servers And Site System Roles.
 - Select the server where you want to install the role:
- From the ribbon click Add Site System Roles to start the Add Site System Roles Wizard.
- If you want to install the role on a new server, click Create Site System Server.
- On the General page, click Next.
- On the Proxy page, enter the appropriate information, and then click Next.
- On the System Role Selection page, select Reporting Services Point from the list of available roles, and click Next.
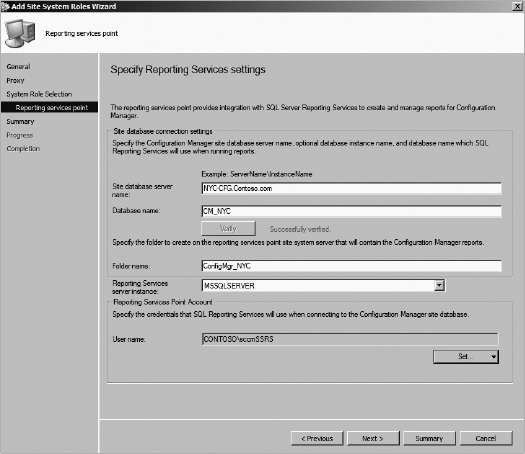
- On the Reporting Services Point Settings page, you must create the data source.
A data source (or database connection) includes the data source type, connection information, and authentication settings used when connecting. The wizard will automatically create the data source based on the information you configure on this page in the wizard.
- The wizard will discover the name of the site database server and the Configuration Manager database. To specify a named instance, type <Server Name><Instance Name>.
- To verify the settings in the Site Database and Database Name fields, click the Verify button.
- The folder name will default to ConfigMgr_<Sitecode>; you can change the folder name if you want.
- In the Authentication Settings area, click Set and choose an existing Configuration Manager account or select a new account.
It is considered best practice to have a specific low-rights user account for Authentication settings.
- Once all settings are configured as shown in Figure 13.1, click Next.
- On the Summary page, verify the settings and click Next.
- On the Completion page, click Close.
A FEW NOTES ABOUT THE DATA SOURCE AUTHENTICATION ACCOUNT
The data source authentication account is used when Reporting Services retrieves the data for reports from the site database. When you specify the account in the wizard, the installation process will take the account and do the following:
- Assign it the proper SQL permissions.
- Display it as the ConfigMgr SRS reporting point in the Administration workspace, Accounts folder.
- Store the account and password encrypted in the Reporting Services database.
WHAT HAPPENS DURING THE INSTALLATION?
When the installation begins, Configuration Manager will perform these steps:
- Create the data source with the specified data source authentication account.
- Create a root folder for all Configuration Manager reports.
- Add the ConfigMgr Report Users and ConfigMgr Report Administrators security roles in Reporting Services.
- Create subfolders and files in %programfiles%SMS_SRSRP.
- Deploy all reports in the %programfiles%SMS_SRSRPReports folder.
- Assign all user accounts in Configuration Manager the ConfigMgr Report Reader rights on root folders and the Configuration Manager folder.
- Assign all user accounts with Site Modify rights in Configuration Manager the ConfigMgr Report Administrator rights on root folders and the Configuration Manager folder.
- Read the current permissions in Configuration Manager, and map those to the newly created reporting folders.
- Assign users who have Run Report permission for any object ConfigMgr Report Reader rights to the associated report folder.
- Assign users who have Report Modify rights in Configuration Manager ConfigMgr Report Administrator rights on the associated report folder.
- Retrieve the mapping between report folders and Configuration Manager secured object types (those maintained in the Configuration Manager site database).
- Configure the following rights for administrative users in Configuration Manager to specific report folders in Reporting Services:
- Add users and assign the ConfigMgr Report Users role to the associated report folder for administrative users who have Run Report Permissions for the Configuration Manager object.
- Add users and assign the ConfigMgr Report Administrators role to the associated report folder for administrative users who have Modify Report permissions for the Configuration Manager object.
Configuration Manager connects to Reporting Services and sets the permissions for users on the Configuration Manager and Reporting Services root folders and specific report folders. After the initial installation of the Reporting Services point, Configuration Manager connects to Reporting Services in a 10-minute interval to verify that the user rights configured on the report folders are the associated rights that are set for Configuration Manager users. When users are added or user rights are modified on the report folder by using Reporting Services Report Manager, Configuration Manager overwrites those changes by using the role-based assignments stored in the site database. Configuration Manager also removes users who do not have Reporting rights in Configuration Manager.
VERIFYING THE INSTALLATION
You can verify the Reporting Services installation by monitoring these log files:
sitecomp.log The sitecomp.log file will have an entry like this:
srsrpMSI.log srsrpMSI.log is the main log file for the installation. You can monitor this for detailed information. Most likely you will find this log file interesting only when troubleshooting a failed installation.
srsrp.log Once the site system is installed, you can monitor the srsrp.log file. It gives you detailed information about the folders and reports as they are published to the reporting site.
You can also monitor the folders created in %ProgramFiles%SMS_SRSRP:
Reports Contains all the default RDL files. The reports are imported during the original installation process. You can use the RDL files to import one or multiple reports again.
Resources Contains various DLL files.
Style Contains the three graphical elements used in most reports. You can replace these files with a custom company logo, for example.
The final test is to connect to the reporting site and verify that you can view all of the reports. Open a browser and type http://reportingserver/reports. Figure 13.2 shows the items in ConfigMgrReports.

Default Reports
By default over 469 canned reports are added during the installation. The reports are organized in several different folders. You can move the reports between the folders as you like and also create new folders. The following folders are available:
Administrative Security Contains information about role-based security, scopes, and audit information.
Alerts Contains information about alerts, such as who closed the alerts.
Asset Intelligence Contains inventory and software license information.
Client Push Contains information about current and past client push installation attempts.
Client Status Contains information about the overall client health and status of the clients installed.
Company Resource Access Contains information about certificate issuance by the certificate registration point and devices/users with certificates about to expire.
Compliance and Settings Management Allows administrators and others to report on Settings Management assignment for a computer or collection. Contain information about the compliance states for computers and collections along with detailed information on configuration items.
Device Management Contains information about device information collected using the Exchange Server mobile connector and from natively managed mobile devices. Integration with Windows Intune provides asset and compliance reporting across cloud-managed PCs as well as mobile devices, including Windows RT, Windows Phone 8, iOS, and Android.
Driver Management Contains information about drivers imported into the drivers repository.
Endpoint Protection Provides detailed information about malware and virus activities. These reports will provide the Security department with up-to-date information about the overall security threat level in the organization.
Hardware - CD-ROM Contains information about CD-ROMs.
Hardware - Disk Contains physical and logical disk information.
Hardware - General Contains a very useful hardware report along with information about the various inventory classes assigned.
Hardware - Memory Contains memory information. You will find information for a specific computer and a count of each unique memory configuration.
Hardware - Modem Contains modem information.
Hardware - Network Adapter Contains network adapter information like IP address, MAC address, and adapter information.
Hardware - Processor Contain processor information.
Hardware - SCSI Contains SCSI information.
Hardware - Sound Card Contains sound card information.
Hardware - Video Card Contains video card information.
Migration Contains information about the migration process from Configuration Manager 2007 to Configuration Manager 2012. Includes migration jobs, migration job status, and other migration reports.
Network Provides information about IP addresses and IP subnets. These reports will give you the number of IP subnets in the network and how many IP addresses you have in each subnet.
Network Access Protection Provides information about NAP rules and computers that have been affected by one or more NAP policies.
Operating System Provides information about operating systems and service packs in the organization.
Out Of Band Management Provides information about managed client systems equipped with Windows Remote Management Technology (WS-MAN).
Power Management Provides power management information like computer activity, energy cost by day, and energy consumption. The information provides the organization with valuable data about the overall power consumption and also how new client power settings have lowered the environmental impact.
Replication Traffic Provides information about database replication throughout the hierarchy.
Site - Client Information Provides information about Configuration Manager client versions, deployments, assignments, communication settings, and out-of-band management configurations.
Site - Discovery and Inventory Information Provides information about client discovery and inventory information. These reports can be very useful when determining the overall client health of the sites.
Site - General Lists computers belonging to a specific Configuration Manager site, and shows when the site status was last updated.
Site - Server Information Lists all site servers and site system roles for a specific site.
Software - Companies and Products One of the primary folders when searching for installed software applications.
Software - Files Provides information based on the software inventory processes.
Software Distribution - Application Monitoring Provides basic and detailed information about application deployment. These reports will provide you with information about computers where requirements or dependencies have not been met, per asset deployment information, application usage, application infrastructure errors, and application compliance.
Software Distribution - Collections Contains information about collections, maintenance windows, and resources belonging to specific collections.
Software Distribution - Content Contains information about distribution points, distribution groups, content, and distribution point usage.
Software Distribution - Package and Program Deployment Contains information about package deployments.
Software Distribution - Package and Program Deployment Status Contains information about statuses for package deployments.
Software Metering When software is enabled, you will use the reports as the primary information source to find information about the applications you monitor, when they were last started and by whom, and where they are installed but not used. The reports will enable you to determine which applications you can uninstall and that way cut down on the license costs.
Software Updates - A Compliance Provides overall compliance information about the software updates released from Windows Updates and also third-party software updates authored and published using the System Center Update Publisher tool.
Software Updates - B Deployment Management Provides information about the software update deployments created in the organization and updates that are required but not yet deployed. You can use the reports in this category to assist you when troubleshooting software update deployments.
Software Updates - C Deployment States This category contains some of the most used reports whenever you work with software update deployment. The single-most important report (in my opinion) is States 1 - Enforcement States for a Deployment. This report can be used to track down the deployment processes of any given software update deployment along with compliance information.
Software Updates - D Scan Reports in this category provide you with information about which clients are able to perform a scan against the WSUS server. The report Scan 1 - Last scan states by collection is the very first report you should run whenever you want to troubleshoot software update problems. If clients are unable to perform a scan, they will not be able to upload compliance information or install required software updates.
Software Updates - E Troubleshooting Contains a few reports that can assist you when troubleshooting client scans and update deployments.
State Migration Provides operating system state migration information for a specific site or state migration site system point.
Status Messages Allows you to see all status messages received by the site server. Useful to determine the health of the Configuration Manager hierarchy.
Status Messages - Audit Allows you to see audit status messages for a specific site or user if using a Configuration Manager agent to remotely control devices.
Task Sequence - Deployment Status Provides you with detailed information about the status of running and historical task sequence deployments.
Task Sequence - Deployments Provides you with detailed information about running and historical task sequence deployments.
Task Sequence - Progress Provides you with detailed information about the progress of task sequences.
Task Sequence - References Provides information about the objects referenced by a specific task sequence.
Upgrade Assessment Provides you with an overview of computers that meet the system requirements for Windows 7 and Windows 8 deployment and those computers that are not capable of being upgraded.
User - Device Affinity Provides you with UDA information, such as UDA associations per collection and UDA statistics.
User Data and Profiles Health Provides you with information about users in a specific domain, a count of users, and computers used by specific users.
Users Provides you with information about users in a specific domain, a count of users, and computers used by specific users.
Virtual Applications Provides information about virtual applications installed in the environment and information about virtual application packages.
Wake On LAN Provides information about the Wake On LAN activity and configurations.
As you can see, Microsoft has done a good job of providing some key reports that are ready to use out of the box.
Running a Report
There are two ways to run a report. The first is to use the Configuration Manager administrative console, and the second is to use the web-based Report Manager. From a management perspective it seems nicer to run the reports from the web-based Report Manager. From here you can also manage and customize the reports.
Viewing Available Reports
You can view the list of available reports from within the Configuration Manager administrative console or through the web-based Report Manager created during the configuration of the Reporting Services site system role. Both Report Manager and Configuration Manager group reports in folders. If needed, you can always move a report from one folder to another folder or even create your own folders.
Running a Report from the Administrative Console
To run a report using the Configuration Manager administrative console, follow these simple steps:
- Open the Configuration Manager administrative console and select the Monitoring workspace.
- Under Overview, expand Reporting, select Reports, and choose the reporting category, for example, Client Push.
- Select the report you want to run, and click Run on the ribbon.
For example (Figure 13.3), I ran Client Push Installation Status Summary.
- Many of the reports require that you select additional information, such as a collection, to narrow the search.
In this example, I clicked Values and selected a value from the Parameter Value window.
- Click View Report.

This will open the report in a new window. You can choose to print or export the report. If you choose to export the report, you can select a file format like Word, Excel, PDF, TIFF, MHTML, CSV, or XML. A sample report is shown in Figure 13.3, demonstrating some of the available options once you have the report open.
Running a Report from Report Manager
To run a report using the web-based SQL Server Reporting Services, follow these simple steps:
- Open your web browser to the URL (the default is http://ReportServer/Reports) for Report Manager.
As described earlier in the chapter, this URL is the location you specified when setting up the reporting site system role.
- Open the folder to the category of the report you want to run.
In this example, I selected Software Distribution - Application Monitoring.
- Hover your mouse over the icon in the Report Information area to display the report contents.
- Select the report you want to run.
I selected All Application Deployments (Advanced).
- Again, you will be required to select some criteria from the drop-down boxes.
- Once you have selected the criteria, click View Report.
This will display a report, as shown in Figure 13.4.

![]()
MODIFYING THE STANDARD LOGO FOR ALL REPORTS
You have been asked by your boss to make sure that canned SQL reports are branded with the company logo in the upper-right corner. In most canned reports you will find three standard images. You want to replace the Report_Header_Right.png file with the custom company logo. To achieve that, you'll use your knowledge of the Style folder and make a change in the registry.
- Log on to the reporting server.
- Open the %ProgramFiles%SMS_SRSRPstyle folder.
- Make a backup of the existing Report_Header_Right.png file.
- Copy the file of your company's logo to the Style folder and rename it
Report_Header_Right.png.
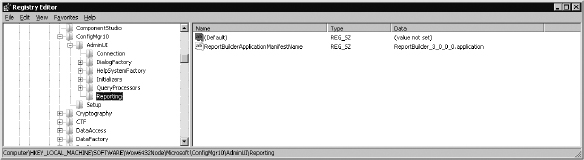
- Open the registry by clicking Start
 Run, and type regedit.
 - Navigate to HKEY_Local_MachineSoftwareMicrosoftSMSSRSRPSRSInitializeState.
- Change the value to 0, as shown in the following graphic.
This will restart the deployment of the canned reports. Note that all existing changes to the reports will be overwritten.

It can take a little while for the changes to take effect; you can monitor the srsrp.log file on the site server for progress.
Working with Reporting Security
Working with security for reports is not that different from working with security for other objects in Configuration Manager. Configuration Manager will automatically synchronize the security settings configured using the Configuration Manager administrative console to SSRS. In theory you can configure security in both the Configuration Manager administrative console and in Report Manager. The preferred method is using the Configuration Manager administrative console because all changes applied here will automatically be synchronized to SQL Server Reporting Services. If you configure security directly in Report Manager, you will find that all your custom settings will be overwritten by the security settings in Configuration Manager. By default Configuration Manager will connect to SSRS every 10 minutes and verify that security settings are correctly configured.
Permissions Required to Run Reports
Configuration Manager will create two new Reporting security groups in SQL Server Reporting Services:
ConfigMgr Report Administrators Offers full administrative permissions to all tasks related to working with reports.
ConfigMgr Report Users Allows users to read reports and create subscriptions.
When you assign the Read permission to a user or group in the Configuration Manager console, that group will automatically be granted the ConfigMgr Report Users role in SQL Server Reporting Services.
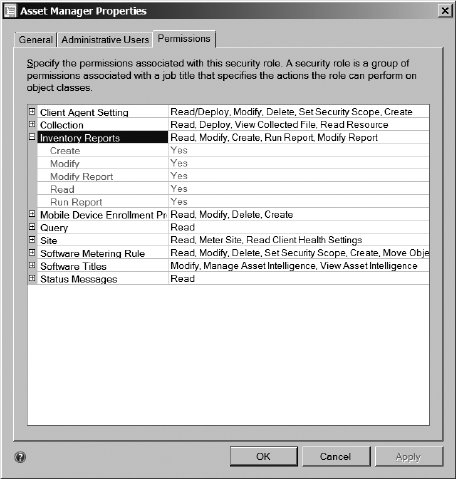
Most, but not all, objects will be assigned either Run Report or Modify Report or both, as shown in Figure 13.5, for the Asset Manager. To read reports not associated with a specific role, you must have Read permission to the site. When security is granted, Configuration Manager will automatically assign the appropriate group or user permissions to the reports.
The following list shows the built-in roles and the report folders they can access:
Application Administrator:
- Alerts
- Device Management
- Software Distribution - Application Monitoring
- Software Distribution - Collections
- Software Distribution - Content
- Software Distribution - Package and Program Deployment
- Software Distribution - Package and Program Deployment Status
- User - Device Affinity
- Virtual Applications
Application Author:
- Alerts
- Software Distribution - Application Monitoring
- Software Distribution - Collections
- Software Distribution - Content
- Software Distribution - Package and Program Deployment
- Software Distribution - Package and Program Deployment Status
- Virtual Applications
Application Deployment Manager:
- Alerts
- Software Distribution - Application Monitoring
- Software Distribution - Collections
- Software Distribution - Content
- Software Distribution - Package and Program Deployment
- Software Distribution - Package and Program Deployment Status
- User - Device Affinity
- Virtual Applications
Asset Manager:
- Asset Intelligence
- Hardware - CD-ROM
- Hardware - Disk
- Hardware - General
- Hardware - Memory
- Hardware - Modem
- Hardware - Network Adapter
- Hardware - Processor
- Hardware - SCSI
- Hardware - Sound Card
- Hardware - Video Card
- Operating System
- Site - Discovery and Inventory Information
- Software - Companies and Products
- Software - Files
- Software Metering
- Upgrade Assessment
- Users
Company Resource Access Manager:
- Alerts
Compliance Settings Manager:
- Alerts
- Compliance and Settings Management
- User Data and Profiles Health
Endpoint Protection Manager:
- Alerts
- Endpoint Protection
Full Administrator: All folders
Infrastructure Administrator:
- Alerts
- Asset Intelligence
- Client Push
- Client Status
- Hardware - CD-ROM
- Hardware - Disk
- Hardware - General
- Hardware - Memory
- Hardware - Modem
- Hardware - Network Adapter
- Hardware - Processor
- Hardware - SCSI
- Hardware - Sound Card
- Hardware - Video Card
- Migration
- Network
- Operating System
- Out Of Band Management
- Power Management
- Replication Traffic
- Site - Client Information
- Site - Discovery and Inventory Information
- Site - General
- Site - Server Information
- Software - Companies and Products
- Software - Files
- Status Messages
- Status Messages - Audit
- Upgrade Assessment
- Users
- Wake On LAN
Operating System Deployment Manager:
- Alerts
- Driver Management
- Software Distribution - Application Monitoring
- Software Distribution - Collections
- Software Distribution - Content
- Software Distribution - Package and Program Deployment
- Software Distribution - Package and Program Deployment Status
- State Migration
- Task Sequence - Deployment Status
- Task Sequence - Deployments
- Task Sequence - Progress
- Task Sequence - References
- Virtual Applications
Operations Administrator: All folders
Read-only Analyst: All folders
Remote Tools Operator: No folder view
Security Administrator:
- Administrative Security
Software Update Manager:
- Alerts
- Hardware - General
- Network Access Protection
- Software Updates - A Compliance
- Software Updates - B Deployment Management
- Software Updates - C Deployment States
- Software Updates - D Scan
- Software Updates - E Troubleshooting
![]()
ASSIGN A GROUP PERMISSION TO VIEW ALL REPORTS
In your organization you have an Active Directory group named CM_Reporting_Viewers that requires read access to all reports in Configuration Manager. As a Configuration Manager administrator you have been assigned the task of assigning the appropriate permissions using the least administrative effort possible. Follow these steps to accomplish this task:
- Open the Configuration Manager administrative console.
- Navigate to the Administration workspace, and in Overview select Security Administrative Users.
- From the ribbon click Add User Or Group.
This will launch the Add User Or Group dialog.
- In User Or Group Name field, click Browse, type CM_Reporting_Viewers, and click OK.
- In the Associated Security Roles dialog, click Add, select the Read-only Analyst security role, and click OK.
- Click OK to close the Add User Or Group dialog.
Managing Reports
One of the main benefits of using SQL Server Reporting Services is the ability to manage reports. Once a report is published, you will be able to use the Report Manager to modify some of the reporting properties. Properties control security, parameter values, the data source, when the report runs (scheduled or on demand), caching options, and more.
To manage the properties for a report, follow these simple steps:
- Open your web browser to the URL (the default is http://ReportServer/Reports) for the Report Viewer.
- Open the folder to the category of the report you want to manage, for example, Software Distribution - Application.
- Click the drop-down arrow for the report you want to manage.
- From the list of options, click Manage.
The first properties you will see are the General properties for the report. You will find a list of report properties in Tables 13.1 through 13.9. Table 13.1 lists the General properties.
TABLE 13.1: General properties
| PROPERTY | DESCRIPTION |
| Delete | Allows you to delete the report. |
| Move | Allows you to move the report to another folder. This is especially useful if you want to create your own folder with a mix of canned reports from different folders. You should always consider creating custom folders like Servicedesk, Software, or License and move the reports you use the most to those folders. |
| Create Linked Report | Allows you to create a link to another report. You will find more information on this property later in this chapter. |
| Download | Allows you to save the report as an RDL file. |
| Replace | Allows you to import a new version of the report. |
| Name | Lets you specify the name of the report. |
| Description | Lets you provide the report description. |
| Hide In Tile View | Enable this to hide the report from the Report Manager tile view mode. Tile view mode is the default view when users browse for reports. |
SHOWING HIDDEN REPORTS IN REPORT MANAGER
To view a report that is configured to be hidden in List view, do the following:
- Open the Report Manager website.
- Click Details View.
- Open the folder containing the report you want to view.
- In Details view all reports and data sources are visible. You can now open the specific report's properties and remove the check mark from Hide In Tile View on the General properties page.
As you start working with reports, you might find yourself modifying reports and later regretting it. All canned reports that are installed with Configuration Manager are located in a folder on the reporting site system. In this example we will reimport the Client Status Summary report from the Client Health folder. To manually import this report, do the following.
- Open the Report Manager website.
- Open the Client Health folder.
- Open the Client Summary report properties, and make sure you are on the General properties page.
- Click Replace.
- Click Browse and navigate to E:Program FilesSMS_SRSRPReportsClient_Health, where E: is the disk volume where you have installed the reporting site system role.
- Select CH_Report_ClientSummaryCurrent.rdl and click Open.
- Back in Report Manager, click OK.
- Click Apply and close the report properties.
Using prompts (or parameters) in reports is very common. It is an easy way for the report user to specify what data to view without having to have deep knowledge of the underlying dataset or SQL reporting skills. You as the administrator can customize the parameters and configure settings such as the default parameter values described in Table 13.2.
TABLE 13.2: Parameter properties
| PROPERTY | DESCRIPTION |
| Parameter Name | The name of the parameter. |
| Data Type | Specification of the data type. |
| Has Default | Allows you to specify a default value, thus saving time whenever you run the report. With this selected you can specify the value in Default Value and/or use the Null property. |
| Default Value | A default value can originate from the report definition, can be query based, or can be a value you type in. The value you enter must adhere to the data type; the use of wild-cards is also determined in the report itself. |
| Null | Allows you to specify that the report will run even if the user does not select any prompted value. This does require that the report allows the use of Null values. |
| Hide | Allows you to hide the parameters in the Report Manager from users when they run a report. The parameter value will still be visible if the user starts the subscription wizard. |
| Prompt User | With this selected, users will be prompted for a parameter. Deselect the check box if you want to control the parameters to be used in the report. |
| Display Text | Text that will be displayed with the parameter value. |
As part of the SQL Server Reporting Services point installation, a shared data source is created. The data source is used to specify what data to access and which security credentials to use. Table 13.3 describes the values you can specify for the created data source. Notice that it is highly unlikely that you will need to change the data source from the Report Manager.
TABLE 13.3: Data Source properties
| PROPERTY | DESCRIPTION |
| A Shared Data Source | Specifies the shared data source. |
| A Custom Data Source | Allows you to specify a custom data source. |
| Connection String | Specifies the connection string used to connect to the data source. |
| Connect Using | Defines how you connect to the data source. For all the canned reports, the connection settings are already defined in the connection string. |
| Connect Using Credentials Supplied By The User Running The Report | Defines that each user must provide a username and password. |
| Use As Windows Credentials When Connecting To The Data Source | Configure this option if the credentials supplied by the user are Windows Authentication credentials. |
| Credentials Stored Securely In The Report Server | Encrypts and stores the credentials in the report server. This will allow you to run a report unattended, which is a requirement for scheduled reports. |
| Impersonate The Authenticated User After A Connection Has Been Made To The Data Source | Used only in rare occasions to allow delegation of credentials if supported by the data source. |
| Windows Integrated Security | Uses the credentials of the logged-on user to access the data source. |
| Credentials Are Not Required | Does not prompt for credentials when running the report. This works only if the data source does not require a user logon. |
| Test Connection | Performs a test to the data source using the supplied credentials. |
One of the advantages of using SQL Server Reporting Services is that you can configure automatic delivery of specified reports by either email or storing the report to a file share. You can create subscriptions in the Report Manager or using the Create Subscription Wizard in the Configuration Manager administrative console. Table 13.4 explains the subscription options available when you are using the Report Manager.
TABLE 13.4: Subscription options
When reports are executed, they will be transformed from the reporting database into a viewable format. The defined query in the dataset will be executed and will return data to the reporting server, where the selected rendering extension will create the report. The performance impact of running a report depends very much on the amount of data retrieved and the rendering format selected. By default when users run a report, that report is generated on demand. Most of the data in Configuration Manager is either inventory data or state messages, which are very rarely real-time data. By knowing the processing options described in Table 13.5 and the report content, you will quickly learn how to speed up the processing for reports.
When you cache a report, the first time the report is executed the process is similar to running an on-demand report. However, the intermediate format is stored in ReportServerTempDB (cache) for a configured period. If any other users request the same data, the server will take the intermediate format and render the report much more quickly.
TABLE 13.5: Processing options
You can preload the cache with temporary copies of the report by creating a refresh plan with the parameters described in Table 13.6. Creating a cache refresh plan requires that the cache options have been defined.
TABLE 13.6: Cache Refresh options
| PROPERTY | DESCRIPTION |
| New Cache Refresh Plan | Lets you create a new plan. |
| Description | You can provide a meaningful description for the plan. |
| Refresh The Cache According To The Following Schedule | The cache can be refreshed on a custom specific schedule or by using a shared schedule. |
As snapshots are generated, you will be able to view the reports in the Report History page. On this page you can also create a manual snapshot of the report. The options are shown in Table 13.7.
TABLE 13.7: Report History options
| PROPERTY | DESCRIPTION |
| Delete | Deletes the selected report snapshot. |
| New Snapshot | Creates a new snapshot. This option is available only if Allow Report History To Be Created Manually has been selected on the Snapshot Options page. |
Report history is stored in the Report Server database. The Snapshot options, shown in Table 13.8, will assist you in controlling how many items are stored and when the snapshot is generated.
| PROPERTY | DESCRIPTION |
| Allow Report History To Be Created Manually | Enables the New Snapshot button on the Report History page. |
| Store All Report Execution Snapshots In Report History | With this feature, reports that are created based on the execution settings on the Processing Options page will be added to the Report History page. |
| Select The Number Of Snapshots To Keep | Controls how many snapshots are added to the history. You can select from three different values:
Use Default Unlimited Snapshots Limit To A Specific Number |
As described earlier in this chapter, Configuration Manager will apply default security settings when the Reporting Services point is installed and will check those security settings every 10 minutes. Table 13.9 describes the Security setting applied to a report.
| PROPERTY | DESCRIPTION |
| Edit Item Security | Allows you to customize the default Security settings. Notice that Configuration Manager will overwrite any custom settings you configure. |
CREATING A SHARED SCHEDULE
To lower the performance requirements on the server when running reports, you have been asked to control when reports are rendered. Prior to configuring the execution options, you decide to create a shared schedule that can be selected for all reports. You follow these steps to create a shared schedule:
- Open the Report Manager website.
- Click Site Settings.
- Click the Schedules link.
- Click New Schedule.
- Type in a schedule name and configure the schedule details.
- Click OK to save the shared schedule.
Working with Subscriptions
One of the many features of using SQL Server Reporting Services is working with subscriptions. You can subscribe to reports and have them delivered via mail or as a file on a network share. A standard user can create and customize their own subscriptions with the options described in Table 13.4. You can create a subscription in Report Manager or use the Create Subscription Wizard in the Configuration Manager administrative console.
CREATING A FILE-BASED REPORT SUBSCRIPTION
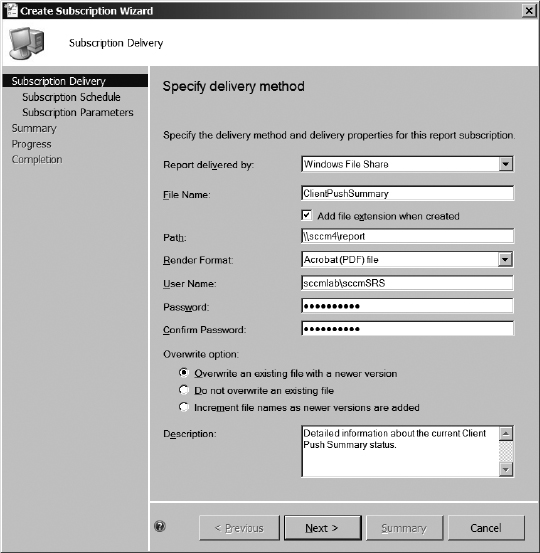
Prior to creating a file-based subscription, you need to ensure that you have an account with write permissions to a predefined server share. In this example we'll create a subscription for the Client Push Status Summary report.
To create a file-based report subscription using the Configuration Manager administrative console, follow these steps:
- Open the Configuration Manager console and select the Monitoring workspace.
- Inside Overview, click Reporting, and select the report from the Reports folder.
- With the report selected, click Create Subscription on the ribbon.
- In the Report Delivered By field, ensure that Windows File Share is selected.
- In File Name field, type in the name of the file without any extension, for example, ClientPushSummary.
- Enable the Add File Extension When Created check box.
- In the Path field, type in the UNC to an existing share.
- Select the rendering format; in the example I have selected Acrobat (PDF) File.
- In the User Name field, specify an account with Read access to the report and Write permissions to the specified UNC.
- Configure the needed Overwrite Option, and click Next.
Figure 13.6 shows how the delivery options can be specified.
- On the Subscription Schedule page, select a shared schedule or create a new schedule, and click Next.
This report is a prompted report, and it requires that you select the prompted value. In this example you must click Values and select the number of days.
- Select All, click OK, and click Next.
- Read the summary information, and click Next.
- Click Close; the subscription is now created.
You can view information and edit the scheduled report by clicking Reporting ![]() Subscriptions in the Monitoring workspace. You can also open the Report Manager and open the properties for the report. Select Subscriptions; here you will find detailed information about when the subscription is about to run or when it was executed the last time.
Subscriptions in the Monitoring workspace. You can also open the Report Manager and open the properties for the report. Select Subscriptions; here you will find detailed information about when the subscription is about to run or when it was executed the last time.
CREATING AN EMAIL-BASED REPORT SUBSCRIPTION
Prior to creating an email-based subscription, you need to configure the email options in the Reporting Services Configuration Manager. In this example you will configure the required mail options and use Report Manager to create a subscription for the Client Push Status Summary report.
To configure email support in the Reporting Services Configuration Manager and create an email-based subscription in Report Manager, follow these steps:
- From the Start menu, choose All Programs Microsoft SQL Server 2008 R2 Configuration Tools Reporting Services Configuration Manager.
- You will be prompted to connect to a reporting server. Make sure the correct reporting server and instance are selected and click Connect.
- Click E-Mail Settings.
- In Sender Address, type the email address that will be used to send the mail.
- In Current SMTP Delivery Method, ensure that Use SMPT Server is selected.
- In SMTP Server, type the name of the SMTP server and click Apply to store the settings.
- Click Exit to close the Reporting Services Configuration Manager.
- Open the SQL Report Manager and connect to the Configuration Manager report by typing http://reportingserver/reports.
- Open the Configuration Manager folder and the Client Push folder.
- Hover the mouse over the report, and select Subscribe from the drop-down list.
- In Delivered By, ensure that E-Mail is selected.
- In To, type the recipient email addresses.
Note that there will be no validation of the addresses; you need to make sure that what you type is correct. You can type multiple addresses by separating them with a semicolon (;).
- Fill in any other CC, BCC, and Reply-To email addresses.
- Type a subject using the variables explained in Table 13.4.
- Choose from among the following options:
- Send A Link
- Include The Report As Attachment
- Embed The Report In The Mail
If the recipients support HTLM 4.0 and MHTML 5.0, you can select the Render format MHTML; this will embed the report in the mail.
- In the Comment field, type in any information that you want to include in the mail body.
- Configure the processing options, and click OK to create the subscription.
You can create the subscription in Report Manager as explained previously or in the Configuration Manager administrative console as explained for file-based subscription. The difference between the two methods is that subscriptions created in the administrative console will be listed in the administrative console as well as in Report Manager, unlike subscriptions created in Report Manager, which will be listed only in Report Manager.
Creating Reports
Even though Configuration Manager 2012 SP1 ships with over 469 canned reports, a few of which are hidden, at some point you will need to modify an existing report or create a new one. Creating reports requires that you have a basic understanding of SQL and that you are familiar with the different tools available to customize reports. In essence you can create a new report in the following ways:
- From scratch using Report Builder or BIDS (Business Intelligent Development Studio)
- By copying and modifying an existing report
- By creating a new report based on a report model
When you create reports, you will use data stored in the site server database through SQL views. SQL views are essentially virtual tables that do not themselves contain any data but are based on tables that contain data. The data is dynamically compiled from source tables when the view is referenced. It is not recommended to query tables directly because tables can be changed, for example, by installing a Configuration Manager service pack. Once you know the basics of the naming standard used for views, they actually start to make sense:
- V_GS_Name—Contains current inventory data
- V_HS_Name—Contains history inventory data
- V_R_Name—Contains discovery data
- V_RA_Name—Contains array (multivalue) discovery data
Basic SQL Commands
So far in the chapter you've seen how to create a new report using SQL Report Builder and how to import a report. The other option is to define the report using SQL scripting. This, of course, requires you to know the relevant SQL commands. In general, an understanding of SQL syntax is a huge asset for a Configuration Manager administrator but not a requirement. However, within the scope of this book, we cannot cover SQL commands in depth. We suggest that you read up on basic SQL commands so you can create rich and powerful reports. Another way to learn is by simply opening existing reports and seeing how they are written.
Although we cannot cover every topic within SQL programming, such as how to define queries to achieve rich reports within Configuration Manager, it will be useful to cover basics such as ORDER BY, sorting with DESC and ASC, COUNT, and setting header names using AS.
For all the examples we will be using the same report statement, shown here:
SELECT
count(model0) as Count, Model0 as ‘Computer Model’, Manufacturer0 as
‘Manufacturer’
FROMv_GS_COMPUTER_SYSTEM GROUP BY Model0, Manufacturer0
ORDER BY count DESC
The result of the statement would look similar to the following output:
Count           Computer Model           Manufacturer
5               Virtual Machine          Microsoft Corporation
One way to make the presentation of reports look professional is to sort the items in some fashion. Within SQL you can use a command such as the following to sort your reports:
ORDER BY count DESC
ORDER BY is the command that tells SQL to sort based on the column COUNT in this example. The order in which the items will be sorted is DESC, or descending. You can use ASC to sort in ascending order.
If you want to sort on multiple items, just add them to the list in the order in which you want to sort, for example:
ORDER BY count, Model0 DESC
Many times you will be tasked with showing very concise reports in which the end user just wants to know, “How many units of model X do we have in our organization?” This is easily achieved by using the COUNT command.
This will show the count of the item Model0 in your report.
Many times, you will not want to have a report with column headings such as Model0, Manufacturer0, and so on. You will want to display meaningful header names. So the following example shows how to achieve this naming:
SELECT
count(model0) as Count, Model0 as ‘Computer Model’, Manufacturer0 as
‘Manufacturer’
FROM v_GS_COMPUTER_SYSTEM
GROUP BY Model0, Manufacturer0
ORDER BY count DESC
By adding the word AS into your SQL statement, you can specify the name of the column header. If the name contains a space, then you have to use single quotes.
Report Models
A report model contains predefined views and fields logically grouped together. By using report models you can assist users in building reports that expose only the needed views and fields. This shortens the learning curve for building reports and also speeds up the process because only the selected views and fields will be presented to Report Builder. Later in this chapter you will learn how to build your own report model and create reports based on the canned Configuration Manager report models. Some of the benefits of using report models are these:
- You can assign reporting model logical names.
- The underlying database structure can be hidden from the person creating the report.
- The report model can contain multiple tables and views yet still list the model as a single object.
- Time saved is money saved. When reporting models are created, not every person creating reports needs to have deep SQL knowledge.
Creating a Report Using Report Builder
Configuration Manager 2012 uses Microsoft SQL Server 2008 Reporting Services Report Builder 2.0 as the authoring and editing tool for both model and SQL-based reports. SQL Server 2008 R2 ships with a new version of SQL Reporting Builder 3.0, which is an updated version of the version that ships with SQL Server 2008. Report Builder will automatically be installed on your computer when you create or modify a report for the first time. Report Builder has a lower learning curve than BIDS and is often used by non-SQL experts to create custom reports. The tool is not a full-blown developer tool but still offers the support needed by many, such as the following:
- Developing one report at a time in a Microsoft Office lookalike environment
- Creating charts and gauges
- Creating rich SQL
- Rich formatting capabilities
- Exporting to reports in other formats
CHANGE REGISTRY TO LAUNCH REPORT BUILDER 3.0 INSTEAD OF REPORT BUILDER 2.0
You have been asked to modify some of the canned reports using Report Builder 3.0. ConfigMgr 2012 may launch Report Builder 2.0 unless you modify the registry, as follows:
- Log on to the computer where you have the ConfigMgr 2012 administrator installed.
- Click Start Run and type Regedit to launch the registry editor.
- Navigate to HKEY_LOCAL_MACHINESOFTWAREWow6432NodeMicrosoftConfigMgr10AdminUIReporting.
- Modify the ReportBuilderApplicationManifestName key, and change the string to ReportBuilder_3_0_0_0.application, as shown here.
- Click OK and close the registry editor.
Next, you will see how to create a report using Report Builder 3.0. The report will be created in the report folder called Hardware - General. Use the following steps to create a basic SQL report that will show and count all the different hardware models you have in the database.
- Open the Configuration Manager console and select the Monitoring workspace.
- In Overview, expand Reporting and right-click Reports.
- From the drop-down menu click Create Report.
- Select SQL-based Report.
- In the Name field type Count Hardware Models.
- In the Description field type Group and count all hardware models.
- In the Path field, click Browse, select the Hardware - General folder, and click OK.
- Click Next.
- On the Summary page click Next (this will create the report).
- Click Close.
Report Builder will launch automatically. If this is the first time you launched the wizard, you will be prompted to install Report Builder.
- In Report Builder click Table Or Matrix.
This will launch the New Table Or Matrix Wizard.
- Click Create A Dataset and click Next.
- In Data Source Connections, verify that the Configuration Manager data source is selected, and click Next.
- Expand dbo Views v_GS_COMPUTER_SYSTEM.
- Select Manufacturer0 and Model0, as shown in Figure 13.7, and click Next.
- Drag Manufacturer0 and Model0 to Row Groups and Model0 to Values.
- In Values, right-click Model0 and select Count; click Next when finished.
- In Choose The Layout, select Stepped Subtotals Above, and click Next.
- Select a style and click Finish.
The report is now open in Design view, allowing you to customize colors, fonts, and much more.
- To view the report, click Run from the ribbon.
- Click Save to save the report.
- Exit Report Builder.
- When prompted to publish the report, click Yes.

ADDING A CUSTOM LOGO TO AN EXISTING REPORT
You have been asked by management to modify the canned report Enforcement States for a deployment from the Software Updates folder. Follow this process to modify the report:
- Open the Configuration Manager console and select the Monitoring workspace.
- Expand Overview Reporting Reports Software Updates - C Deployment States.
- Select States 1 - Enforcement States for a deployment, and click Edit on the ribbon. This will launch the SQL Server Report Builder.
- From the Report Data column on the left, right-click Images, and select Add Image.
- Locate the image file and click Open.
- Drag and drop the image object into the report header.
- Click OK in the Image Properties dialog.
Creating a Report Using Business Intelligence Development Studio
Business Intelligence Development Studio, or BIDS, is often used by developers when creating more advanced reports. BIDS is a component that ships with SQL Server and is in essence Microsoft Visual Studio 2008 with prebuilt project types used in SQL-like reporting services. BIDS can be installed on SQL Server as well as on a workstation operating system like Windows 7. The following example demonstrates how you can create and publish a report using BIDS. The report will list and count Adobe applications installed on all workstations.
- Click Start All Programs Microsoft SQL Server 2008 R2 SQL Server Business Intelligence Studio.
- Select File New Project.
- Select Report Server Project Wizard.
- Enter the name as Mastering CM2012, and click OK.
This will start a wizard to take you through the process of creating the report.
- In the Welcome To The Report Wizard dialog, click Next.
- In Select The Data Source under Name, type CM2012 and click Edit.
- In Connection Properties, type the name of the SQL Server in the Server Name field, and select the Configuration Manager database from the Select Or Enter A Database Name drop-down list.
- Click OK to save the connection properties.
- Click Make This A Shared Data Source, and click Next.
In the design query step you can either paste an existing SQL statement or click Query Builder and create your own statement. In this example you will build the statement yourself.
- Click Query Builder.
- Click the Add Table icon in the toolbar.
- Select the Views tab, navigate to V_R_System, and click Add.
- Select V_GS_ADD_REMOVE_PROGRAMS, click Add, and click Close.
- Back in Query Designer, arrange the two views so you can see both.
- From V_R_SYSTEM, drag ResourceID and drop the field on ResourceID in the V_GS_ADD_REMOVE_PROGRAMS view.
By doing so, you are creating an inner join between the two views. You should see a SQL statement like this:
SELECT *
FROM  v_GS_ADD_REMOVE_PROGRAMS
INNER JOIN v_R_System ON v_GS_ADD_REMOVE_PROGRAMS.ResourceID =
v_R_System.ResourceID
- From V_GS_ADD_REMOVE_PROGRAMS, select DisplayName0, Publisher0, and Version0.
- In Publisher0 Filter, type Like Adobe%.
This will ensure that you see only the application from a specific vendor.
- From V_R_System, select Operating_System_Name_and0.
- In Filter, type like %workstation%, and remove the check mark from Output.
This will query for all workstations but not show the operating system information in the report.
- From V_GS_ADD_REMOVE_PROGRAMS, drag DisplayName0 down to the fourth field in your query.
- In the Alias field, type Total.
You can use the Alias column to type a more descriptive title for each of the fields.
- To calculate the number of applications installed, click the Use Group By icon on the toolbar.
Notice that this will add an extra column named Group By.
- In the last column with DisplayName0, change Group By to Count.
- Click the red exclamation mark to run the query.
Your query should look like this (notice that I have used some aliases not mentioned in the previous steps):
SELECT
v_GS_ADD_REMOVE_PROGRAMS.DisplayName0 AS Application,
v_GS_ADD_REMOVE_PROGRAMS.Publisher0 AS Publisher,
v_GS_ADD_REMOVE_PROGRAMS.Version0 AS Version,
COUNT(v_GS_ADD_REMOVE_PROGRAMS.DisplayName0) AS Total
FROM  v_GS_ADD_REMOVE_PROGRAMS
INNER JOIN v_R_System ON v_GS_ADD_REMOVE_PROGRAMS.ResourceID =
v_R_System.ResourceID
GROUP BY v_GS_ADD_REMOVE_PROGRAMS.DisplayName0,
v_GS_ADD_REMOVE_PROGRAMS.Publisher0,
v_GS_ADD_REMOVE_PROGRAMS.Version0,
v_R_System.Operating_System_Name_and0
HAVING (v_R_System.Operating_System_Name_and0 LIKE ‘%workstation%’)
AND (v_GS_ADD_REMOVE_PROGRAMS.Publisher0 LIKE ‘Adobe%’)
- Click OK to close Query Designer.
- In the Report Wizard, on the Design The Query screen, click Next.
- In Select The Report Type, ensure Tabular is selected and click Next.
- In Design The Table, move all available fields to the Details section and click Next.
- In Choose The Table Style, select Corporate and click Next.
- In Choose The Deployment Location, verify that the correct SQL report server version and report server are selected.
The Deployment folder will be the location where SQL Server Reporting Services will publish the report. It is often a good idea to publish reports to a “sandbox” folder before adding the report to the same folder as the canned Configuration Manager reports.
- Click Next.
- On the Completing The Wizard page, type Number of Adobe applications installed.
- Click Finish.
Your report is now ready to be customized. You will find many of the features in BIDS that you have in Report Builder to create a fancy report.
Once you have finished modifying the report, you can deploy the report to the sandbox folder.
- From the Build menu, select Deploy Mastering CM2012.
Moving Reports
When you are satisfied with the newly created report, you can move it from the sandbox folder to the folder where you have the canned Configuration Manager reports, as follows:
- Open a browser and connect to http://reportingserver/reports.
- Open the sandbox folder.
- Click Details View from the toolbar.
- Select the report and click Move from the toolbar.
- Browse to the destination folder containing the canned Configuration Manager reports.
- Click OK, and the report will be moved to the new location.
- Open the report properties and select Data Source.
- Browse to the folder containing the canned Configuration Manager reports, and select the shared data source.
- Click OK.
- Click Apply.
Linked Reports
A linked report is something you can create when you want to have several versions of the same report with different data. You can look at linked reports as you would cloning an existing report with the exception that a linked report inherits the layout and data source properties of the original report. Properties like parameters, subscriptions, and schedules can be changed in the linked report.
![]()
PROVIDING DIFFERENT TEAMS WITH THE SAME REPORT BUT DIFFERENT DATA
You need to provide managers from the desktop and server team with a monthly third-party software license reconciliation report in their mailbox. The managers need the same report but with data from different collections. From time to time, you have modified the layout of the report, and you do not want to do that on multiple reports. To meet the challenge you decide to create two linked reports derived from the canned report License 15A - General License Reconciliation Report. Here's how you create the first linked report:
- Open a browser and connect to http://reportingserver/reports.
- Open the Asset Intelligence folder.
- Click the drop-down arrow for the report License 15A - General License Reconciliation.
- Select Create Linked Report; notice that you can also do the same thing by opening the report properties.
- Type a descriptive name for the linked report like License 15A - Server License Reconciliation Report.
- Click OK.
- Open the properties for the new linked report (notice that by default you still have the properties for the original report open).
- Select Parameters.
- Check Has Default, and type the Collection ID in the Default Value field. You can find the Collection ID by viewing the collection properties in the Configuration Manager administrative console.
- Check Hide, and remove the check mark from Prompt User.
- Click Apply, and run the report.
Importing and Exporting Reports
One of the fastest and easiest ways to build reports into your Configuration Manager console is to import them from others who have already created the report you want. This technique allows administrators to share reports quickly and easily. Here is a list of some popular sites where you can download examples:
http://blog.coretech.dk/category/confmgr/config-mgr-inventory-and-reporting/ Contains ready-made reports to download and import. Offers step-by-step descriptions of how to create and modify reports.
http://myitforum.com/cs2/blogs/sthompson/default.aspx Personal blog of Steve Thompson, long-time Configuration Manager and SQL MVP. Steve publishes full reports as well as useful troubleshooting tips.
http://www.myitforum.com Large online System Center community where you will find several community leaders and contributors posting reporting solutions.
Please see the Microsoft Technet Library article detailing how to create custom reports by using SQL Server Views in System Center 2012 Configuration Manager at http://technet.microsoft.com/en-us/library/dn581954.aspx.
Note that there are many other community websites that contribute with the SQL reporting knowledge base and the previous list provides just a base reference.
Importing Reports
Unlike in previous versions of Configuration Manager, you will not be able to import reports using the Configuration Manager console. Instead you will use Report Manager and upload an RDL file as described here:
- Open a browser and connect to http://reportingserver/reports.
- Open the ConfigMgr_<SITECODE> folder.
- Click New Folder, and enter a name like Mastering Configuration Manager 2012. Click OK when finished.
- Open the newly created folder and click Upload File.
- Click Browse, select the report file, and click Open.
- You can type a new name for the report; click OK when finished.
It is very likely that the data source specified in the report is not valid and needs to be changed after the import.
- Hover the mouse over the right side of the report to access the drop-down arrow, and select Manage.
- Select Data Sources.
- Select A Shared Data Source and click Browse.
- Navigate to the Configuration Manager site folder, and select the data source.
- Click OK.
- Back in Data Sources, click Apply.
The newly imported report is now ready for use and will also be imported into the Configuration Manager administrative console.
Exporting Reports
Exporting reports also requires that you use Report Manager and download the report as described here:
- Open a browser and connect to http://reportingserver/reports.
- Open the Configuration Manager 2012 folder.
- Navigate to the report you want to export.
- Open the report properties as explained previously in this chapter.
- Select Properties and click Download.
- Click Save, and save the RDL file to a location of your choice.
The Bottom Line
Install the Reporting Services point. Installing a Reporting Services site system within Configuration Manager allows not only administrators but everyone to view reports in some fashion either via different file formats or a direct link within the Report Manager Website.
Master It What is the procedure to enable Reporting with Configuration Manager?
Manage reporting security. Reporting security is an integrated part of the built-in security. You provide users with access to reports by adding them to a predefined security role or by creating a custom role with permissions to run or modify reports.
Master It Add users to a built-in security role.
Create and manage report subscriptions. Creating subscriptions can be very helpful in many scenarios. You can configure subscriptions from Report Manager or in the Configuration Manager console.
Master It Create an email-based subscription.
Create custom reports. Creating custom reports can be helpful in many scenarios. You will quickly find that the canned reports are very useful but may be limited for all your needs.
Master It Create a custom report.