Section 10
Loading a Warehouse
- Lesson 60: Dimension Load
- Lesson 61: Fact Table Load
Chapter 60
Dimension Load
If you have a data warehouse, you’ve probably been thumbing through this book looking for a way to load your dimension tables. Luckily, what used to take thousands of lines of code is now done with a simple wizard in SSIS. This Slowly Changing Dimension (SCD) Wizard is a Data Flow object that takes all the complexity out of creating a load process for your dimension table.
Before we discuss the Slowly Changing Dimension Wizard, you must understand a bit of terminology. The wizard can handle three types of dimensions: Type 0, Type 1, and Type 2. Each of these types is defined on a column-by-column basis.
- A Type 0 (Fixed Attribute) dimension column does not allow you to make updates to it, such as a Social Security number. Even if the source value changes, the change is not propagated to a fixed attribute.
- A Type 1 (Changing Attribute) dimension handles updates, but does not track the history of such changes.
- A Type 2 (Historical Dimension) dimension tracks changes of a column. For example, if the price of a product changes and it’s a Type 2 column, the original row is expired, and a new row with the updated data is created.
The last term you need to be familiar with is inferred members (also called late arriving dimension members). These happen when you load a fact table and the dimension data doesn’t exist yet, such as if you are loading a sale record into the fact table when the product does not exist. Perhaps you get the product data from one server and the sales information from another. The server with the product data was unavailable, but the sales server was available. You, therefore, imported sales information, but were unable to update the product table. There may have been a sale for a product that you were unable to load. In that case, your fact load should create a dimension stub record in the dimension table. When the dimension record finally comes from the source, the transform updates the dimension as if it were a Type 1 dimension, even if it’s classified as a Type 2.
To use the Slowly Changing Dimension Wizard, you should first create a Source and Destination Connection Manager, and then create a source component in your Data Flow. Then drag the SCD Transform onto the Data Flow window and connect it to the source. After connecting it to a source or another transform, double-click the transform to open the Slowly Changing Dimension Wizard. The first screen (Figure 60-1) specifies which destination you want to load. First, select the destination connection manager, then the destination table, and then map the source input columns to the target dimension columns. Lastly, select one key to be your business key (the primary key from the source system is sometimes called the alternate key or the business key).

In the next screen (shown in Figure 60-2), assign a type to each column. These are the slowly changing dimension types discussed earlier. The SCD Wizard calls dimension Type 0 a Fixed Attribute, Type 1 a Changing Attribute, and Type 2 a Historical Attribute. This example uses List Price as Historical. All others will be Changing.
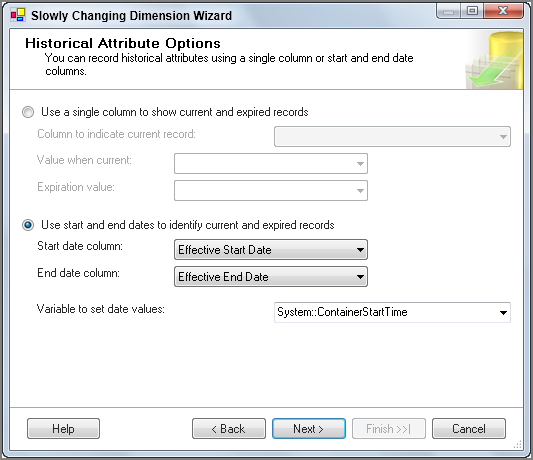
If any of those columns are set to a Historical Attribute, then in a few screens (shown in Figure 60-3) you are asked how you want to expire the row and create a new row. The top section enables you to define a column where you can set a value to Expired, Active, or whatever value you want. The bottom section sets a start date and an end date column to a date system or user variable. Don’t worry—all of this can be customized later. The end date column you choose must allow nulls. Current columns will contain null and expired columns will have a non-null end date. All of this is managed by the SCD Task(s).

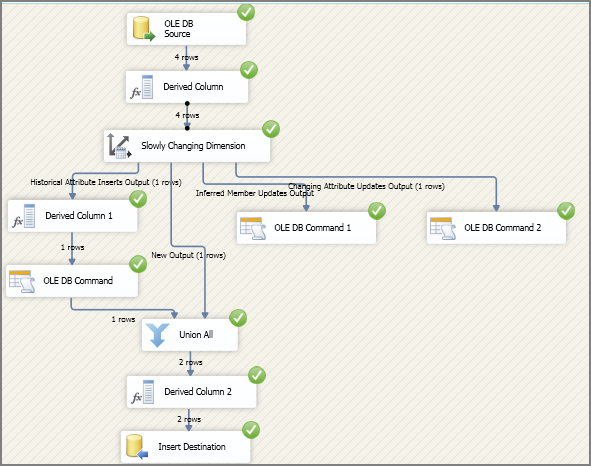
After you complete the wizard, the template code is created, and your dimension is ready to load. As the Data Flow Task runs, every row is checked to see if the row is a duplicate, new row, or a Type 1 or Type 2 update. Inferred members are also supported. All the code that you see can be customized, but keep in mind that if you change any code and rerun the wizard, the customization will be dropped and the template code will be recreated.
Try It
In this Try It, you learn how to use the Slowly Changing Dimension Wizard to load a new product dimension. You then make some changes to the source data and see the changes flow into the dimension table. After this lesson, you will understand how to load a dimension table using the Slowly Changing Dimension Wizard.
You can download the completed package and SQL scripts for this lesson from www.wrox.com.
Lesson Requirements
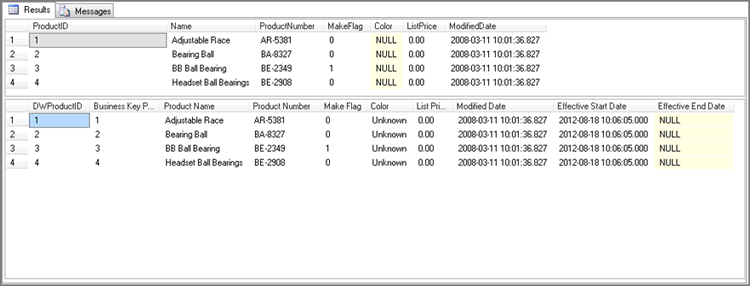
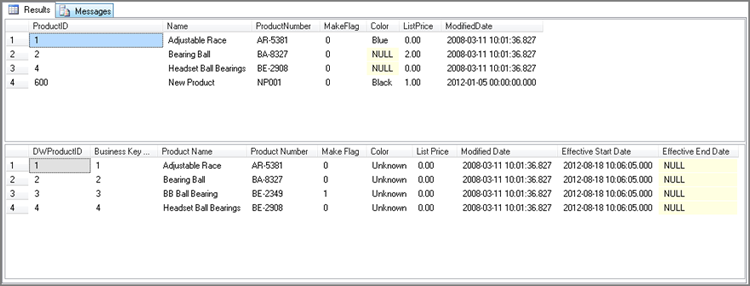
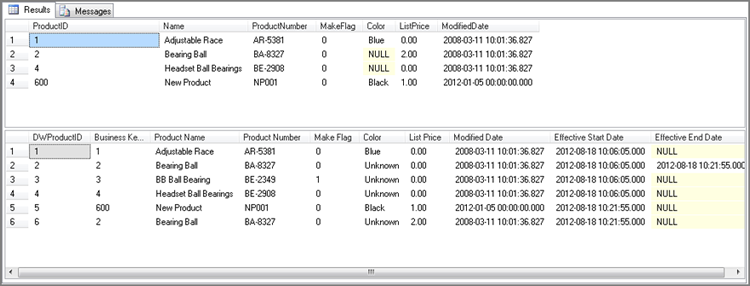
To complete this lesson, you must have permissions to create and drop tables from the AdventureWorks2012 and AdventureWorksDW2012 databases. To create and load the Lesson60ProductSource table and to create the Lesson60DimProduct table, run the Lesson60Create.sql script in Management Studio. (The Lesson60Create.sql creation script is available at www.wrox.com.) This script will load only four product rows, so it will be easy for you to see what is happening. You will use the Slowly Changing Dimension Wizard in your package. Your source table is Production.Lesson60ProductSource in the AdventureWorks2012 database. The destination table is Production.Lesson60DimProduct and is in AdventureWorksDW2012. The ListPrice column will be a Type 2 (Historical) dimension column. As a business requirement, you must replace null values in the Color column with the value Unknown. The Color column will be treated as a Type 1 (Changing) attribute. After you run the package, run Lesson60Update.sql to make changes to the source table. Then run the package again to propagate those changes to the destination dimension table.
Hints
- Use the OLE DB Source to pull data out of the Production.Lesson60ProductSource table.
- You can use the Derived Column Transform to change the Color column to Unknown if it is null.
- Use the Slowly Changing Dimension Wizard to load the dimension.
Step-by-Step
ISNULL(Color) ? “Unknown” : Color