
Chapter 57
Running SSIS Packages
When your packages are deployed, you’re ready to run them. In this lesson, you see how to execute a package from a variety of places like Management Studio and from the command line. You also see some of the key differences between 32- and 64-bit machines and some of the items that may not work on a 64-bit machine.
Before you begin, there is one important caveat for packages in the package deployment model deployed to the SQL Server. Even though your package is deployed onto a server, the package uses the resources and runs from whichever machine executes it. For example, say you deploy a package to your production server and then you connect through Management Studio and execute the package from your work laptop. In this case, the package will use your laptop’s resources, not the production server’s resources, to run the package and will likely overwhelm your laptop. For packages in the project deployment model, this will not be the case. They would run on the server, using its resources.
One way to run a package is through Management Studio. Simply open Management Studio and connect to the Integration Services service for packages in the package deployment model or to the database instance for those stored in the project deployment model.
Once connected, you can right-click any package and click Run Package (or Execute catalog packages) to execute the package.
Executing Packages in the Package Deployment Model
After you click Run Package, the Execute Package Utility opens. You can also access this utility by double-clicking any package in Windows Explorer or by just running DTExecUI. The tool wraps a command-line package executor called DTExec.exe.
When you first open the Execute Package Utility (shown in Figure 57-1), you see that the package is automatically selected for you in the General page. If you enter the tool by just typing the command DTExecUI, it does not have the package name already filled out. (This lesson covers the important pages in the tool and just touches on the pages that you’ll rarely use.)

The next page in the Execute Package Utility is the Configurations page. In this page, you can select additional configuration files that you want to use for this execution of the package. If you do not select an additional configuration file, any configuration files that are already on the server will be used. Even though you may have configuration files already defined in the package, the existing ones will not show in the list here. This is a place where you can only add additional configuration files.
The Command Files page passes additional custom command-line switches into the DTExec.exe application.
The Connection Managers page shows the power of connection managers. This page enables you to change the connection manager settings at run time to a different setting than what the developer had originally intended by simply checking the connection you would like to change and making your changes. For example, perhaps you’d like to move the AdventureWorks2012 connection for a package to a production server instead of a QA server. Another typical example is when you don’t have the same drive structure in production as they had in development and you need to move the connection manager to a different directory.
The Execution Options page is where you configure the package’s execution runtime environment, such as the number of tasks that will run in parallel.
The Reporting page controls what type of detail will be shown in the console. You may decide that you’d rather show only Errors and Warnings, which would perform slightly better than the Verbose message. You can also control which columns will show in the console.
The Logging page is where you can specify additional logging providers.
Another powerful page is the Set Values page. This page enables you to override nearly any property you want by typing the property path for the property. The most common use for this is to set the value of a variable. To do this, you would use a property path that looked like Package.Variables[VariableName].Value and then type the value for the variable in the next column. This page is also a way to work around some properties that can’t be set through expressions. With those properties, you generally can access them through the property path.
In the Verification page, you can ensure that the package will run only if it’s the correct build of the package.
The Command Line page is one of the most important pages in the interface. This page shows you the exact DTExec.exe command that will be executing. You can also edit the command here as well. After the command is edited how you like it, you can copy and paste it in a command prompt after the DTExec.exe command.

Keep in mind that on a 64-bit machine, you have two Program Files directories: C:Program Files (x86) for 32-bit applications and C:Program Files for 64-bit applications. A copy of DTExec.exe resides in each of these folders under Microsoft SQL Server110DtsBinn. If you must execute a package in 32-bit mode, you can copy and paste the command from the Command Line page to a command prompt and append this command after the word DTExec.exe (once you’re in the appropriate directory). For example, if you’re on a 64-bit machine, packages that use Excel at the time of this writing will not work. You’ll need to run those packages in 32-bit mode.
You can also execute the package by clicking the Execute button at any time from any page. After you click the Execute button, you see the Package Execution Progress window, which shows you any warnings, errors, and informational messages, as shown in Figure 57-2. You’ll only see a fraction of the message in some cases, but you can hover over the message to see it in full.
Running Packages in the Project Deployment Model
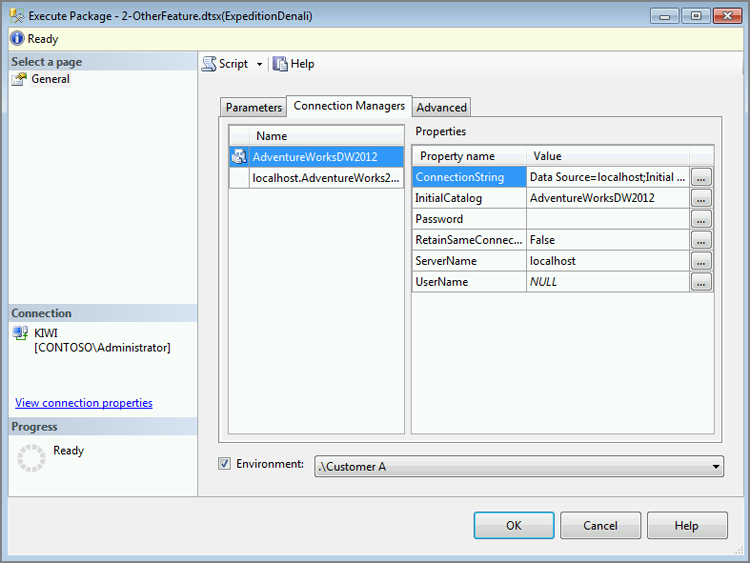
Running a package in the project deployment model involves connecting to the package catalog in the database instance. Once you are connected, right-click the package under the folder and project and select Execute, which opens the Execute Package dialog box (shown in Figure 57-3). In this General tab, you can change any parameter before you run the package. If the package is using an environment, you can also select the environment you want from the Environment drop-down box.

In the Connection Managers tab (shown in Figure 57-4), you can change connection managers for this execution. Any changes will not be kept permanently and will be rolled back after the execution. In the Advanced tab, you can also select to run the package only in 32-bit mode. Click OK once you’re ready to run the package.
Once you run the package, a message similar to what is shown in Figure 57-5 appears. This is telling you that the package has run, but not telling you if it was successful. In the next lesson, you’ll see more information about how to debug the packages that have run, but until then, click Yes in this dialog box to show if the package was successful.

Try It
In this Try It, you learn how to execute a previously created package and change some basic properties prior to execution. You have realized that the original developer of the package left old server information in the package, and you now need to point the connection manager to a different directory to see the file without modifying the package. After this lesson, you will understand how to run a package in Management Studio and change the properties to point to a new directory.
For this lesson you will need the ExpeditionDenali.zip project, which is available as part of the Lesson 53 download files from the Wrox website for this book at www.wrox.com.
Lesson Requirements
To simulate this problem, you are going to execute the package that was deployed and configured earlier in this lesson, 2-OtherFeature.dtsx, which is in the ExpeditionDenali project. Instead of connecting to the AdventureWorks2012 database, try to change the DatabaseName parameter to point to the AdventureWorksDW2012 database.
Hints
- Run the package in Management Studio by right-clicking the package and selecting Execute. Go to the General page to change the parameter.