
Chapter 37
Using the CDC Components in SSIS
Lesson 36 covered loading data incrementally. That lesson covered two patterns: an insert/update pattern and a delete pattern. Those patterns also apply when using the Change Data Capture (CDC) components.
In the prior lesson, you used a modified date to determine which rows were inserted or updated, and you used a lookup from the destination to the source to find the deleted rows. Change Data Capture components will identify which rows have been inserted, updated, and deleted. Using the patterns from the previous lesson, the CDC components will replace some of the manual reads and lookups that were used to identify the changed rows. With the insert/update pattern, CDC components will replace the Read Inserted Updated Rows from SourceDB and Lookup ProductdIDs in Destination tasks. These tasks from Lesson 36 are shown enclosed in a square box in Figure 37-1.
CDC components will replace the Read rows from Destination and Lookup ProductCategoryIDs in Source task in the delete pattern from Lesson 36, as shown in Figure 37-2.
Change Data Capture is a functionality that has been available in the SQL Server Engine since the 2008 version. Change Data Capture must be set up by an administrator on the source systems prior to use of the CDC components. CDC keeps track of insert, update, and delete activity for tables that are marked for CDC tracking. This information is made available to other applications via tables and functions. SSIS packages responsible for loading and maintaining data in data marts and data warehouses can use CDC functions as well as SSIS tasks specifically designed to consume and operate on CDC data.


Three SSIS tasks are related to CDC:
- CDC Control Task—Responsible for initial loading of data and maintaining incremental load status by keeping up with the Log Serial Number (LSN) associated with changes. This task also does some error handling.
- CDC Source Task—Reads data that has been inserted, updated, or deleted within a range and provides those rows to downstream consumers in your package.
- CDC Splitter Task—Accepts the Data Flow from the CDC Source Task and splits it into three separate Data Flows: one for insertions, one for updates, and one for deletions.
Primary target consumers for CDC information are data marts and data warehouses; other possible uses include replication, data auditing, and loading. Using CDC components provides a low-impact way to determine which rows have changed. It does this by reading the SQL Server transaction log. This is especially useful when the tables do not contain any meta data columns like ModifiedDate, CreatedDate, or LastUpdatedDate. CDC tasks also simplify the use of Change Data Capture functionality within SQL Server.
When planning Change Data Capture, you must plan for two pieces of work: the initial load and the incremental load.
- The initial load is when the tables are loaded with data for the first time. During this one time load, all rows are copied from the source to the destination.
- The incremental load is when you find the rows which have changed since the last load, and update them in the destination. After the initial load, only new or changed rows are moved to the destination.
You can do the initial load in three different ways:
In this lesson, we take you through load scenario 3. Although this type of loading is the most complicated, it is not difficult, and load scenarios 1 and 2 are even easier.
The goal of the initial load is to add all of the rows from the source table into the destination. Imagine you do an initial load on Sunday night. Both the source and destination tables match. During the day on Monday, changes are made to the source table—rows are inserted, updated, and deleted. Monday night, you must find the inserted, updated, and deleted rows in the source, and make the appropriate changes in the destinations. This is called the incremental load. At the end of the incremental load on Monday night, the source and destination tables match again.
In the Try It section, you will do the both initial load and the incremental load. First we will look at the three SSIS tasks which you will use to do these loads. The tasks are the CDC Control Task, the CDC Source Task, and the CDC Splitter Task.
CDC Control Task
When planning the use of these components, you will probably need to maintain more than one table. Using these CDC tasks, groups of tables can be maintained together. You will create an initial load package and an incremental load package for each group. The incremental load will contain a CDC Source for each table in the group.
Which tables should be together in a group? A group of tables must load to the same destination. Tables that have primary/foreign key relationships should be in the same group to avoid referential problems in the destination. Tables with the same requirements for data recency should also be together. In general, groups that need to be updated frequently should contain a smaller number of tables than groups that are processed less frequently. For example, if a group of tables needs to be loaded once a week, placing them in a separate group can reduce system load.
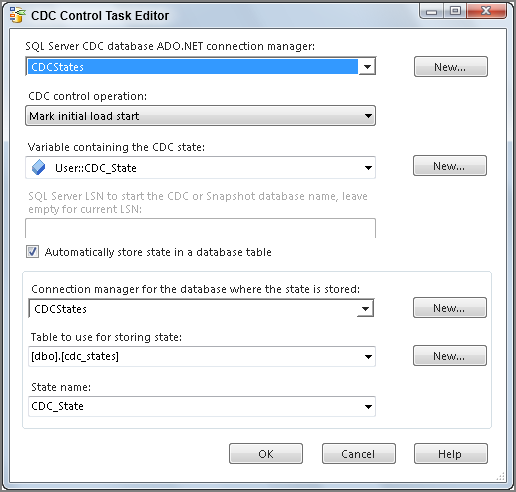
There must be a way to maintain information about what data is new and what data has already been processed by prior package runs. The CDC Control Task does this by maintaining Log Sequence Number (LSN) information. The task can also persist this state information in a database. This allows for the state to be maintained across multiple packages and between multiple package runs. As you begin to create your packages, you will set up your CDC Control Task to persist state in a database and provide it to your packages in a variable.
CDC Source Task
The CDC Source Task reads the change data for a group of tables, and passes rows for a single table of your choice. In your Incremental Load Data Flow, you will have a CDC Source for each table in the group. Figure 37-3 shows a Data Flow Task with CDC Sources for Product, ProductCategory, and ProductSubcategory. These tables would be in the same group because they have primary/foreign key relationships. You will define your insert, update, and delete code for each source independently, and they will be processed in parallel.

The CDC Source Task is not used in the initial load. The Data Flow source and destination for the initial load will not be the CDC Source Task—you will use the OLE DB Connections for these. If you do try to use the CDC Source Task here, you will get an error.
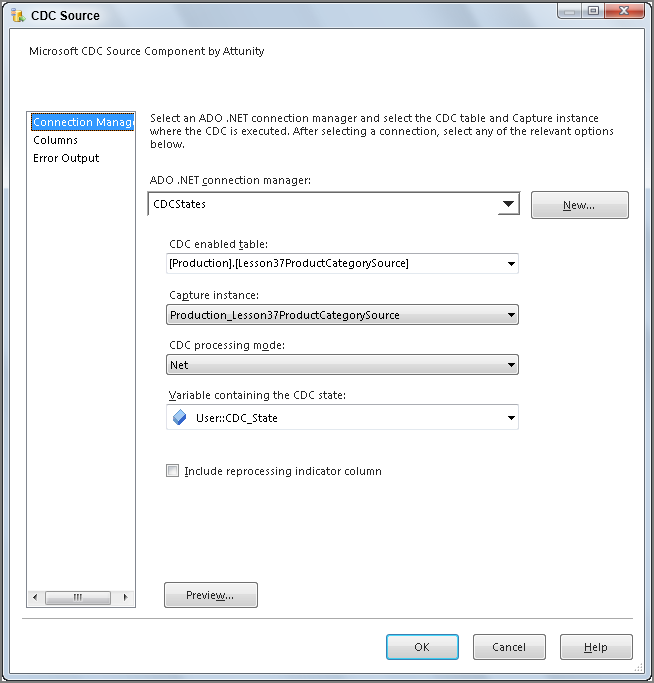
For the CDC Source Task, you must provide the CDC Source with a capture instance. A specific CDC-enabled table may have up to two capture instances. This allows you to continue change capture during a table schema change, one instance stores the before schema change data, and the second contains the after schema change data. Since we will not change the table schema during the Try It, your table will have one capture instance. You also provide a user variable where the task will store the CDC state information. This variable must be a string data type.

You must also choose a CDC processing mode. The processing modes shown in Figure 37-4 are:
- All—Returns a row containing the new values for each change in the current range. If a row is changed several times, a row is returned for each change.
- All with old values—Returns rows for each change in the current range. Two rows are returned for each update: one with the original (old values) and one with the updated values (new values). If a row is changed multiple times, two rows are returned for each update.
- Net—Returns a single row for each change in the current range. If a row is updated multiple times, only the most recent version of the row is returned. If a row is inserted and then updated in the range, only the updated version is returned. A row that is updated and then deleted is returned as a single delete. A single source row appears only once in the stream; the changes are split into three separate paths: insert, update, and delete.
- Net with update mask—Similar to Net, but includes boolean columns that indicate which column values have changed. The added columns are named _$<column-name>_Changed.
- Net with merge—This is also similar to Net, except that inserts and updates are merged into a single Merge operation. This is for use with Merge or Upsert Tasks.
The CDC Source Task also includes a check box where you can request a reprocessing indicator column. When checked, your returned rows include a column indicating if this row is being reprocessed. This allows you to handle errors differently. You may choose to ignore the deletion of a non-existent row, or the insertion of a row that returns a duplicate key error—the types of errors you might receive when reprocessing data. These values are set when your processing range overlaps the initial load or when you reprocess a range that failed in a previous run of the package. This dialog box is shown in Figure 37-5.
CDC Splitter Task
The CDC Splitter Task is the other CDC-related Data Flow Task. The splitter takes the Data Flow from a CDC Source component and splits it into different data streams for insert, update, and delete. Splits are based on a column named _$operation. This column contains values from the CDC change tables maintained by SQL Server. These values are:
- 1—Deleted row
- 2—Inserted row (not available using Net with merge)
- 3—Updated row before values (only available with All with old values)
- 4—Updated row after values
- 5—Updated - merge row (only available with Net with merge)
Any other value is an error.
Try It
In this Try It, you do an initial and incremental load of a single table using the CDC components. A script creates the source and destination tables using Production.ProductCategory data. It also loads the source table. You create an initial load package and ensure the initial synchronization is completed successfully, then you create an incremental load package, make changes to the source data, and do the incremental load. The tables, data, and changes for this Try It are the same as the ones in Lesson 36, so you can easily compare the methods used in both lessons. After completing this Try It, you will understand how to keep the data in your data warehouse or data mart tables up-to-date, using the three CDC tasks in SSIS.
You can download the completed Lesson 37 examples and sample code from www.wrox.com.
Lesson Requirements
You must have sysadmin permissions on your database server to set up CDC and create tables. Additionally, SQL Server Agent must be running. To do the CDC setup and create the Lesson 37 tables, run the Lesson37Create.sql script in SQL Server Management Studio (SSMS) before you begin the Step-by-Step. Again, all scripts and the completed package for this lesson are available for download on the book’s website at www.wrox.com.
Hints
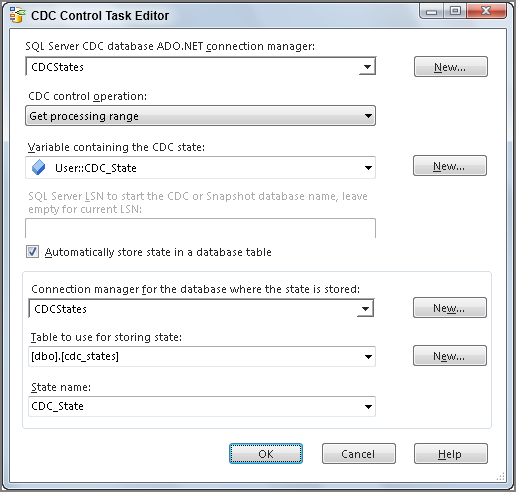
- The CDC Control Task manages the date ranges and keeps up with the status of your CDC group. This control provides the range to the CDC Source Transform.
- Use the CDC Source Transform to retrieve the rows that have been inserted, updated, or deleted during the range.
- Use the CDC Splitter Task to generate an insert, update, and delete data stream.
- Use the OLE DB Destination to insert new rows in the destination table.
- Use the OLE DB Command to update rows in the destination table that were updated in the source.
- Use the OLE DB Command to update rows in the destination that should be marked as deleted.
Step-by-Step
You create the initial load package as follows:


Now that the initial load is complete, you can create the incremental load package:


UPDATE  [Production].[Lesson37ProductCategoryDestination] SET
Name = ?,
ModifiedDate = ?,
[Deleted Flag] = 'F'
WHERE ProductCategoryID = ?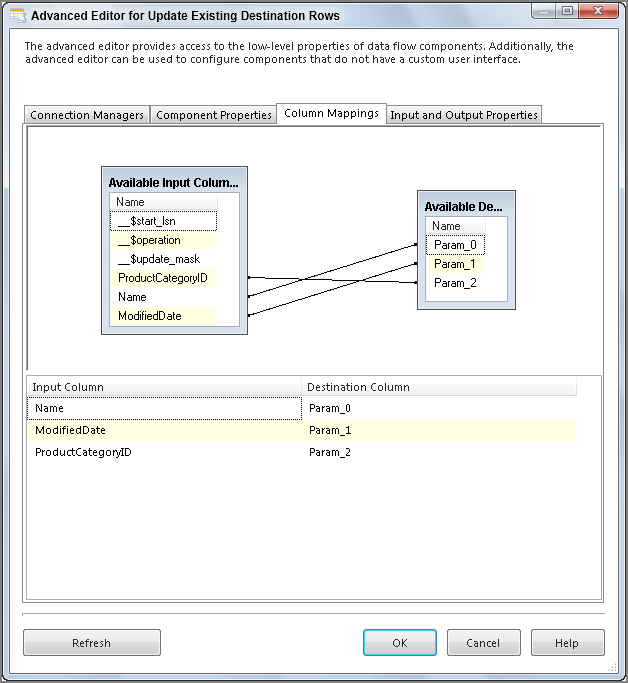
UPDATE  [Production].[Lesson37ProductCategoryDestination] SET
[Deleted Flag] = 'T'
WHERE ProductCategoryID = ?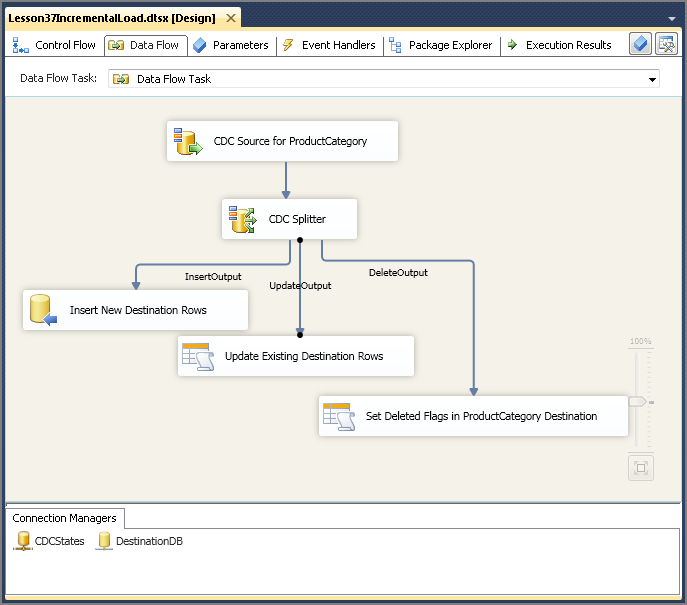


If you run your incremental package again, you should see a successful completion with no rows changed.