Section 5
Common ETL Scenarios
- Lesson 36: Loading Data Incrementally
- Lesson 37: Using the CDC Components in SSIS
- Lesson 38: Using Data Quality Services
- Lesson 39: Using the DQS Cleansing Transform
- Lesson 40: Creating a Master Package
Chapter 36
Loading Data Incrementally
Importing an entire table each time you run a package is the simplest way to work, and creating a package to do this is easy. Replacing the whole table is sometimes called a wipe and load. However, if the table is very large, your package may run for a long time. Instead of replacing the entire table, you can find the changes in the table and make the same changes in the destination table. This is called an incremental load. Generally, an incremental load runs much more quickly than a complete load. This is especially true if your source table is very large and few rows are changed each day. Incremental load packages generally handle inserts and updates from the source table. Rows that have been added to the source table will be inserted into the destination table. Rows that have been changed in the source table will be updated in the destination table. What will you do in the destination when rows are deleted from the source? You may choose to delete them in the destination, set a deleted flag to True but not delete the row, or you may choose to ignore source deletes. In a data warehouse dimension load, it is common to ignore deletes.
How will your package know which rows have been inserted, updated, or deleted in the source? Sometimes the source is audited and you will have a history table that provides the needed information. However, this is rare. Sometimes, source tables will have created and updated date columns, which indicate when rows were inserted or updated.
Absent these datetime columns, you must either keep shadow copies of the source table data, or use a Change Data Capture (CDC) technique.
NOTE Lesson 37 covers the CDC components in SSIS.
If you want to handle deletes, it is likely that you will have to look for rows in the destination table that do not exist in the source. If a row exists in the destination, but not in the source, it must have been deleted from the source, so you would then delete it from the destination. You can do this by scanning the actual destination table, or by keeping a copy of the key values that exist in the destination table in a staging area. Using a key table in staging reduces the impact of lookups on the destination and allows the package to run more quickly.
When your package runs, it should find those rows in the source that have been inserted, updated, or deleted within a time range. It is very common for these packages to run nightly, gathering all of the changes from the prior day. As an example, the package may run every night at 2:00 a.m., looking for changes from midnight to midnight the prior day. You might store the last completed time range in a control table, and use that as the starting point for your next time range. You are going to look in the destination table for the most recent change and find all rows in the source with a modified date after that time and before midnight of the current day.
How you handle the time range is very important and is worth some thought and planning. Your package should always use a target range of time, bounded at both the beginning and the end. The package execution should begin after the target range end time.
The following example uses two patterns: the insert/update pattern and the delete pattern. A pattern is a generic example that you may use to solve other similar problems. You will work on a table called Lesson36ProductCategorySource. This lesson’s Try It provides the detailed instructions. For now, try to understand each pattern. The insert/update pattern is shown in Figure 36-1. This pattern handles rows that have been inserted or updated in the source during the time range.
Select a date range and store the values in variables called StartDate and EndDate. Then read all of the rows from the source table where the ModifiedDate is within the target range. The read query looks like:
SELECT ProductCategoryID, Name, ModifiedDate
FROM [Production].[Lesson36ProductCategorySource]
WHERE ModifiedDate > ? and  ModifiedDate <=?
The two question marks will be mapped to your StartDate and EndDate variables.
The Lookup Transform uses each row that comes from the source and attempts to look up a row with the same ProductCategoryID in the destination. If the row exists in the destination, it must be updated. If the row does not exist in the destination, it must be inserted.
The output from the Lookup Transform results in two paths: one path for rows to be inserted and another path for rows to be updated.
Now take a look at the delete pattern in Figure 36-2. The delete pattern handles the rows that have been deleted from the source table. Instead of deleting the corresponding destination rows, set the Deleted Flag column value to True (T).
The Data Flow reads the DestinationDB, selecting only the key of the Lesson36ProductCategoryDestination table. For each row, look up the corresponding row in the source table. If the row does not exist in the source table, it must have been deleted. Therefore, the Lookup No Match Output will contain the rows that have been deleted from the source. These are the rows you need to update in the destination. The OLE DB Command at the bottom of the flow does this work for you.
NOTE You may find that the OLE DB Command task is slower than other destination tasks. This is because the OLE DB Command task issues a SQL statement for each row, rather than a more efficient batch operation.
Try It
In this Try It, you learn how to do an incremental load. A script will create the source and destination tables using Production.ProductCategory data. The script will create both source and destination tables, then synchronize them with the same data. In the example, the initial load has been completed and you are writing the package that will handle future updates. A date range will be chosen. For rows that were inserted or updated during that range, the package will insert or update matching rows in the destination. It will also search for rows that exist in the destination, but not in the source, and mark those rows as deleted in the destination. After this lesson, you will know how to load data incrementally.
You can download the completed Lesson36.dtsx and all scripts for this lesson from www.wrox.com.
Lesson Requirements
You must have permissions within AdventureWorks2012 database to create tables. To load the Lesson36ProductCategorySource and Lesson36ProductCateogoryDestination tables, run the Lesson36Create.sql script in SQL Server Management Studio (SSMS). Run this script before you begin the “Step-by-Step.”
Hints
- Use the OLE DB Destination named DestinationDB to determine the beginning of your date range. The end time of the range will be midnight of the current day.
- Use the Lookup Transform to determine which rows have been inserted or updated during the range.
- Use the OLE DB Destination to insert new rows in the destination table.
- Use the OLE DB Command to update rows in the destination table that were updated in the source.
- Use the OLE DB Destination named DestinationDB to read the keys from the destination table.
- Use the Lookup Transform to determine which rows do not exist in the source.
- Use the OLE DB Command to update rows in the destination that should be marked as deleted.
Step-by-Step
1. Create a new package called Lesson36.dtsx.
2. Create an OLE DB Connection Manager to the AdventureWorks2012 database called SourceDB and another to AdventureWorks2012 called DestinationDB.
3. Create two variables called StartDate and EndDate. Their data type should be DateTime.
4. Drag an Execute SQL Task into the Control Flow and name it Get Date Range.
5. Double-click the task, set the Connection to DestinationDB, set the ResultSet property to Single row, and enter the following SQL into the SQLStatement field. The dialog box should look like
Figure 36-3.
SELECT ISNULL( MAX(ModifiedDate),'Jan 1, 1900') as StartDate
, CONVERT(DATETIME, CONVERT(DATE, GETDATE())) as EndDate
FROM [Production].[Lesson36ProductCategoryDestination]
6. Click the Result Set tab on the left and map the result set. Map StartDate to User::StartDate and EndDate to User::EndDate. Click OK to exit the dialog box.
7. Drag a Data Flow Task to the Control Flow window and connect the Get Date Range SQL Task to it by dragging the green line. Name the Data Flow Task Handle Insert Update and then double-click the Data Flow Task to open the Data Flow window.
8. Drag an OLE DB Source into the Data Flow window and name it
Read Inserted Updated Rows from SourceDB. Double-click it to open the editor. Choose SourceDB for the OLE DB Connection Manager and SQL Command for the Data access mode. Use the following for the SQL command text:
SELECT ProductCategoryID, Name, ModifiedDate
FROM [Production].[Lesson36ProductCategorySource]
WHERE ModifiedDate > ? and  ModifiedDate <=?
9. Click on the button named Parameters… on the right. You will create two parameters. Type 0 in the Parameters column for the first parameter. Set the Variables column value to User::StartDate and the Param direction to Input. Now create the second parameter. Type 1 in a new row in the Parameters column. Set the Variables column value to User:EndDate and the Param direction to Input.
10. Now click the Columns item on the left. Check all of the columns in the Available External Columns table and map each external column to the output column with the same name. Click OK to exit the editor.
11. Drag a Lookup Task onto the Data Flow window and connect the OLE DB Source Task to it. Name the task Lookup ProductCategoryIDs in Destination. Double-click the Lookup Task to open the editor. On the General window, choose the OLE DB Connection Manager, and choose Redirect rows to no match output in the Specify how to handle rows with no matching entries drop-down.
12. Click Connection on the left. Choose DestinationDB for the OLE DB Connection Manager, and select the Use results of an SQL query: radio button. Enter the following SQL into the text box:
SELECT ProductCategoryID
FROM   Production.Lesson36ProductCategoryDestination
13. Click Columns on the left. Drag ProductCategoryID from Available Input Columns to Available Lookup Columns. The results are shown in
Figure 36-4. Click OK to exit this editor.
14. Drag an OLE DB Destination onto the Data Flow, name it Insert New Destination Rows, and connect it to the Lookup No Match Output of the Lookup. You can do this by dragging the blue line and selecting the no match option when the dialog box appears. Click OK to exit.
Then double-click the Destination Task to open the editor. Choose DestinationDB in the OLE DB Connection Manager, choose Table, or view - fast load in Data access mode item, and choose [Production].[Lesson36ProductCategoryDestination] in Name of the table or the view.
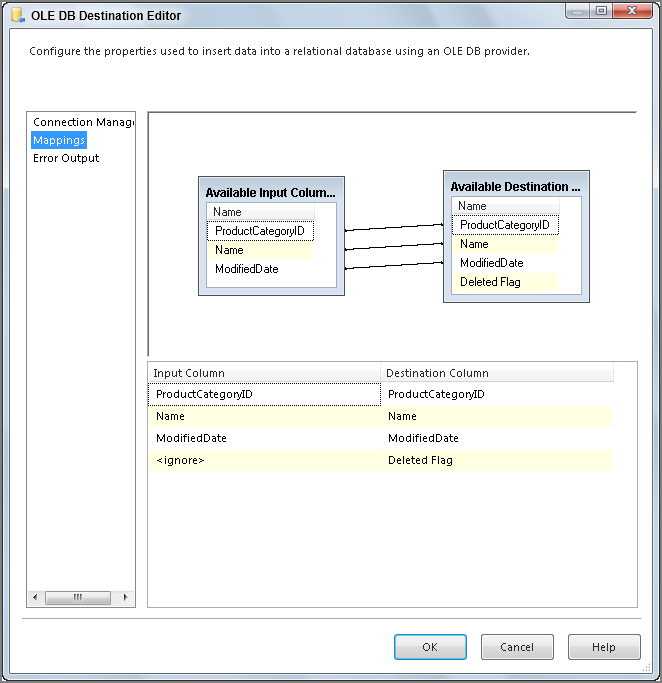
15. Choose Mappings and complete the mappings as shown in
Figure 36-5. Click OK to close the dialog box.
16. Drag an OLE DB command onto the Data Flow window and connect the Lookup Match Output to it. Name the command task Update Existing Destination Rows.
17. Double-click the task to open the editor. In the Connection Managers tab, choose DestinationDB for the Connection Manager.
18. In Component Properties tab, select the SqlCommand property and click the ellipsis that appears on the right-hand side. Use the following command in the String Value Editor that appears. Then click OK to exit the String Value Editor.
UPDATE  [Production].[Lesson36ProductCategoryDestination] SET
Name = ?,
ModifiedDate = ?,
[Deleted Flag] = 'F'
WHERE ProductCategoryID = ?
19. In the Column Mappings tab, set up the mappings as shown in
Figure 36-6. Then click OK. Remember that Param_0 is the first question mark encountered in the SQL string, Param_1 is the next question mark, and so on.
20. Your Data Flow Task should look like
Figure 36-1, the first figure in this lesson.
21. Now you handle the deletes. Drag another Data Flow Task onto the Control Flow window and name it Handle Deletes. Connect the Handle Insert Update Task to the Handle Deletes Task. Double-click the task to move to the Data Flow window.
22. Drag an OLE DB Source Task onto the Data Flow window and name it Read rows from Destination. Double-click the task.
23. Choose Destination DB for the OLE DB Connection Manager, SQL Command for the Data access mode, and use the following SQL in the SQL command text box:
SELECT ProductCategoryID
FROM [Production].[Lesson36ProductCategoryDestination]
WHERE [Deleted Flag] != 'T'
24. Click Columns on the left. Make sure the ProductCategoryID column is checked and mapped.
25. Drag a Lookup Task onto the Data Flow, name it Lookup ProductCategoryIDs in Source, and connect the Read rows from Destination Task to it by dragging the blue line. Double-click the task to open the editor. In the General window, choose Redirect rows to no match output in the bottom drop-down list.
26. Choose the Connection item in the list on the left. Choose SourceDB as the source. Select the radio button titled Use the results of an SQL query:. Enter the following SQL into the text box:
SELECT ProductCategoryID
FROM   Production.Lesson36ProductCategorySource
27. Choose the Columns item from the list on the left. Drag ProductCategoryID from Available Input Columns to Available Lookup Columns. Click OK to exit the Lookup Transformation Editor.
28. Drag an OLE DB Command Task onto the Data Flow window and name it
Set Deleted Flags in ProductCategory Destination. Drag the blue line from the Lookup Task to this task. A dialog box appears, asking whether the matching or not matching rows should be used. Select Lookup No Match Output, as shown in
Figure 36-7. Click OK to exit the dialog box.
29. Double-click the Command Task to open the editor. Choose Destination DB as the Connection Manager. In the Component Properties tab, select the SqlCommand property and then click the ellipsis on the right side to open a dialog box. Use the following SQL in the dialog box. Then click OK to close the String Value Editor.
UPDATE  [Production].[Lesson36ProductCategoryDestination] SET
[Deleted Flag] = ‘T’
WHERE ProductCategoryID = ?
30. In Column Mappings tab, drag ProductCategoryID from the Available Input Columns to Param_0 in the Available Destination Columns. Click OK to exit the editor.
31. Your Delete Data Flow should look like
Figure 36-2 earlier in this lesson.
32. Go to the Control Flow window. It should look like
Figure 36-8.
33. You should have already run Lesson36Create.sql while reading the lesson requirements earlier in the lesson. If you have not run it already, you can run it now. It will not hurt anything to run this script multiple times. This script creates the tables and populates them. It shows all rows in the source and destination tables. The result of this query is shown in
Figure 36-9. Both tables have the same data, except that the destination has the deleted flag with all values set to F. This places your tables in a state where the initial load has been done, and the tables are in sync.
34. Now execute the script Lesson36MakeChanges.sql. This script simulates user actions by changing the source table. The script updates the Bikes row, adds a new row called New Category, and deletes the Accessories row. Notice that the ModifiedDate column has also been updated. No changes are made to the destination table. Then the source and destination tables will be reselected so you can see the changes, shown in
Figure 36-10.
35. Now save and run your package. Look at your Handle Insert Update Data Flow window. You should see two modified rows that were read from the source. These were modified during the time range you specified. One of them was a new row, and the other was an update. These results are shown in
Figure 36-11.
36. Figure 36-12 shows that your Handle Deletes Data Flow read all rows from the destination. Searching for these rows in the source shows that one row was missing from the source. The Deleted Flag was set to True in the destination.
37. If you run the Lesson36Select.sql script, you will see the results shown in
Figure 36-13. ProductCategoryID 1 has its name updated. ProductCategoryID 2 and 3 were unchanged. ProductCategoryID 4, which was deleted from the source by users, has its deleted flag set in the destination. And the new ProductCategoryID 5 was inserted into the destination. Perfect!