Chapter 30
Handling Bad Data with the Fuzzy Lookup
More often than not, when you are working in the real world, data is not going to be perfect like it is in the AdventureWorks2012 database. Real-world situations call for cleansing dirty data or data that has abnormalities like misspellings or truncation.
Imagine you are attempting to retrieve a foreign key from a dimension table, but, strangely, you find rows without a match. Upon investigation, you find bad data is being supplied to you. One technique might be to divert these rows without matches to a table to be dealt with later; another might be to just add the bad data regardless of misspellings and other mishaps that occur during data entry.
The Fuzzy Lookup Transform, discussed in this lesson, and the Fuzzy Grouping Transform, discussed in the next lesson, gives other alternatives to dealing with dirty data while reducing your number of unmatched rows. The Fuzzy Lookup Transform matches input records with data that has already been cleansed in a reference table. It returns the match and can also indicate the quality of the match. This way you know the likelihood of the match being correct.
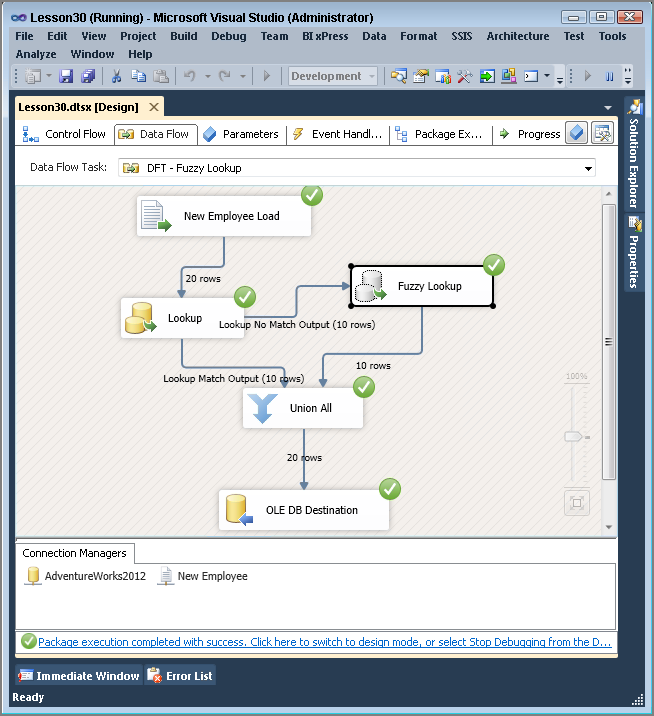
During the configuration of the transform, you must specify a reference table to be used for comparison. Figure 30-1 shows the reference table selection being made in the Fuzzy Lookup Transformation Editor. The transform uses this reference data and builds a token-based index (which, despite its name, is actually a table) before it begins the process of comparing entries.

Using the Fuzzy Lookup Transform requires at least one field to be a string, either a DT_WSTR or DT_STR data type. On the Columns tab in the editor, you need to map at least one text field from the input to the reference table for comparison.
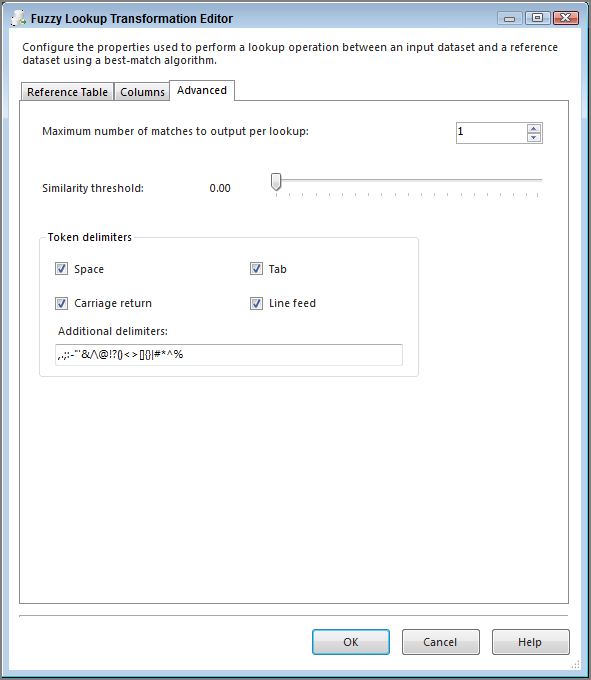
The Advanced tab contains the settings that control the fuzzy logic algorithms. You can set the maximum number of matches to output per incoming row. The default is set to 1, which pulls only the best record out of the reference table that meets the similarity threshold. Incrementing this setting higher than the default might generate more results that you’ll have to sift through, but it might be required if you have too many closely matching strings in your data. A slider controls the similarity threshold. When you are experimenting, a good strategy is to start this setting at 0.5 and move up or down as you review the results. This setting is normally decided based on a businessperson’s review of the data, not the developer’s review. If a row cannot be found that’s similar enough, the columns that you checked in the Columns tab will be set to NULL. The token delimiters can also be set if, for example, you don’t want the comparison process to break up incoming strings with a period (.) or spaces. The default for this setting is all common delimiters. See Figure 30-2 for an example of an Advanced tab.
The transform creates several output columns that you may or may not decide are useful to store in a table. Either way, they are important to understand:
- Input and Pass-Through Field Names and Values—This column contains the name and value of the text input provided to the Fuzzy Lookup Transform or passed through during the lookup.
- Reference Field Name and Value—This column contains the name and value(s) of the matched results from the reference table.
- Similarity—This column contains a number between 0 and 1 representing similarity. Similarity is a threshold calculated by comparing one word with another; you set this when configuring the Fuzzy Lookup Transform. The closer this number is to 1, the closer the two text fields match. A similarity of 1 would indicate an exact match.
- Confidence—This column contains a number between 0 and 1 representing confidence of the match relative to the set of matched results. Confidence is different from similarity; it is not calculated by comparing just one string against another, but rather by comparing the chosen string match against all the other possible matches. Confidence gets better the more accurately your reference data represents your subject domain, and it can change based on the sample of the data coming into the ETL process.
You may not want to use each of these fields, but it is important to appreciate the value they could provide.
Try It
In this Try It, you use the Fuzzy Lookup Transform to attempt to correct some bad data that you receive in a flat file. After this lesson, you should have an idea of how useful the Fuzzy Lookup Transform can be in cleansing your data.
You can download the completed Lesson30.dtsx and other sample files for this lesson from www.wrox.com.
Lesson Requirements
Create a table in the AdventureWorks2012 database named Occupation, using the following code (which you can find as part of this lesson’s download on the book’s website at www.wrox.com):
CREATE TABLE [dbo].[Occupation](
    [OccupationID] [smallint] IDENTITY(1,1) NOT NULL,
    [OccupationLabel] [varchar](50) NOT NULL,
 CONSTRAINT [PK_Occupation_OccupationID] PRIMARY KEY CLUSTERED
(
    [OccupationID] ASC
) ON [PRIMARY]
) ON [PRIMARY]

GO
INSERT INTO [dbo].[Occupation] Select ‘CUSTOMER SERVICE REPRESENTATIVE’
INSERT INTO [dbo].[Occupation] Select ‘SHIFT LEADER’
INSERT INTO [dbo].[Occupation] Select ‘ASSISTANT MANAGER’
INSERT INTO [dbo].[Occupation] Select ‘STORE MANAGER’
INSERT INTO [dbo].[Occupation] Select ‘DISTRICT MANAGER’
INSERT INTO [dbo].[Occupation] Select ‘REGIONAL MANAGER’
Download the flat file named FuzzyExample.txt from www.wrox.com to use as your source. Save this file to the C:ProjectsSSISPersonalTrainer directory. Correct the bad data from this flat file and insert it to a new table called EmployeeRoster.
Hints
- Remember the best practice tip mentioned earlier in this lesson. First, attempt to use a regular Lookup and then use the Fuzzy Lookup to catch the bad data.
Step-by-Step

CREATE TABLE [dbo].[Occupation](
    [OccupationID] [smallint] IDENTITY(1,1) NOT NULL,
    [OccupationLabel] [varchar](50) NOT NULL,
 CONSTRAINT [PK_Occupation_OccupationID] PRIMARY KEY CLUSTERED
(
    [OccupationID] ASC
) ON [PRIMARY]
) ON [PRIMARY]

GO
INSERT INTO [dbo].[Occupation] Select ‘CUSTOMER SERVICE REPRESENTATIVE’
INSERT INTO [dbo].[Occupation] Select ‘SHIFT LEADER’
INSERT INTO [dbo].[Occupation] Select ‘ASSISTANT MANAGER’
INSERT INTO [dbo].[Occupation] Select ‘STORE MANAGER’
INSERT INTO [dbo].[Occupation] Select ‘DISTRICT MANAGER’
INSERT INTO [dbo].[Occupation] Select ‘REGIONAL MANAGER’


CREATE TABLE [EmployeeRoster] (
    [EmployeeID] [smallint] IDENTITY(1,1) NOT NULL,
    [LastName] varchar(50),
    [FirstName] varchar(50),
    [OccupationID] smallint,
    [OccupationLabel] varchar(50)
)