
Chapter 28
Separating Data with the Conditional Split Transform
Sometimes you deal with source data that may require different treatments applied to it. For example, you want to generate a mailing list for a direct mail campaign, but you want to target only customers with children. You want to make sure to separate the customers without kids before preparing the list. You would also like anyone who has more than five kids to receive a buy-two-get-one-free coupon with the mailer.
The best way to separate data within a package to apply different types of actions is with the Conditional Split Transform. With this transform, you can send data from a single data path to multiple outputs based on conditions set in the Conditional Split Transformation Editor, shown in Figure 28-1. To open the editor, drag the transform in the design surface and double-click it.
The Conditional Split Transform uses the SSIS expression language to determine how the data pipeline should be split. For this example, all you need to know is that the Conditional Split Transform is checking to see if customers have more than five kids so they can receive the extra coupon.
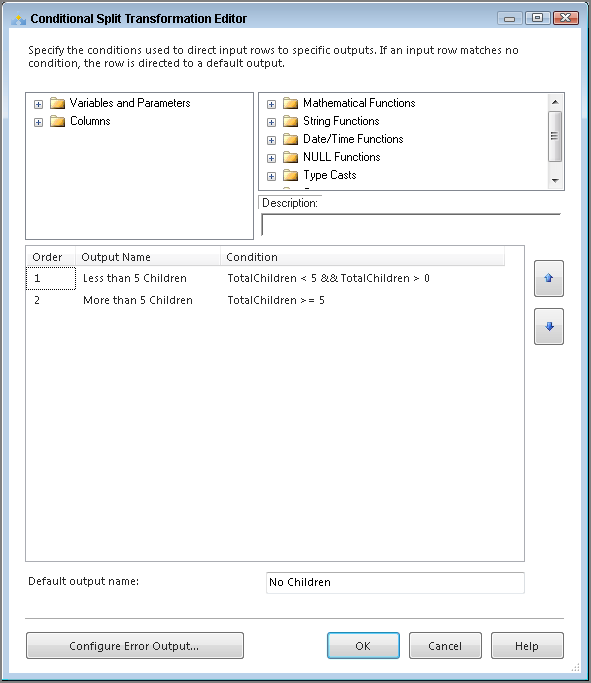
This check produces three possible outputs:
- For customers with more than five children
- For customers with between one and four children
- For customers with no children
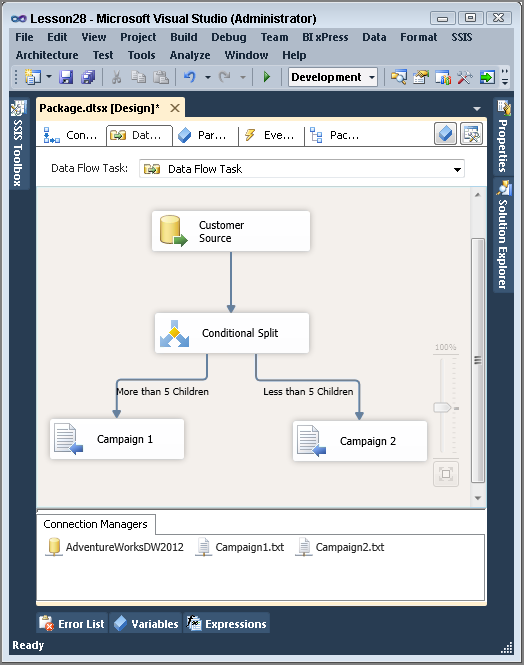
It may look like you have only two outputs, but if you look on the bottom of the Conditional Split Transformation Editor, the Default Output Name provides an output for data that doesn’t apply to the conditions declared. In the case of this package, you need only those customers with at least one child; you will see only these outputs in the final package (shown in Figure 28-2). You do not need to use the output for customers with no children.
Try It
In this Try It, your company needs a list of customers for a direct mail campaign that is only going to be sent regionally. You need to create an SSIS package that generates two different mailing lists because one region is going to receive a different promotion than the other. After completing this Try It, you will know how to split data within a package based on set conditions using the Conditional Split Transform.
You can download the completed Lesson28.dtsx from www.wrox.com.
Lesson Requirements
Create a new package named Lesson28 and make the following changes. (Again, you can also find the completed Lesson28.dtsx package at www.wrox.com.)
- Use the following tables from the AdventureWorksDW2012 database:
- DimCustomer
- DimGeography
- Bring back the following columns from DimCustomer:
- Title
- FirstName
- MiddleName
- LastName
- EmailAddress
- AddressLine1
- AddressLine2
- Phone
- Using the GeographyKey, use any method to join the DimCustomer and DimGeography tables together and bring back the following columns from DimGeography:
- StateProvinceCode
- PostalCode
- Create a Conditional Split with these conditions:
- Campaign 1—StateProvinceCode == “FL” || StateProvinceCode == “GA”
- Campaign 2—StateProvinceCode == “CA” || StateProvinceCode == “WA”
- Send these two outputs to two separate flat files to create the regional mailing lists.
Hints
- In the Data Flow, you need only one OLE DB Source to bring in customer data.
- You need a Lookup Transform to join geography data to each customer.
- Use a Conditional Split Transform to separate the different state codes.
- You need two separate Flat File Destinations for the results.
Step-by-Step
Select FirstName,
MiddleName,
LastName,
AddressLine1,
AddressLine2,
EmailAddress,
Phone,
GeographyKey
From DimCustomerSELECT GeographyKey, StateProvinceCode
FROM DimGeography
StateProvinceCode == "FL" || StateProvinceCode == "GA"StateProvinceCode == "CA" || StateProvinceCode == "WA"
