
Section 2
Control Flow
- Lesson 9: Using Precedence Constraints
- Lesson 10: Manipulating Files with the File System Task
- Lesson 11: Coding Custom Script Tasks
- Lesson 12: Using the Execute SQL Task
- Lesson 13: Using the Execute Process Task
- Lesson 14: Using the Expression Task
- Lesson 15: Using the Send Mail Task
- Lesson 16: Using the FTP Task
- Lesson 17: Creating a Data Flow
Chapter 9
Using Precedence Constraints

When using tasks in SQL Server Integration Services (SSIS), you need a way to connect these tasks in most cases. Precedence constraints are the connections between the tasks that control the execution order of each task. After you drag in more than one task in the Control Flow in SSIS, you can link them together by using these precedence constraints. Click once on a task, and you see a green arrow pointing down from the task; this is the precedence constraint line for this task. For example, in Figure 9-1, you can see a Script Task with a green arrow below the task. This is the precedence constraint arrow to connect to the next task you need to run after this task completes successfully. These arrows control the order of tasks in a package, and they also control whether tasks will run at all.

To create an On Success Precedence Constraint, click the green arrow coming out of the task and drag it to the task you want to link to the first task. In Figure 9-2, you can see the On Success Precedence Constraint between the two Script Tasks. Only if the first Script Task completes successfully will the second Script Task run. To delete the constraint, click once on the constraint line and press Delete on the keyboard, or right-click the constraint line and left-click Delete.

The precedence constraint arrows can be different colors to represent different commands. They can also have an FX logo to represent an expression, as shown in Figure 9-3. Placing expressions on precedence constraints gives you more advanced ways to control the execution of each package. For example, you could state that you want Script Task 1 to execute only if you’re processing a month-end cycle. Each color represents a status of when a task will execute:
- Green = On Success
- Red = On Failure
- Blue = On Completion
- Any color with FX Logo = Expression, or Expression with a Constraint

The arrows that connect tasks in a Data Flow tab look similar to the precedence constraints in the Control Flow. These Data Flow connections do not have the same properties as the Control Flow. Click a source or a transformation in the Data Flow tab, and you see a blue and red arrow pointing down, as in Figure 9-4 (though in this figure you won’t be able to see the colors). The blue arrow is the flow of good data, and the red arrow is the flow of data with errors. This allows data with errors to be sent to another destination separate from the good data.
In the Control Flow, you need to use a different approach. If you’d like the next task to execute only if the first task has failed, create a precedence constraint as explained previously for the On Success Constraint. After the constraint is created, double-click the constraint arrow and the Precedence Constraint Editor opens, as shown in Figure 9-5. This is where you set the conditions that decide if the next task will execute at run time. The first option you want to change is Value to Failure, which changes the precedence constraint to an On Failure event.

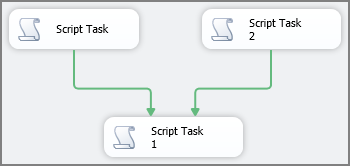
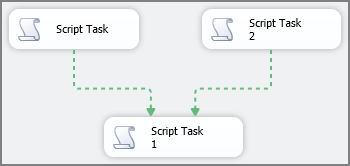
In the Precedence Constraint Editor, you can also set the logical AND/OR for the preceding task. SSIS gives you the option of adding a logical AND or a logical OR when a task has multiple constraints. In the Precedence Constraint Editor, you can configure the task to execute only if the group of predecessor tasks has completed (AND), or if any one of the predecessor tasks has completed (OR). A predecessor task is any task with a precedence constraint that is connected to another task. If a precedence constraint is a logical AND, the connecting lines are solid (Figure 9-6). If a precedence constraint is a logical OR, the lines are dotted (Figure 9-7), which allows the task to perform even if one or more predecessor tasks have failed.
In the Evaluation Operation drop-down box of the Precedence Constraint Editor, you can edit how the task will be evaluated. The drop-down menu has four options:
- Constraint—Evaluates the success, failure, or completion of the predecessor task or tasks
- Expression—Evaluates the success of a customized condition that is programmed using an expression
- Expression and Constraint—Evaluates both the expression and the constraint before moving to the next task
- Expression or Constraint—Determines if either the expression or the constraint has been successfully met before moving to the next task
If you select any constraint with an expression, the expression box requires a valid expression. An SSIS expression is most often used to evaluate a variable before proceeding to the next task. New in SQL Server 2012 is the ellipse button next to the expression. This button opens the Expression Builder, making it easier to write your expressions. Expressions are covered in detail in Lesson 14. One example of an SSIS expression is comparing two variables. This is done using the following syntax:
@Variable1 == @Variable2Try It
In this Try It, you create four Script Tasks in a package and control when they execute with precedence constraints. After this lesson, you will understand how to use precedence constraints to decide which tasks will execute in a package.
You can download the completed Lesson9.dtsx from www.wrox.com.
Lesson Requirements
Drag four Script Tasks into a blank package. The names of the Script Tasks will automatically be Script Task, Script Task 1, Script Task 2, and Script Task 3. Connect the Script Task so that Script Task 1 runs if Script Task is successful. Connect Script Task 1 to Script Task 2 with a success constraint. Connect Script Task 3 before Script Task 2 with a success constraint and run the package once with the logical constraints on Script Task 2 set to AND. Then change the logical constraint on Script Task 2 to OR and change the properties of Script Task 3 to Force Failure and run the package again. You should see a green check above Script Task 2 each time, indicating success.
Hints
- Script Task 2 should have two incoming precedence constraint lines.
- Look in the Properties window in the bottom right of Visual Studio to find the ForceExecutionResult property for the Script Task.


