
Chapter 6
Creating Your First Package
Creating packages in SQL Server Integration Services (SSIS) is a bit like LEGO-block programming. You drag various tasks over, configure the tasks, chain them together, and then voila, execute. Well, it’s not quite that easy, but you’ll find it much easier than writing any program. In this lesson, you learn how to create your first SSIS package. Granted, the package does very little here, but it shows you many of the concepts that will be critical throughout the rest of the book. Many of the concepts may not make complete sense yet when it comes to configuring various components, but no worries—the concepts are deeply covered throughout the rest of the book.
To create your first package, you need an SSIS project. Creating a project is covered extensively in Lesson 4. After you create your first project, a package called Package.dtsx is automatically created. If you want to rename this package, simply right-click the package in Solution Explorer and select Rename, leaving the .dtsx extension.
To create a new package, you can also right-click SSIS Packages in the Solution Explorer and select New Package. This action creates a new package that you will want to rename as soon as it’s created because it, too, will be called Package.dtsx or some variation of it. The final result will resemble Figure 6-1, which shows a partially complete SSIS project.

Creating and Using Connection Managers
To design a package, you want to first create connections, which are called connection managers in SSIS. A connection manager is a connection that can be leveraged and consumed once or many times in a package. To create a connection manager, right-click in the Connection Manager pane at the bottom of the screen in SSDT and select New <type of connection>. Any connection that you would use in SSIS, whether to a file or a database, will be stored as a connection manager here. Some of those common items would include the connections in the following table.
| Type of Connection | Connection Manager |
| Database | OLE DB Connection Manager for Oracle, SQL Server, DB2.ADO.NET and ODBC Connection Manager for ODBC types of connections and in some cases OLE DB Data Sources. |
| File | Flat File Connection Manager when you want to load the file using a Data Flow Task. There is also an additional connection manager called the File Connection Manager that you can use if all you want to do is rename, delete, or perform some other type of file operation. |
| Excel | Excel Connection Manager. |
| Internet Connection | SMTP Connection Manager for mail servers. FTP Connection Manager for FTP servers. HTTP Connection Manager for websites or web services. |
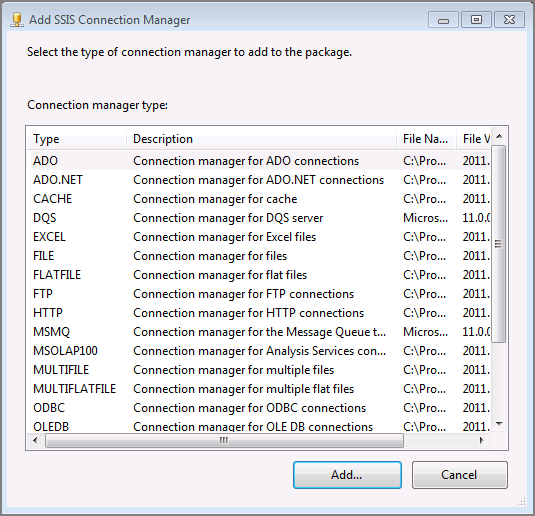
You can access some of the connections by right-clicking in the Connection Manager pane and selecting New Connection. This brings up a list of all the available connection managers (shown in Figure 6-2), including third-party ones that you have installed. The handy thing about connection managers is that they’re externally available to a DBA at run time. In other words, when a DBA goes to schedule this package, he or she can point the connection to a new database or file on-the-fly for that one job.
Once you create an OLE DB connection, it is available to you anywhere in the package from any component that can use the connection. If you’d like, you can create a connection that can be leveraged from multiple packages by creating a project connection manager. To do this, right-click Connection Managers in the Solution Explorer and select New Connection Manager. These data sources can be leveraged from multiple packages in the project and can be changed by the DBA later. By creating a connection here, you type the password one time for your connection, and if you ever change any type of connection information, it changes across any package using that connection. No negative consequences result from doing this, so generally speaking, it’s a great design-time practice to use project connection managers if you see yourself using the connection a few times.
Using and Configuring Tasks
Your package would be nothing without tasks. Tasks in the Control Flow tab orchestrate the work that you want to do in the package. For example, one task may copy a file over from a different server while another task may load the file into a database. To use a task, simply drag it onto the design pane in the Control Flow tab from the Toolbox. A common task that you’ll use in this book is the Script Task because it requires no configuration, which makes it a great training tool.

Until most tasks are configured by double-clicking the task, you may see a yellow warning or red error indicator on the task. After you configure the task, you can link it to other tasks by using precedence constraints. Once you click the task, you’ll notice a green arrow (the precedence constraint) pointing down from the task, as shown in Figure 6-3. This precedence constraint controls the execution order of the various tasks in your package, and you can use it by dragging the green arrow to the next task that you want to chain together. You read more about most of the core tasks and the topic of precedence constraints in Section 2 of this book.
You should never keep the default name of your tasks. Instead, you should rename them to something that you can recognize in the log later. We prefer to name all of our tasks with some two- or three-digit qualifier, such as SCR for a Script Task, and then the purpose of the task such as SCR - Encrypt File. This name then shows up in your logs when a problem occurs and can also help you self-document your package.
Exploring Package Encryption
A package is essentially an XML file behind the scenes. To prove this, you can right-click any package and select View Code to see the package’s XML. As you can imagine, though, storing secure information inside an XML file could create some security problems. Luckily, Microsoft already thought of that problem and has a solution—encrypting your packages.
Microsoft encrypts your package by default with your Windows user key, which is a key that protects your Windows user credentials on your PC. You can look at the property that encrypts your package by going to the Properties pane and looking at the ProtectionLevel package-level property. This property is set to EncryptSensitiveWithUserKey by default, which means that all the usernames, passwords, or any other sensitive data are locked down with your credentials. If you were to pass the package to another user, the package’s encrypted data would not be visible, and the user would have to retype the secure information, such as the login information.
Another option is to change the property to EncryptSensitiveWithPassword, which locks down the package with a password instead. You can also use EncryptAllWithPassword (or UserKey). This property value locks down the entire package to where no one can open it without a proper password.
Executing Packages
Once your package is ready to execute, you can run it in debug mode by right-clicking it in Solution Explorer and selecting Execute Package. By running the package in debug mode, you have enhanced logging views and breakpoints available to you to determine why your package is not working. While in debug mode, however, you will not be able to sizably change the package. To stop debug mode, click the Stop button or click Debug > Stop Debugging.
Try It
In this Try It, you learn how to create your first basic package that will do very little other than demonstrate some of the SSIS functionality.
You can find the complete package (Lesson6.dtsx) as part of the download for this lesson on the companion website for this book at www.wrox.com.
Lesson Requirements
To create your first package, you can reuse the project from Lesson 4 or create a brand new project. Once created, you’ll notice that one such package in your project is Package.dtsx. Rename or create a new package called Lesson6.dtsx that has two Script Tasks in it that are connected. One Script Task should be named Step 1 and the other Step 2. These two tasks will do nothing at all. Create a connection manager that points to AdventureWorks2012 and create a password on the package of your choosing that will always pop up when you open the package and execute it.
Hints
- Create a new package by right-clicking the word Packages in Solution Explorer in SSDT.
- Drag over the two Script Tasks and connect them together using the green precedence constraint coming out of the task.
