Chapter 2
The ESXi Hypervisor
Underpinning any design based on vSphere technologies is the hypervisor. ESXi host software drives vSphere deployments and makes guest virtualization possible. VMware's hypervisors have evolved rapidly over the years, and the basis of the enterprise offering has gone through a recent transition phase. It has emerged stronger on the other side with the new slim-line ESXi, more efficient, more capable, and more flexible than before.
This chapter looks closely at ESXi: what makes it tick and how to get it out across your organization. We'll dive deeply into its internal structure to understand the components that a design revolves around. There is an abundance of deployment choices, and these speak to the platform's growth and maturity. We'll compare the options, looking at the advantages of each and which may be more appropriate in different circumstances. The enterprise can now push ESXi out facilely and manage it consistently with effective policy management. So, we'll discuss the necessary configuration that is required in the design and how to effectively manage the hosts. The heart of any good vSphere architecture is a solid ESXi design.
In this chapter, you'll learn to
- Understand the evolution of the ESXi hypervisor from its ESX roots
- Understand all the components that make up the ESXi image and what makes ESXi unique as an operating system
- Deploy ESXi using the multitude of options, and the impact those options have on the resulting build
- Upgrade ESXi from previous versions, and how this affects the host configuration
- Migrate ESX hosts to ESXi
- Configure ESXi hosts and achieve the planned design
- Manage the resulting ESXi deployment
Evolution of the vSphere Hypervisor
vSphere 5 hosts run a solitary, unified hypervisor operating system. The hypervisor is the software that virtualizes the host's hardware and makes it available to multiple guest OSes. vSphere hosts are what is known as type 1 hypervisors, or bare-metal hypervisors. Unlike a type 2 (or hosted) hypervisor, which runs atop a standard OS such as Windows or Linux, a type 1 hypervisor runs natively on the physical hardware without the need for an intermediary OS. This gives the hypervisor direct access to the hardware, reducing the performance overhead of running on an intermediary OS, and without the security and stability issues that adding another layer to the stack brings.
VMware released its GSX (type 2) and ESX (type 1) products in 2001. VMware GSX was renamed VMware Server in 2006, and support ended in 2011; it followed a lineage close to that of VMware's other hosted products such as Workstation, Player, and Fusion. The ESX enterprise hypervisor steadily evolved over the years; the latest versions, 4.0 and 4.1, were released in 2009 and 2010, respectively.
When ESX 3.5 was released in December 2007, VMware also made the first public release of ESXi 3.5. This marked the first significant fork in the ESX model, and since then VMware has released both ESX and ESXi alongside each other until the arrival of vSphere 5. Ever since the initial release of ESXi, VMware made no secret of the fact that it planned to replace ESX with the newer ESXi product. However, with the announcement of version 4.1, the company proclaimed that it would be the last of the ESX line, and all subsequent vSphere hypervisors would be ESXi based. vSphere 5.0 marked the first ESXi-only release and the death knell of ESX.
Since the introduction of the competing vSphere host with a remarkably similar moniker, ESX began being referred to as ESX classic to help distinguish it from its ESXi brethren. They had disparate management designs, but ESX and ESXi had far more in common than they had differences because their hypervisors were based on the same underlying code.
Both products, with the exception of the free stand-alone ESXi version, were priced and licensed identically. ESX classic and ESXi hosts can still coexist in the same cluster at the same time and share resources among VMs. Unless you work hands-on with the hosts themselves, you may not notice the difference in the client when connecting to vCenter. VM administrators, storage or network teams, and IT managers may understandably be oblivious to the difference. However, if you design or manage vSphere hosts, then you'll be interested in the differences that ESXi brought.
VMware openly stated for some time that ESXi was the destiny of the company's bare-metal virtualization line. The reality is that there is no future in ESX; the sooner a business moves to ESXi, the less it will waste on developing processes around and supporting an end-of-life product.
ESX classic consisted of three main elements that ran on the physical hardware, providing the virtualized environment for the guest OSes. Analogous versions of two of these, the VMkernel and the Virtual Machine Monitor (VMM), are still found in ESXi. The third, the Service Console, is the key differentiator because it's no longer found in ESXi.
The Service Console, also known as the Console Operating System (COS) or VMnix, was the command-line interface and management console of ESX hosts. It was a modified Red Hat Enterprise Linux build and allowed user-privileged access to the VMkernel. It didn't have any direct access to the physical server and its hardware components, although additional hardware drivers could be installed within it. It also enabled scripts to be run and infrastructure, hardware, and third-party agents to run.
The ESXi Concept
The removal of the Service Console fundamentally changed what was possible with VMware's hypervisor. ESXi has a smaller and less demanding footprint, which means the hypervisor consumes fewer host resources to perform essentially the same functions. ESXi also uses significantly less disk space, whether local disk or boot-from-SAN space. The Service Console of ESX hosts effectively ran as a single vCPU guest, which meant all of its processes ran serially. With ESXi, those functions were moved to the VMkernel, meaning there is greater scope for those processes to run in parallel using much more sophisticated scheduling.
One unequivocal advantage of ESXi's reduced code base is the greater level of security it brings. An ESX install came in at around 2 GB of installed files, whereas ESXi currently is near 125 MB. It's easy to see that so much less code means less to keep secure with a smaller attack vector. The Service Console provided additional software that had to be secured, which ESXi avoids.
With fewer patches to apply, ESXi reduces the frequency of host-server reboots and lessens the administrative burden of regular patching. Any large enterprise with a sizable collection of ESX hosts will be only too familiar with the seemingly never-ending cycle of host patching. ESXi patches come as a single relatively small file, as opposed to ESX patches, which could be very large. Patching is also easier to manage if hosts are spread across several remote sites, particularly where slow WAN links cause issues with vCenter Update Manager's (VUM's) ability to push out these large packages. Another advantage with ESXi's patches is that they come as a single firmware-like image that updates everything. Compare this to ESX patches, which came in multiple updates, potentially with dependencies on previous patches, and required multiple reboots.
An ESXi host is also more reliable than an ESX classic host. It effectively has less code to go wrong and fewer processes running over and above the VMs. The ability of the Service Console to run third-party agents was a double-edged sword, because although it allowed you to add extra functionality, some of the available agents caused stability issues on hosts. The inability of ESXi hosts to run unmanaged code means this is no longer a concern. Additionally, the dual-image nature of ESXi means there is always a standby bootable copy of the OS to roll back to, should you have any problems with an update.
ESXi brings with it the possibility of running hosts in a practically Stateless mode, meaning host servers are more comparable to hardware appliances. The deployment techniques available for ESXi are similar to those for ESX, but the install is considerably easier. You're prompted for very little information, and the install time is incredibly short. You don't need to understand the nuances of a POSIX filesystem and how best to carve up ESX's partitions. Even rebooting an ESXi server takes considerably less time than rebooting an equivalent ESX classic host.
The simplification of host management, with no need to understand a Service Console when configuring and troubleshooting, means a lower entry bar for staff to install and maintain new vSphere environments. The simple Direct Console User Interface (DCUI) screen is more comparable to a BIOS setup screen and far less intimidating to staff unfamiliar with Linux. If a problem exists in a remote office and there are no remote access cards or a keyboard, video and mouse (KVM) switch, then it's more feasible that an onsite employee might be able to assist in restarting a management daemon.
ESXi has so many advantages that it's clearly the better option for VMware and the company's customers moving forward. Despite the many ESX classic installations that still exist awaiting migration to ESXi, clearly the smart option—the only option—is to deploy ESXi. Thanks to vSphere's inherent abstraction, migrating VM workloads is relatively trivial and pain-free.
ESXi Design
The ESXi hypervisor shares many common elements with its older big brother ESX classic, but the main differentiator is that the Linux-based Service Console was stripped out. ESXi retains VMkernel and VMM components similar to ESX but has additional features built into the VMkernel; a new, much smaller management console; and other user-mode processes to replace the old Service Console OS functionality.
ESXi was redesigned this way to allow VMware users to scale out through a hypervisor that is more akin to a hardware appliance. The vision was a base OS that is capable of autoconfiguring, receiving its settings remotely, and running from memory without disks. But it's also an OS that's flexible enough to be installed on hard disks along with a locally saved state and user-defined settings for smaller, ready-to-use installations that don't require additional infrastructure.
Removing the Service Console obviously had an impact. A number of services and agents that were normally installed had to be rethought. The familiar command-line interface with its access to management, troubleshooting, and configuration tools is replaced in ESXi. And the Linux-styled third-party agents for backups, hardware monitoring, and the like must be provisioned in different ways.
ESXi Components
The ESXi OS is built on three layers. It achieves the same VM environment as ESX classic, but it has some significant architectural differences:
Important—and something that differentiates ESXi from many common OSes—is the fact that because the entire OS is loaded into memory when it boots up, these user-space worlds are never swapped to disk. However, these worlds can be controlled via resource pools much the same as VMs. They have CPU and memory reservations, shares, and limits. This presents an advantage over the way ESX classic worked, where the Service Console ran as one world and a single Service Console agent using excessive memory could affect other processes. This is why Service Console memory was often increased to the maximum amount, to try to prevent the hostd process from being swamped. With ESXi, these processes are better protected.
ESXi Agents
The VMkernel runs several noteworthy agents and daemons:
The last three processes are examined in more depth later in the chapter to show the effect these tools can have on the host's management.
ESXi System Image
Before we explain the installation and deployment options of an ESXi design, it's important to understand the structure of the ESXi image. The system image is a bootable image that is loaded into memory and runs the hypervisor. The ESXi installer uses this same system image to copy the files onto a bootable device for future boots (into the /bootbank partition). On its first boot, the image auto-discovers the hardware and runs an autoconfiguration based on the type of installation used. The system image can boot from CD, PXE, local disk, USB storage (USB flash key or SD card), FC, FCoE or iSCSI SAN (boot from SAN).
In addition to a handful of files used to bootstrap ESXi, an ESXi system image includes two main sets of files:
As each VIB is extracted, it's overlaid onto the filesystem. As archives are consecutively laid down, only the latest changes are visible. If an archive is removed, then the previous branch is visible in the filesystem.
The last archive to be overlaid is called the state archive (state.tgz). This archive contains all the configuration settings, such as the /etc files. The state archive doesn't exist on the ISO image, because there is no nondefault configuration at that stage, but is created on initialization. To save excessive wear on the boot disk, which may be flash based, the state archive file is only updated to disk when a configuration change occurs. This is commonly every 10 minutes but is limited to no more than 6 backups every hour. This means some very recent changes may not survive a host crash (an update to disk does occur before reboots, though). This state archive tardisk forms the basis of the backup and restore routines.
Because the image is loaded into memory, it doesn't rely on its boot device when it's running. This means the boot device can fail or become disconnected, and the OS will continue to run. Changes that are made to the filesystem but that don't modify the system image are lost after a reboot. All added components and configuration changes must update the image in order to be persistent or must be reloaded each time.
ESXi allows only authorized code, and these modules have to be digitally signed by VMware. This restriction on VMkernel extensions helps to secure the environment, preserve system resources, and maintain a tight codebase.
Vendor-Specific Images
The main server vendors produce their own customized system images. These ISO images are enhanced versions of the regular VMware system images, with hardware-specific additions. They can include new or improved hardware drivers, extra CIM plug-ins to provide better hardware monitoring, and added support information.
ESXi Customized Images
You can customize your own ESXi images. This can be useful, because the VMware provided system image can become outdated. VMware releases patches but usually doesn't release a new image until a less frequent update is provided. By creating a customized image, it's possible to slipstream in several patches. Additionally, the standard system image may not include all the drivers or hardware CIM providers, or those included may be obsolete and require refreshing. It's possible that for newly released hardware, the standard image might not even install without the addition of special drivers. Extra plug-in software such as the HA agent, which is normally pushed from vCenter, or authorized third-party solutions can also be fed into the image.
To allow the creation of customized ESXi images, VMware released a new tool with vSphere 5 called Image Builder. Image Builder is a set of PowerCLI commandlets that package together installation bundles into customized ISO images and can fill a special image distribution container called a software depot. Image Builder uses three distinct components to create the customized ESXi images:
The Image Builder tool uses four acceptance levels: VMwareCertified, VMwareAccepted, PartnerSupported, and CommunitySupported. Each VIB is set to an acceptance level; when Image Builder creates a customized image, that image can't take on an acceptance level higher than the lowest VIB level. This guarantees that an image is only trusted up the level of its least-accepted component.
In addition to the acceptance level of each VIB, the image profile has its own acceptance level. All VIBs must be at least the same acceptance level as the image profile, if not higher, or the VIBs can't be added. VIB dependencies and conflicts are also checked for compliance when they're added to the image profiles.
VIBs by themselves can be distributed, but these have to be installed via a command-line tool or the graphical VUM. Vendors instead usually choose to distribute their wares via a software depot that groups all their VIBs into one package and allows the software to be used directly by Image Builder. A software depot is simply a VIB or a collection of VIBs with some additional special metadata contained in a Zip file. Software depots are a better format for distributing packages because they allow the greatest versatility of installment options. Software depots that contain VIBs but not the base ESXi VIB are sometimes referred to as software bundles to distinguish that they're just meant as an addition to a core image.
A software depot can be made available for use in two ways: offline depots or online depots. An offline software depot is just a Zip archive file, much like a software bundle that also contains the ESXi image. When working with Image Builder you need a software depot, and a local Zip file is the easiest way to get started. You can also use an online depot, which may have the same contents as the file-based version but is centrally hosted on a web server. Most mainstream vendors host their own online depots that can be accessed over the Internet. Using an online depot has the advantage that whenever you create a new image, you pull down the latest version of the vendor's tools automatically. But you're at the mercy of the vendor to stay current with the other components. You can also use the online depots in VUM, subscribing to the vendor's site and allowing VUM to notify you when it finds newer software versions.
VMware provides its own software depots, both as offline Zip files and a web-based repository. If there is no custom depot for the server hardware for which you're creating the image, then you can start with VMware's base image. VMware provides two images: a standard one, and one that excludes the VMware Tools. The standard image is around twice the size of the slimmer sans-tools version. How the image is used will usually dictate which version to grab. As you'll see, the full version is good for ISO-style installs and the thinner one for the auto-deploy method of deployment. If you use the smaller ISO, you should set up a central shared locker for VMware Tools and configure each host to point to it.
Software depots are always required as an input resource for Image Builder to create images. Those created images (the output) can be either ISO files for regular installs/upgrades or new transformed software depots for use by VUM, CLI installs, or an Auto Deploy server.
Image Builder Process
Image Builder is a collection of PowerShell commandlets that exists in PowerCLI to create custom images. These commandlets use VIBs, image profiles, and software depots, and generate ESXi images as either ISO files for interactive and scripted installs or as Auto Deploy ready bundles.
The basic process to create a custom image with Image Builder is as follows (the commands provided are just pointers; additional switches and parameters are required):
It's worth noting that creating your own custom images isn't always a requirement. Large enterprises and service providers can benefit from the ability to customize images if they have a lot of servers or need to rebuild servers on a frequent basis. But the standard VMware ISO or vendor-customized ISO is probably sufficient for most companies.
ESXi Disk Layout
ESXi is loaded into memory when it boots up and runs from RAM. In memory, it uses tardisk archives that are static files and ramdisks that grow and shrink as they're used. In addition to the tardisks and ramdisks in memory, a number of disk partitions can be found. The way ESXi is deployed and the hardware that is discovered when it's deployed will determine what additional partitions are present and where they're stored. If these additional partitions exist, they're mounted in the filesystem. There is no way to manually define the partition layout during the install. Alternatively, if they aren't present, then the backing for the directories is more in- memory disk mounts. A detailed description of the deployment options for ESXi comes later in the chapter; here, let's focus on probably the most popular type—how ESXi Installable is copied to a local hard disk—because it shows all the possible partitions. Figure 2.1 illustrates the typical layout.
Figure 2.1 Typical partition layout of ESXi Installable on a local disk (minimum 5.2 GB)
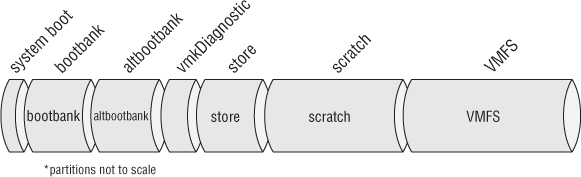
A new ESXi 5 build now uses a GUID Partition Table (GPT) partition table as opposed to previous versions that used the older master boot record (MBR) partitioning. To view the list of partitions, instead of fdisk, use the partedUtil command.
Scratch partitions are created if there is space on the local boot disk or another local disk. If not, then ESXi attempts to create a folder on a local Virtual Machine File System (VMFS) datastore if available; failing that, it uses a ramdisk. You can redirect the scratch directory to a persistent VMFS or NFS volume if the install doesn't create the partition (although VMware doesn't recommend using an NFS volume). Scratch partitions are never created on what ESXi considers remote disks such as “boot from SAN” logical unit numbers (LUNs) and some SAS disks that are labeled as remote. Additionally, ESXi never creates scratch partitions on USB flash drives or SD cards, even if they have the capacity, because the potentially heavy disk I/O from the userworld swap could damage them.
Tardisks and Ramdisks
ESXi uses both tardisks and ramdisks to create its running filesystem. As the system boots up, tardisks are mounted as directories within the base VMkernel's tardisk, which is uncompressed into memory. Unlike regular filesystems, these tardisks aren't untarred and the resulting copy of the files used. Instead, ESXi keeps the tardisks intact and mounts them at points as if they were disks. The physical partitions described in the last section are also mounted in the running filesystem. Run ls -lah / to see the symbolic links for directories that are redirected to partitions (this is an easy way to check whether the running /scratch directory is on a local partition, VMFS, or ramdisk). The tardisks are laid out onto the filesystem in order as the system boots; once the process is finished, the filesystem you can see and interact with in the ESXi Shell is assembled. The tardisks are read-only and can't be changed. A tardisk in the image can overlay another one in the running filesystem, but it can't be modified.
Ramdisks provide storage for files that need to be created or modified while ESXi is running. For example, configuration settings and logs need to be maintained. If a modification to a file on a tardisk is required, ESXi uses a branching technique to create a working copy of it on a ramdisk. This is used extensively for the /etc folder. It uses a file's sticky bit to designate that it's allowed it to be branched off in this way. But these changes can't be written back to the tardisk files because they're read-only, so to persist this information it's written to the state file: state .tgz (most files are actually stored in local.tgz, which is inside state.tgz).
ESXi Deployment
ESXi can be deployed in a multitude of ways and will dynamically self-select its configuration options depending on the environment it finds. This gives you several deployment options, each subtlety suited to different scenarios. The consequences of each delivery mechanism in different hardware situations will drive an ESXi server's base design.
Hardware Requirements
To install ESXi, you need to consider several factors. First, the hardware should match the required specifications, and you should verify that all the components are supported on the HCL. Chapter 4, “Server Hardware,” looks in detail at hardware requirements. However, as a basic starting point, the server should have 64-bit x86 CPUs with a minimum of 2 GB RAM. 1 GB of bootable disk space is required to complete a local installation.
ESXi Flavors: Installable, Embedded, and Stateless
ESXi comes in three flavors that dictate how it can be deployed. ESXi Installable is currently the most common and allows you to install the hypervisor on your own server hardware. ESXi Embedded is an OEM option that you can purchase preinstalled on new servers. ESXi Stateless describes booting the hosts each time from a special PXE service called Auto Deploy.
The following section discusses ESXi Installable, ESXi Embedded, and ESXi Stateless and how these elements affect the design of a host deployment and your selection of hypervisor.
ESXi Installable
ESXi Installable is the version of ESXi that you install yourself to run on a server. It doesn't come pre-embedded on the hardware. Various options exist for the installation; and despite the name, you can boot and run it without installing it to a local drive.
One significant difference from most other OS deployments is that the system image is copied to the install location, and no installation per se is required. This makes the process significantly faster. The following explains the primary design factors in an ESXi Installable deployment:
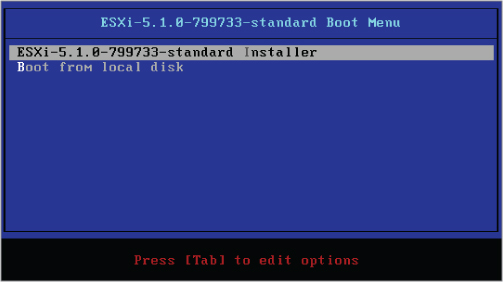
PXE booting is invoked when the server starts and is going through its Power On Self Test (POST). Usually a particular keystroke is required; or, often, if a server doesn't find a suitable bootable image on one of its storage devices, it will automatically try to find a PXE server. The network card broadcasts, looking for a response from a suitable PXE server. If discoverable, the PXE server replies to requests and can be configured to offer up the ESXi media as a bootable device. PXE servers offer a convenient solution to centrally storing installation media in a LAN environment. If you have several servers in one location, you can use PXE-based ESXi media depots to speed up installations, because each server doesn't need to be physically touched as it's built (or rebuilt). However, if you have several sites with WAN interconnects, you may need a PXE server at each location. Installing an OS of several hundred megabytes over a WAN link is probably impractical. Such an installation would be slow, could saturate the WAN link, and would probably fail before it finished.
An installable deployment can also be started from an Auto Deploy server. As we'll look at more closely in the upcoming Auto Deploy section, this service is primarily used to deploy Stateless servers. But since vSphere 5.1, Auto Deploy can also be used for what is known as stateful installs. A stateful install uses Auto Deploy for PXE services and copies the images to the destination as installable images. It doesn't continue to boot from the Auto Deploy server like a regular Stateless install but merely uses the environment as a deployment tool. Once the image is copied to the destination, it behaves exactly as an installable ESXi image.
Figure 2.2 ESXi text installer
- Provides a perfectly repeatable and consistent process, should you need to rebuild the server
- Makes it faster to build and rebuild a server
- Creates a standardized build that can be applied to multiple servers
- Provides additional installation options
- ESX Deployment Appliance (EDA): www.virtualappliances.eu/
- Ultimate Deployment Appliance (UDA): www.ultimatedeployment.org/
To reiterate the possible options, the ESXi Installable image can be provisioned in the following ways:
Booted from
- CD
- USB
- PXE server
- Auto Deploy server
Gets its instructions
- Interactively
- Scripted
Boots its image from
- Local disk (including SSD)
- USB or SD (acts like ESXi Embedded)
- FC, FCoE, or iSCSI SAN LUN
ESXi Embedded
The concept behind ESXi Embedded is that it's a version of ESXi that server vendors can sell onboard their equipment at the time of purchase. The ESXi image is preinstalled as firmware in the factory or burned to a USB flash drive or SD card and installed in an internal socket on the main system board. Usually, the ESXi image includes the hardware drivers and CIM plug-ins that vendors provide in their customized versions of ESXi Installable. The software is installed out of the box and is only awaiting setup details after it's first powered on. In reality, many server vendors will ask you to buy one of their certified USB drives, which they ship with a copy of the vendor-customized image that is normally available online as a customized ESXi Installable image.
The important point is that everything else about the image is the same. The hardware may vary, the manufacturer's warranty and support details may be different, but the software image of ESXi Embedded is the same image used in ESXi Installable. But in theory, ESXi Embedded is only an option on new hardware. Officially, you can't retroactively add it to an existing server. That said, because the image is the same, by installing ESXi Installable to a USB flash drive, you're effectively getting the same thing.
ESXi Embedded considers its media removable and treats it somewhat differently. It only uses the first 1 GB of the drive and doesn't have a scratch partition unless it can find a local disk partition or local VMFS datastore to store the scratch directory. Otherwise it will default to a memory-resident a memory-resident ramdisk. The impact is that its content will be lost during a reboot or server failure. The risk can be mitigated by creating a scratch folder on a remote datastore or by redirecting the logs to a centralized syslog server, as explained in the “Postinstallation Design Options” section of this chapter.
If you're procuring new server hardware and have decided on ESXi, then what are the key decision points for ESXi Embedded?
- No installation is required.
- Servers are potentially cheaper, because manufacturers don't need to configure them with RAID cards and local disks.
- Servers have an appliance-style nature, so you know all hardware will work out of the box and be fully supported.
- You can use Installable or Auto Deploy across all your existing servers, so you have a unified installation method and can continue to purchase the same hardware as before.
- ESXi's regular HCL is much more extensive, meaning you have more choices to customize the hardware to your exact requirements.
- Servers bought for Installable or Auto Deploy can be repurposed in other server roles, because you know they're off-the-shelf servers.
- Servers that were purchased for Installable are likely to have local disks, meaning they can offer local scratch and VMFS partitions.
ESXi Stateless
ESXi Stateless was introduced as a supported deployment in vSphere 5.0. As opposed to ESXi Installable and Embedded, Stateless hosts don't normally boot from a disk. Currently all Stateless hosts take advantage of their memory-resident nature and the small size of ESXi by streaming their image over the network every time they boot. This is dissimilar to PXE booting an install of Installable, because those hosts copy the ESXi image to a disk, and all subsequent boots are from the disk not the network.
The defining characteristic of Stateless hosts is that the physical servers themselves aren't authoritative for their state. This means despite where the servers boot from, they always get their state information from a third-party authority. So Stateless hosts do have a state, but it's reapplied from another source whenever they boot. As Stateless hosts boot, their state is streamed down to them from several sources. Table 2.1 shows where each part of a host's state is derived.
Table 2.1 Components that provide system state to stateless hosts
| Component | State Provided |
| Image profile | The ESXi image from which the host boots. Customized with Image Builder to include drivers. |
| Host profile | Configuration settings. |
| Host profile answer file | Configuration settings specific to that host, such as IP address. |
| vCenter | List of VMs stored on the host, HA state, licensing, VM autostart information, and distributed power management (DPM) details. |
By default, the runtime state information such as log files is stored in the hosts' ramdisk and lost during each reboot.
Advantages of Stateless Hosts
Why would you want a server that forgets all its settings every time it reboots? Stateless servers receive their state from a central authority, which makes hardware much more interchangeable and allows for easy deployment and redeployment. Applying new ESXi images with host updates, improved drivers, or a tweaked configuration only requires a host reboot. In the same way you can consider hosts to be compute resources that you give to the cluster to be distributed to VMs, you have the ability to automatically rebuild hosts in minutes en masse to suit new cluster configurations with new network and storage settings.
Stateless servers also help to prevent configuration drift, because each server is refreshed back to the corporate standard after each reboot. No need to troubleshoot an individual host's configuration state anymore.
There is no need for Stateless hosts to have any local storage. The image is pulled from the network every time it boots up and is loaded straight into memory. If there is no local disk present, then you should redirect the logs and core dumps to remote collectors to protect them; but if local storage is available when the server boots, ESXi will take advantage of this and mount the scratch partition there. The concept of having no local disks and no local state information makes the ESXi servers more like hardware appliances than you might typically think of your servers. The nature of a Stateless deployment means the ESXi image and all the host's configurations can be managed centrally. In a large environment, this is more efficient than kickstart-style scripting installs.
Stateless Caching
vSphere 5.1 introduced a new option called Stateless caching. This follows the same ethos as a regular Stateless deployment, but during each boot as the image and state are being pulled down from the Auto Deploy server, they're also being copied to disk. The disk could be a local disk, a removable USB key, or even a boot-from-SAN LUN. If there is ever a problem with the Auto Deploy infrastructure, then the host can boot from its “locally” cached copy. In normal circumstances, a Stateless caching host boots from the network image. It only drops to the cached image as a fail-safe option. Having the local copy allows the server to power on even if there is a problem with the Auto Deploy server, and get the VMs started. It can then help troubleshoot the Auto Deploy problem. When the Auto Deploy infrastructure is available and configured correctly again, the next server reboot will see the host take its image from the network again (and update its cached copy again). To enable this mode, a small change to the host profile is required, and the server's BIOS needs to attempt to boot from the disk if the PXE boot fails.
The regular Stateless mode without local caching enabled, which has been available since vSphere 5.0, still exists as the default mode in vSphere 5.1. Stateless without caching enabled retains the advantage that no disks need be involved.
Auto Deploy Infrastructure
Auto Deploy is a deployment tool to automate the provisioning and configuration of ESXi hosts. It can simplify large deployments by centralizing the images and configuration details. All hosts, at least initially, boot via PXE and connect to an Auto Deploy server. The Auto Deploy server selects an ESXi image via a set of rules and streams the images to the physical server. vCenter supplies the host with its configuration details via the Host Profiles feature.
Auto Deploy can dispense Stateless hosts as described in the previous section, “ESXi Stateless.” In this case, the hosts come back to the Auto Deploy mechanism on every reboot. Auto Deploy can also be used as a pure installation mechanism for what are known as stateful hosts. Statefully deployed hosts are in effect regular ESXi Installable images. The only difference is that they were initially provisioned via the Auto Deploy tools, so they used an Auto Deploy image and host profile information to configure the hosts. This means the host can be rebuilt quickly if required as the information is retained in the Auto Deploy system. But once a stateful host is deployed, it's no longer dependent on the Auto Deploy server. It maintains its own state information, doesn't boot from the network, is patched in a normal fashion, and is to all intents and purposes an ESXi Installable host.
Auto Deploy Components and Process
Auto Deploy needs several components available and configured to provision ESXi hosts:
The Auto Deploy server can use the Image Builder tool mentioned earlier in the chapter to customize and update ESXi as required. The rules can match a number of machine attributes such as MAC address, IP address, and SMBIOS details. You use PowerCLI to create the working rules and then activate the rules.
The basic process to create the working rules and activate the rule set is as follows (the commands provided are just pointers; additional switches and parameters are required):
VMware has released a fling, a free unsupported tool, called Auto Deploy GUI that you can find at http://labs.vmware.com/flings/autodeploygui. The Auto Deploy GUI simplifies the process of configuring the Auto Deploy service. Although VMware flings aren't officially supported, as long as the hosts are tested once they're deployed, then this won't affect their operational running.
Deployment Modes
Currently, Auto Deploy supports three distinct deployment modes. Hosts will deploy via the first option unless specifically set to a different mode in their host profile (under System Image Cache Configuration):
Auto Deploy Recommendations
You should follow several general recommendations when designing your Auto Deploy infrastructure:
- Consider keeping your Auto Deploy servers in a separate dedicated management cluster, analogous to recommendations made for vCloud Director deployments. This prevents chicken-and-egg situations when a datacenter-wide outage shuts down all the physical servers and the VMs required to boot up the hosts can't be brought back online. Create a management cluster where the hosts aren't deployed in Stateless mode (although it's feasible to use Auto Deploy to build them in stateful mode).
- If you opt to use non-Stateless hosts to house the Auto Deploy infrastructure, ensure that all the pieces needed are running on this cluster. At least one DHCP server, the TFTP server, the Auto Deploy server, the vCenter server (along with database, SSO, and web client server), DNS, and almost certainly a domain controller should be there.
- Although you could install these components on physical hardware, it's recommended that they're installed on VMs. This provides hardware-failure protection through HA, hardware independence via vMotion and Storage vMotion, and resource protection and load-balancing with DRS.
- Build at least one host with a full ESXi image including the VM tools. These tools can be copied to a shared locker for all the hosts. Don't use this full image for all the hosts because it puts unnecessary load on the network and the Auto Deploy server.
- Remember to create a centralized persistent storage location for the Stateless hosts' logs and core dumps, or redirect these to remote collection servers: a syslog server and a dump collector. The dump collector will only work with a vSphere 5.1 vNetwork distributed switch (vDS).
- If the hosts are to be joined to Active Directory (AD), configure the AD Authentication Proxy service (available on the Windows vCenter install). This proxy service prevents domain administrator credentials from being stored in the host profile.
Comparing Deployments Options
Each of the described deployment options will provision serviceable ESXi hosts. There are advantages and disadvantages to each technique, and different methods suit some environments better than others. Figure 2.3 summarizes these options and how they affect where the servers boot their image from.
Figure 2.3 Deployment options and the resulting boot images
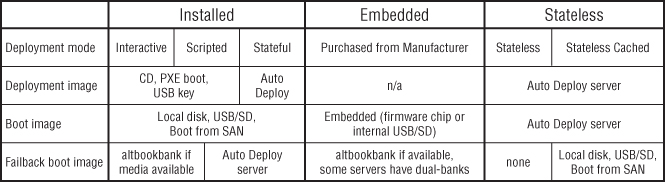
- visor-thin—An installable host. This also includes an Auto Deploy stateful install.
- visor-usb—An embedded host. This also includes self-installed ESXi on USB flash drives or SD cards.
- visor-pxe—A Stateless host, including those delivered in Stateless caching mode.
The deployment strategy chosen is often decided by the size of deployment, the skill level within the organization, and how rapidly the servers need to be deployed (and possibly redeployed). The WAN topology and vCenter implementation also affect how servers are deployed: there can only be one Auto Deploy server per vCenter, which may limit where Stateless hosts are provisioned or encourage more vCenters to be introduced.
Scaling Deployments
A small company with only a handful of host servers is likely to opt to manually install each server using a bootable CD and the interactive install routine. As the company grows and the level of automation increases, the company may look at scripting the installs. In companies with most servers in one location, or locations with good WAN links, then PXE boot servers are a convenient way to centralize the image. This approach combined with kickstart scripts allows for a scalable option, providing quick and centrally managed install points. The largest companies, with vSphere Enterprise Plus licensing, can then consider automated post-install methods to make initial configurations and maintain these environments through host profile policies.
If the company already has a custom PXE boot environment and has amassed some knowledge around its scripted installs, then it may want to stick with this. But companies looking to set up automated installs from the ground up are best advised to implement this as an Auto Deploy infrastructure. In principle, the custom PXE booting with scripted installs is similar to Auto Deploy stateful; but why build this yourself when VMware has done much of the hard work for you? The Auto Deploy solution is fast becoming a standard across companies and will be easier to maintain than a custom solution. When the organization needs the maximum flexibility and to reduce reprovisioning times, Auto Deploy Stateless builds show their worth. VMware is continuing to develop Auto Deploy, a Web Client GUI for configuration is almost certain to appear shortly, and the Host Profiles feature is maturing with each new release.
Companies may choose multiple techniques for different situations. For example, a company may use Auto Deploy Stateless in its primary datacenter, stateful installs for its management cluster, a handful of Embedded servers in a remote site managed by an external contractor, and Installable on local disks for servers to be built and sent to country-wide small offices.
For very large installs that use Auto Deploy, the infrastructure can be scaled out to an extent. The current limiting factor is that you can have only one Auto Deploy server per vCenter. If you need more, then you may need to split out to multiple vCenters. Then link them through the SSO service so they can be managed through the same Web Client server (or linked mode if you need shared licenses and roles, or across WAN links).
Each Auto Deploy server can boot around 40 servers concurrently with vSphere 5.1. This is based on using the smaller ESXi image without the VMware Tools. You should plan for the worst-case scenario of a boot storm (for example, after a power outage) and consider the minimum number of hosts you would want to power on initially. You can add more web proxy servers in front of a load balancer to distribute the web service load on the Auto Deploy server, which should allow for some level of linear scaling (another 40 hosts per additional web server), but you'll eventually hit a limit depending on the CPU power of the Auto Deploy server. As always, only testing in your own environment can prove these measures. For any Auto Deploy infrastructure of size, you shouldn't install the Auto Deploy service on the same server as vCenter, because both servers get hit fairly hard when multiple servers reboot.
Impact of Image Location
Even though all the deployment methods give you a running version of ESXi on your hosts, it's important to understand the impact of the different configurations you can end up with. Local disks are better for small deployments if you already have the servers and they come with disks. The disks are normally reliable, and the install has good defaults that require less post-install work to correct any deficiencies. Taking the most common image location for a deployment, the server's local disk, let's look how each alternative compares:
- Boot-from-SAN configurations are more complicated to configure, requiring individual fabric zoning for each server and potentially complex HBA/CNA configuration.
- SAN storage is usually more expensive than local storage, so any saving on server storage is lost on the extra SAN disks.
- A SAN LUN needs to be provisioned and managed for every server, which can create significant additional work for a storage team.
- Periods of heavy VMkernel disk swapping I/O can affect the VM's disk performance, because they share the same disk I/O channels.
- VMs configured with Microsoft Clustering (MSCS or Failover Clustering) aren't supported on boot-from-SAN configurations.
Upgrading ESXi
Upgrading ESXi hosts from ESXi 4.x can be tackled several ways. ESXi Installable 4.x hosts can be upgraded in one of three ways: an interactive upgrade via an ESXi Installable image, a scripted upgrade, or VUM. ESXi 5.0 hosts can be upgraded to 5.1 using these tools and can also use the esxcli command-line tool; or if you deployed with Auto Deploy, you can simply apply a new image and reboot.
When upgrading hosts from ESXi 4.x to 5.x using any of the three supported methods, 50 MB must be available on the local VMFS volume. This space is used to store the server's configuration data temporarily.
An alternative strategy to running in-place upgrades across the hosts is to perform a clean install on each one. The install will run through faster if you can apply the same post-install configuration steps as you did for the previous build, using the same script or host profile. This provides the opportunity to standardize your host fleet if there has been any configuration drift among them. This is also the chance to migrate to a new deployment strategy, such as using Auto Deploy.
However, in-place upgrades are faster if no existing configuration is set in host profiles or post-install scripts. VMs on local datastores don't need to be migrated or restored, and VUM can orchestrate the entire upgrade. There are at least two small resulting differences when upgrading hosts instead of rebuilding them. First, the local VMFS volume remains as VMFS-3. This can later be upgraded nondisruptively to VMFS-5, but it remains an “upgraded VMFS-5” volume. The impacts of this aren't terribly significant; see Chapter 6, “Storage,” for the gory details, but it may create a small mismatch between the subsequently provisioned new hosts and the upgraded ones. The second difference is that the boot-partitioning scheme remains MBR-style instead of the new standard, which is GPT. The GPT partitioning allows local partitions to be greater than 2 TB in size. This isn't that important on local ESXi disks but again will introduce variances in your host design going forward, which may confuse troubleshooting, for example.
Upgrading ESXi 5.0 Stateless hosts to 5.1 is much simpler because the single image profile just needs to be updated and the active rule set pointed to the new image. Upon the next reboot, the hosts will be upgraded. And in reality, the hosts won't even be upgraded but freshly rebuilt.
One point worth mentioning about updating and patching Stateless hosts is related to VIBs that don't need a reboot to apply. Any patch that isn't applied to the image profile gets lost after a reboot. So even if a patch doesn't require a reboot, it's important to update the image; otherwise, the patch will drop off after the next reboot. However, it can be handy to quickly apply host patches directly via VUM if doing so addresses a security vulnerability and you want to immediately protect your hosts before you have a chance to reboot them all. Just install the nondisruptive patch and then apply it to the image profile in preparation for the next planned (or even unplanned) reboot.
Migrating from ESX
A project still common among businesses with existing vSphere environments is migrating from ESX to ESXi. These conversions undoubtedly require testing and planning, but it's important to go back to the fundamental design of your vSphere hosts to ensure that the principal objectives are still met and to determine whether any additional improvements can and should be made. Although ESX and ESXi have more commonalities than differences, it's beneficial to understand how you can transition an existing ESX design to ESXi.
Testing
Prior to any redeployment of ESX hosts to ESXi, you should run a testing phase that looks at the existing disposition and examines whether each element is suitable for ESXi. Obviously, a pilot is a good way to test the sociability of ESXi in your existing configuration. However, it's difficult to test every possible scenario via a small pilot, because usually large enterprises have many different types of hardware, versions of hardware, connections to different network and storage devices, backup tools, monitoring tools, and so on.
It may be prudent to provide a contingency plan in case ESXi doesn't fit in a particular situation; the plan may provide financing to replace equipment, or it may specify that you keep ESX classic in that circumstance and migrate later when the equipment is due for replacement. It's feasible to mix ESX and ESXi hosts during a migration, even within the same cluster. If you're thinking of making some ESX hosts a more permanent fixture, you may want to consider some of the side effects of supporting mixed hosts, such as maintaining two patching cycles, troubleshooting two types of hosts, and collecting hardware-monitoring data in different ways.
You need to look at your server hardware carefully to be sure it's compatible with and fully supported for ESXi. The HCL listing for ESXi Installable is now greater than that of ESX classic, but it still lacks some of the older servers. You should check that the servers and their add-on components are listed on the HCL.
If there are hosts that you can't migrate for whatever reason, consider treating them like ESXi hosts as much as possible with regard to how you manage them. Most of the VMware and third-party tools can now connect to either type of host. You can use tools that replace some Service Console functionality, such as the vMA and PowerShell commands, to manage ESX classic hosts. You can also use ESXi tools in a mixed environment and no longer have to rely on the Service Console.
Deployment
ESX servers can be upgraded or rebuilt. ESX 4.x server upgrades can be undertaken by the ESXi interactive or scripted install mechanism, or via VUM. If the ESX 4.x servers have previously been upgraded from ESX 3.x, then the partitioning configuration brought across might not allow a subsequent upgrade to ESXi. There needs to be at least 50 MB free in the host's local VMFS volume to store the previous configuration. If you're using VUM to upgrade, the /boot partition needs to have at least 350 MB free. If you don't have this much space, you can still use the interactive update because it doesn't need this space for staging the upgrade files. Any VMFS volumes on the local disk that need to be preserved must start after the first 1 GB; otherwise the upgrade can't create the ESXi partitions it requires.
If you have any ESX 3.x hosts, they must be upgraded to 4.x first and then upgraded to 5.x. You really have to question whether a dual upgrade is better than a single fresh install. Also, any host that is still ESX 3.x may struggle to match the HCL for ESXi 5, so migrating to new server hardware with clean builds is probably more appropriate.
There are several impacts from upgrading instead of completely rebuilding your ESX servers. Many of them mirror the considerations faced with ESXi 4.x upgrades that we discussed in the last section. In summary, the disks will keep their MBR scheme, limiting them to 2 TB; no scratch partition will be created, and the VMFS-3 volume will remain (although it can be upgraded afterward to VMFS-5, it remains an “upgraded” VMFS-5 volume). However, upgrading from ESX 4.x, as opposed to from ESXi 4.x, is a much bigger jump in platforms, and it's only reasonable to assume the results won't be as smooth.
Alternatively, a rebuild strategy might actually prove to be simpler and certainly generates a more consistent, dependable end result. During a rebuild, all settings are lost, and the newly rebuilt servers must be reconfigured. Larger companies with dedicated server staff are probably familiar with rebuilding OSes instead of upgrading them. But smaller companies that may have used external consultants to initially deploy ESX may be less prepared to run full installs across all their hosts.
If you completely rebuild the hosts, you should move all the data off any local VMFS volumes—VMs, templates, ISO files, and so on. It's possible to leave data on an existing local data store and do a fresh install of ESXi to the remaining space, but you risk losing it if something goes wrong, and you won't get the immaculate install for which you chose this option. Check the filesystem for files in the /home directories, /tmp, and anywhere else a local user may have saved files. Finally, you may wish to back up the files, particularly those in the /etc directory for configuration settings and the /opt directory for third-party installed agent software.
The VMware fling called ESX System Analyzer is a tool that can scan across ESX hosts attached to a vCenter and create pre-migration reports. It provides details such as HCL compatibility for the physical servers, VMs registered on local storage, Service Console modifications, and version details for datastores and VMs. These reports can be invaluable when you're planning a migration strategy; this tool makes light work of an otherwise onerous task. You can download ESX System Analyzer at http://labs.vmware.com/flings/esx-system-analyzer.
If you wish to avoid VM downtime, you must have access to shared storage and at least the equivalent spare capacity of your most powerful server in each cluster. That way, you should be able to migrate the VMs around the hosts as you remove one at a time from the cluster to rebuild it.
Fortunately, many of the deployment methods you may have used for your ESX classic hosts are reusable. ESXi can use PXE servers you've already set up—you just need to copy the new images to the server. You need to modify ESX kickstart scripts for ESXi, but they can use largely the same syntax for the configuration; and usually you must remove unneeded lines rather than add new lines.
Management
One of the more obvious techniques to smooth a transition is to begin using the newer cross-host management tools as early as possible. Most of the utilities available for ESX classic hosts work with ESXi hosts. vSphere Client, vCenter Server, vCenter Web Client, vSphere command-line interface (vCLI), and PowerCLI are host-agnostic and will make any transition less disruptive. There is no reason not to start working with these tools from the outset; even if you decide not to migrate at that stage, you'll be better prepared when ESXi hosts begin to appear in your environment.
The primary management loss when you replace ESX is the Service Console. This is the one tool that, if you use it regularly, must be replaced with an equivalent. There are two main contenders: the vCLI and the ESXi Shell. The vCLI provides the same Linux-style commands as the Service Console. The easiest way to get it is to download the vSphere Management Assistant (vMA) virtual appliance. This includes a Linux shell and all the associated environmental tools you'd expect. Generally, anything you can do at a Service Console prompt, you can do in the vMA. Most scripts can be converted to vMA command syntax relatively easily.
The second option is the ESXi Shell. Although it's a stripped-down, bare-bones environment, it provides the majority of vSphere-specific commands that you'd otherwise find in the Service Console. Some of the more Linux-centric commands may not be available; but it provides a more familiar feel than the vMA, because it's host-specific and therefore the syntax is closer to that of the Service Console.
In addition to rewriting scripts, you'll need to replace other services that ESX includes in the Service Console. For ESXi hosts without persistent storage for a scratch partition, it's important to either redirect the logs to a remote datastore or configure the host to point to a remote syslog server. ESXi hosts don't have their own direct Web Access as ESX hosts do. It's unlikely that this is a regularly used feature, but if you've relied on it in certain circumstances, then you need to get accustomed to using the Windows client to connect to the host. Finally, if you've used the Service Console for host monitoring via SNMP or a server vendor's hardware agent, then ESXi has built-in CIM agents for hardware on the HCL, and many vendors can supply enhanced modules for their particular hardware. With these CIM modules, you can set up alerts in vCenter, and some third-party hardware-monitoring software can use the information. ESXi also provides some SNMP support, which you can use to replace any lost functionality of Service Console agents.
If your hosts are licensed for Enterprise Plus, host profiles can provide a convenient method of migrating host settings from ESX to ESXi. You can capture an existing ESX classic host in a cluster as a reference host, rebuild one of the servers to ESXi, and apply that profile to receive a common set of configuration settings. The new ESXi host with the cluster's profiles applied can then be the basis of a new profile that you can apply to all the other hosts as they're rebuilt. If you're migrating existing servers whose design doesn't need to change, host profiles can be an excellent time saver.
You also need to replace any third-party applications that used the Service Console. Most add-ons are now available in ESXi-friendly versions, so you should be able to continue to use the applications you rely on, although you may need to upgrade them to the latest version. Most of these tools use a common set of APIs that works equally with either host. Check with your vendors to be sure they're ESXi host compatible; if they don't offer this, consider migrating to an equivalent tool from another vendor that does.
Postinstallation Design Options
From a design perspective, a number of configurations are important for your deployed hosts. You can include many of these in the post-install section of a scripted install, use a separate vMA or PowerShell script, push them out through host profiles, or configure them manually. But you should set these, because your host design isn't complete without them.
Here is a list of common post-install tasks that you should consider for an ESXi server deployment:
vSphere 5.0 had a problem when exporting dumps remotely when hosts used a vDS. This created a particular issue because Auto Deployed hosts were often connected to a vDS type switch and needed somewhere to remotely store dumps. This has been resolved in vSphere 5.1—another reason you should look at using 5.1 if you're considering Auto Deploy.
To enable a host for the Dump Collector service, in the host profile go to Network Configuration ⇒ Network Coredump Settings ⇒ Fixed Network Coredump Policy.
The following is a brief overview explaining how to create a shared directory and configure the hosts:
To restrict access, you may wish to create specialized AD groups and provide only a certain level of access and only to specific hosts. An advanced setting can also be set on hosts to prevent the ESX Admin group from getting full administrative access: Config.HostAgent.plugins.hostsvc.esxAdminsGroupAutoAdd.
If you're deploying hosts via Auto Deploy, a small tool called the AD Authentication Proxy eliminates the need to store domain admin credentials in the host profiles. This authentication proxy tool is a ready-to-use service on the VCSAs or a Windows-installable application available on the vCenter ISO image.
Lockdown mode doesn't disable local ESXi Shell or remote ESXi Shell services, but it does prevent any user (including root) from accessing them because the authentication permissions are locked.
You can only enable lockdown mode on vCenter-connected hosts. It's disabled by default but can be enabled via the vSphere Client or the DCUI. Figure 2.4 shows the lockdown mode interface on the vSphere Client.
Table 2.2 shows how lockdown mode affects each remote-access method for hosts.
Table 2.2 Lockdown mode impact
| Access | Default Mode | Lockdown Mode |
| DCUI | Root and users with admin privileges | Root only |
| Local ESXi Shell | Root and users with admin privileges | No access |
| Remote ESXi Shell (SSH) | Root and users with admin privileges | No access |
| vSphere Client direct to host | Root and users with admin privileges | No access |
| vSphere Client via vCenter | Users with admin privileges | Users with admin privileges |
| vCLI/vMA script to host | Root and users with admin privileges | No access |
| PowerCLI script to host | Root and users with admin privileges | No access |
Figure 2.4 Lockdown mode
Lockdown mode is reversible and can be disabled on a host-by-host basis. Despite lockdown mode being disabled by default, it's worth considering enabling it across an environment during your design. If you need remote access to the host, you can temporarily disable lockdown while you perform administrative local tasks, and then re-enable it afterward. However, enabling lockdown mode via the DCUI causes the local user and group permissions to be lost. To retain these local permissions, be sure you enable lockdown mode via vCenter.
For very security-conscious settings, you can take an additional step known as total lockdown mode. This is a combination of enabling lockdown mode and disabling the DCUI. Access can only be granted via vCenter, preventing anyone with the root password from disabling lockdown mode locally via the DCUI. But if the DCUI is disabled, and vCenter isn't available and can't be restored, then your only recourse to gain administrative access to the host is to reinstall ESXi.
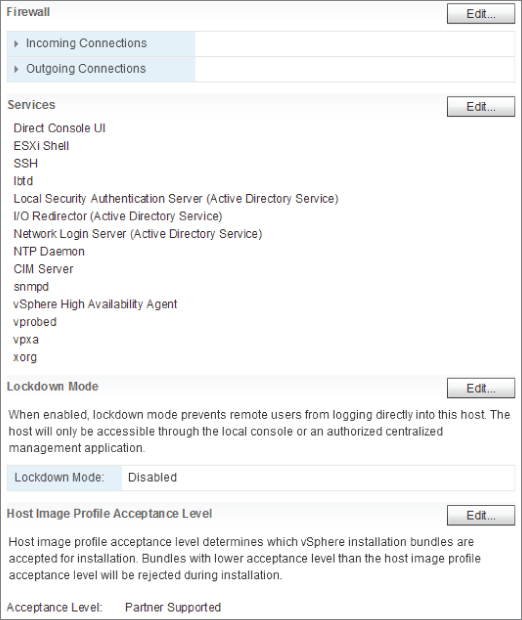
On ESXi hosts, you can enable and disable access to certain remote access services, as you can see in Figure 2.4. But you're merely specifying that listed daemons can start or stop, and the setting of their runlevels. The most common services are listed explicitly in the web client, but additional ports can be manually added as regular firewall rules. Access can also be restricted to an IP address or a subnet. In addition to using the web client, you can adjust the security profile via PowerCLI, ESXCLI, or host profiles.
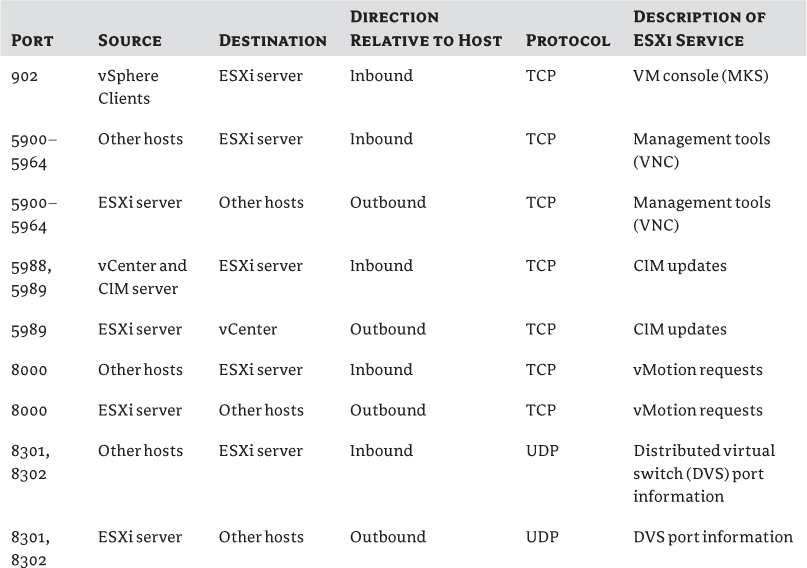
Table 2.3 ESXi host firewall requirements

Management Tools Overview
Once any ESXi host is deployed and configured, several management tools exist to monitor and maintain it. Many of these are discussed in depth in the next chapter, but let's review the full gamut of tools available and how they help specifically with the corralling of your ESXi hosts. The tools' functionality can fundamentally affect your design of a vSphere environment and how it will be maintained, and therefore your hypervisor architecture.
Host-Management Tools
Here are some tools you can use to manage hosts directly without any access to vCenter. These are often useful when first configuring hosts, when troubleshooting hosts, or while there are problems with vCenter.
vSphere Client
The Windows vSphere Client, often referred to as the C# or legacy client these days, can connect to an ESXi host directly in a way similar to how it can connect to vCenter. When directly connected, it uses the local ESXi accounts.
DCUI
The DCUI is the BIOS-styled yellow menu tool that appears on an ESXi server's console screen. Figure 2.5 shows a typical DCUI screen.
Figure 2.5 DCUI interface
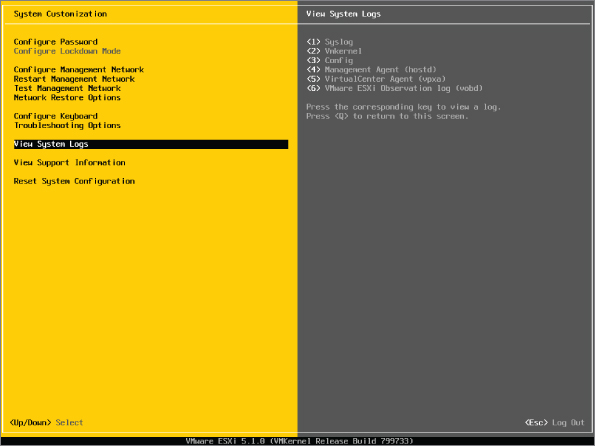
You can use the DCUI to initially configure the management network's details, set the administrative password, monitor and restart management agents, view logs locally, enable access to the ESXi Shell, and turn on lockdown mode. It allows onsite first-line staff to set basic configuration options and perform rudimentary troubleshooting actions. This allows more complex configuration and management tasks to be performed remotely. The DCUI is focused on all the tasks that can prevent successful remote connections, such as network-configuration errors and failed management agents.
ESXi Shell
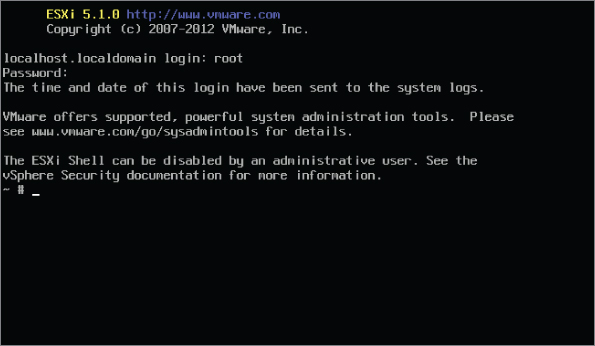
The ESXi Shell is a simple shell that provides a local console on which you can perform advanced troubleshooting and technical support. Regular maintenance tasks are still best executed with tools such as the vSphere Web Client and the vMA. In addition to local access, the tool offers remote ESXi Shell mode, which allows remote connections through SSH. Figure 2.6 shows an active logged-in local ESXi Shell session.
The ESXi Shell isn't a regular Linux shell and doesn't give you exactly the same environment that the Service Console used to. It uses the ash shell, instead of the more common bash shell, and it doesn't include all the normal Linux commands. For example, the current ESXi Shell mode doesn't include man (manual) pages for commands. Those commands that are present may not offer the same arguments and options, may be limited, and may not operate as you expect. The ESXi Shell is still a very useful tool for quick break-fix situations. Most important, the ESXi Shell gives you access to the complete esxcli command set and esxtop, the real-time resource management tool for the console. The ESXi Shell doesn't allow any scheduled scripting jobs and is focused only on that single host—this is where the vMA shines.
Figure 2.6 ESXi Shell console
The ESXi Shell is disabled by default and must be turned on via the DCUI or vSphere Client before use. All commands are logged by the syslog service, so a full audit trail remains; and a timeout is available for both local ESXi Shell and remote ESXi Shell modes to ensure that no sessions stay logged in.
The ESXi Shell can be very useful if management agents are unresponsive, because at that point the vSphere Client, vCenter, vMA, or PowerCLI tools won't help. You can log in to the DCUI and try to restart the agents; if there are further problems, the ESXi Shell gives you console access to troubleshoot the issue. The ESXi Shell is usually quicker to use than some of the remote tools, so it's ideal when you need a fix as soon as possible. However, the filesystem presented in the ESXi Shell is formed from relatively small ramdisks; you must be careful not to copy large files to it as you may do on the vMA, because filling any of the partitions is likely to make the entire server unstable. Also remember that the system's files are laid out as it boots from the system image, so files that you change or add may not survive a reboot. The ESXi Shell is a user world on ESXi and so is limited by the resource constraints the VMkernel sets. This means the console can run out of memory if too many commands are run at once.
Local ESXi Shell and remote ESXi Shell access are both available to local users who are granted the Administrator role. The modes must be enabled for use, and access can be affected by the lockdown mode discussed earlier in the chapter.
vCLI and vMA
The vCLI is a Perl-based set of scripts that mimics the commands available at the ESXi Shell. The major difference between vCLI commands and ESXi Shell commands is that in the command syntax, you need to specify which host or vCenter you wish to direct the command to and with what credentials. The vCLI is packaged for both Linux and Windows.
The vMA is a small, Just enough OS (JeOS) prepackaged Linux virtual appliance that comes with the vCLI installed and ready to use. It's a convenient way to get the vCLI toolkit up and running quickly. You can also use the vMA as a syslog server for your ESXi hosts. And you can use it to run scripts, create scheduled tasks with cron, and centrally run commands to several hosts at once. Both the vCLI and the vMA can be used against ESXi hosts and vCenter Server.
PowerCLI
The PowerCLI is similar to the vCLI, except that instead of Perl and Unix style syntax, it's Microsoft PowerShell based. It's a toolkit that you can install on Windows PCs with PowerShell installed. You can use it to run remote commands and scripts against ESXi hosts and vCenter. Like the vCLI, it has a vibrant community around it with many sample code snippets and scripts openly available.
Browser-Based Tools
A notable deficiency of ESXi at the time of writing (5.1 GA) is the lack of Web Client access. As long as the ESXi host is attached to vCenter, you can control VMs through vCenter's Web Client.
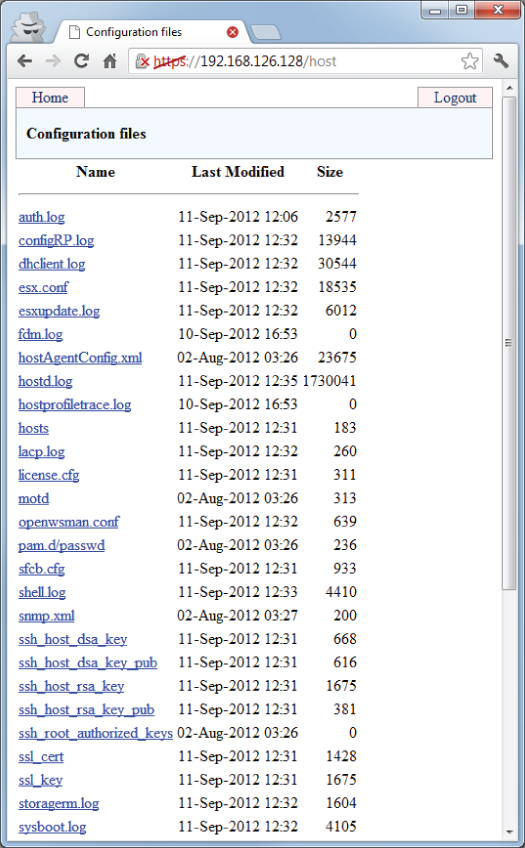
A nice web-based feature that is available on all vSphere hosts is a listing of the configuration files and log files. Although very simplistic, it gives a quick one-stop view of a host's settings. Figure 2.7 shows an example of the file listing, which is available through https://<hostname>/host.
There is also a similar web-based access to view a host's datastores on https://<hostname>/folder.
Centralized Management Tools
In addition to the stand-alone direct tools we just covered, there are several centralized management tools to nurture your ESXi hosts. vCenter is pivotal to these tools and is covered heavily in Chapter 3, “The Management Layer.” Suffice it to say most of the following are dependent on vCenter for their operation.
vSphere Web Server
The vSphere Web Server client is the new interface of vCenter operations. First introduced in 5.0 as a basic VM management tool, the 5.1 release promoted it to full status as a vSphere client. It now supplants the Windows client as the principal tool, with all new features from 5.1 only available through it. It's undoubtedly the forward direction for vSphere, and the race is on for third-party plug-ins and remaining features still attached to the Windows client to get on board.
With the release of vSphere 5.1, the main sticking point is the Web Client's inability to connect directly to hosts. We'll have to wait for a future release until the ESXi hosts can be recognized by the SSO system to allow this functionality.
VUM
VUM is a vCenter plug-in that can scan hosts for missing updates, upgrades, and third-party driver and CIM modules, and centrally push out those patches and coordinate their installation. It's very useful for large environments where patching hosts regularly can otherwise prove to be an onerous task.
Host Profiles
Host profiles are a vCenter feature that can check for and apply consistency across ESXi hosts. This feature allows you to set a standard configuration to a single host or a cluster of hosts and also automatically check for compliance to that standard. It reduces the management overhead associated with maintaining host configurations, helps to prevent misconfigurations, and alleviates some of the repetitive burden of setting up each host. Hosts must have Enterprise Plus licensing to use host profiles.
Figure 2.7 Web browser access to configuration and log files
Host profiles have a growing relevance to ESXi hosts moving forward. As organizations look to automatic host deployments and more Stateless hosts, host profiles provide an especially useful tool to automate the post-install configuration.
Host profiles are also valuable to companies with very large numbers of hosts, to keep their settings consistent. You can create scheduled tasks in vCenter to check on host compliance. By default, a check for compliance is set to run once every 24 hours when a host profile is applied. Alarms triggers can also be applied, to alert you that profiles are being applied or non-compliance exists. You can only schedule tasks around compliance, not tasks to apply profiles.
Host profiles are particularly suited to new host installations, because this is when most of the work involving configuration-setting takes place, and host profiles work best on clusters of identical hardware. Slight differences between hardware can be tolerated, but it's advisable to start with the oldest server with the fewest hardware options (such as additional PCI cards). The profile won't work well if the reference host has more settings configured than a recipient host can apply.
Each profile is captured from a reference host when the settings of one host that has been configured properly are recorded. You can export each profile to a file with the extension .vpf; it's a simple XML-formatted file. To modify and update a profile, you can either change the settings on the reference host and recapture the profile or use the Profile Editor in vCenter, which lets you apply more advanced options. When you use the Profile Editor to change an existing profile, it's advisable to export the original first, rename it, and import it back in. Then you can work on a duplicate profile, test it before it's applied to an entire cluster, and still have the base profile to roll-back to.
Profiles are flexible enough to allow per-host settings, so even though most of the configuration options will be exactly same for every host, each host can vary. The options available for each setting are as follows:
Although you can apply host profiles just to individual hosts, doing so limits the usefulness of host profiles to compliancy. To make the most of this feature, you should try to apply profiles at the cluster level. If you have multiple vCenters in linked mode, then the host profiles aren't available across them. You can export a profile from one vCenter to use in another, but it won't remain synchronized.
Try to minimize the number of different configurations where possible, and group like hosts together. You can apply a profile to a mixed cluster containing legacy vSphere 4.x hosts (ESX and ESXi). It's possible to apply ESX classic profiles to ESXi hosts but not vice versa. The Host Profiles feature can translate the Service Console and VMkernel traffic settings to ESXi management networks, but not the other way around. Therefore, if you have clusters with mixtures of ESX and ESXi hosts, you should use one of the ESX hosts as the reference host to avoid issues.
To apply a profile to a host, that host must first be in maintenance mode. For that reason, you must maintain sufficient redundant capacity with the servers to apply profiles without causing VM outages. Clusters have inherent compliance checks for special features such as DRS, DPM, HA, and FT. You don't need host profiles to keep these settings consistent.
Hardware Monitoring
ESXi's primary hardware monitoring is based on CIM. CIM is an open standard that allows information to be exchanged and can allow control of managed items. For example, Windows Management Instrumentation (WMI) is a CIM implementation, and storage vendors have a version of CIM known as Storage Management Initiative-Specification (SMI-S).
ESXi's CIM usage provides an agentless service to monitor hardware resources. It consists of two pieces: the CIM providers that allow access to particular device drivers and hardware, and the CIM broker that collects the information from all the providers and makes it available via a common API. In addition to the default VMware CIM providers for common hardware on the HCL, you can install supplementary server-vendor, and OEM manufacturer specific CIM providers to extend the hardware-monitoring capabilities.
Because CIM is a common standard, most server-monitoring software can collect information from ESXi servers. vCenter can use the CIM information from the ESXi brokers. You can view this from connected vSphere Clients, and you can set vCenter alarms to warn of failures.
Logging
The collation and retention of logs is not only vital for troubleshooting host issues but also usually necessary for legal compliance reasons. It's important that you configure the hosts correctly for time synchronization with a suitable NTP time source, to ensure that the logs are accurate. Locally, all ESXi server logs are stored in /var/log. An improvement with vSphere 5 is that the logs that were previously combined into just a handful of files are now split into multiple single-purpose logs. This makes finding the pertinent information when troubleshooting that much more straightforward. The logs of primary interest are as follows:
- auth.log ESXi Shell authentication
- esxupdate.log ESXi patches/updates
- fdm.log HA logs
- hostd.log Host management
- shell.log ESXi Shell usage
- sysboot.log VMkernel and module startup
- syslog.log Management service initialization, watchdogs, scheduled tasks, and DCUI
- vmkernel.log Core VMkernel logs (devices, storage/network device/driver events, and VM startup)
- vmkwarning.log VMkernel warnings and alerts
- vmksummary.log ESXi startup/shutdown, uptime, VMs running, and service usage
- vpxa.log vCenter vpxa agent
A little known gem included in the new 5.1 Web Client is the integrated Log Browser. From it you can not only view all the pertinent logs centrally in a simple GUI interface, but it has advanced filtering and searching, can compare multiple logs to each other, and highlights key words and entries. You can review the ESXi logs in a number of other ways:
- vSphere Web Client's excellent log browser
- DCUI: Select View System Logs (can be seen in Figure 2.5)
- ESXi Shell console (local or remote): tail each log file
- vMA/vCLI/PowerCLI: Programmatically retrieve files
- vSphere Windows Client (connected to host or vCenter): Export diagnostic data
- Web browser: http://<hostname>/host (seen in Figure 2.7)
- Syslog server
Summary
Host design is an important foundation for any vSphere deployment. The host is the core component; the efficiency and effectiveness of any design depends on this key underpinning. A deeper understanding of its internal make-up and moving parts helps to ensure that you can respond to the associated design questions.
We've looked at the many decision points regarding ESXi deployment and upgrades. The selection depends on many diverse factors such as the size of the deployment, geographical distribution, available equipment, skills of the support staff, delivery expedience required, frequency of builds and rebuilds, and resilience of the infrastructure. It's feasible that your deployment solution will encompass more than one technique to suit your disparate environment.
The other important aspect of the design, once the deployment is complete, is a grasp of the outcome. Each host's layout and configuration is not a result of happenstance but of several competing factors weighing in, and the upshot can be complex to predict. The image used, hardware, delivery system, destination, and settings applied all determine how a host will react. How the servers cope with key infrastructure pieces like vCenter and the Auto Deploy hosts being offline, the ability of hosts to maintain log files after a crash, and how your operations team needs to subsequently patch the hosts need to be tested thoroughly to vindicate the design.