Chapter 5
Automating SQL Server
WHAT’S IN THIS CHAPTER
- Automate Common Maintenance Activities Using Maintenance Tasks
- Schedule Jobs to Perform Maintenance Activities Using SQL Server Agent
- Secure the Jobs You Create Using SQL Server Agent Security
- Configure SQL Server Agent to Meet Your Needs
- Set Up Database Mail to Enable the SQL Server Agent to Send Notifications
- Schedule Jobs Across Multiple Servers Using the Multi Server Admin Capabilities
Much of the work that a database administrator does is repetitive: backing up databases, rebuilding indexes, and checking for file sizes and disk-space availability. Responding to events such as a full transaction log being out of disk space may also be part of DBA daily life. The problems grow rapidly with the number of servers you must administer. Automating this work is more than a convenience; it is a requirement for enterprise systems.
Two features in SQL Server 2012 come to the rescue of the DBA: Maintenance Plans and SQL Server Agent. Maintenance Plans enable you to automate the routine maintenance activities for a database. Backups, database integrity checks, and index maintenance tasks can be automated with Maintenance Plans. The Maintenance Plan Wizard makes it easy to create Maintenance Plans. SQL Server Agent enables you to manually create a schedule of jobs to be run on a SQL Server, further enhancing the ability of the DBA to automate routine activities.
Maintenance Plans are a quick-and-easy way to automate routine maintenance tasks in SQL Server. They are no more than a user interface on top of regular SQL Server Agent jobs. However, the tasks in a plan aren’t equivalent to job steps because Maintenance Plans are built using SQL Server Integration Services (SSIS), and these are then run as a single SSIS job step in a job that maps to the Maintenance Plan name. For routine maintenance tasks, Maintenance Plans may be all that you need to automate on many SQL Servers.
There are two ways to create and maintain Maintenance Plans. The quick and easy way is to use the Maintenance Plan Wizard, and the manual way is to use the Maintenance Plan Designer.
Maintenance Plan Wizard
This section walks you through the steps to create a backup using the Maintenance Plan Wizard:
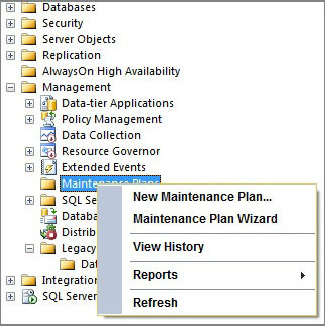
1. First, launch the wizard, which lives on the context menu on the Maintenance Plans node in the Object Explorer in SQL Server Management Studio. Select the Maintenance Plans Wizard menu item to launch the first page of the wizard. Figure 5-1 shows the menu selection to start the Maintenance Plan Wizard.
You can opt to not show this page again and then select Next. This brings up the Select Plan Properties page, where you can set some of the Plan options.
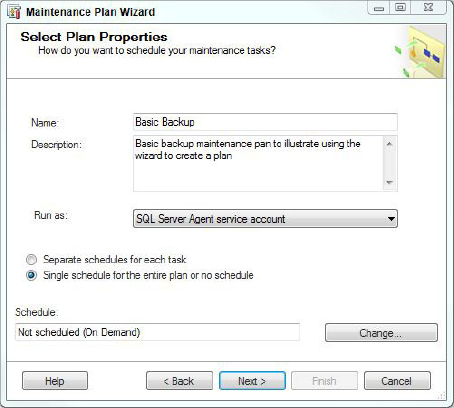
2. On this page, as shown in Figure 5-2, specify a name and description for the plan and select the scheduling options.
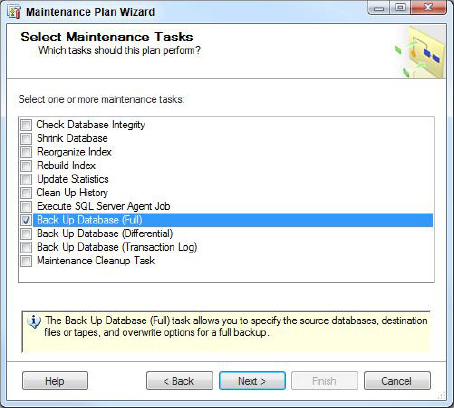
3. Select Next to move to the Select Maintenance Tasks screen where you can choose the tasks you want the plan to perform. For this example select the Back Up Database (Full) option, as shown in Figure 5-3.
4. Select Next to move to the Select Maintenance Task Order screen, as shown in Figure 5-4. If you selected multiple tasks on the previous page, you can reorder them here to run in the order you want. In this example you have only a single task, so click Next.

5. The next page is the Define Back Up Database (Full) Task screen, as shown in Figure 5-5. On this page select the details for the backup task. If you selected a different task on the Select Maintenance Tasks screen, you need to supply the details for that task. In the case of multiple tasks, this step presents a separate page for each task you selected in your plan.

6. Figure 5-6 shows the dialog where you can select the databases you want to back up. This figure shows just one database to back up.

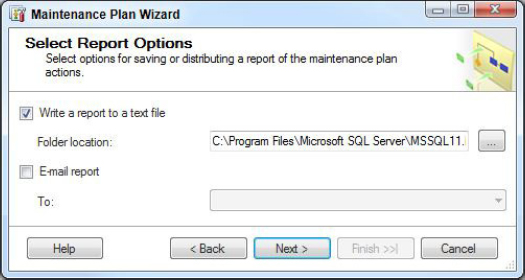
7. On the next page (shown in Figure 5-7), select the reporting options for the plan: write a log to a specific location, send an e-mail, or both.
8. Select Next to go to the final page of the wizard, where you can confirm your selections (see Figure 5-8).
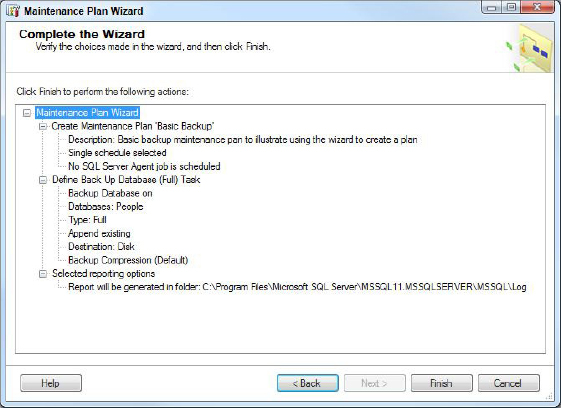
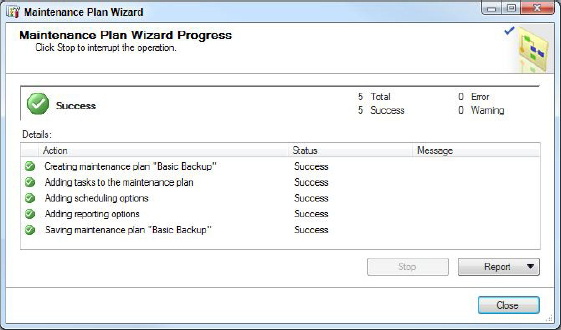
9. Click Finish to create your plan. While the plan is being created, a status page will show you the progress on each step of the plan’s creation, as shown in Figure 5-9.
The new plan now displays in the Object Explorer under the Maintenance Plans node and can be manually run by using the menu from that node.
You should have noticed along the way that the Maintenance Plan Wizard can perform only a limited number of tasks, but these are some of the most important routine maintenance activities on the server. Using this wizard enables you to automate many of the essential tasks needed on a SQL Server.
To explore more details about the plan you just created, look at the job created for this plan in the SQL Server Agent node, under the Jobs node. The job will be named <Your plan name>.subplan_1, so in this example the job name is Basic Backup.Subplan_1.
Maintenance Plan Designer
Now that you’ve used the Wizard to create a basic backup job, it’s time to learn how to use the Designer to achieve the same task:
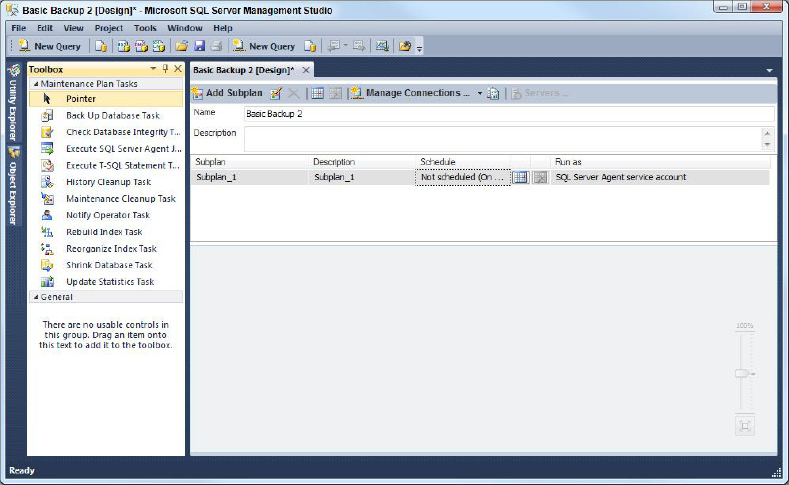
1. Right-click on the Management Node in Object Explorer, and this time select the New Maintenance Plan item. This will open the New Maintenance Plan dialog, which you can see in Figure 5-10. Enter a new plan name, Basic Backup 2, so you don’t conflict with the plan created using the Wizard. Click OK.
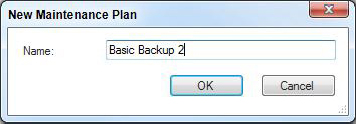
Figure 5-11 shows the Plan Designer dialog that appears. You see two new windows inside Management Studio. The Maintenance Plan Tasks toolbox appears as a pane below the Object Explorer. The Plan Designer window appears on the right side of the screen.
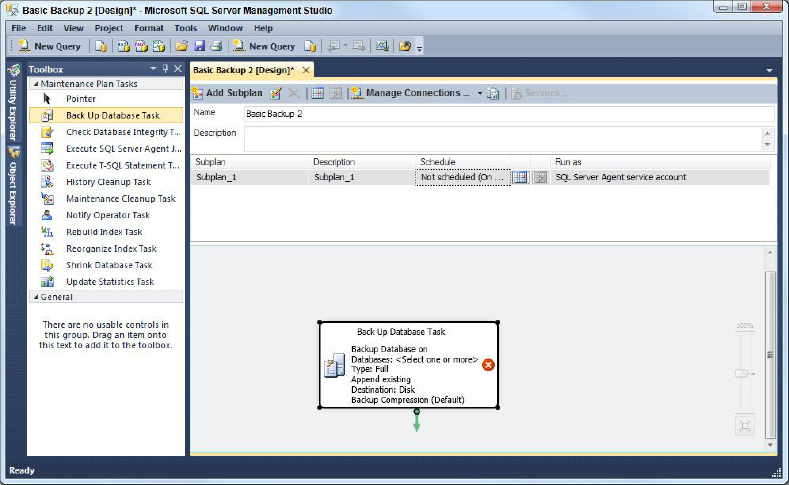
2. To create the basic backup task, click on the Back Up Database Task in the toolbox and drag it onto the designer’s surface. After doing this, your designer will look like Figure 5-12.
3. At this point you have created the basic Backup task, but haven’t defined what the backup task needs to do. To specify the same parameters as you did when using the Wizard, edit the properties of the Back Up Database Task by double-clicking the task on the designer. This opens the task properties screen, shown in Figure 5-13.
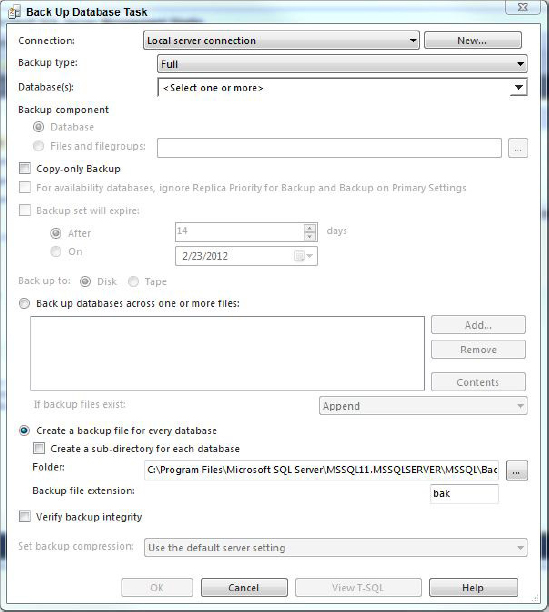
4. This is the same dialog you completed using the Wizard, so select the same database to back up, and the same options you selected when using the Wizard. When you have finished making these changes, click OK to return to the designer. This time the Back Up Database Task no longer has the red warning sign, but now looks like Figure 5-14 (indicating the database you selected).

5. To create the plan you have just designed, merely save it. This creates the plan.
You can use the Plan Designer at any time to edit the plan’s properties.
AUTOMATING SQL SERVER WITH SQL SERVER AGENT
When a Maintenance Plan does not cover all the automation you require on a SQL Server, or anytime you need to do more than you can with a Maintenance Plan, using SQL Server Agent directly is the way to go.
There are four basic components of SQL Server Agent, each of which the following sections discuss:
- Jobs: Defines the work to be done
- Schedules: Defines when the job will be executed.
- Operators: Lists the people who can be notified for job status and alerts
- Alerts: Enables you to set up an automatic response or notification when an event occurs
By default, the SQL Server Agent service is not running, and the service is set to manual after the install of SQL Server. If you use SQL Server Agent service in production, be sure to use SQL Server Configuration Manager to set the Start Mode of this service to Automatic. You should never use the Services Console in the Administrative Tools folder to manage SQL Server Services. As indicated in SQL Server Books Online, using the Services Console to manage SQL Server services is unsupported.
Jobs
A great reason to use SQL Server Agent is to create tasks you can schedule to complete work automatically, such as backing up a database. A SQL Server Agent job contains the definition of the work to be done. The job itself doesn’t do the work but is a container for the job steps, which is where the work is done. A job has a name, a description, an owner, a category, and a job can be enabled or disabled. Jobs can be run in several ways:
- By attaching the job to one or more schedules
- In response to one or more alerts
- By executing sp_start_job
- Manually via SQL Server Management Studio
Job Steps
A job consists of one or more job steps. The job steps are where the work is actually done. Each job step has a name and a type. Be sure to give your jobs and job steps good descriptive names that can be useful when they appear in error and logging messages. You can create a number of different types of job steps:
- PowerShell Job: Enables you to execute PowerShell scripts as part of a Job.
- ActiveX Script: Enables you to execute VBScript, JScript, or any other installable scripting language.
- Operating System commands (CmdExec): Enables you to execute command prompt items. You can execute bat files or any of the commands that would be contained in a bat or cmd file.
- SQL Server Analysis Services command: Enables you to execute an XML for Analysis (XMLA) command. This must use the Execute method, which enables you to select data and administer and process Analysis Services objects.
- SQL Server Analysis Services Query: Enables you to execute a Multidimensional Expression (MDX) against a cube. MDX queries enable you to select data from a cube.
- SQL Server SSIS Package Execution: Enables you to execute an SSIS package. You can assign variable values, configurations, and anything else you need to execute the package. This can save a great amount of time if you already have complex SSIS packages created, and want to execute them from a SQL Agent Job step.
- Transact-SQL Script (T-SQL): Enables you to execute T-SQL scripts. T-SQL scripts do not use SQL Server Agent Proxy accounts, described later in this chapter. If you are not a member of the sysadmin fixed-server role, the T-SQL step can run using your user credentials within the database. When members of the sysadm fixed-server role create T-SQL job steps, they may specify that the job step should run under the security context of a specific database user. If they specify a database user, the step executes as the specified user; otherwise, the step executes under the security context of the SQL Server Agent Service account.
The GUI for T-SQL security can be confusing. Although there is a Run As drop-down on the first page of the Job Step Properties dialog where you set up job steps, this is not where you set the security for T-SQL steps. The Run As drop-down here is used to specify security contexts for other types of steps. To set security for your T-SQL step, click the Advanced tab. At the bottom of the dialog is a Run as User drop-down. Set the T-SQL user security context here.
There are other job-step types that you do not usually create yourself, although it is possible to do so. These jobs, with their associated steps, are usually created by setting up replication. Each job step runs under a security context. The security contexts for other types of job steps are described later in this chapter. The process to set up replication defines jobs that use these step types:
- Replication Distributor
- Replication Merge
- Replication Queue Reader
- Replication Snapshot
- Replication Transaction Log Reader
There is some control of flow related to job steps as well. You may specify an action for when the step succeeds and when the step fails. These actions can be one of the following:
- Quit the job, indicating success.
- Quit the job, with failure.
- Go to another job step.
You may also require that the job step be retried before the job step fails. You may specify the number of retry attempts and the retry interval, in minutes. Once you set these guidelines, a job step will then be retried the number of times you specify in the Retry Attempts field before it executes the On Failure control of flow. If the Retry Interval in Minutes field has been set, the step waits for the specified time period before retrying. This can be useful when there are dependencies between jobs. For example, you may have a job step that does a bulk insert from a text file. The text file is placed into the proper directory by some other process, which may run late. You could create a VBScript job step that checks for the presence of the input file. To test for the file every 10 minutes for 30 minutes, you would set the retry attempts to 3 and the Retry Interval to 10.
When you create a job, you can place it into a job category. Each job can be in only one category. There are several predefined job categories, including [Uncategorized (Local)] and Database Engine Tuning Advisor. You can also create your own job categories.
1. From the Object Explorer Window of SQL Server Management Studio, open the SQL Server Agent item in the tree view and right-click the Jobs Node.
2. From the menu select Manage Job Categories. The dialog box shown in Figure 5-15 appears.

3. Select Add, and the dialog shown in Figure 5-16 appears.

4. Enter the new Job Category name into the Name field, and select OK.
As trivial as it might seem, give some thought to organizing your jobs before creating your categories. You may be surprised how quickly the number of jobs on your server grows, making it difficult to find the correct job.
Job Step Logging
Each time a job is run, job history is created. Job history tells you when the job started, when it completed, and if it was successful. Each job step may be configured for logging and history as well. All the logging setup for a job step is on the Advanced Tab of the job step properties. The Advanced Tab of the Job Step Properties is shown in Figure 5-17 and the key options that affect logging are discussed in the following list.

- Output to File: Job steps executed by sysadmin role members may also have the job step history written to a file. To do so, enter the filename in the Output File text box. Check the Append Output to Existing File check box if you do not want to overwrite the file. Job steps executed by others can log to only dbo.sysjobstepslogs in msdb.
- Log to table: You may also choose to have the information logged to dbo.sysjobstepslogs in msdb. To log to this table, check the Log to Table check box. To include step history from multiple job runs, also check the Append Output to Existing Entry in Table. Otherwise, you see only the most recent history.
- Include step output in history: To append the job step history to the job history, check the Include the step output in history check box.
Anytime you refer to network resources such as operating system files, ensure that the appropriate proxy account has the correct permissions. In addition, always use the UNC name for files, so the job or its steps are not dependent on directory maps. This is an easy place to get into trouble between the test and production environments if you are not careful.
By default, SQL Server stores only 1,000 rows in its Job History Log and a maximum of 100 for any one job. The Job History Log is a rolling log, so the oldest records are deleted to make room for newer job history. If you have a lot of jobs, or jobs that run frequently, the Job History Log can soon become full and start deleting old records. If you need to change the size of the log, you can do so under the SQL Server Agent properties, as shown in Figure 5-18.

Job Notifications
You can configure SQL Server Agent to notify you when a job completes, succeeds, or fails. To do so, follow these steps:
1. In the Job Properties dialog, choose Notifications to see the dialog box shown in Figure 5-19.
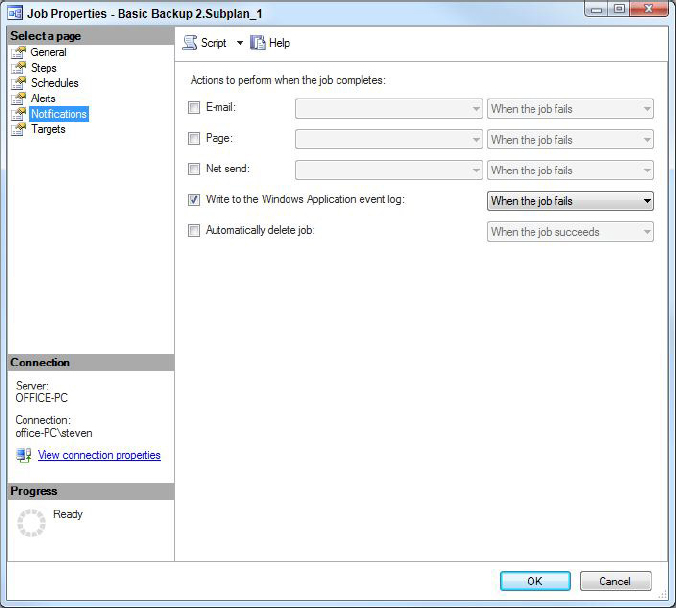
2. A job can send a notification via e-mail, pager, and Net Send. A job can also write to the Windows Application Event Log. As Figure 5-19 shows, there is a line in the dialog box for each of these delivery methods. Place a check beside the delivery method you want; you may choose multiple methods.
3. Click the drop-down menu for each option and choose an operator to notify. An operator enables you to define the e-mail address for the delivery. (Operator setup is described later in this chapter.)
4. Choose the event that should trigger the notification. It can be when the job completes, when the job fails, or when the job succeeds. You may not want to be notified at all for some jobs such as routine maintenance like Index Maintenance. However, for mission-critical jobs, you might want to be e-mailed always when the job completes, and perhaps paged and notified through Net Send if the job fails, so you can know immediately. Examples of more critical jobs where you do want notification might be Backups and DBCC CHECKDB.
Windows Messenger Service must run on the server where SQL Server Agent runs to send notifications via Net Send. You can send a message to any workstation or user that can be seen from the SQL Server Agent server. The target workstation must also be running the Windows Messenger Service to enable it to receive the notification.
Schedules
One of the advantages of SQL Server Agent is that you can schedule your jobs. You can schedule a job to run at any of these times:
- When SQL Server Agent starts
- Once, at a specified date and time
- On a recurring basis
- When the CPU utilization of your server is idle
To create a schedule in Management Studio, select SQL Server Agent, right-click Jobs, and choose Manage Schedules. The scheduler is particularly easy to use. For instance, you can create a schedule that runs on the last weekday of every month. (It is convenient not to have to figure out which day is the last day of the month.) A schedule can be created when you create the job, or it can be created as an independent schedule, and later associated with jobs.
After your schedule is created, you can associate it with one or more jobs. A job can also have multiple schedules. You may want to create a schedule for nightly batching and another for end-of-month processing. A single job can be associated with both schedules. If a scheduled job is triggered when the job is already running, that schedule is simply skipped.
Care and planning should be taken when naming schedules, or confusion can occur. The most common difficulty is deciding if the schedule name should reflect when the schedule runs or what kind of work it includes. You actually can use both time and type indications on the same schedule. An example of this might be Daily Backup Schedule, or Daily Index Maintenance Schedule. For business-related schedules, you might create a schedule named End of Month Accounts Payable or Biweekly Payroll Cycle. Including business names can be convenient for quickly finding a schedule associated with a specific action or process. Including when the work occurs helps if you want to change the frequency of a schedule.
There are also times when the CPU utilization of your server is idle, and these jobs can be worthwhile. You can define when the CPU is idle by setting up the Idle CPU Condition in SQL Server Agent Properties on the Advanced tab. You can define a minimum CPU utilization and a duration here. When the CPU utilization is less than your definition for the duration you specify, CPU idle schedules are triggered. If the CPU is not otherwise busy, you can get some batch-related work done. Be careful, however; if you have many jobs scheduled for CPU idle; they can begin to run quickly and you can overpower your system. Be prudent with the number of jobs of this type that you schedule.
One item that is sorely lacking in SQL Server Agent’s arsenal is the capability to link jobs together so that one begins as the other ends. You can still make this happen though by adding a final step in one job that executes the second job. You can do this using sp_start_job. However using this approach puts all the navigation inside job steps. Navigation between Jobs should not be happening at the Job Step level; it should be outside at the job level. Some third-party tools do a good job of this. However, if you want to do it on your own, it is likely to be difficult to maintain.
Operators
An operator is a SQL Server Agent object that contains a friendly name and some contact information. Operators can be notified on completion of SQL Server Agent jobs and when alerts occur. (Alerts are covered in the next section.) You may want to notify operators who can fix problems related to jobs and alerts, so they may go about their business to support the business. You may also want to automatically notify management when mission-critical events occur, such as failure of the payroll cycle.
You should define operators before you begin defining alerts. This enables you to choose the operators you want to notify as you are defining the alert, saving you some time. To create a new operator, follow these steps:
1. Expand the SQL Server Agent Node in the Object Explorer in SQL Server Management Studio.
2. From there, right-click Operators and select New Operator. The New Operator dialog shown in Figure 5-20 appears, and here you can create a new operator. The operator name must be unique and fewer than 128 characters.

Operator Notifications
Jobs enable you to notify a single operator for three different send types:
- E-mail: To use e-mail or pager notifications, Database Mail must be set up and enabled, and SQL Server Agent must be configured. For e-mail notifications, you can provide an e-mail address. You may provide multiple e-mail addresses separated by semicolons. This could also be an e-mail group defined within your e-mail system. If you want to notify many people, it is better to define an e-mail group in your e-mail system. This enables you to change the list of people notified without having to change every job.
- Pager: For pager notifications, you also provide an e-mail address. SQL Server Agent does not come equipped with paging. You must purchase paging via e-mail capabilities from a third-party provider. SQL Server Agent merely sends the e-mail to the pager address. Your pager software does the rest. Some pager systems require additional configuration characters to be sent around the Subject, CC, or To line. This can be set up in SQL Server Agent Configuration, covered at the end of this chapter.
Notice that there is a Pager on Duty Schedule associated with the Pager E-mail Name. This applies only to pagers. You can set up an on-duty schedule for paging this operator and then set this operator to be notified regarding an alert or job completion. When the job completes or the alert occurs, the operator will be paged only during her pager on-duty schedule.
- Net Send: You can also use Net Send to notify an operator. To use Net Send, Windows Messaging Service must be running on the same server as SQL Agent. Additionally, you must provide the name of the workstation for this operator, and a Message dialog box pops up on her workstation. Out of these three, Net Send is the least reliable method of notification because the message is only available for a short period of time. If the operator is not at his desk at the time when the Net Send arrives, or the target server is offline or unavailable for any reason, the message will not be delivered.
Notifications from alerts can reach multiple operators. This provides you with several convenient options. For example, you can create an operator for each shift (First Shift Operators, Second Shift Operators, and Third Shift Operators), set up a group e-mail and a group page address for each of the shifts, set up the pager-duty schedule to match each shift’s work schedule, and add all three operators to each alert. If an alert set up like this occurs at 2:00 a.m., then only the third-shift operators will be paged. If the alert occurs at 10:00 a.m., then only the first-shift operators will be paged.
There are several limitations of the schedule. Notice that the weekday schedule must be the same every day; although, you can specify a different schedule for Saturday and Sunday. Additionally, there is nothing to indicate company holidays or vacations. You can disable operators, perhaps because they are on vacation, but you cannot schedule the disablement in advance.
Failsafe Operator
What happens if an alert occurs and no operators are on duty, according to their pager on-duty schedule? Unless you specify a failsafe operator, no one would be notified. The failsafe operator is a security measure that enables an alert notification (not job notification) to be delivered for pager notifications (not e-mail or Net Send) that could not be sent. Failures to send pager notifications include the following:
- None of the specified operators are on duty.
- SQL Server Agent cannot access the appropriate tables in msdb.
To designate an operator as the Failsafe Operator, perform the following steps:
1. Select the properties of SQL Server Agent.
2. Select the Alert system tab as shown in Figure 5-21.
3. In the Fail-safe operator section select Enable fail-safe operator.
The failsafe operator is used only when none of the specified pager notifications could be made or msdb is not available. If you have three pager operators associated with a specific alert, and one of them is notified but two of them failed, the failsafe operator will not be notified.
You can indicate whether the failsafe operator will be notified using any or all of the three notification methods discussed in the previous section. However, a failsafe operator can be notified only if a pager notification cannot be successfully delivered, in which case the failsafe operator can be notified via e-mail, pager, Net Send, or a combination of these methods.
Because the failsafe operator is a security mechanism, you may not delete an operator identified as failsafe. First, you must either disable the failsafe setup for SQL Agent or choose a different failsafe operator. Then you can delete the operator. Disabling an operator defined as failsafe can prevent any normal alerts or job notifications from being sent but cannot restrict this operator’s failsafe notifications.
Alerts
An alert is an automated response to an event. An event can be any of the following:
- SQL Server event
- SQL Server performance condition
- Windows Management Instrumentation (WMI) event
An alert can be created as a response to any of the events of these types. The following responses can be triggered as the result of an event alert:
- Start a SQL Server Agent job
- Notify one or more operators
While you may notify only one operator of each notification type for job completion, you can notify multiple operators for alerts.
To create an alert, follow these steps:
1. Open the New Alert dialog (see Figure 5-22) by selecting New Alert from the context menu on the Alerts Node under the SQL Server Agent node in SQL Server Management Studio.

2. When you create an alert, you give it a name. Ensure that this name tells you something about what is going on; it will be included in all messages. Names such as Log Full Alert or Severity 18 Alert on Production might be useful.
3. Then choose the event type on which the alert is based (refer to Figure 5-22). SQL Server events and SQL Server performance condition events are covered in this section; WMI events are outside the scope of this book and not addressed here.
SQL Server Event Alerts
The SQL Server event alerts are based mainly on error messages. You can create an alert based on one of two things: a specific error number or on an error’s severity level.
For an alert based on a specific error number, you might create an alert on error number 9002 (log file full) or error number 1105 (out of disk space). An alert can be fired for any particular database or all databases. You may for example care to get this alert only when the Production database transaction log is full, not when the other test and development databases run out of log space. In this case, choose the Production database in the Database name drop-down list. If you want to alert on two databases but not all of them, you have to create two separate alerts. SQL Server doesn’t currently support multiple database alerts.
It is common to set up alerts on error 9002 for your important databases to notify you if the database is out of log space. This way, by the time your users call on the phone, you can tell them you are already aware of the problem and are working on it.
Each error also has a severity level, and you can choose to create an alert based on this specific severity level. For instance, severity 19 and above are fatal server errors, and you may want to receive an alert when any fatal SQL error occurs. If so, you would create alerts for each severity level from 19 through 25.
When using various combinations of error number and severity level alerts, it is important to remember that error number alerts trump error severity level alerts. For example, if you create an alert on one specific error number that has a severity level of 16 and then also create another alert for all severity-16 errors, only the error number alert will fire. You can think of the severity-level alert as a backup. Alerts defined on specific error numbers fire when the error occurs. For all other errors of that severity, the severity-level alert fires as needed.
If you create two of the same error-level or severity-level alerts in the same database, then only one gets fired. For example, suppose you create an alert on message number 50001 in a database called Production and another alert on message number 50001 for <all databases>. In this case, when the error message occurs in Production, the alert for Production fires, not the <all databases> alert. The <all databases> alert fires for a message number 50001 that occurs in any database other than Production. The lesson here is that the most local handling of an event will trump a more general specification.
You may also create an alert that has an additional restriction on the text of the message. You can create an alert using the same process as previously stated at the beginning of the Alerts section, but check the box Raise Alert When Message Contains, and enter a text string in the text box. The alert then fires only on messages that include the specified text. For example, you could create an event that fires when the text Page Bob is included in the error message. Then applications could raise user errors that cause the alert to occur, paging Bob. The same principle as before applies here though: If a message with matching text is sent, the associated alert fires. The more general alert fires only if there is no text match.
SQL Server alerts work by watching the operating system application event log. If the event is not logged, the alert does not fire. However, you can use the sp_altermessage system stored procedure and specify @parameter = 'write_to_log' to change the behavior such that the event is now logged.
You can create error messages with the sp_addmessage stored procedure. You may specify whether the message is logged. For example, you can create a simple message using the following SQL:
sp_addmessage 50001,16 ,'MESSAGE', @with_log = 'TRUE'
The preceding message has a message number of 50001 and a severity level of 16. You can then create alerts to test your system. Set these alerts to use e-mail as the response. To test the alert, use the following code:
Raiserror(50001,16,1)with log
Select * from msdb.dbo.sysmail_allitems
Raiserror sends the error message. You can log an error message using the Raiserror command if you have the appropriate permissions.
Select displays all the mail items. Scroll to the bottom of the list to check for the mail notification that has been attached as a response to the alert.
SQL Server Performance Condition Alerts
When you install SQL Server, a collection of Windows Performance Monitor counters is also installed. The Windows Performance Monitor tool enables the operations staff to monitor the performance of the server, including CPU utilization, memory utilization, and much more. When SQL Server is installed, an additional collection of monitor counters is added to enable DBAs to monitor the performance and status of SQL Server instances. You can create an alert on a condition based on any SQL Server counter. For more information on monitoring SQL Server using Performance Counters, refer to Chapter 12, “Monitoring Your SQL Server.” A SQL Server performance condition alert is shown in Figure 5-23.

You cannot create multicounter alerts. For example, you cannot create an alert that fires when Percent Log Used is greater than 80 and Transactions/sec is greater than 100. You must choose to alert on a single counter.
Performance counters are grouped according to their objects. For instance, the Databases object contains the counters associated with a specific database, such as Percent Log Used and Transactions/sec. The Buffer Manager object includes counters specific to buffer management. To begin creating an alert, follow these steps:
1. Choose the object and then the counter for which you want to create an alert.
You cannot create SQL Server alerts on counters that are not specifically for SQL Server, such as CPU utilization. However, the Performance Monitor tool gives you the capability to set alerts for these other non-SQL Server counters.
2. The next choice you make is in the Instance text box. When you choose Databases objects, the Instance text box contains the list of databases. Select the database on which to create the alert.
3. Next is the Alert if Counter box. You can alert if the counter falls below, becomes equal to, or rises above a value you specify. Specify the value in the Value text box.
While you can still create an alert to notify you when the transaction log becomes full, this is not ideal because by then, it is a little too late. It would be better to know when it looks like the log may become full but before it actually does. You can do this by creating a performance condition alert on the Percent Log Used counter for the Databases object for the database you are interested in.
1. Choose when the counter rises above some safe limit, probably 80 to 95 percent. You can then be notified before the log is full.
2. Adjust this actual value so that you are not notified too quickly. If you have set up your log to be what you believe is large enough, you might instead want to notify on autogrowths.
WMI Event Alerts
Windows Management Instrumentation (WMI) is a tremendously powerful mechanism, but is also the least understood of all the alerting technologies.
SQL Server 2005 introduced the WMI Provider for Server Events which translates WMI Query Language (WQL) queries for events into event notifications in a specific database. For more information on using event notifications see Chapter 12, “Monitoring Your SQL Server.”
To create a WMI event alert, select WMI event alert as the Type for the alert, validate the namespace is correct, and enter your WQL query.
Alert Responses
As was previously discussed, you can respond to an alert by starting a SQL Server Agent job or notifying one or more operators. You set this up on the Response tab of the Create Alert dialog box. To execute this job, simply check the check box and choose an existing job or create a new job. To notify an operator, check the appropriate box, and select the operators you want to notify by choosing one or more of the notification methods. For alerts, it is nice to have an operator for each shift you must cover, with the pager on duty set up appropriately, as discussed in the “Operators” section earlier in the chapter.
As you think about how you might best use this in your enterprise, imagine a scenario such as the transaction log getting full. You could set up a performance alert to notify operators when the log is actually full and run a job that grows the log. You could set up an alert that backs up the log when it becomes 80 percent full.
The scenario might play out as follows. You are having lunch and your pager goes off, notifying you that the log is 70 percent full. A job runs automatically that tries to back up the log to free space. In a couple of minutes you get a page telling you that the job completed successfully. After a few more potato chips, your pager goes off yet again — the log is now 80 percent full. The prior log backup did not free up any space. There might be a long-running transaction. The log backup job runs again, and you are notified upon its completion. You finish your lunch with no other pages. This means the last log backup freed up some space and you are now in good shape.
Your pager may have gone off again, telling you that the log is nearly full, and has either been extended with autogrow, or a job to extend the log has run and extended the transaction log onto an emergency log disk. It’s probably time for you to get back to work, but the automation you have brought to the system has already been fighting this problem while you ate your lunch, notifying you of each step. With some thoughtful consideration, you might account for many planned responses such as this, making your life easier and operations tighter.
The Alert Options page in the Create Alert dialog box enables you to do several things:
- Specify when to include more detailed information in the notification. Sometimes the error text of the message might be long. Additionally, you may have a limit on the amount of data that can be presented on your devices. Some pagers limit you to as few as 32 characters. You should not include the error text for those message types that cannot handle the extra text, which are most commonly pagers.
- Add information to the notification. The dialog includes a large text box labeled Additional Notification Message to Send. You can type any text here, and it will be included in the notification message. Perhaps something such as Get Up, Come In, and Fix This Problem Immediately might be appropriate.
- Delay the time between responses. At the bottom of the dialog, you can set a delay between responses. The default value for this is 0. Imagine a scenario in which an alert goes off many times during a short period. Perhaps a program is repeatedly executing raiserror or a performance condition alert is going wild. The performance condition alerts that run to alert of limited resources are especially vulnerable to this problem. You run low on memory, which causes an alert or job to run, which uses more memory. This causes the alert to fire again, using more memory, repeatedly. You are paged repeatedly as well.
You can right-click any of the SQL Server Agent objects and create a script that can drop or create the object. If you want the same object to exist on many servers, you can script it out, change the server name, and load it onto a different server. This means you would have to keep operators, jobs, alerts, and proxies in sync between multiple servers, which could be painful and error prone. Event forwarding can also simplify your life when you administer many servers. Multiserver jobs and event forwarding are covered later in the section “Multiserver Administration.”
SQL Server Agent security is more fine-grained than ever. This section covers not only the service account, but also security issues such as who can create, see, and run SQL Server Agent jobs. SQL Server 2012 enables multiple, separate proxy accounts to be affiliated with each job step. These proxy accounts are associated with SQL logins, which provide excellent control for each type of job step.
Service Account
The SQL Server Agent service account should be a domain account if you plan to take advantage of Database Mail or require any network connectivity. The account should map to a login that is also a member of the sysadmin fixed-server role.
Access to SQL Agent
After the installation, only members of the sysadmin fixed-server role have access to SQL Server Agent objects. Others cannot even see the SQL Server Agent object in the Object Explorer of Management Studio. To give other users access to SQL Agent, you must add them to one of three fixed database roles in the msdb database:
- SQLAgentUserRole
- SQLAgentReaderRole
- SQLAgentOperatorRole
The roles are listed in order of increased capability, with SQLAgentOperator having the highest capability. Each higher role includes the permissions associated with the lower roles, so it is not necessary to assign a user to more than one role.
Members of the sysadmin fixed-server role have access to all the capabilities of SQL Server Agent and do not have to be added to any of these roles.
SQLAgentUserRole
Members of the user role have the most restricted access to SQL Server Agent. They can see only the Jobs node under SQL Server Agent and can access only local jobs and schedules that they own. They cannot use multi-server jobs, which are discussed later in this chapter. They can create, alter, delete, execute, start, and stop their own jobs and job schedules. They can view but not delete the job history for their own jobs. They can see and select operators to be notified on completion of their jobs and choose from the available proxies for their job steps.
SQLAgentReaderRole
The reader role includes all the permissions of the user role. It can create and run the same things as a user, but this role can see the list of multi-server jobs, including their properties and history. They can also see all the jobs and schedules on the local server, not just the ones they own. They can see only the Jobs node under SQL Server Agent as well.
SQLAgentOperatorRole
The operator role is the least restricted role and includes all the permissions of the reader role and the user role. This role has additional read capabilities and execute capabilities. Members of this role can view the properties of proxies and operators. They can list the available proxies and alerts on the server as well. Members of this role can also execute, start, or stop local jobs. They can enable or disable any job or operator; although, they must use the sp_update_job and sp_update_schedule procedures to do so. They can delete job history for any job. The Jobs, Alerts, Operators, and Proxies nodes under SQL Server Agent are visible to this role. Only the Error Log node is hidden.
SQL Server Agent Proxies
A SQL Server Agent Proxy defines the security context under which different job steps run. In the case where the user who creates a SQL Server Agent job does not have permissions to access the resources needed by the job, the job creator can specify a proxy. The proxy contains the credentials of a Windows user account that does have access to the resources needed by the job. For job steps that have a proxy specified, SQL Server Agent impersonates the proxy account and runs the job step while impersonating that user account.
SQL Server Agent Subsystems
SQL Server Agent subsystems are objects that group similar sets of functionality that can be used by SQL Server Agent proxies. These subsystems provide a security boundary that enables a more complex security model to SQL Agent Proxies.
SQL Server Agent has 11 subsystems on which security can be placed. When you add a job step, it appears in the following order:
- ActiveX Script
- Operating System (CmdExec)
- PowerShell
- Replication Distributor
- Replication Merge
- Replication Queue Reader
- Replication Snapshot
- Replication Transaction Log Reader
- Analysis Services Command
- Analysis Services Query
- SSIS Package Execution
- Transact SQL
The permissions for Transact SQL are not governed by proxy. All users execute T-SQL under their own account. If you are a member of the sysadmin group, you can choose any SQL login as the Run As Account. All the other subsystems use one or more proxies to determine permissions for the subsystem.
Subsystem Permissions
Each subsystem has its own permissions, but the proxy combines the permissions for the CmdExec step and the users who may run under this proxy. Figure 5-24 shows the basic relationship among the parts.

Because the proxy combines these permission, it is difficult to determine which operating-system permissions are used when someone executes a CmdExec job step. Issues may arise when setting permissions for proxies, so it is important to perform the set-up correctly the first time. The following steps show the setup for permissions for the operating system (CmdExec) subsystem.
1. First, you must create a credential. The easiest way to do this is in Management Studio: Expand Security, right-click on Credentials, and choose New Credential. A dialog box like the one shown in Figure 5-25 displays.

2. Give the credential a friendly name, and associate it with a Windows login or group. You must also provide the password to complete the creation. The permissions associated with this login or group will be the permissions applied to the CmdExec job step.
If your SMTP Server requires a login, you may want to set up a specific local account with minimum permissions specifically for sending SMTP mail. The sole purpose of this account is to follow the principle of least privileges; it should be used for nothing else.
3. Now you can create your proxy. In Management Studio, expand SQL Server Agent, right-click Proxies, and choose New Proxy. You get a New Proxy Account dialog box, as shown in Figure 5-26.
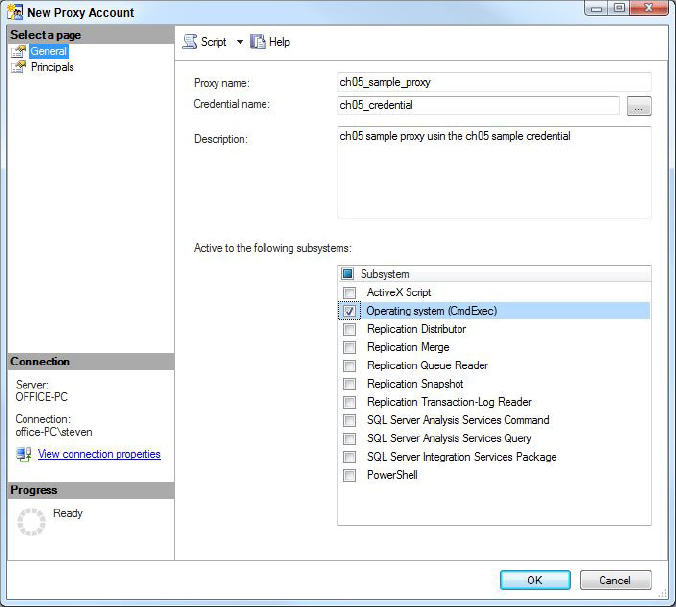
4. Give the proxy a name that provides information about its security level or its intended use. Then associate a credential with the proxy. The proxy provides the permissions associated with its credential when it is used. Provide a more detailed description of what the proxy enables and how it should be used and when.
5. Then select the subsystems that can use the proxy. A proxy can be associated with many subsystems.
6. Create a list of users (principles) who may use this proxy. This is done on the Principles page. A principle can be a Server Role, a SQL Login, or an msdb role.
7. Now assume you have created the two proxies for the CmdExec subsystem (refer to Figure 5-24). Your SQL login is associated with both proxies. You want to create a job that contains a CmdExec job step. When you add the job step, open the drop-down labeled Run As, which contains a list of all the proxies you are allowed to use for your job step. Each proxy has its own permissions. Choose the proxy that contains the permissions you need for your job step, and you should be ready to go.
Now that you have learned how things work in SQL Agent, you can take on the configuration task. You already know about some of the configuration options, so now you can go through the different pages to configure the SQL Server Agent properties.
To start configuration, right-click the SQL Server Agent node in Management Studio, and choose Properties.
General Properties
The General page appears, as shown in Figure 5-27. Review each section on this page and consider the following:
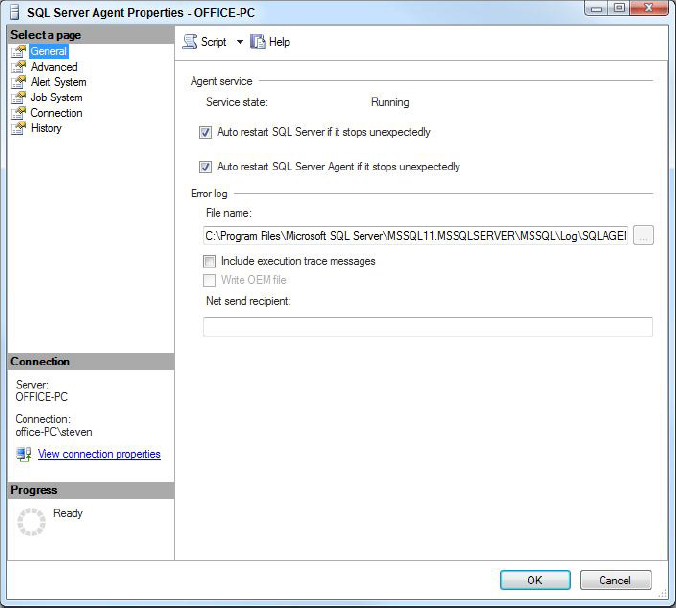
- Check the two top check boxes: Auto Restart SQL Server If It Stops Unexpectedly and Auto Restart SQL Server Agent If It Stops Unexpectedly. The Service Control Manager watches both of these services and automatically restarts them if they fail.
- Usually you leave the error-log location at the default; however, you can change it if you want. If you need some additional logging, check Include Execution Trace Messages. Execution Trace Messages provide detailed information on SQL Agent operation which is written to the SQL Agent Error Log. Enabling this option increases the space used in the SQL Agent Log, so Agent log size is something to consider when enabling this option.
- To get a Net Send when errors are logged, enter a workstation name in the Net Send Recipient text box. Of course, Windows Messaging Service must be running on the server for Net Sends to occur.
Advanced Properties
Choose the Advanced Page on the top left, which brings up the dialog shown in Figure 5-28. There are several options from which to choose on this page:
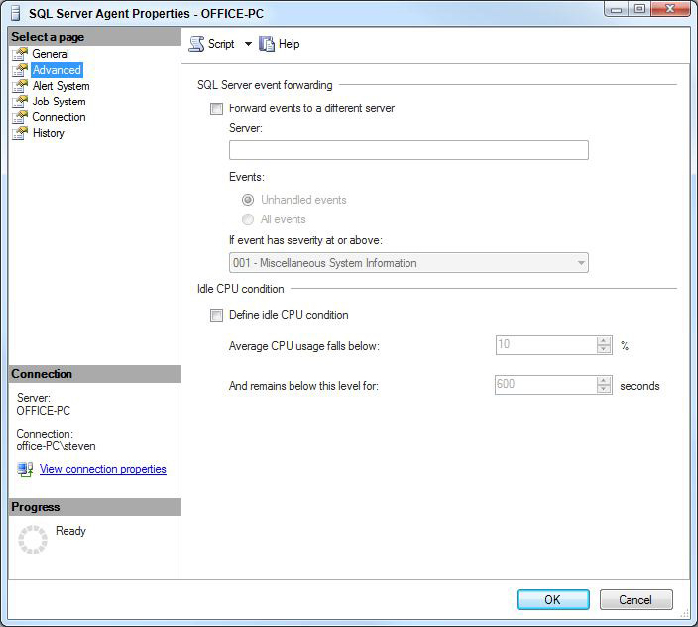
- The top section, SQL Server Event Forwarding, enables you to forward your events from one server to another. You can set up operators and alerts on a single server and then have the other servers forward their events to the single server. To use this capability, you also need to understand how to use SQL Server Agent tokens, which are covered in the section “Using Token Replacement” later in this chapter. If you want to employ this capability, check the box labeled Forward Events to a Different Server. Then select the server name. You can forward all events or only unhandled events. An unhandled event is one that does not have an alert defined for it. You also select how severe the error must be before it can be forwarded. For example, you may not want anything less than a severity 16 error (Miscellaneous User Error) to be forwarded. Whether you forward severity 16 errors depends on whether you have application-defined errors that specify notifications. If you plan to use this capability, you also need to understand how to use SQL Server Agent tokens, which are covered in the section “Using Token Replacement” later in this chapter.
- The second section is Idle CPU Condition. Recall that you can create a schedule that runs when the CPU becomes idle. This is where you define what idle means. The default is CPU utilization at less than 10 percent for 10 minutes.
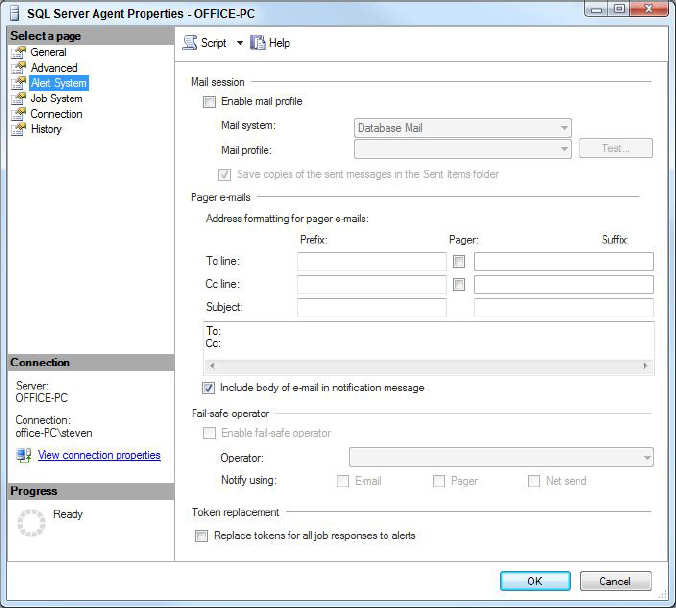
Alert System Properties
The next page is for the Alert System, as shown in Figure 5-29.
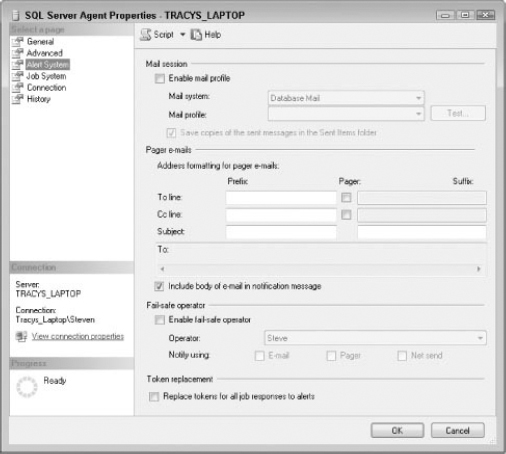
- If you plan to use Database Mail, you do the setup here. Although you may have many mail profiles in Database Mail, SQL Server Agent uses only one profile. Choose the mail system and profile.
- The second section is for pager e-mails. If your pager system requires special control characters in the To, CC, or Subject line, you may add those characters here in front of the item (prefix) or after the item (suffix). As you make changes, you can see the effect in the small box below your data-entry section. You may also choose to include or exclude the body of the e-mail for pagers by indicating your selection in the appropriate check box.
- The third section enables you to provide failsafe operator information. Please use this if you are doing any notifications. It is too easy to change a schedule in such a way that results in no one being notified, so don’t get caught. Enable this section, choose an operator, and indicate how the failsafe messages should be delivered (by e-mail, pager, Net Send, or some combination of these).
- The last check box enables you to specify whether you want to have tokens replaced in jobs run from alerts. Details of token replacement are covered in the section “Multiserver Administration” later in this chapter.
Job System Properties
The Job System page is next, as shown in Figure 5-30.
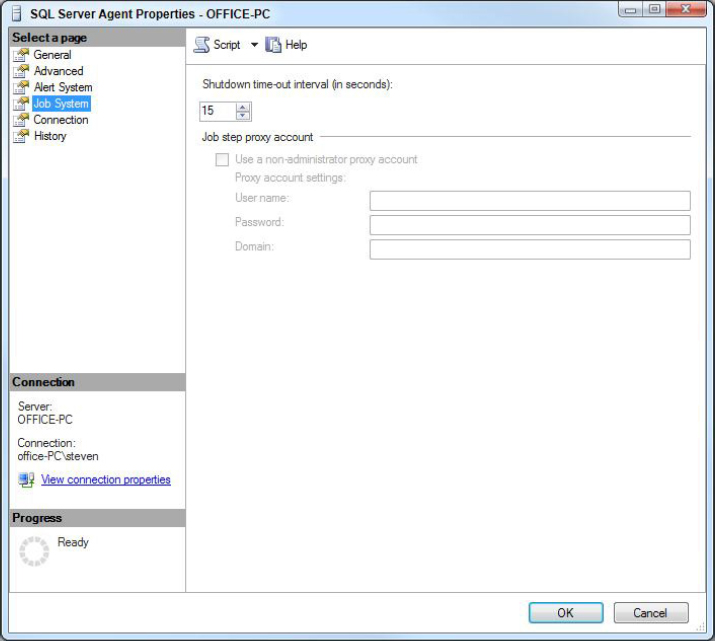
- In the first section, you can specify the shut-down period (in seconds) in the Shutdown time-out interval list. For instance, suppose you are trying to shut down SQL Agent, and jobs are running. You can specify how long SQL Server Agent should wait for jobs to complete before killing them and shutting down.
- The second section is only available if you administer a SQL Server 2000 Agent. This enables you to set the backward compatible nonadministrator proxy. SQL 2000 allowed only one proxy. SQL Server 2005, 2008, and 2012 allow many proxies, so this is not necessary when administering SQL Server 2005, 2008, and 2012 Agents.
Connection Properties
The Connection page is one that most users do not need. SQL Server Agent connects to SQL Server, by default, using the server name, the default port, the SQL Server Agent Service account, and the highest-matching protocol between the client configuration and the protocols enabled for SQL Server. There are several circumstances in which you may want to alter these defaults:
- Your server has multiple network cards, and you want to specify a particular IP or port.
- You want to connect using a specific protocol (IP, for instance).
- You want SQL Server Agent to connect to the server using a login different from the service account login.
To create an alias for SQL Server, follow these steps:
1. Open Configuration Manager.
2. Expand the SQL Native Client Configuration, right-click Aliases, and choose New Alias.
3. Set up the alias to suit your connectivity needs.
4. On the SQL Server Agent Connection page, enter the alias name and the connection information you want SQL Server Agent to use. Although SQL Server authentication is allowed, it is not recommended.
History Properties
The last page is the History page, shown previously in Figure 5-18. Here you can limit the size of the job history log to a fixed number of rows, and the Maximum Job History Rows per Job option is a lifesaver. Imagine a job that runs repeatedly. It could be a job scheduled by a user to run every second, or it could be a job that runs from an alert that occurs repeatedly. In any case, the log entries from this job could fill up your entire job history, and you would have no history information for any other jobs. That could leave you in a tough spot if any other job needed debugging. This is exactly the situation that Maximum Job History Rows per Job is intended to prevent. The default is 100 rows, but you can change it based on your needs.
Database Mail appeared with SQL Server 2005 and was a welcome replacement for SQLMail; Database Mail and SQLMail both enable you to notify operators via e-mail and to send e-mails via stored procedures, but Database Mail is more secure, more reliable, and does not rely on MAPI. It uses Simple Mail Transfer Protocol (SMTP). It is cluster-aware, and enables automatic retry of failed e-mail messages and failover to another SMTP server should the first become unavailable. Database Mail also enables you to set up multiple accounts and provide secured or public access to the accounts.
Database Mail is not available in the Express Edition of SQL Server.
Architecture
Database Mail is loosely coupled to SQL Server and it uses queuing provided by Service Broker technologies, as shown in Figure 5-31. When an e-mail is sent, either by calling sp_send_dbmail or from SQL Server Agent notifications, security is checked. The e-mail is stored in a table in msdb, and a message is placed in the Service Broker message queue in msdb. This activates an external program, DatabaseMail.exe, located in the MSSQLBinn directory. DatabaseMail.exe reads the message and sends the e-mail with any attachments to one or more SMTP mail servers. It then places a message in the status queue, containing the results of the send process. The status queue insert activates a stored procedure in msdb to update the status of the e-mail in msdb.

Security
For security reasons, Database Mail is disabled by default. You can enable and configure it by running the Database Mail Configuration Wizard, or running the Database Mail XPs.
Additionally, to send notifications via Database Mail from SQL Agent, SQL Server Agent must be configured to use Database Mail, as covered in the “SQL Server Agent Configuration” section of this chapter.
The external program, DatabaseMail.exe, must have network access to the SMTP servers. It runs using the security credentials for the SQL Server Service account. Therefore, the SQL Server Service account must have network access, and the SMTP servers must enable connections from the SQL Server computer. Database Mail supports Secure Sockets Layer (SSL) if it is required by the SMTP server.
Local System and Local Service do not have network access and cannot be used as service accounts for SQL Server if you use Database Mail. Database Mail cannot connect to another computer (the SMTP server) when using either of these local accounts.
To send Database Mail, you must either be a member of the sysadmin fixed-server role or be a member of the DatabaseMailUserRole in msdb. You can place a size limit on mail attachments and prohibit attachments with certain file extensions.
Configuration
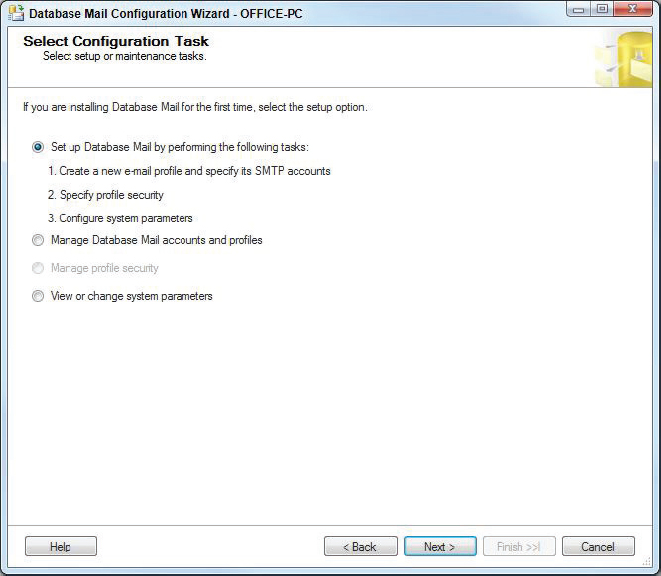
To use Database Mail, you need to do some configuration. Specifically, you need to set up the Database Mail account, configure the mail procedure itself, and set up archiving. This is achieved using the Database Mail configuration Wizard. The first page of the Database Mail configuration wizard is shown in Figure 5-32.
Database Mail Account
A Database Mail account is a basic unit of configuration for Database Mail. An account contains the following configuration information:
- “From” information for the e-mail messages: All outgoing e-mail messages indicate that they are from the account you provide here. This does not have to be a real e-mail account.
- “Reply to” e-mail address: If the recipient of one of these e-mails tries to reply, the reply is sent to the e-mail address provided for this account.
- SMTP connection information: The SMTP Server name and port number are included in the account configuration. Database Mail supports encrypted and unencrypted messages. Encryption is done via Secure Sockets Layer (SSL). Whether you want the messages from this account to be encrypted is included in the account configuration.
- E-mail retry configuration: You may specify how many times to retry sending an e-mail and a wait period between retries.
- E-mail size limits: You may set a maximum size limit allowed for e-mails from this account.
- Excluded attachment extension list: You may provide a list of file extensions. Any attachment that has a file extension in the prohibited list will not be allowed.
- Logging level: You may specify how much logging should be done for this account.
If your passwords time out on a regular basis, your job steps begin to fail. You have to reset the passwords for each credential or increase or drop the password expiration for the special accounts. These accounts should be created specifically for this and have the minimum security necessary for the job step to complete successfully.
You should plan your implementation carefully. You may set up more than one Database Mail account. For example, you may want to have accounts for several different SMTP servers. This would enable you to automatically failover from one to another. This is done via profiles, which is covered in the next section. You may also want to set up a special account that allows dangerous extensions or large attachments to be sent, and restrict that account to special users.
Another reason to set up multiple accounts is to provide different From and Reply to addresses. You may want to do this for several departments in your company. For instance, you might set up an account named Accounts Payable that has a From address of [email protected] and a Reply to address of [email protected]. This reply address could be an e-mail group that sends to the accounts payable service reps at your company.
Setup
In this section, you set up Database Mail.
1. Use the wizard by expanding Management in SQL Server Management Studio. Right-click Database Mail and choose Configure Database Mail. This launches the Database Mail Configuration Wizard and shows the wizards welcome page.
2. Click Next on the Welcome page. The next page in the wizard is the Select Configuration page, and is shown previously in Figure 5-32. Check the top radio button to indicate you are setting up Database Mail for the first time. Click Next.
3. If you haven’t previously enabled Database Mail, you receive a message box asking if you want to enable the Database Mail feature. Choose Yes and continue.
4. This brings you to the New Profile dialog box, as shown in Figure 5-33. To continue, you need to add at least one mail account. Click the Add button to display the New Database Mail Account dialog, as shown in Figure 5-34. Here you provide the information needed to communicate with an SMTP server. Choose a name and description for this account.


E-mails sent from this account will be tagged from the e-mail address and display name that you set in this section. If the recipients reply to the e-mail, the reply will be sent to the address you supply in the Reply e-mail text box.
5. In the Server name text box, provide the name of the SMTP server. This is usually in the form of smtp.myserver.com. Do not provide the complete URL, such as http://smtp.myserver.com. Database Mail does this for you. If you check the box labeled This Server Requires a Secure Connection (SSL), the URL created will be https://smtp.myserver.com. The default port number of 25 will suffice unless you have changed the SMTP port number.
6. Provide the SMTP login information in the SMTP authentication section. Not all SMTP servers require authentication; some require only a known sender e-mail, and others require nothing. After supplying the needed information, click OK to return to the New Profile dialog, and then click Next.
7. The next page is the Manage Profile Security dialog, as shown in Figure 5-35. Here you set up public and private profiles. Check the Public check box next to a profile to make it public. You may also want to set this as a default profile.

8. Click Next to move to the Configure System Parameters page. On this page you can change the values for system parameters such as retry attempts, maximum file size, prohibited extensions, and logging level. The default values work well in most cases.
9. Click Next to view the Complete the Wizard page, where you have a last chance to confirm the selections you made before they are applied.
10. Click Finish to apply the changes you made and view progress and a completion report as each set of changes is made.
11. To ensure things are working properly, you should send a test e-mail. In SQL Server Management Studio, expand Management, right-click Database Mail, and choose Send Test E-Mail. You are prompted to enter an e-mail address. Send the mail and wait for receipt.
Archiving
If you are using DBMail and sending mail and attachments, the mail you send and the attachments are stored in tables. These tables don’t have any automatic maintenance, they just continue to grow. To prevent them from filling the database and causing errors, you will need to archive the data in them.
You can access mail information in the sysmail_allitems view. Attachments can be accessed via sysmail_mailattachments, and the mail log is in sysmail_eventlog. The tables under these views are not automatically maintained; they just get larger and larger. Therefore, to perform maintenance, Microsoft provides stored procedures to delete items from these tables: msdb.dbo.sysmail_delete_mailitems_sp and msdb.dbo.sysmail_delete_log_sp. Each of these has two parameters: @sent_before and @sent_status.
- @sent_before takes a datetime value and deletes all log or mail items with a time before the parameter time. When you do not specify a sent_status, all mail items that have a send_request_date prior to the parameter will be deleted, whether or not they have been sent; so be careful.
- @sent_status can have values of unsent, sent, failed, or retrying. When you specify a sent_status, only the mail items that have a sent_status equal to the parameter are deleted.
You may want to archive this information prior to its deletion.
Several tactics within SQL Server 2012 enable you to easily administer multiple servers. The focus of these tactics is to centralize your administration. This can be done by forwarding events to a central event management server, which enables you to centralize alert handling. Another optimization is to use master and target servers to create jobs on a single master server and have the jobs run on multiple target servers.
Using Token Replacement
SQL Server 2012 has some nice capabilities related to SQL Server Agent job tokens. A token is a string literal that you use in your job steps (T-SQL scripts, CMDExec job steps, or Active Script). Before the job runs, SQL Server Agent does a string replacement of the token with its value. Tokens are usable only in SQL Server Agent jobs.
One of the tokens you can use is (STRTDT). For example, you might add the following in a T-SQL job step:
PRINT 'Job Start Date(YYYYMMDD):' + $ESCAPE_SQUOTE(STRTDT))
If you capture the output, it should look like this:
Job Start Date(YYYYMMDD):20120923
Tokens are case-sensitive.
The following is a list of tokens that you can use in any job:
- (DATE): Current Date (YYYYMMDD).
- (INST): Instance name of the SQL Server. This token is empty for the default instance.
- (JOBID): SQL Server Agent job ID.
- (MACH): Computer name where the job is run.
- (MSSA): Master SQLServerAgent service name.
- (OSCMD): Prefix for the program used to run CmdExec job steps.
- (SQLDIR): SQL Server’s install directory. The default install directory is C:ProgramFilesMicrosoftSQLServerMSSQL.
- (STEPCT): The number of times this step has executed. You could use this in looping code to terminate the step after a specific number of iterations. This count does not include retries on failure. This is updated on each step run during the job, such as a real-time counter.
- (STEPID): The job step ID.
- (SVR): The server name of the computer running SQL Server, including the instance name.
- (TIME): Current time (HHMMSS).
- (STRTTM): The job’s start time (HHMMSS).
- (STRTDT): The job’s start date (YYYYMMDD).
The following is a list of tokens that can be used only in a job that has been started from an alert. If these tokens are included in a job started any other way, the job throws an error:
- (A-DBN): Database name where the alert occurred
- (A-SVR): Server name where the alert occurred
- (A-ERR): Error number associated with the alert
- (A-SEV): Error severity associated with the alert
- (A-MSG): Message text associated with the alert
The following token is available for use only on jobs run as the result of a WMI alert (see the “Using WMI” section later in the chapter).
- (WMI(property)): Provides the value for the WMI property named property. $(WMI(DatabaseName)) returns the value of the DatabaseName property for the WMI alert that caused the job to run.
All these tokens must be used with escape macros. The purpose of this change is to increase the security related to the use of tokens from unknown sources. Consider the following token, which you might have included in a T-SQL job step:
Print 'Error message: $(A-MSG)'
The T-SQL job step runs as the result of a user error (raiserror). A malicious user could raise an error like this one:
Raiserror(''';Delete from dbo.Employee',16,1)
The error returned would be:
';Delete from dbo.Employee
The print message would be:
Print 'Error message:';Delete from dbo.Employee
If this happens, it means you have just been attacked with a SQL injection attack. The delete statement runs if the T-SQL job step has permission.
To combat an attack such as this, you must add an escape macro. Because the print statement uses single quotes, a SQL injection attack closes out the single quote and then insert its own SQL. To prevent this attack, you can double-quote any quote that comes in via the token. The escape macro ESCAPE_SQUOTE does exactly that. It is used like this:
Print 'Error message: $(ESCAPE_SQUOTE(A-MSG))'
Continuing the example, you end up with the following:
Print 'Error message:'';Delete from dbo.Employee
You then get an error due to the unmatched quote, and the step fails, keeping you safe.
The following is a list of escape macros:
- $(ESCAPE_SQUOTE(token)): Doubles single quotes (‘) in the replacement string.
- $(ESCAPE_DQUOTE(token)): Doubles double quotes (“) in the replacement string.
- $(ESCAPE_RBRACKET(token)): Doubles right brackets (]) in the replacement string.
- $(ESCAPE_NONE(token)): The token replacement is made without changes. This is used for backward compatibility only.
You can also use these values directly if you ensure proper data types. The SQL script-looping job with tokens contains the following code that terminates a job step after it has executed five times. The top line converts the STEPCT token to an integer so it can be used in a comparison. Then the JOBID token for this job is converted to a binary 16 and passed to the sp_stop_job stored procedure, which can take the job ID of the job you want to stop:
 IF Convert(int,$(ESCAPE_NONE(STEPCT))) >5
   BEGIN
   DECLARE @jobid binary(16)
   SELECT @jobid =Convert(Uniqueidentifier,$(ESCAPE_NONE(JOBID)))
   EXEC msdb.dbo.sp_stop_job @job_id = @jobid
   END
Imagine how you might use the alert-based tokens. You could create a SQL performance alert that fires when the <any database> transaction log becomes greater than 80 percent full. Create a job with a T-SQL step like this:
 DECLARE @a varchar(100)
 SELECT @a ='BACKUP LOG $(ESCAPE_SQUOTE(A-DBN))
   TO DISK = "UNCNameShare$(ESCAPE_SQUOTE(A-DBN))log.bak"'
 SELECT @a
 BACKUP LOG $(ESCAPE_SQUOTE(A-DBN))
   TO DISK = 'UNCNameShare$(ESCAPE_SQUOTE(A-DBN))log.bak'
Here UNCName is the name of the server where you want the backup to be stored and Share is the share on the server. Make sure the job runs when the alert occurs. If the alert fires for NorthAmerica, the backup command looks like this:
BACKUP LOG NorthAmerica TO DISK = UNCNameShareNorthAmericalog.bak
You have to create the directory first and grant appropriate permissions to the proxy you use. You could create a CMDExec step, which creates the directory on-the-fly. Now, a single log backup job can back up any transaction log. You might improve the name of the directory you create in the CMDExec step by adding the date and time to the filename.
Event Forwarding
Where events and alerts are concerned, you can create operators and alerts on a single system and then have the other systems forward their events to your central alert-handling SQL Server, which responds to those alerts as necessary.
Designating a server to forward events to is done on the Advanced Page of the SQL Server Agent properties dialog (refer to Figure 5-28). Check Forward Events to a Different Server then you can specify the server to forward events to.
You can configure which events will be forwarded using by choosing from the options under Events. Here you can choose between Unhandled Events and All Events. If you choose All Events, you can then add a filter on the severity level If Event has Severity at or Above. You can set up operators on your master event management system. Create the jobs that respond to the alerts. Then create alerts on the single master event management system to handle the event. The jobs you create can take advantage of SQL Server Agent tokens and know on which server and database the original event occurred.
Using WMI
Windows Management Instrumentation (WMI) is a set of functions embedded into the kernel of Microsoft Operating Systems and Servers, including SQL Server. The purpose of WMI is to enable local and remote monitoring and management of servers. It is a standards-based implementation that incorporates the Distributed Management Task Force’s (DMTF) Web-Based Enterprise Management (WBEM) and Common Information Model (CIM) specifications.
WMI is a big initiative and probably warrants an entire book of its own. What you need to know most is that WMI has many events for SQL Server. Search for WMI to start in Books Online, and you can discover the many, many events. You can create alerts on these events. Included are Data Definition Language (DDL) events that occur when databases are created or dropped and when tables are created or dropped, for example.
WMI has a specific language to query these events called Windows Management Instrumentation Query Language (WQL). It is similar to T-SQL, and you it is so easy that you should immediately feel comfortable with it.
Search Books Online for “WMI Provider for Server Events Classes and Properties.” This material helps you navigate the many events available, and choose the specific event you want to monitor. Each event has a list of attributes, just like a table has a list of columns. Using WMI, you can select the attributes from the event in an alert.
To create an alert, use SQL Server Management Studio.
1. In Object Explorer, open the SQL Server Agent tree node, right-click Alerts, and choose New Alert. In the Alert Type drop-down box, choose WMI Event Alert. The namespace will be populated based on the server you connect to and should look like this:
 .
ootMicrosoftSqlServerServerEventsSQL2012
The period (.) represents the server name, which you can change, such as \MYSQLSERVER. The last node should be MSSQLSERVER for a default instance and the <instance name> for named instances. In the preceding example, the instance was called SQL2012.
2. In the text box, either enter your WQL query, as shown here:
SELECT * FROM DDL_DATABASE_LEVEL_EVENTS
Or to select only the TSQLCommand attribute, use this query:
Select TSQLCommand from DDL_DATABASE_LEVEL_EVENTS
3. Click OK and there will be a pause. If your namespace is incorrect, or the syntax or event/attribute names are incorrect, you get a message immediately.
4. Then, in your job, you may use the WMI(attribute) event token — in this case:
Print '$(ESCAPE_SQUOTE(WMI(TSQLCommand)))'
5. To get events from a database, Service Broker notifications must be turned on for that database. To turn on Service Broker notifications for NorthAmerica, use the following syntax:
ALTER DATABASE NorthAmerica SET ENABLE_BROKER;
If your alerts occur but the text replacement for the WMI token is not being done, you probably need to turn on the Service Broker for your database.
The service account that SQL Server Agent uses must have permission on the namespace and ALTER ANY EVENT NOTIFICATION permissions. This is done automatically if you use SQL Server Configuration Manager to set up accounts. However, to adjust these settings manually, from the Run prompt, type wmimgmt.msc. An administrative dialog appears, allowing you to set up permissions.
If you want to try WMI, there is a test program for WMI on your server. To run it from the command line, type WBEMTest. It is installed in the WBEM directory of your Windows system directory. To find out more, Microsoft has an entire subsection of its website devoted to WMI. Just search for WMI on www.microsoft.com.
Multiserver Administration — Using Master and Target Servers
SQL Server enables you to set up a master server (MSX). The master server can send jobs to be run on one or more target servers (TSX), but the master server may not also be a target server that receives jobs from another master server. The target servers receive and run jobs from a single master server, in addition to their own local jobs. You may have multiple master servers in your environment, but a target server is associated with a single master server. This is a simple two-level hierarchy; a server is a master server, a target server, or neither. The language used to describe the process is military in character: You enlist target servers to add them, and they defect to go away.
Setting up servers is easy. Simply follow these steps:
1. In SSMS, right-click the SQL Server Agent node, select Multiserver Administration, and choose Make This a Master.
2. After the initial dialog box, you see a box where you can provide the e-mail address, pager address, and Net Send location to set up a master server operator. Fill in these fields appropriately. This operator will be set up on the master server and all target servers. This is the only operator who can be notified from multiserver jobs.
3. The next dialog box enables you to choose all the target servers. The list includes the servers that you have registered in SSMS. Choose the servers that you want to be targets of this master, and click Next. You may add additional registrations by clicking the Add Connection button.
4. Close this dialog box. SQL checks to ensure that the SQL versions of the master and targets are compatible. If the versions are not compatible, drop the target from the list and then continue. Later, you can upgrade the target or master, so the versions are the same.
5. Go to the next dialog box and use the wizard to create a login on the target, if necessary, and grant it login rights to the master server. Target servers must connect to the master server to share job status information. After you complete the setup, refresh your SQL Server Agent nodes and see the change. There will be a note on the master server (MSX) and a note on the target server.
Now you can create jobs to be used at multiple target servers. Notice on the MSX that the Jobs node is divided into two sections: local jobs and multiserver jobs. To create a job, follow these steps.
1. Right-click multiserver jobs, and select New Job to create a simple job.
2. Create a simple job on the MSX server and have it run at one or many TSX servers. While doing this, be sure to go to the notifications page. The only operator you can notify is MSXOperator.
Creating multiserver jobs is a nice way to manage a larger implementation without having to buy additional third-party products. No one on the TSX box can mess up your jobs. Use SSMS to connect to the target server as an administrator and look at the job properties for the job you just created and downloaded from the MSX. You can see the job, you can see the job history, and you can even run the job. You cannot delete the job, change the schedule, change the steps, or anything else. This job does not belong to you; it belongs to the MSX.
As you begin to think about how you might use this, be sure you consider the implications of a single job running on multiple servers. Any reference to directories, databases, and so on must be valid for all the TSXs where this job runs. You can create a single backup share that all the backups can use, for instance.
Because a job can start another job, you could also create a master job that has a single step that starts another job. This other job is created on each TSX and is specific to each TSX. This enables you to perform some customization, if necessary. To create a master job, perform the following steps:
1. Back in SSMS, right-click the SQL Server Agent node on the master server.
2. Choose Multi Server Administration. Here you can add target servers and manage target servers.
3. Choose Manage Target Servers. In this dialog box, you can monitor the status of everything. When you create a job for a target server, the job is automatically downloaded to the target server. If the unread instructions count does not go down to 0, poll the target server. This wakes it up to accept the instructions.
4. Click the relevant tab to see the details of downloaded instructions. This shows you details of when jobs are downloaded and updated.
5. Using the Post Instructions button in the Target Server Status dialog, you can synchronize clocks between the servers, defect target servers, set polling intervals, and start jobs. You can also start the job directly from the Jobs node on the MSX or the TSX.
6. Job histories can be viewed on the MSX for the job, just like any other job, but you cannot see job-step details. To get the step details, view the job history from the TSX.
7. You can defect TSXs from the TSX SQL Server Agent node or from the Manage Target Servers dialog on the MSX. When all the TSXs have been defected, the MSX is no longer an MSX.
Automating SQL Server is one of the most important things you can learn to make your life and your business run smoothly and easily. Maintenance plans take away a lot of the work of automating routine maintenance activities, and are a great way to get started with automating common maintenance tasks. Additionally, SQL Server Agent provides many features and services to make your life easier. Just creating a few simple backup jobs that notify operators can automate many normal tasks. If you want to be fancy, go ahead, but do some planning first, especially when considering multiserver jobs.
Using Alerts is a great way to automate notifications about significant activities occurring on your database systems. You can use the pager notifications and the related on-duty schedules for regular e-mail or pagers. This is a good way to ensure that the correct people are notified. If you have many operators for alert notifications, consider creating e-mail groups and offloading some of the notification work to your e-mail server. Start small, and take your time. As you become more comfortable with Maintenance Plans and SQL Server Agent, you can spread your wings and fly.