Chapter 3
Upgrading SQL Server 2012 Best Practices
WHAT’S IN THIS CHAPTER
- Upgrade Planning
- Discontinued and Deprecated Features
- Choosing an Upgrade Method
- What to Watch for After the Upgrade
Chapter 2, “Installing SQL Server 2012 Best Practices,” covers performing a new installation of SQL Server 2012. This chapter discusses upgrading SQL Server from a previous version. The best strategy for a successful upgrade is planning and preparation. First, you cover reasons for upgrading to SQL Server 2012. You then consider the pros and cons of various upgrade strategies, and you learn about the various tools available to help mitigate risk during the upgrade process. Then you learn about SQL Server 2012 behavior changes and discontinued features that you need to know before upgrading. To wrap up, this chapter explores unexpected issues you might encounter after the upgrade. By the end of the chapter, you will have learned everything you need to know to perform a successful upgrade to SQL Server 2012.
WHY UPGRADE TO SQL SERVER 2012?
This book introduces significant enhancements throughout the product. During the development cycle, consider the three pillars of focus for the product: mission-critical confidence, breakthrough insight, and cloud on your terms. With the release of SQL Server 2012, Microsoft enhanced numerous features in the areas of scalability, reliability, availability, and security. Following are many benefits that these new features and capabilities provide:
- More efficient high availability and disaster recovery with AlwaysOn
- Support for column store indexes
- Built-in encryption capabilities
- Reduced operating system patching with support for Windows Server Core
- Accelerated I/O performance with new compression capabilities
- Default Schema for Groups
- SQL Server Audit for all editions
- Contained database authentication
- User-defined server roles
Risk Mitigation — the Microsoft Contribution
As with all previous versions of SQL Server, the SQL team took extraordinary steps to ensure that the quality of SQL Server 2012 is as high-grade as possible. The specific steps of the software engineering cycle are beyond the scope of this book, but a few points are highlighted here, considering public knowledge about the daily build process.
Today, a daily process produces x86, x64, and Itanium versions of SQL Server 2012 code (called builds) that have gone through a battery of tests. This process is utilized for both the development of new releases and the development of service packs for SQL Server 2012. These tests are a convergence of in-house build tests, customer-captured workloads, and Trustworthy Computing processes. Microsoft Research worked on bringing innovations to Microsoft’s products. In the areas of software development, the Microsoft research team is an essential contributor to the software engineering and testing processes. It improves the test harness with enhancements in several areas, including threat modeling, testing efficiencies, and penetration analysis.
In addition, many customer-captured workloads are also part of the software testing harness. These workloads are acquired through an assortment of programs such as the Customer Playback program and various lab engagements, including SQL Server 2012 compatibility labs.
The daily builds are tested against this gathered information, and out of this process come performance metrics, security metrics, and bugs. Bugs are subsequently filed, assigned, prioritized, and tracked until resolution. After a bug is fixed, its code goes through security testing as part of the software engineering process. This happens before the code is checked back into the software tree for the next testing cycle. This rigorous development and quality assurance process helps ensure that the shipped product is reliable and ready for production environments. The bottom line is that the old adage, “Wait until the first service pack to upgrade,” is no longer true for SQL Server 2012.
Independent Software Vendors and SQL Community Contributions
Starting with SQL Server 2005 and continuing with SQL Server 2012, the concept of community technology preview (CTP) was adopted. The November 2010 CTP was the first of several such releases, in addition to Release Candidate (RC) releases. The decision to adopt this snapshot in time of code (or build) resulted in hundreds of thousands of CTP and RC downloads, providing unprecedented access to updated code to both independent software vendor (ISV) and SQL community testing. At the time of this writing, Microsoft has published ten case studies detailing successful implementations of SQL Server 2012. This type of access to beta code was leveraged as a means to identify additional bugs, conducting additional testing of software fixes, and driving additional improvements based on community feedback.
Chapter 2 covers the installation guidelines, so this section mainly focuses on upgrade strategies and considerations for the SQL Server 2012 database component. A smooth upgrade requires a good plan. When you devise an upgrade plan, you need to break down the upgrade process into individual tasks. This plan should have sections for pre-upgrade tasks, upgrade tasks, and post-upgrade tasks:
- Your pre-upgrade tasks consider SQL Server 2012 minimum hardware and software requirements. You should have an inventory of your applications that access the server, database-collation requirements, server dependencies, and legacy-systems requirements such as data-access methods. Your list should include database consistency checks and backup of all databases. Plans should be in place for testing the upgrade process and applications. You should have a thorough understanding of backward-compatibility issues and identify workarounds or fixes. You should also use the SQL Server 2012 Upgrade Advisor, as described later in this chapter, to assist in identifying and resolving these issues.
- The upgrade execution process is a smooth execution of your well-documented and rehearsed plan. To reiterate the importance of this step, ensure you make a backup of all the databases before you execute the upgrade process.
- Post-upgrade tasks consist of reviewing the upgrade process, bringing the systems back online, monitoring, and testing the system. You need to perform specific database maintenance before releasing the system to the user community. These and other recommended steps are outlined later in the chapter. Run your database in backward-compatibility mode after the upgrade to minimize the amount of change to your environment. Update the database-compatibility mode as part of a follow-up upgrade process and enable new SQL Server 2012 features.
As part of deciding your upgrade strategy, consider both in-place (upgrade) and side-by-side migration methods for upgrading.
In-Place Upgrading
The in-place server upgrade is the easier but riskier of the two options. This is an all-or-nothing approach to upgrading; meaning that after you initiate the upgrade there is no simple rollback procedure. This type of upgrade has the added requirement of greater upfront testing to avoid using a complex back-out plan. The benefit of this approach is that you don’t need to worry about users and logins remaining in sync, and database connectivity changes are not be required for applications. In addition, SQL Server Agent jobs migrate during the upgrade process.
Following is a high-level scenario of an in-place upgrade based on Figure 3-1.

1. First, install the prerequisite files on your system. Before upgrading to SQL Server 2012, your server needs, at a minimum, the following:
- .NET Framework 4.0
- Windows PowerShell 2.0
- .NET 3.5 with Service Pack 1
- A current instance of SQL Server 2005, SQL Server 2008, or SQL Server 2008 R2
2. Next run the System Configuration Checker (SCC). The SCC examines the destination computer for conditions that would prevent an upgrade from completing, such as not meeting the minimum hardware or software requirements. If such a condition is found, setup aborts and the SQL Server 2012 components uninstall.
3. Once verified, the SQL Server setup program can lay the 2012 bits and backward-compatibility support files on a disk while SQL Server 2008 (or 2005) is still available to users. However, don’t plan to upgrade a server while users are online. The setup program takes the server offline by stopping the existing SQL Server services. The 2012-based services assume control of the master database and the server identity. At this point, the SQL Server service takes over the databases and begins to update them while not allowing users back into the environment. When a request for data occurs in a database that has been only partially updated, the data associated with this request is updated, processed, and then returned to the user.
4. Finally, kick off the uninstall procedure for the old binaries. This step occurs only if no remaining SQL Server 2005 or 2008 instances are on the server. SQL Server Agent jobs are now migrated.
Following are the advantages of an in-place upgrade:
- Fast, easy, and automated (best for small systems).
- No additional hardware required.
- Applications retain same instance name.
- Preserves SQL Server 2008 (or 2005) functionality automatically.
The disadvantages of an in-place upgrade are as follows:
- Downtime incurred because the entire SQL Server instance is offline during upgrade.
- No support for component-level upgrades.
- Complex rollback strategy.
- Backward-compatibility issues must be addressed for that SQL instance.
- In-place upgrade is not supported for all SQL Server components.
- Large databases require substantial rollback time.
Additionally, if you would like to change editions as a part of your upgrade, you must be aware of some limitations. You can upgrade SQL Server 2005 and 2008 Enterprise, Developer, Standard, and Workgroup editions to different editions of SQL Server 2012. However, SQL Server 2005 and 2008 Express Editions may only be upgraded to SQL Server 2012 Express Edition. If this is of interest to you, see SQL Server 2012 Books Online (BOL), “Version and Edition Upgrades,” under the section “Upgrading to SQL Server 2012.”
Side-by-Side Upgrade
In a side-by-side upgrade, SQL Server 2012 installs either along with SQL Server 2008 (or 2005) as a separate instance or on a different server. This process is essentially a new installation followed by a database migration. You may want to select this option as part of a hardware refresh or migration to a new platform, such as Itanium or x64. Because of the backup and restore times involved in a back-out scenario, if you have a sizable database, this is definitely the option to use.
As part of this method, you can simply back up the databases from the original server and then restore them to the SQL Server 2012 instance. Other options are to manually detach your database from the old instance and reattach it to the new instance, use log shipping, or database mirroring. You can also leverage the Copy Database Wizard to migrate your databases to the new server. Although this approach provides for a good recovery scenario, it has additional requirements beyond those of the in-place upgrade, such as maintaining the original server name, caring for application connectivity, and keeping users and their logins in sync.
Following are the arguments in favor of a side-by-side upgrade:
- More granular control over upgrade component-level process (database, Analysis Services, and others)
- Ability to run SQL Servers side-by-side for testing and verification
- Ability to gather real matrix for upgrade (outage window)
- Rollback strategy because original server is still intact
- Best for large databases because restore time could be sizable
The arguments against a side-by-side upgrade are as follows:
- Does not preserve SQL Server 2008 (or 2005) functionality.
- Issue of instance name for connecting applications.
In-Place Upgrade versus Side-By-Side Upgrade Considerations
Consider numerous factors before selecting an upgrade strategy. Your strategy should include the need for a component-level upgrade, the ability to roll back in case of failure, the size of your databases, and the need for partial upgrade. Your top priorities might depend upon if you can upgrade to new hardware, facilitate a change of strategy such as a server consolidation, and manage a small server outage window for the upgrade. Table 3-1 shows a summary of the two upgrade methods.
TABLE 3-1: In-Place and Side-by-Side Upgrade Comparison
| PROCESS | IN-PLACE UPGRADE | SIDE-BY-SIDE UPGRADE |
| Number of resulting instances | One | Two |
| Data file transfer | Automatic | Manual |
| SQL Server instance configuration | Automatic | Manual |
| Supporting upgrade utility | SQL Server setup | Various migration and data transfer methods |
Now that you understand the reasons and options for upgrading to SQL Server 2012, you can move on to choosing your upgrade tools to assist in the upgrade process and performing pre-upgrade steps. Prior to the upgrade process, you can take preventative measures to avoid common upgrade issues, such as running out of disk space or executing startup stored procedures during the upgrade. There are also a number of tools that can help identify potential upgrade issues in your environment. The two most useful tools to aid in this process are the SQL Server Upgrade Advisor and the SQL Server Upgrade Assistant. These tools both provide pre-upgrade analysis and help you gain confidence that your upgrade will run successfully. Upgrade Assistant uses workload testing to test post-upgrade application behavior, while Upgrade Advisor performs in-place analysis of your databases for potential compatibility issues.
Pre-Upgrade Steps
There are a number of steps to take prior to performing the upgrade process. These precautions and preventative measures help eliminate nasty surprises during upgrade.
- Set your data and log files to autogrow during the upgrade process.
- Disable all startup stored procedures because the upgrade process stops and starts services on the SQL Server instance being upgraded.
- Before upgrading to SQL Server 2012, use the sp_dropextendedproc and sp_addextendedproc stored procedures to reregister any extended stored procedure not registered with the full pathname.
- Allocate additional space or have plenty of space for tempdb to grow during the upgrade process. Chapter 14, “Indexing Your Database,” covers overall guidance for tempdb in greater detail.

tempdb is responsible for managing temporary objects, row versioning, and online index rebuilds.
- Disable all trace flags before upgrading to SQL Server 2012. The possibility exists that the trace-flag functionality is either different in SQL server 2012 or does not exist. After the upgrade process, you should work with Microsoft Support to determine which (if any) of your trace flags are still required.
- Migrate to database mail. SQL Mail has been discontinued.
Pre-Upgrade Tools
Performing an upgrade can be a daunting task. Mitigate the risk of a failed upgrade or unexpected post-upgrade behavior by examining your instances prior to performing the upgrade process. There are two tools to consider as you begin preparing for an upgrade: SQL Server Upgrade Advisor and Upgrade Assistant for SQL Server 2012.
SQL Server Upgrade Advisor
The rules checked by Upgrade Advisor represent conditions, situations, or known errors that might affect your upgrade to SQL Server 2012. If you want to take advantage of the lessons other SQL Server users have learned about upgrading, the SQL Server 2012 Upgrade Advisor is the tool for you. This tool is based on early adopters’ feedback and internal lab-testing feedback. The SQL Server 2012 Upgrade Advisor is a free download available as part of the Microsoft SQL Server 2012 Feature Pack at www.microsoft.com/download/en/details.aspx?id=26726 and is also available as part of the SQL Server 2012 installation media for all editions. The purpose of this tool is to identify known upgrade issues and provide guidance for workarounds or fixes for the identified issues on a per-server components’ basis. Microsoft worked hard on this tool as a risk-mitigation effort to empower SQL Server 2005 and SQL Server 2008 users to upgrade to SQL Server 2012. So, whether you run Analysis Services, Integration Services, Reporting Services components, or a combination of components, the Upgrade Advisor tool can help.
Installing the SQL Server 2012 Upgrade Advisor
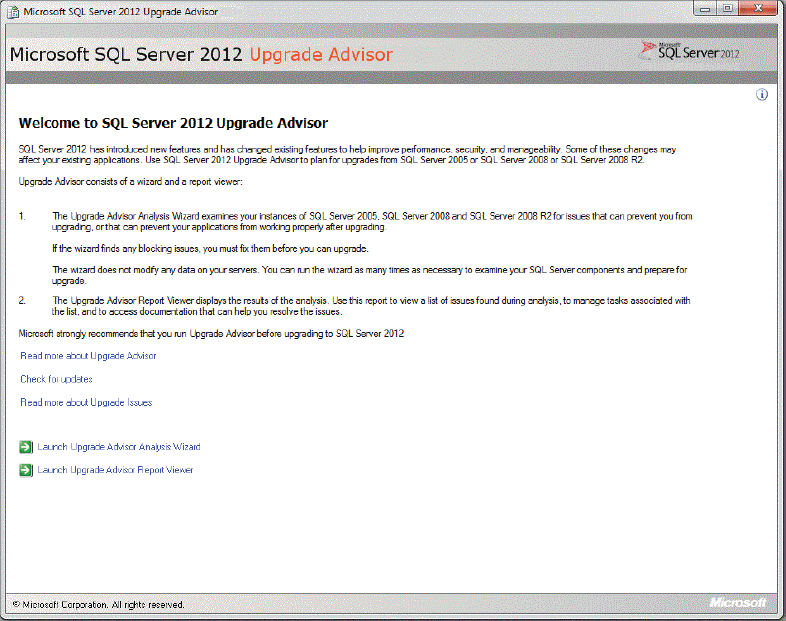
The Upgrade Advisor is a relatively simple tool to use. You can find it in the “Prepare” section of the default screen of the installation CD/DVD. It can also be found at www.microsoft.com/download/en/details.aspx?id=26726. The Welcome screen for the Upgrade Advisor is shown in Figure 3-2. Be sure to select Check for Updates because upgraded versions of this tool are available online.
The tool is constantly updated to reflect the lessons learned by the DBAs who upgraded before you. The tool requires .NET 4.0, which you can download through the Windows Update service or from MSDN. In addition, you must install Microsoft SQL Server Transact-SQL ScriptDom before you install the Upgrade Advisor. It is available at www.microsoft.com/download/en/details.aspx?id=26726. Alternatively, you can choose to install a single instance and version of the tool to test servers across your enterprise. This option supports a zero-footprint interrogation with read-only access to servers.
This tool is read-intensive and should be tested on a test server to evaluate the potential impact on your systems.
The installation process is straightforward; the only option is to select the location where you would like to install the tool. The default install path is C:Program Files (x86)Microsoft SQL Server Upgrade Advisor.
Using the Upgrade Advisor
When installed, the Upgrade Advisor presents you with two choices, Upgrade Advisor Analysis Wizard and Upgrade Advisor Report Viewer. Launch the Upgrade Advisor Analysis Wizard to run the tool. As shown in Figure 3-3, you simply select a server and the components to analyze for upgrade, or you can click the Detect button, which starts the inspection process that selects the components installed on your system.

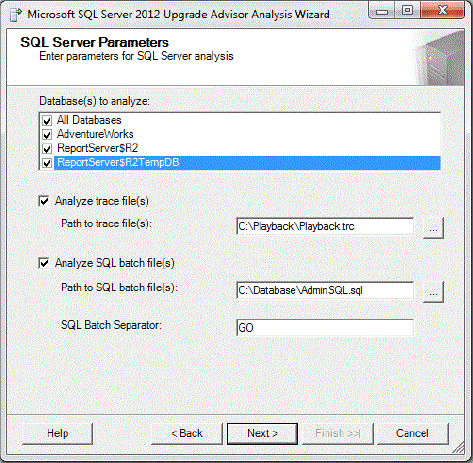
After you select the components for testing, the next decision is to select the databases that you would like to have evaluated for upgrade, as shown in Figure 3-4. The best part of this process is that you have the option to analyze SQL Profiler trace and SQL batch files to help make this a comprehensive analysis. That is, by adding these files to the evaluation process, Upgrade Advisor evaluates not only the database but its trace workload and SQL scripts as well. By evaluating this additional information, Upgrade Advisor evaluates not only the database as it exists right now, but also information about past database usage and behavior contained in the trace and batch files. All you need to do is select the path to the directory where your trace files or your batch files are located.
After you complete configuration of the components that you want to evaluate, you will be prompted to begin the analysis. If you have any questions during the configuration steps, the Help button brings up an Upgrade Advisor-specific Book Online (UABOL) that is rich in information and guides you through the options. As the component-level analysis completes, a green, yellow, or red dialog box indicates the outcome of the test.
When the test completes, you can view the discovered issues via the Upgrade Advisor Report Viewer. The reports, as shown in Figure 3-5, are presented in an interface similar to a Web browser. You can analyze the information by filtering the report presented by server, instance, or component, or issue type. How to interpret the results of this report is discussed later in this chapter.

Scripting the Upgrade Advisor
If you have a server farm or just prefer scripting, a command-line capability is also available. With the UpgradeAdvisorWizardCmd utility, you can configure the tool via an XML configuration file and receive results as XML files. The following parameters can be passed to the UpgradeAdvisorWizardCmd utility:
- Command-line help
- The configuration path and filename
- The SQL Server login and password for SQL Server (if SQL Server authentication is used, rather than Windows authentication)
- An optional flag to indicate whether to output reports in a comma-separated value (CSV) format
The configuration file exposes all capabilities and parameters discussed in the wizard section. The results from a command-line execution can still be viewed in the Report Viewer, via XML documents or Excel if you use the CSV option. For example, the following XML document from Upgrade Advisor reflects the choices of analyzing all databases, Analysis Services, and SSIS packages on a server named SQL12Demo and an instance named SQL2012:
<Configuration>
   <Server>SQL12Demo</Server>
   <Instance>SQL2012</Instance>
  <Components>
     <SQLServer>
        <Databases>
          <Database>*</Database>
        </Databases>
     </SQLServer>
   </Components>
 </Configuration>
You can modify the file in an XML editor, such as Visual Studio, and save the file with a new filename. Then, you can use the new file as input to the command line of Upgrade Advisor. For example, the following code snippet displays the command prompt entry required to run the command line of Upgrade Advisor using Windows authentication. The configuration file already contains names for a remote server named SQL2012 and an instance named SQL2012, and the PATH environment variable contains the path to the Upgrade Wizard:
C:>UpgradeAdvisorWizardCmd -ConfigFile "SQL2012Config.xml"
From the command prompt, you can also install or remove the Upgrade Advisor application. From there you can control the install process with or without the UI. You can also configure the install path and process-logging options.
For more information on the Upgrade Advisor’s configuration files, see the Upgrade Advisor Help section “UpgradeAdvisorWizardCmd Utility.”
Resolving Upgrade Issues
The Upgrade Advisor’s report contains a wealth of information. The key is to understand how this information appears, what you need to resolve, and when. As shown previously in Figure 3-5, the first column indicates the importance of a finding or a recommendation, the second column tells you when you need to address it, and the Description column tells you about the issue. Approach this analysis by first categorizing the information by Importance and When to Fix the items. Specifically, the sum of the indicators should dictate whether you need to address issues before or after the upgrade process. Table 3-2 provides recommendations of when to address these issues.
TABLE 3-2: When to Address Upgrade Issues
| IMPORTANCE | WHEN TO FIX | OUR RECOMMENDATION |
| Red | Before | Resolve Before Upgrade |
| Red | Anytime | Resolve Before Upgrade |
| Red | After | Resolve After Upgrade |
| Yellow | Anytime | Resolve After Upgrade |
| Yellow | After | Resolve After Upgrade |
| Yellow | Advisory | Resolve After Upgrade |
Issues that have been flagged with an Importance of Red, and a When to Fix of Before or Anytime should be addressed before starting an upgrade process. Typically, these issues require remediation because of SQL Server 2012 functionality changes, such as discontinued features. You can usually resolve the remaining issues after the upgrade process because they either have a workaround within the upgrade process or do not affect it at all. If you expand the error in question, additional information appears, as shown in Figure 3-6.

The Show Affected Objects link shows the exact objects flagged by the Upgrade Advisor process as affected, whereas the Tell Me More About This Issue and How to Resolve It link takes you to the corresponding section of the Upgrade Advisor Books Online (UABOL). The UABOL describes the conditions and provides guidance about corrective action to address the issue. The UABOL is a true gem because it provides guidance for problem resolution in areas beyond the scope of the tools (such as replication, SQL Server Agent, and Full-Text Search).
The This Issue Has Been Resolved check mark is for your personal tracking of resolved issues. This metadata check mark is in place to support remediation processes by enabling the report to be viewed by filtered status of resolved issues or pre-upgrade (unresolved) issues.
If you prefer command-line scripting, the viewer is nothing more than an XSLT transformation applied to the XML result file located in your My DocumentsSQL Server 2012 Upgrade Advisor Reports directory. You can find individual component results and configuration files in each server’s name-based directories. You can even export viewer-based reports to other output formats such as CSV or text.
Upgrade Assistant for SQL Server 2012 (UAFS)
UAFS was first developed for use in the SQL Server 2005 application-compatibility lab engagements run as part of the Microsoft Ascend (SQL 2005 customer training) and Touchdown (SQL 2005 partner training) programs. The purpose of these labs was to help customers analyze their SQL Server 2000 (or 7.0) applications to understand the impact of upgrading to SQL Server 2005 and to provide guidance on any changes that may be necessary to successfully migrate both their database and their application. The labs helped improve the quality of SQL Server 2005 by running upgrades and performing impact analysis on real customer workloads against SQL Server 2005. The labs were run by Microsoft personnel and staffed by partners such as Scalability Experts. Nearly 50 labs were run worldwide, and hundreds of SQL Server 2000 applications were tested using this tool. A new version of UAFS was developed specifically for SQL Server 2008 and has been updated for 2012; you can download it free from www.scalabilityexperts.com/tools/downloads.html.
From a conceptual standpoint, the difference between this tool and Upgrade Advisor is that UAFS naturally encompasses the essence of a true upgrade and testing methodology. By reviewing the results of a SQL Server 2008 (or 2005) workload against the results of the same workload run against SQL Server 2012, you can identify upgrade blockers and application-coding changes that may be required. For SQL Server 2012, the UAFS tool supports upgrading from SQL Server 2008 and 2005.
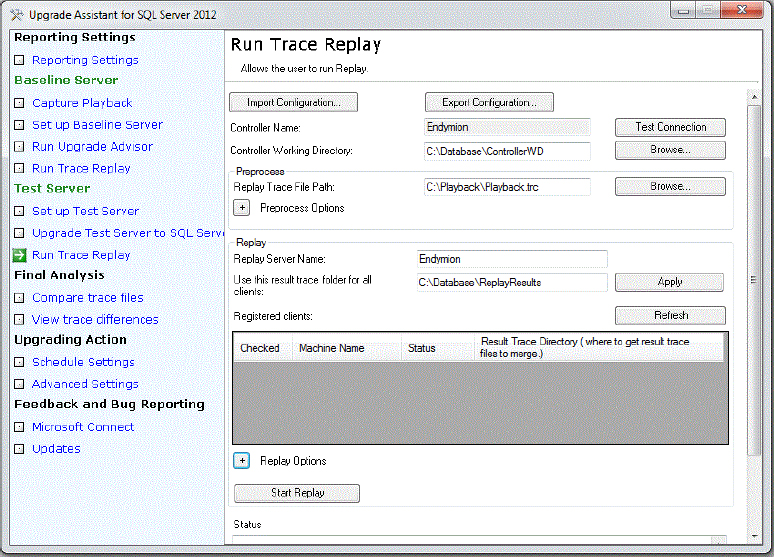
The following sections walk through an overview of this process to show details of the steps contained in the UAFS, as shown in Figure 3-7. By using the UAFS, you can back up all databases and users and capture a subset of production workload. You can then restore the databases and users you just backed up and process the captured workload. The goal is to develop a new output file, also known as a baseline. You then upgrade the test server to SQL Server 2012 and rerun the workload to capture a SQL Server 2012 reference output for comparison.
Capturing the Environment
You should establish your baseline by backing up all SQL Server 2008 (or 2005) systems and user databases from your server. Following this step, you need to start capturing your trace file to avoid gaps in the process. When you capture a trace file, it needs to be a good representation of the workloads that characterize your environment. To do this, you might need to create an artificial workload that better represents the workloads of the application over time. While capturing the trace file, it’s a good idea to avoid multiserver operations such as linked server calls or bulk-copy operation dependencies. Be aware that there is a performance cost while tracing. The sum of the trace files and database backups represent a repeatable and reusable workload called a playback.
Setting Up the Baseline Server
Now that you have captured the playback, you can set up the baseline system to use for the remainder of the test. Load this server with SQL Server 2008 R2 SP1, 2008 SP2, or SQL Server 2005 SP2, with the minimum requirement for upgrading to 2012. In reality, it should be identical to the source system in collation and patching level. The tool then checks your server for this matching. If necessary, you are prompted to patch or rebuild the master database. It then restores your databases in the correct order so that your DB IDs match to production. (This also includes padding the DB creation process to accomplish this.) Finally, SSUA re-creates your logins and ensures that the IDs match production because all this is necessary to run the trace file. The next step in the process is to run the Upgrade Advisor as described earlier. When the environment has been remediated, you can then proceed to the next step to replay the trace.
Running the SQL Profiler Trace
When you run the trace, first the statistics update on all databases. The replay tool then uses the API and runs all the queries within the trace file in order. This tool is a single-threaded replay, but blocking can occur. If the trace appears to run slowly or stop, you may want to check SQL Server blocking; and if it does not clear up by itself, you need to kill the blocking processes. The output from this step generates a trace-output file for comparison in the final analysis.
Upgrading to SQL Server 2012
Now you are ready to upgrade to SQL Server 2012. You have two options. You can use SSUA to restore the state of the SQL Server 2008 (or 2005) to its baseline and then upgrade in-place to SQL Server 2012, or you can migrate the SQL 2008 (or 2005) databases to an existing SQL Server 2012 instance. As discussed earlier in this chapter, the decision to perform an in-place or side-by-side upgrade is based on a number of factors specific to your environment. You do not measure performance metrics, so these servers don’t need to be identical. You measure workload behavior between two versions of SQL Server. After restoring the baseline on a SQL Server 2012 platform, go through the Running the SQL Profiler Trace step again, but this time on SQL Server 2012. The output from this step generates the other trace-output file for comparison in the final analysis.
Final Analysis
After completing all these processes, you will reach the final steps to compare the output files by filtering and comparing all batches in both trace files for discrepancies. The Report Viewer shows one error condition at a time by showing the last correct step, the error step, and the next correct sequences of the batch files. When a condition has been identified, it can be filtered from the error-reviewing process to enable the DBA to focus on identifying new error conditions. After the SQL Server 2012 upgrade completes, change the database compatibility mode to 110, and run your application to validate that it works in SQL Server 2012 compatibility mode. This ensures that no application behavior differences exist when your application runs on the database compatibility level of 110.
This section covers major product changes to SQL Server 2012 classified in one of three categories: unsupported, discontinued, or affecting the way SQL Server 2008 or 2005 behaves today. Although the Upgrade Advisor tool highlights these conditions if they are relevant to your environment, you should read this section to learn about these changes.
Unsupported and Discontinued Features in SQL Server 2012
From time to time, to move a technology forward, trade-offs must be made. From SQL 2008 to SQL Server 2012, the following lists some of the features no longer available:
- The system stored procedures sp_ActiveDirectory_Obj, sp_ActiveDirectory_SCP, and sp_ActiveDirectory_Start.
- sp_configure options user instance timeout and user instances enabled.
- Support for the VIA protocol.
- SQL Mail (Use Database Mail instead.)
- The creation of new remote servers using sp_addserver (Use Linked Servers instead.)
- Database compatibility level 80.
- RESTORE {DATABASE | LOG} . . . WITH DBO_ONLY (Use the WITH RESTRICTED USER clause instead.)
This is a limited list of discontinued features. For a complete list of discontinued and deprecated features, go to http://msdn.microsoft.com/en-us/library/cc280407(v=SQL.110).aspx.
SQL Server 2012 Deprecated Database Features
These features are no longer available as of the SQL Server 2012 release or the next scheduled release of the product. Following are some of the features scheduled for deprecation; try to replace these features over time with the recommended items:
- SOAP/HTTP endpoints created with CREATE ENDPOINT and ALTER ENDPOINT (They have been replaced with Windows Communication Framework (WCF) or ASP.NET.)
- The compatibility level 90 will not be available after SQL Server 2012.
- Encryption using RC4 or RC4_128, is scheduled to be removed in the next version. Consider moving to another encryption algorithm such as AES.
- Not ending T-SQL statements with a semicolon will no longer be supported in a future version of SQL Server.
Other SQL Server 2012 Changes Affecting Behavior
The behavior changes in the following features could adversely affect migration to SQL Server 2012:
- If you create a new job by copying the script from an existing job, the new job might inadvertently affect the existing job. This is because the parameter @schedule_uid should not be duplicated. Manually delete it in the script for the new job.
- Deterministic scalar-valued CLR user-defined functions and deterministic methods of CLR user-defined types are now foldable. This seeks to enhance performance when these functions or methods are called more than once with the same arguments. However, if a nondeterministic function or method has been marked deterministic in error, it can create unexpected results.
- When a database with a partitioned index upgrades, there may be a difference in the histogram data for these indexes. This is because SQL Server 2012 uses the default sampling algorithm to generate statistics rather than a full scan.
- Using sqlcmd.exe with XML Mode behaves differently in SQL Server 2012.
For additional behavior changes, see SQL Server 2012 Books Online or go to http://msdn.microsoft.com/en-us/library/cc707785(v=SQL.110).aspx.
SQL SERVER COMPONENT CONSIDERATIONS
This section discusses individual components, along with any respective considerations that you need to evaluate during an upgrade process. Components not covered here are covered later in the book in their respective chapters.
Upgrading Full-Text Catalog
During the upgrade process, all databases with Full-Text Catalog are marked Full-Text disabled. This is because of the potential time involved in rebuilding the catalog. Before you upgrade your Full-Text Search environment, you should familiarize yourself with some of the enhancements. The database attach and detach processes also result in the Full-Text Catalog being marked as Full-Text Disabled. You can read SQL Server 2012 Books Online to learn about additional behavior.
Upgrading Reporting Services
Reporting Services 2008 and Reporting Services 2005 support upgrading to Reporting Services 2012. Reporting Services 2012 supports a Report database on SQL Server. Prior to upgrading, run the SQL Server 2012 Upgrade Advisor and follow its recommendations, guidance on possible mitigation options, and steps. Then, before executing the upgrade, back up the database, applications, configurations files, and the encryption key.
Following are two ways to upgrade Reporting Services:
- In-place upgrade: You can accomplish this by executing the SQL Server 2012 setup.exe; select the older Reporting Services to upgrade with Reporting Services 2012. This has the same advantages and disadvantages described earlier with the in-place upgrade. The risk with this is that it is an all-or-nothing approach, difficult to roll back except by reinstalling it again.
- Side-by-side upgrade: With this option, the Reporting Services 2012 instance installs in the same physical server along with the older version of Reporting Services or on a separate physical server. After the Reporting Services 2012 instance installs, the report content migrates either individually or in bulk, using one of the following options:
- Redeploy the reports using SQL Server 2012 Business Intelligence Development Studio
- Use rs.exe to extract and deploy the reports
- Use Report Manager.
Published reports and snapshot reports are upgraded. After upgrading Reporting Services 2012, redeploy any custom extensions and assemblies, test the applications on Reporting Services 2012 after it is fully operational, and then remove any unused applications and tools from the previous version.
Chapter 19, “Database Mirroring,” discusses upgrading your existing cluster in detail. Chapter 16, “Clustering SQL Server 2012,” discusses upgrading database mirroring in detail.
Upgrading to 64-Bit
Upgrading from a SQL Server 2005 32-bit platform or SQL 2008 32-bit platform to SQL Server 2008 x64-bit platform is not supported. Although running a SQL Server 2005 32-bit platform with Service Pack 2 or SQL Server 2008 32-bit platform on a Windows x64-bit subsystem is supported, upgrading this configuration to a SQL Server 2012 x64-bit environment is not supported. Side-by-side migration is the only supported upgrade path for migrating databases from a 32-bit to x64-bit platform.
The information in the following sections is about product behaviors that have surprised a lot of people after upgrading. There is nothing worse than successfully upgrading your environment and then having end users blame the upgrade for poor query performance. Proactive attention to post-upgrade issues lessens the risk that your careful planning and hard work will be tainted by post-upgrade problems.
Poor Query Performance After Upgrade
A possible reason for poor query performance after upgrading to SQL Server 2012 is that the old statistics are considered outdated and cannot be used by the query optimizer. For most situations, this should not be an issue as long as you have enabled the auto-update statistics and autocreate statistics options. This enables statistics to be automatically updated by default when needed for query compilation. The statistics built from these features are built only from data sampling. Therefore, they can be less accurate than statistics built from the entire dataset. In databases with large tables, or in tables where previous statistics were created with fullscan, the difference in quality may cause the SQL Server 2012 query optimizer to produce a suboptimal query plan.
With SQL Server 2012, when you create an index, the statistics use the query optimizer’s default sampling algorithm.
To mitigate this issue, you should immediately update the statistics after upgrading to SQL Server 2012. Using sp_updatestats with the resample argument rebuilds statistics based on an inherited sampling ratio for all existing statistics. Typically, that is a full sample for index-based statistics and sampled statistics for the rest of the columns. An additional benefit that you could gain from this process is that if the data is less than 8MB (the minimum sampling size), the statistics are also built with fullscan.
There are many compelling reasons for upgrading to SQL Server 2012. Some strategies and tools for doing so include the Upgrade Assistant for SQL Server 2012 and the SQL Server 2012 Upgrade Advisor, which can be leveraged during the upgrade. The upgrade process includes the pre-upgrade, the actual upgrade, and the post-upgrade steps for a successful upgrade. There are several discontinued features to watch out for, including database compatibility level 80 and SQL Mail, along with features whose behavior changes could also affect your upgrade, such as partitioned index histograms post-upgrade and sqlcmd.exe with XML mode. Now that you have done the groundwork for a successful upgrade, jump into SQL Server 2012.