
Chapter 5. SEO in Development

Let us tell you about a company that went through a $5 million site redesign but didn’t include any SEO considerations. With a hefty investment in user research, they thought they had everything covered. Wow, were they stunned to find out they had lost 40 percent of their traffic and 30 percent of their conversions after the new site launched! Besides not addressing search intent in the new content, they broad-brushed the redirect plan so it overlooked key content, ignored international SEO settings, and locked in the default CMS template settings so the content team couldn’t even edit basic search-impacting elements—like title tags! It was a real bummer.
With a little knowledge and some technical SEO considerations, that huge drop in performance could have been avoided.
Now, you might be thinking: “Isn’t there an SEO plugin for that?” After all, some CMS platforms do have built-in SEO bells and whistles and, sure, there are plugin options for most content management systems that provide some of the SEO scaffolding—saving development time and ensuring precise details are implemented according to search engine standards. But no matter how robust the plugin, it’s likely that additional details will need to be considered during development and implementation.
Built-in CMS functionality and plugins are good at providing shortcuts for basic editing needs, like editing titles, URLs, meta descriptions, noindex options, and social meta data. They’re also great for technical SEO implementation of universal elements, like canonical links, XML sitemaps, and common structured data types. Beyond that, their ability to impact SEO outcomes is limited. Plugins can’t guarantee you’re using search engine-friendly architecture and semantically meaningful HTML—that’s up to you. Identifying the gaps between what you need and what’s provided by the platform or plugin is critical, because it allows you to understand what sort of manual implementation efforts will be required during development.
Understanding where technical decisions overlap with SEO performance helps ensure that research and search-friendly design decisions don’t get lost in development. You can think of these overlapping areas as technical SEO—the practice of improving a site’s search visibility through coding and implementation. While you can do a lot to optimize for search in design and content, it needs to live in a sound infrastructure; otherwise, you risk creating an experience that isn’t accessible or easily understood by search engines.
Technical SEO Considerations
Technical SEO isn’t just about optimizing your site for crawling and indexing; it’s also about how a site is built. It encompasses what can be edited in the CMS, sitemaps, JavaScript indexing, responsive design, and more. Getting technical SEO right is important not only because it helps Google crawl and understand your site more efficiently, but also because the code and technology behind the scenes will ultimately deliver a better, faster, more usable experience for those maintaining and those visiting the website. An improved user experience in the CMS means a less frustrating governance process for content maintainers, leading to better results in the long-term. On the public-facing side, it means people staying on the page longer, interacting further with your site, not clicking the back button, revisiting the site anew, and sharing your content—all boons for SEO.
There’s quite a lot to unpack around technical SEO and we don’t have the space here to discuss all of its ins and outs—it’s a topic deserving of its own book. But we can cover essential requirements that will make sure all of that hard, search-relevant work you did during your research, content, and design phases doesn’t get lost in development.
Page titles
A page title is the headline of each search listing that appears as a link in Google search results; it also appears in the browser tab. The text here is contained within the title element in the head of the document. There should only be one instance of a page title per URL. Page titles might seem like an afterthought, but they are highly visible and super important in terms of ranking factor.
Most of the time, CMSs are configured to autogenerate page titles so that titles aren’t duplicated or overlooked altogether. This is a good and necessary first step, but since page titles are headlines and their main job is to win the user’s click, most of the time they need to be written by a real human.
Although page titles should be editable in the CMS, manually writing page titles for every single page on a giant website with hundreds, thousands, or even millions of similar pages can be nearly impossible. To make managing titles for these pages easier, create a pattern for page titles that can be dynamically generated; allow editors to override the automated titles manually if necessary. Some plugins offer this functionality at a base level, but if you’re not using plugins, you can implement it on your own.
Whatever route you choose, make sure it results in page titles that are semantically relevant and meaningful to the end user. For example, an effective page title tag might look like this:
<title>Shop Jaguar Guitars | Fender</title> An ineffective page title tag might look like this:
<title>Jaguar</title> Without context, “Jaguar” truly means nothing. It could refer to an animal or a car. That’s what you’d get if you simply dropped the page name into title.
Meta descriptions
Meta descriptions are the brief (160 characters or fewer) summaries of a page’s content that show up in the search engine results underneath the page title. This text is the value of the content attribute of the meta element with the name="description" attribute, in the head of the document.
Meta descriptions for each page should be editable in the CMS. It’s important not to use overly generalized descriptions as placeholders—when a description is omitted, Google will generate a much more specific and useful one for you, based on the contents of that page. Although this isn’t always ideal, it’s still better than using duplicate descriptions across multiple pages (Fig 5.1).

As with page title tags, if you have a high page count for a single type of page, it’s possible to create quality autogenerated meta descriptions that emulate well-written sentences. Start with a thoughtful Mad Libs-style template and fill in the blanks with unique data points for that page type. You’ll just need to make sure the dynamically inserted data doesn’t blow your character count. If you want to build out a really luxe editorial experience and support correct implementation of everything, include some guidance in the CMS on the maximum character count—you could even program functionality that warns users when they go over the character limit. Fancy!
Image optimization
As we discussed in Chapter 4, alt text is a way of describing visual information—our image content. Alt text needs to be easily editable; without it, search engines have trouble understanding what images are meant to represent, and that content has no way of showing up in image or video search results. Likewise, images’ file names can be interpreted as meaningful content, especially when an alt attribute has been omitted. Make sure to implement all images (that aren’t purely decorative or only meant as background design) in HTML, and allow editors to manage alt text, captions, and file names in the CMS.
Hyperlinks
Search engines use the language contained in text links to help them understand the purpose of the page referenced by that link. However, while a page’s primary content is typically editable by default, microcopy is a frequently overlooked area—smaller content modules, CTA buttons, and other smaller units of content often get designed without the same level of flexibility. Links are often relegated to generic language like “learn more,” when a linked headline or a more specific call to action could be much more meaningful to a search engine. Regardless of what you see in mockups and prototypes, give editors the ability to link text anywhere they need to in the content module, not just the button or designated link area. Doing so means you’ll need to make sure the link styling doesn’t interfere with the module design; you may need to consider a different link style variation. For instance, a headline turning bright blue and underlined on focus could look quite jarring. It might be better to do something subtle, like apply a slight color change on hover instead.
Although they’re not in a high-priority location, footer links still have significant influence on how both users and crawlers flow through the site and pass link equity. Editors will need to be able to sculpt this flow on an ongoing basis by having access to edit, add, and remove text links in this area.
Crawling and indexing
Traditionally, technical SEO was all about making sure a site could be crawled (discovered and categorized) and indexed (assessed and then displayed in search results and ranked) by search engines as efficiently as possible. And although that’s not the only aspect of technical SEO you need to consider now, it’s still really important. As we discussed in Chapter 2, search engines use crawlers to follow links and discover content on your site. Having a solid internal linking structure and avoiding blocking or crawling errors helps Google understand what the most important content is on your site, but there’s more to it behind the scenes.
XML sitemaps
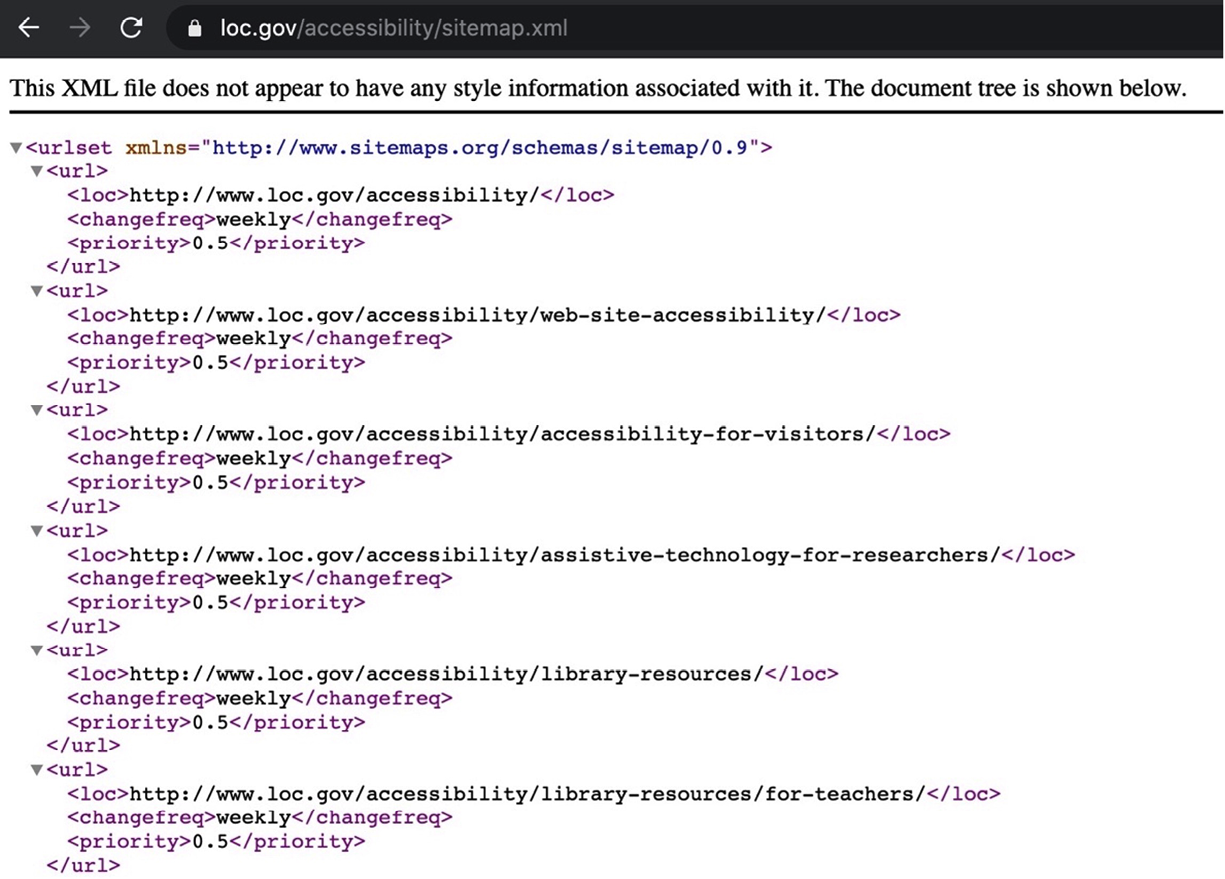
An XML sitemap is a file created specifically for search engines (as opposed to a dedicated sitemap page intended for users). It lists all of the public-facing URLs on a single domain that should be crawled and indexed for that site, excluding subdomains and any pages like confirmation pages, paywalled or password-protected pages, and landing pages designed specifically for paid-search campaigns. Think of it this way: an XML sitemap is like a map of your website that tells Google where all of the pages are. It helps Google crawl your site more quickly and efficiently.
XML sitemaps should live in the root directory of your site structure (Fig 5.2). Of course, XML sitemaps should be dynamic, automatically updating URLs as they are added to or removed from the site. On more sites than you’d like to imagine, you might still find a static sitemap hiding under the hood. These should be set to automatically update, as new pages are added or existing pages are removed. Without setting XML sitemaps to automatically update, they’ll quickly fall out of date, often causing more harm or confusion than not having a sitemap at all.
Sitemaps become increasingly important—and impactful—for sprawling sites with higher page counts, since the process of discovering URLs naturally through links becomes increasingly difficult for search engines. Remember, crawlers work by discovering a page and following the links they find naturally, like someone browsing the web. On a large site, it could take Google a long time to discover new content crawling naturally like this. An XML sitemap tells Google exactly where the new content is so they can index it faster.
Google limits a single XML sitemap to fifty thousand URLs (and fifty megabytes, uncompressed), so sites with pages over that limit will need to create multiple XML sitemaps linked to from a sitemap index file (Fig 5.3). Some tests show that limiting sitemaps to ten thousand URLs leads to even more thorough levels of indexing (http://bkaprt.com/seo38/05-01).

Once you create your XML sitemap(s), don’t forget to submit it (or them) to Google Search Console. Doing so will allow you to keep track of the number of pages Google has indexed from the site, and you can even request a recrawl if you’ve recently made a lot of updates. To make it easy to manage sitemaps and measure crawling/indexing progress, it’s a good idea to segment URLs into multiple sitemaps by the type of URL, content, or section (or whatever kind of segmentation is important within the context of your site). For example, you might have one XML sitemap with articles, another with product pages, and so on. With only one file, you can’t see which pages are and aren’t indexed.
Robots.txt
If the main purpose of an XML sitemap is to tell engines where you do want them to crawl, the primary purpose of a robots.txt file is to suggest where you don’t want them to crawl. We say “suggest” quite literally here, because sometimes Google blows through these stop signs.
Robots.txt is the plain text file part of the robots exclusion protocol, a standard used by websites to communicate with web crawlers and other web robots. It operates on basic “disallow” and “allow” commands, giving you the ability to clearly communicate which pages or directories you’d like crawlers not to follow so those pages won’t likely get indexed if you don’t want them to (Fig 5.4).
Robots.txt files are best for:
- Keeping non-public-facing content private. This is essentially a backup plan; it doesn’t replace site security if you allow people to access these files without security in front of them, like in an admin or staging area.
- Preventing new content (like a page behind a paywall) from being discovered and indexed.
- Stopping internal search results pages from showing in SERPs.
- Setting crawl delays for specific bots that are overloading the server (though we don’t suggest limiting crawling for Google or Bing, since that could adversely impact indexing).
- Specifying the location of your XML sitemap(s). The file is located in the root directory of a site. So, for site www.example.com, you would find the file at www.example.com/robots.txt.
It’s important to note that a robots.txt file influences crawling, not indexing. Restricting access in the robots.txt file prevents crawlers from discovering the content in the first place. However, if the content has already been discovered by a crawler before you had the robots.txt file in place, restricting access in the file won’t remove it from the index. If you want to block engines from indexing content, the better choice is to implement a noindex tag directly on those pages. That way, they won’t show up in search results at all.

noindex tags
Although you most likely want nearly all of the pages on your site indexed by engines, there may be a few you don’t (like a special offer for existing customers or PDF content you don’t want to show up in search). Adding a noindex meta tag in the head of that page will get the job done.
We recommend not making this editable in the CMS to protect your site from folks accidentally applying noindex to meaningful pages.
URL styling
Even slight inconsistencies in URLs—such as trailing slashes, http rather than https, a capital letter instead of a lowercase, or the addition of tracking parameters—will be parsed as a unique URL or page by a search engine, even if they are the same pages with the same content (Fig 5.5). Referencing multiple URL versions of the same page leads to duplicate content issues in a search engine’s index and dilutes the link authority of each page. Linking to multiple variations of the same page divides PageRank into smaller increments across several URLs, rather than consolidating that power under one more authoritative URL. Duplicate pages can also wreak havoc in analytics reporting, making it difficult to view the total performance of a page in one line or row of data.

Piggybacking off the work we did in Chapter 4, to design URLs that communicate site structure and subject matter relevance, there are additional technical details you will need to consider to avoid duplicate content and to consolidate authority (and performance) under one URL.
Identify and document the URL format your organization prefers. Our recommendations:
- Stick with all lowercase letters.
- Use hyphens (“-”) as word separators because they are great for user and search engine readability.
- There are no SEO advantages or downsides to starting your URLs with www, or ending them with a trailing slash. The important part is that you stick with one and use it consistently.
- Choose the secure https option. Most browsers now show warnings for non-secure content, and secure URLs give you a slight ranking boost.
Once you’ve implemented your URL system, link only to preferred URLs for each page from all site locations: navigation, footer, in-content links, calls to action, and your XML sitemap(s).
To properly cement your preferred URL decisions in stone, implement canonical tags. A canonical tag (<link rel="canonical" href="https://example.com/page"/>) is an HTML element added to the head of the page that allows you to communicate the exact version of the URL you’d like the search engine to index. If a search engine were to happen upon a duplicate version of that page, the canonical sends a strong suggestion to the engine to index only the preferred, canonical version. Reference “Canonical Tags: A Simple Guide for Beginners” from Ahrefs for more details (http://bkaprt.com/seo38/05-02).
Canonical tags are a suggestion, but not a directive, to search engines. For a bulletproof backup plan, implement a 301 redirect for non-preferred versions to go to the preferred ones. For example, let’s say you decide all URLs will not end in a trailing slash (“/”). Redirect anybody trying to access a version with the trailing slash to the preferred version, the one without the slash.
For sites that have already adequately set their canonicals and currently drive significant levels of organic search traffic, be careful about making any changes to the URLs. One small update can change all URLs for the entire site, creating the need for a search engine to reindex all pages, which will cause a disruption in search visibility. It may be worth timing any URL changes with other major changes—like a site redesign or a migration—to minimize the number of times your URLs will change.
Pagination
Site pagination lists and links the pages within a given site section, such as onsite search results, category pages, or forum threads. Pagination is a clever sleight of hand that ensures there are crawlable links to deeper content on the site, so that users and search engines alike can discover all of the content in every section.
Before jumping headfirst into pagination, determine if you need it at all. If there are only a few items in a category, it is often faster and more straightforward to present all of the items on one page, rather than splitting them into paginated results. But if presenting all items at once would overwhelm users or slow load times down, pagination is a good option.
Here are the two best search-friendly ways to paginate:
- Multipage links. This is the most common style of pagination, where each page in the series is linked from a numbered list (Fig 5.6). This is a solid (if no-frills) approach that makes it easy for search engines to understand, and easy for users to browse and return to the listings. This method uses self-referencing canonicals, where the canonical link for each page links to itself.
- View more. This method allows users to load the next set of results within the original item listing (Fig 5.7). This is a good option when you want to encourage users to continue browsing all results (as with a retail store shopping experience) but still want to make it easy for them to stay oriented within a specific set of items. This method also uses self-referencing canonicals.
- Infinite scroll. This method loads additional content as the user scrolls down the page, essentially eliminating pagination. Although infinite scroll has enjoyed some popularity, it has many hidden downsides for both search engines and users. Currently, search engines can’t crawl content that isn’t present on page load, so everything that loads with the scroll is essentially invisible. Infinite scroll can also make users feel like they’re not in control of the experience, and can make it maddeningly difficult to find particular content (like the footer) (http://bkaprt.com/seo38/05-03). If you must implement endless scrolling, tread very carefully. John Muller, a senior webmaster trends analyst at Google, recommends including multipage links with infinite scroll (Fig 5.8), and automatically updating the URL to the next page in the series as users scroll down (http://bkaprt.com/seo38/05-04).

Fig 5.6: With multipage linking, the item series displays self-referencing canonical links to provide access to subsequent pages in the series.

Fig 5.7: In this wireframe example, a user has clicked the “View more” button to display a second set of ten items beneath the first set.
 Fig 5.8: John Muller built this example site to show how multipage linking can be incorporated into infinite scrolling (http://bkaprt.com/seo38/05-05). Here, the multipage links indicate placement on page 14, which will change as page 15 scrolls to the top of the screen.
When you talk about pagination, inevitably someone will bring up pagination markup. Although Google no longer uses this markup (rel="next" and rel="prev"), it can provide wayfinding hints to users browsing via assistive technologies—especially with a markup pattern that is difficult to parse but essential for navigating a site. This markup is also relevant to frontend performance, potentially allowing modern browsers to preemptively queue up requests for related assets.
International SEO
Imagine a website for a global organization that distributes pacemakers, with separate sections of the site targeting specific countries. Now, imagine a user in Australia trying to find a doctor for an in-person pacemaker consultation. It would be frustrating for them to see relevant search results in Google, only to click through to information on how to book a consultation in the United States. And if there’s no visual cue to indicate what region the user is currently viewing? No helpful message to guide them to the appropriate site section? Painful.
This is exactly the kind of thing that happens to users when hreflang is ignored or set up improperly. If you work with multilingual sites or sites targeted to multiple countries, you’ll want to use hreflang—an HTML attribute that specifies the language and geographical targeting of a web page—to help Google understand your intended audience location and language. If you have multiple versions of a page for different languages or regions, hreflang annotations tell search engines about the relationship among those alternate versions to make sure the right version of the page—in the right language, targeted to people in the right geographic area—shows up in search results.
These attributes can be implemented through code placed either directly in the head of each regional page, in your XML sitemap(s), or in HTTP headers. You’ll want the markup to list all URLs that are alternates or regional equivalents to one another, the language referenced on the page, and the country target for each URL, including the URL for the page you’re adding markup to. Keep in mind that it’s fine to specify a language by itself, but never a region by itself.
As an example, in this markup we’re setting the United States version of the homepage as the global default, meaning it’s the page you’d want users from all other countries to find:
<head>
<title>Your Organization, Inc.</title>
<link rel="alternate" hreflang="en-US"
href="https://www.yourorganization.com" />
<link rel="alternate" hreflang="es-US"
href="https://www.yourorganization.com/es" />
<link rel="alternate" hreflang="en-GB"
href="https://www.yourorganization.com/uk" />
<link rel="alternate" hreflang="zh-hans-HK"
href="https://www.yourorganization.com/hk/zh" />
<link rel="alternate" hreflang="en-HK"
href="https://www.yourorganization.com/hk/en" />
<link rel="alternate" hreflang="de-DE"
href="https://www.yourorganization.com/de" />
<link rel="alternate" hreflang="x-default"
href="https://www.yourorganization.com" />
</head>
You might have noticed the regions here are capitalized— these are technically case-insensitive, but uppercasing the region is a common practice.
Implementation of hreflang is complex, difficult to perfect (especially when you have a large enterprise site with millions of pages), and hinges on having a consistent site structure and aligned implementation governance between each regional or language section. In other words, hreflang is complicated because it requires multiple people managing different sites to follow the same steps in a coordinated fashion, as well as someone to monitor the implementation on an ongoing basis to ensure the protocols are being followed. If you’re in a position to champion this cause, or know someone in your organization who is, remember it’s a worthwhile endeavor and an important part of international SEO. See the Resources section for more information on hreflang implementation.
JavaScript SEO
Avoid JavaScript rendering for core content or key areas of a site. If you must use it, be sure to provide backup dynamic rendering (prerendering) for search engines with a static HTML version of the page, and make sure your site’s robots.txt file doesn’t disallow crawling of your JavaScript files.
Testing has shown that content in JavaScript can take days or weeks to be crawled and indexed, resulting in lower search visibility; static HTML rendering is always the faster route (http://bkaprt.com/seo38/05-06). Currently, Google and Bing can index JavaScript-rendered content (although we’re not sure to what degree Bing can). Yandex and Baidu have limited support, and other engines have little to no support for JavaScript.
In his article “The Ultimate Guide to JavaScript SEO,” Tomek Rudzki notes that despite JavaScript’s popularity, many JavaScript websites “underperform in Google because they don’t do JavaScript SEO properly.” Bottom line: even the “best” JavaScript rendering frameworks can deprioritize semantic markup and frontend performance in ways that impact SEO (http://bkaprt.com/seo38/05-07). This is about as technical as SEO gets—we highly recommend you check out Rudzki’s guide to avoid any potential issues early on.
Develop a device-agnostic website
Historically, Google’s index relied on how your site performed when rendered on desktop devices, and the content displayed there, when evaluating the relevance of a page to a user’s query. Now, since the majority of users access Google with a mobile device, Googlebot primarily crawls and indexes a website using the mobile-rendered version of the site’s content. So if users can’t access the same content on small screens that they can on desktop devices, via a fast-loading, user-friendly experience, you’re in trouble.
A thoughtful approach to responsive design is your best bet here. You need to offer the same content (including text, images, videos, links, and structured data and metadata) regardless of the device being used to access the site or the screen size it’s being rendered on. Treating the mobile view of your website as an afterthought, or creating a secondary mobile site with pared-down content or a separate “streamlined” mobile experience, poses a risk to your rankings because Google indexes the web on a mobile-first basis, regardless of whether or not you have a mobile-friendly experience.
Use tags to structure pages
Markup plays a significant role in how your site is understood by any technology tasked with parsing a page for meaning, from search engines to assistive technologies like screen readers. HTML’s sectioning elements (header, nav, main, section, aside, and footer, to name a few) allow you to utilize specifically named containers to add essential context to the sections of a page that can’t be conveyed by the content alone, and clearly signal where one part of the page ends and another begins (Fig 5.9).
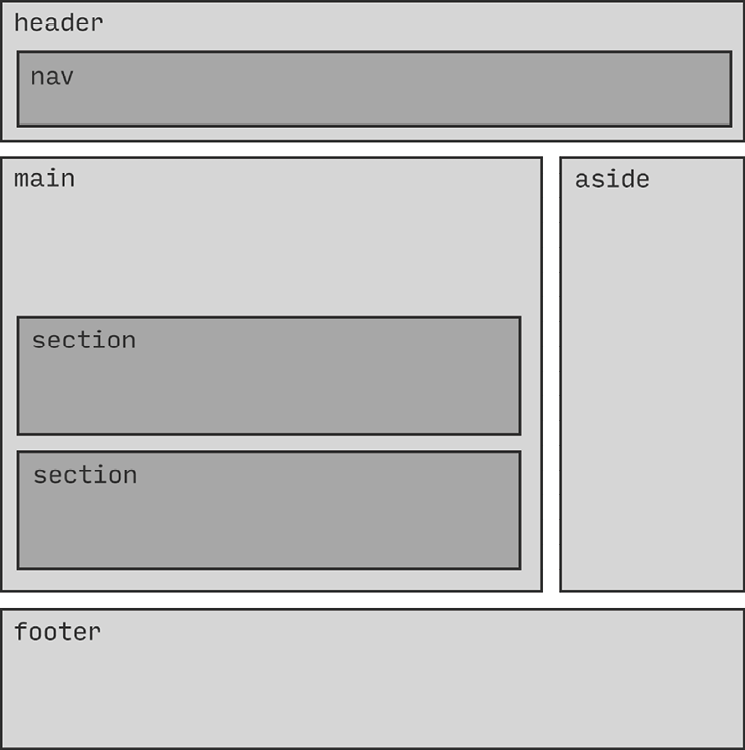 Fig 5.9: This wireframe shows what HTML5 sectioning on a page can look like.
Well-formed markup communicates not only the role of each section of a page, but also its relative importance and how it relates to other sections. For example, drawing a clear boundary around the core content of a page allows crawlers to better understand its primary focus. A properly coded page will make it clear that an individual blog post’s most important content is the post itself, inside a main element, not the supplemental content—advertisements, author contact information, and so on—wrapped in an aside element that has been styled as the post’s sidebar.
Heading elements
Heading elements play a key role in communicating the structure of a page and defining the relationship between the pieces of content above and below the headings. They provide a way to outline the contents of the page with a clear hierarchy ranging from h1 through h6.
For on-page SEO, the advice has traditionally been to use headings hierarchically throughout a page’s content, where h1 represents the top headline on the page used to describe the main topic, and subsections organized from h2 through h6 represent the subtopics. This came about because headings communicate the meaning and context of a page, which is of great interest to search engines. While that still holds true, search engines have evolved and gotten much better at parsing meaning in more advanced ways. This is important because headings are about more than content—ultimately, they’re about usability. In order to make sure your pages are accessible to everyone—especially folks using screen readers and other accessibility devices—you can’t just apply header tags to the content. You have to use them to give context to the whole page and all of its elements, from navigational elements to the logo.
The HTML specification also allows each sectioning element to have its own heading outline (h1 through h6 inside of each article, for example)—no more or less correct on paper than a page-level outline. In theory, this pattern might someday allow for individual sections of a page to be syndicated to external sources while retaining a sensible internal heading structure. In practice, however, this is where things can break down for users navigating with assistive technology. It can be especially problematic for people using built-in keyboard shortcuts to quickly navigate via headings—not just within a page’s content, but the page itself. Make sure you use heading elements to communicate the structure of the entire page, beyond just the content elements, to make it clear to both users and search engines what your page and its content are about. And it goes without saying that we should use heading elements only to communicate meaning, not for styling or any other purpose.
Site speed, responsiveness, and visual stability
Site performance is one of the few subjects where Google is forthcoming about impact on search results: fast, well-built sites rank better, full stop. Performance matters to Google because it matters to users—so much so that the company created metrics around site speed, responsiveness, and visual stability known as Core Web Vitals (http://bkaprt.com/seo38/05-08).
Core Web Vitals aim to measure overall site performance, and are made up of three specific measurements:
- Largest Contentful Paint (LCP) looks at how quickly a page renders its largest image or text in the initial viewport. You should aim for this initial content to load in under 2.5 seconds (http://bkaprt.com/seo38/05-09).
- First Input Delay (FID) measures load responsiveness, or the time it takes the browser to respond to user interaction with the page. Here, you’ll want to be under a hundred milliseconds (http://bkaprt.com/seo38/05-10).
- Cumulative Layout Shift (CLS) measures the visual stability of the page by summing up each and every unexpected layout shift that wasn’t caused by user interaction. With this one, your target score is 0.1 or less (http://bkaprt.com/seo38/05-11).
Ensuring that your site is doing everything it can to deliver a fast, responsive, visually stable experience can make all the difference. Here are a few tools that can help you optimize for Core Web Vitals and site performance in general:
- Google Search Console can give you a bird’s eye view of how your pages are performing according to its Core Web Vitals. It categorizes each URL as poor, needs improvement, or good (Fig 5.10).
- Google Analytics Site Speed reports allow you to pinpoint pages that load slowly. It will show your site’s average load speed across different dimensions to see how quickly your pages loaded over a set period of time, in different browsers, or in specific countries. And Page Timing reports will let you know which pages are slowing you down most often, too (Fig 5.11).

Fig 5.10: A Core Web Vitals report in Google Search Console. This site is in bad shape: the majority of its URLs fall into Google’s “poor” category. Ideally, as you implement improvements to your site, you should see this report improve. 
Fig 5.11: The Google Analytics Page Timings report shows you URLs with loading-speed issues so you can pinpoint where to make improvements.
- Google’s PageSpeed Insights tool (http://bkaprt.com/seo38/05-12) gives you page-by-page performance scores from Google (Fig 5.12) and recommendations on how to improve those scores (Fig 5.13). It measures loading, interactivity, and visual stability metrics (part of Google’s Core Web Vitals) for your site.
 Fig 5.12: Google PageSpeed Insights provides an overview of how a page is performing with a handful of Core Web Vitals metrics.
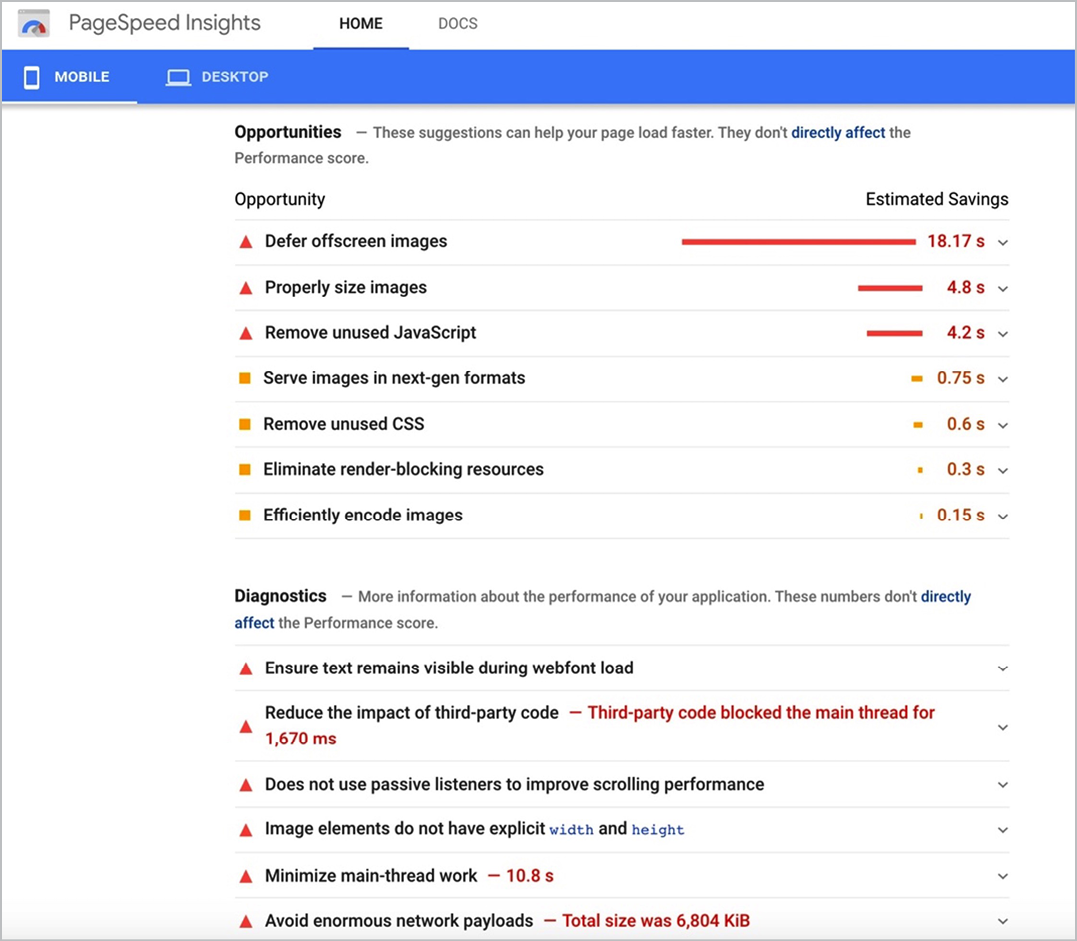
Fig 5.13: Google PageSpeed Insights suggests further recommendations for improving your page performance.
Structured Data Implementation
As discussed in Chapter 4, Schema.org is a structured-data markup schema used by all major search engines for information pertaining to creative work, events, organizations, people, places, and products. Using this on-page markup (implemented in JSON-LD) helps search engines better understand the information on a page. Correct implementation from a technical perspective is imperative. Not implementing structured markup according to guidelines will either trigger errors in your code, causing a search engine to ignore your markup altogether, or, worse, will cause your site to be penalized. Here are a few tips:
- Stay away from marking up information in your structured data that doesn’t correspond to content literally represented on that page.
- Future-proof your implementation by using Google’s preferred method, JSON-LD. While JSON-LD can be implemented anywhere in the page, studies have shown that incorporating the code in the
headis most commonly validated by Google (http://bkaprt.com/seo38/05-13). - Visit Google’s official list of structured data it supports for use in rich snippets to understand how the markup could impact the visual display of your SERP listing (http://bkaprt.com/seo38/05-14).
For more details on creating error-free Schema.org code, check out the Schema.org website and Google’s “General Structured Data Guidelines” (http://bkaprt.com/seo38/05-15).
How to treat Schema.org markup in the CMS is complex. The world is still really figuring out the best way to enable editors to manage this without dev resources, and there isn’t yet a perfect solution. Most solutions we see require technical implementation or use of a plugin. Editors might not need to change this markup often, but someone dedicated to SEO in your organization likely will. While it takes dev resources to set up Schema.org in the background, building the capability to edit certain markup fields in the CMS so SEO specialists and adventurous content editors can update it themselves—instead of relying on dev resources to make one-off changes—could be a huge time-saver.
As we outlined in Chapter 4, someone working with content will need to determine which Schema.org markup is appropriate, and which pages it will apply to, before developers can implement it and create an editing interface in the CMS to support this markup.
Redirect Implementation
If you lose a ton of traffic after a redesign that involved changes to URLs, taxonomy, navigation, or any of the like, your first step should always be to review the redirect implementation. Chances are a lot of URLs have changed and now you’ve got a bunch of broken links—where links in search results and from other sites linking to you result in a 404 error for the user. This is no trifle. As Tim Berners-Lee said in his brilliant piece from 1998, “Cool URIs Don’t Change”:
When you change a [URL] on your server, you can never completely tell who will have links to the old [URL]. They might have made links from regular web pages. They might have bookmarked your page. They might have scrawled the [URL] in the margin of a letter to a friend. (http://bkaprt.com/seo38/05-16)
When links break, frustration abounds; usability is impeded. Furthermore, in our experience, sites that don’t take seamless redirects seriously during a site transition will lose anywhere from 40 to 85 percent of their organic traffic. Search engines simply aren’t set up to make the connection between your older previously ranked pages and the new content you’re launching. All the search value from those old pages, in terms of the content and the link authority they had, gets lost instead of being transferred to the new related pages, and old URLs could still show up in SERPs.
The first takeaway here is that you shouldn’t change URLs if you don’t need to—although sometimes they must be changed, because they weren’t created with semantic relevance in mind. The second takeaway is that anytime significant changes are made to a site’s domain location, content, information architecture, navigation, design, or functionality, there’s a risk of losing the organic visibility the site has already earned.
It’s during this transition from old pages to new pages, or the old site experience to the new one (also known as site migration), that a plan on how to handle redirects becomes really important. We call this a redirect guide.
During site migration, it’s important to establish a redirect strategy that gives users and search engine bots alike a seamless experience when attempting to access URLs from the previous site. Think of a redirect guide as a tool to send users and search engine crawlers to a new URL where the content satisfies the same intent as closely as possible.
The complexity of your redirect plan will depend largely on the complexity of the project. If you’re doing a complete site redesign—one where most URLs will change, pages will be eliminated and added, multiple properties will merge into one domain, or the domain name itself will change—your plan will be fairly involved. But even a single change in a single URL can still benefit from a (simpler) redirect plan.
Whatever your situation may be, creating a redirect plan will help minimize (or eliminate) poor post-migration search performance and ensure as smooth of a transition as possible for users and search engines.
Types of redirects
The most common types of redirects are 301 (a permanent redirect), 302 (a temporary redirect where the HTTP method can change), and 307 (a temporary redirect where the HTTP method must remain the same). A 301 redirect is considered the most SEO-friendly redirect; it communicates to a search engine that this URL has permanently moved to a new location. Because the decision is permanent, search engines understand you won’t be changing this again anytime soon, so they remove the old URL from their index and add the new one.
A 302 or 307 redirect communicates to search engines that the move is temporary. Therefore, they do not remove the old URL from their index or transfer link equity from the old page to the new.
Some Google employees have stated that Google now passes the same levels of link equity (or PageRank, Google’s patented term) between 301s, 302s, and 307s (http://bkaprt.com/seo38/05-17). But industry tests show otherwise. In a 2016 Moz article, Mike King explained:
[A client] had millions of links both internally and externally pointing to URLs that returned 302 response codes. After many meetings, and a more compelling business case, the one substantial thing that we were able to convince them to do was switch those 302s into 301s. Nearly overnight there was an increase in rankings. (http://bkaprt.com/seo38/05-18)
The lesson here? The only time you should use a 302 or 307 redirect is when a URL moves locations for a brief time, as when A/B testing or when adding a temporary alternate version of a page without impacting the rankings of the original page. Otherwise, stick to 301 redirects.
Avoid redirect chains
A redirect chain happens when there is more than one redirect between the original URL and the final destination. Redirect chains can lead to slower load times, especially in mobile browsing contexts, and slow load times can block search engines from acknowledging the redirect altogether. If a search engine is unable to take note of the redirect, it won’t pass link authority to the new URL, nor will it switch the old URL out for the new one in search results.
Redirect chains are also more difficult to maintain from a content management perspective. All it takes is for someone to forget or mistype one URL in a chain, and whammo—you’ve got yourself a dead link.
Google stated in 2014 that it can follow a maximum of five redirect links in a chain (http://bkaprt.com/seo38/05-19). They recommend linking directly to the final destination or, if that’s not possible, minimizing the steps in the chain to three or fewer. Ultimately, redirect chains are usually the result of a lack of governance around redirects and legacy sites. It’s best to clean them up and try to eliminate chains entirely.
Manual versus automated redirects
The best way to handle redirects is at the page level: assigning each outdated URL a new URL that satisfies the same search intent as the original page (Fig 5.14). Mapping your redirect decisions on a page-by-page basis can be tedious and time-consuming work, especially when there are hundreds or thousands of URLs at stake—but it is seriously worth every minute of your time. Ignoring page-level redirects or taking shortcuts is a good way to damage search rankings post-migration.

A common shortcut we see clients try to take is applying the same redirect to many pages at once, such as redirecting all old URLs to the new homepage. That might save time up front, but it’ll cost you—in both search rankings and user experience—in the long run. Blanket redirects force users to start their search process from scratch or navigate through an unfamiliar site structure in search of specific content. Search engines treat blanket redirects as soft 404s—you likely know 404s as error pages, but they can also serve to direct users to pages that aren’t comparable to the old content. Google won’t transfer link equity from the old to the new location, and your site will lose what equity it had built.
We once worked on a migration strategy during a site redesign for a large ecommerce website. All URLs were changing in the process, meaning there would be over four million different URLs in the redirect plan!
Obviously, making redirect decisions for four million URLs one at a time would be unthinkable—so we sought out ways to automate decisions as often as possible. One page type on the site accounted for 99 percent of the URL count and 75 percent of the site’s organic search traffic: the product pages. Getting redirects right for these pages was essential to a successful migration. The development team was able to implement a dynamic solution that implemented automatic 301 redirects for each of the old product URLs to the new equivalent product URL—and without any redirect chains, to boot!
While we had a workable solution for product pages, there were still other page types we needed to account for—product category pages, manufacturer pages, articles, and more. We determined there was no way to automate redirects for these URLs, so we handled the remaining several hundred redirects by documenting our redirect decisions one at a time in a spreadsheet. The development team then used the spreadsheet to update the site’s .htaccess file (where redirect lists are officially entered).
The combination of dynamic and manual redirect solutions ensured we accounted for all URL changes in the site redesign. At launch, there was no short-term loss in organic traffic or conversions while Google crawled, indexed, and processed the new changes. By incorporating SEO strategy into the design, development, and site migration process, the site experienced a 50 percent increase in traffic and a 74 percent increase in revenue from organic search in the first year, post-launch. Success!
Perhaps yours isn’t a complex ecommerce site, or a property with such a high page count. For most projects, creating a spreadsheet to document all of your redirect decisions will be fairly straightforward, and can be repurposed by your development team during the implementation process.
Don’t be afraid of 404s
Some people get nervous at the thought of letting their outdated content lead to a 404 (page not found) response. In an effort to keep users on the site and not lose their business, these nervous folks push to have outdated URLs redirect to the home page. But there’s nothing wrong with a page-not-found error as long as it’s the result of a purposeful decision, not an accident or oversight. On the contrary, letting a page die in a 404 response is incredibly useful to users and search engines, clearly communicating that the content is no longer available.
If you go this route, make sure the server is configured to return a 404 status code for these pages—that way, you send a clear signal to engines that this URL is longer available and that they should remove it from their index.
Okay, that’s it. Bet you never imagined going so deep into redirects, right?
Check Yourself
It’s always helpful for the whole team to talk things through in person before development starts. Try a working session with representation from design, development, and content to walk through the requirements together. Discuss the expected functionality of wireframes or design comps from an editorial standpoint. Think through which elements of each content module will need to be editable, and whether those changes will occur at the site or page level. This decreases the likelihood of unforeseen misunderstandings in implementation and gets everyone on the same page.
Up to this point, we’ve focused on making search-friendly design decisions and bringing them to life with the right technical considerations in development and editorial tools in the CMS. We’ve discussed what needs to happen for human-centered SEO; in the next chapter, we’ll explore how we’ll get the buy-in and implement the workflow it takes to get it done. There’s so much opportunity for more efficient coordination between SEO, UX, and content—the key is making sure we create room in our process for it to happen.