
27. An Introduction to Creating Apps for Office
In This Chapter
Creating Your First App—Hello World
Adding Interactivity to Your App
Using JavaScript to Add Interactivity to Your App
Napa Office 365 Development Tools
With Office 2013, Microsoft has introduced Apps for Office, applications that provide expanded functionality to a sheet, such as a selectable calendar, or an interface with the Web, such as retrieving information from Wikipedia or Bing. Like add-ins, once installed, the app is always available. But unlike add-ins, the app has limited interaction with sheets and does not use VBA.
An app consists of an HTML file that provides the user interface on a task or content pane, a CSS file to provide styles for the HTML file, a JavaScript file to provide interactivity to the HTML file, and an XML file to register the app with Excel. Sounds like a lot of new programming skills, but it’s not. I’ve only designed the most basic web pages, years ago, but was able to apply my VBA programming skills to JavaScript, which is where the brunt of the programming goes. The language is a little different, but not so different that you can’t create a simple, useful app.
This chapter introduces you to creating an app to distribute locally and to the basics for the various programming languages. It is not meant to be an in-depth instruction, especially to JavaScript.
Creating Your First App—Hello World
Hello World is probably the most popular first program for programmers to try out. It’s a simple program, just outputting the words “Hello World,” but that simplicity introduces the programmer to the basics required by the application. So, with that said, it’s time to create a Hello World app. Follow these steps to create the files for the app:
A network is used to distribute the app locally. You cannot use a local drive or a network drive mapped to a drive letter. If you do not have access to a network, you will not be able to test your app. See the section “Napa Office 365 Development Tools” for an alternative location for creating apps.
Note
In the following steps, you enter text into a text editor. Unlike with the VB Editor, there isn’t a compiler to point out mistakes before you run the program. It is very important that you enter the text exactly as written, such as the case of text within quotation marks.
To open a file for editing, such as with Notepad, right-click the file and select Open With, Choose Default Program. From the dialog that opens, find Notepad. Make sure that Use This App for All filetype Files is not selected (if you’re in Windows 8, do this before selecting Notepad). The next time you need to edit the file, Notepad appears in the quick list of available programs in the Open With option. Then use the following steps to create your app:
1. Create a folder and name it HelloWorld. This folder can be on your local drive while you are creating the program. All the program files will be placed in this folder. When finished, you will move it to the network.
2. Create the HTML program.
a. Insert a text file in the folder and name the file HelloWorld.html.
b. Open the HTML file for editing and enter the following code in it. When done, save and close the file.
<!DOCTYPEhtml>
<html>
<head>
<meta charset="UTF-8"/>
<meta http-equiv="X-UA-Compatible" content="IE=Edge"/>
<link rel="stylesheet" type="text/css" href="program.css"/>
</head>
<body>
<p>Hello World!</p>
</body>
</html>
3. Create the CSS file. This is a file that holds the styles used by the HTML file.
a. Insert a text file in the folder and name the file program.css. Note that this is the same filename used in the HTML file in the <link rel> tag.
b. Open the CSS file for editing and enter the following code in it. When done, save and close the file.
body
{
position:relative;
}
li :hover
{
text-decoration: underline;
cursor:pointer;
}
h1,h3,h4,p,a,li
{
font-family: "Segoe UI Light","Segoe UI",Tahoma,sans-serif;
text-decoration-color:#4ec724;
}
4. Create the XML file.
a. Insert a text file in the folder and name the file HelloWorld.xml.
b. Open the XML file for editing and enter the following code in it. Do not close it just yet.
Caution
The following code sample and others that follow extended beyond the width of the page and so a carryover (_) was added, much like VBA. But unlike VBA, you should not type in the underscore. Instead, remove the underscore and bring in the next line to be with the previous line.
<?xml version="1.0" encoding="utf-8"?>
<OfficeApp xmlns="http://schemas.microsoft.com/office/appforoffice/1.0"
xmlns:xsi="http://www.w3.org/2001/XMLSchema-instance"
xsi:type="TaskPaneApp">
<Id>08afd7fe-1631-42f4-84f1-5ba51e242f98</Id>
<Version>1.0</Version>
<ProviderName>MrExcel.com</ProviderName>
<DefaultLocale>EN-US</DefaultLocale>
<DisplayName DefaultValue="Hello World app"/>
<Description DefaultValue="My first app."/>
<IconUrl DefaultValue=
"http://officeimg.vo.msecnd.net/_layouts/images/general/ _ officelogo.jpg"/>
<Capabilities>
<Capability Name="Document"/>
<Capability Name="Workbook"/>
</Capabilities>
<DefaultSettings>
<SourceLocation DefaultValue="\workpcMyAppsHelloWorld _ HelloWorld.html"/>
</DefaultSettings>
<Permissions>ReadWriteDocument</Permissions>
</OfficeApp>
5. While the XML file is still open, note the Id 08afd7fe-1631-42f4-84f1-5ba51e242f98. This is a globally unique identifier (GUID). If you are testing on a private network and not distributing this file, you can likely use this GUID. But if you’re on a business network with other programmers or if you’re distributing the file, you must generate your own GUID. See the section “XML Use with Your App,” later in this chapter, for more information on GUIDs.
Note
GUID stands for globally unique identifier. It is a unique reference number used to identify software. It’s usually displayed as 32 alpha-numeric digits separated into five groups (8-4-4-4-12) by hyphens. So many digits are included that it’s rare for identical ids to be generated.
6. Move the HelloWorld folder to a network share folder if it’s not already there. Note the path to the folder and to the HTML file because you will be making use of this information. The path to the folder should be \myservermyfolder. For example, my HelloWorld folder is located at \workpcMyAppsHelloWorld.
7. Open the XML file for editing and change the <SourceLocation> (located near the bottom of the code) to the location of the HTML file on your network. Save and close the file.
8. Configure your network share as a Trusted Catalog Address:
Caution
Only one network share at a time can be configured to show in the catalog. If you want users to have access to multiple apps at once, the XMLs for the apps must be stored in the same network share. Otherwise, users will have to go into their settings and select which catalog to show.
a. Start Excel and go to File, Options, Trust Center and select Trust Center Settings.
b. Select Trusted App Catalogs.
c. Enter your folder path in the Catalog URL field and click Add Catalog. The path is added to the list box.
d. Select the Show in Menu box.
e. Click OK. You should see a prompt indicating that the app will be available the next time Excel starts (see Figure 27.1). Click OK twice.
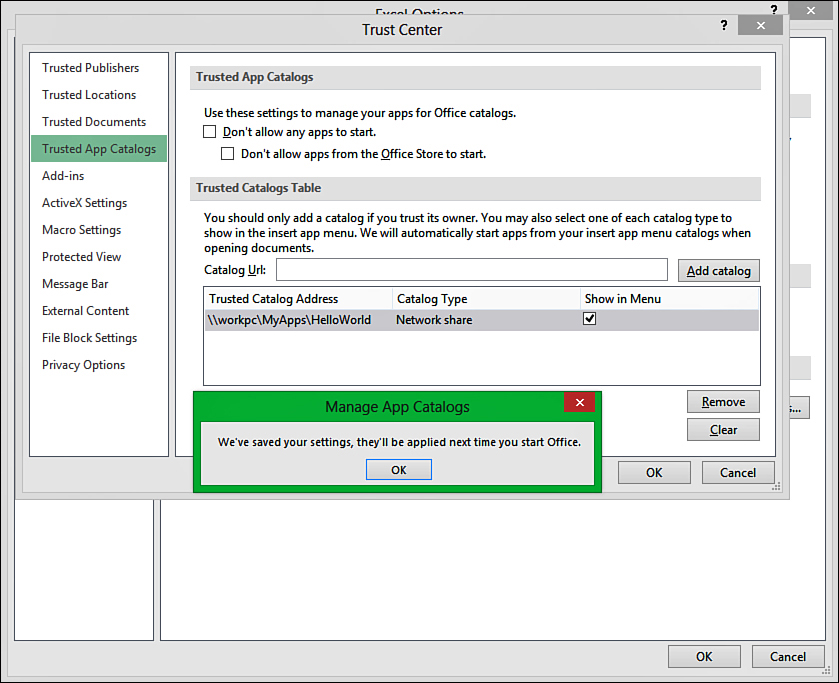
Figure 27.1. Configure the location of your apps under Trusted App Catalogs.
f. Restart Excel.
9. Insert the app you just created into Excel.
a. Go to Insert, Apps, Apps for Office. Select See All from the drop-down menu.
b. From the Apps for Office dialog, select Shared Folder. If you don’t see anything when you’ve selected the link, click Refresh. The Hello World app should be listed, as shown in Figure 27.2.
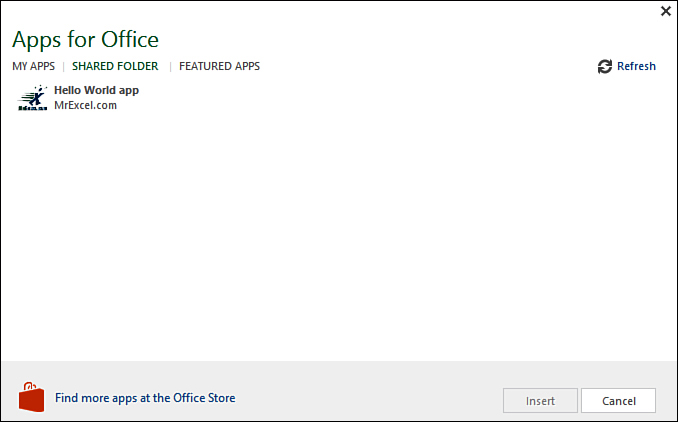
Figure 27.2. The Shared Folder in the Store lists any apps it finds in the active catalog.
Note
If you still do not see anything after refreshing, there is something incorrect in the files or setup. Carefully review all the code and steps. If you do not see anything incorrect, try changing the GUID.
c. Select the app and click Insert.
d. A task pane on the right side of the Excel window should open, as shown in Figure 27.3, displaying the words “Hello World!”
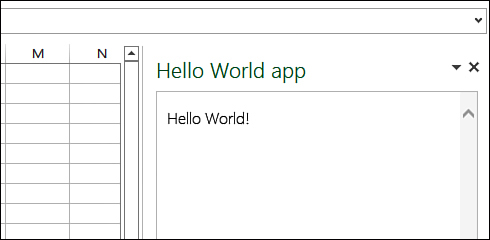
Figure 27.3. Hello World is the first step to creating interactive apps.
Adding Interactivity to Your App
The Hello World app created in the preceding section is a static one—it doesn’t do anything except show the words in the code. But as you browse the Web, you run into dynamic web pages. Some of those web pages use JavaScript, a programming language that adds automation to elements on otherwise static websites. Follow these steps to modify the Hello World app by adding a button to write data to a sheet and another button that reads data from a sheet, performs a calculation, and writes the results to the task pane.
Tip
You don’t have to restart Excel if you are editing the code of an installed app. Instead, right-click in the app’s task pane and select Reload.
1. Create the JS file that will provide the interactivity for the two buttons, Write Data to Sheet and Read & Calculate Data from Sheet, created by the HTML file in the next step.
a. Insert a text file in the folder and name the file program.js.
b. Open the JS file for editing and enter the following code in it, and then save and close the file. Note that in JavaScript, lines prefixed by // and /* are comments.
Office.initialize = function (reason) {
//Add any needed initialization
}
//declare and set the values of an array
var MyArray = [[234],[56],[1798], [52358]];
//write MyArray contents to the active sheet
function writeData() {
Office.context.document.setSelectedDataAsync(MyArray, _ {coercionType: 'matrix'});
}
/*reads the selected data from the active sheet
so that we have some content to read*/
function ReadData() {
Office.context.document.getSelectedDataAsync("matrix", _ function (result) {
//if the cells are successfully read, print results in task pane
if (result.status === "succeeded"){
sumData(result.value);
}
//if there was an error, print error in task pane
else{
document.getElementById("results").innerText = _ result.error.name;
}
});
}
/*the function that calculates and shows the result
in the task pane*/
function sumData(data) {
var printOut = 0;
//sum together all the values in the selected range
for (var x = 0 ; x < data.length; x++) {
for (var y = 0; y < data[x].length; y++) {
printOut += data[x][y];
}
}
//print results in task pane
document.getElementById("results").innerText = printOut;
}
2. Edit the HelloWorld.html file to point to the JavaScript file, program.js and add the two buttons used by the JavaScript code.
a. Replace the existing code with the following. The actual changes are the addition of <script> tags and the replacement of the code between the <body> tags. Comment tags, <!--comments-->, are included to show where the changes are. Save and close the file.
<!DOCTYPEhtml>
<html>
<head>
<meta charset="UTF-8"/>
<meta http-equiv="X-UA-Compatible" content="IE=Edge"/>
<link rel="stylesheet" type="text/css" href="program.css"/>
<!--begin pointer to JavaScript file-->
<script src = "https://appsforoffice.microsoft.com/lib/1.0/ _ hosted/office.js"></script>
<script src= "program.js"></script>
<!--end pointer to JavaScript file-->
</head>
<body>
<!--begin replacement of body-->
<button onclick="writeData()">Write Data To Sheet</button></br>
<button onclick="ReadData()">Read & Calculate Data From _ Sheet</button></br>
<h4>Calculation Results: <div id="results"></div> </h4>
<!--end replacement of body-->
</body>
</html>
After creating the JS file and updating the HTML file, reload the app and test it by clicking the Write Data to Sheet button. It should write the numbers from MyArray onto the sheet. With those cells selected, click Read & Calculate Data from Sheet, and the results of adding the selected numbers together will appear in the Calculation Results line of the task pane, as shown in Figure 27.4.
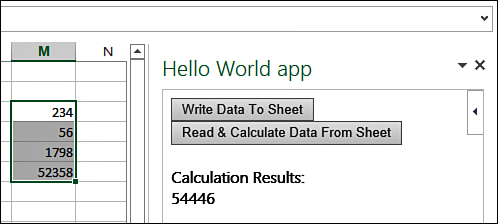
Figure 27.4. Use JavaScript to create an app that can perform a calculation with data from a sheet.
A Basic Introduction to HTML
The HTML code in an app controls how the task or content pane will look, such as the text and buttons. If you open the HTML file from either Hello World sample, it opens in your default browser, looking as it did in Excel’s task pane (though without any functionality). You can design the app as you would a web page, including images and links. This section reviews a few basics to get you started in designing your own app interface.
Tags
HTML consists of elements, such as images, links, and controls, that are defined by the use of tags enclosed in angle brackets. For example, the starting tag <button> tells the code that what follows, inside and outside the tag’s brackets, relates to the button element. For each start tag, you have an end tag, which is usually use the same tag with a slash—like </button>—but some tags can be empty—like />. A browser does not display tags or anything within the tag’s brackets. Text that you want displayed needs to be outside the tags.
Comments have a tag of their own and don’t require your typical end tag. As in VBA, commented text does not appear on the screen. Add comments to your HTML code like this: <!--This is a comment-->. A multiline comment would appear like this:
<!--This is a multiline comment.
Notice that nothing special is needed -->
Buttons
The code for a button is a combination of labeling the button and linking it to a function in the JavaScript file that will run when the button is clicked. For example:
<button onclick="writeData()">Write Data To Sheet</button>
The first part, <button onclick="writeData()">, identifies the control as a button and assigns the function, writeData, to the click event for the button. Notice that the function name is in quotes and includes argument parentheses, though they are empty. The second part, Write Data To Sheet, provides a label on the button. The label name is not in quotation marks. The line ends with the closing tag for the button.
By specifying other attributes of the button, you can change them. For example, to change the button text to red, add the style attribute for color, like this:
<button onclick="writeData()" style="color:Red">Write Data To Sheet</button>
To add a ToolTip that appears when the mouse is placed over the button, as shown in Figure 27.5, use the title attribute, like this:
<button onclick="writeData()" style="color:Red"
title = "Use to quickly add numbers to your sheet">
Write Data To Sheet</button></br>

Figure 27.5. Add other attributes to your button to change colors or add tip text for the users.
Use a space to separate multiple attributes. After the attribute name, such as style, put an equal sign and then the value in quotation marks. Also notice that HTML is rather forgiving about where you put your line breaks. Just don’t put them within a string or you might also get a line break on the screen in that position.
CSS
CSS stands for Cascading Style Sheets. You create styles in Excel and Word to make it easy to modify how text looks in an entire file without changing every single occurrence. You can do the same thing with an app by creating a separate style file (CSS) that your HTML code references. In the file, you set up rules for various elements of the HTML file, such as layout, colors, and fonts.
The CSS file provided in the Hello World example can be used for a variety of projects. It has a style for h1, h3, h4 headings, hyperlinks (a), paragraph tags (p), and bullets (li) configured.
Using XML to Define Your App
The XML defines the elements needed to display and run the app in Excel. This includes the GUID, app logo, and location of the HTML file. It also configures how the app will appear in the app store and can provide a version number for the program.
Caution
XML tags are case sensitive. When you make changes to the provided Hello World sample, be sure you don’t change any of the tags, only their values.
Two types of user interfaces are available for an app: a task pane or a content pane. A task pane starts off docked on the right side of the Excel window, but a user can undock it and move it around the window. A content pane appears as a frame in the middle of the Excel window. Which type you use is up to you. To tell your app which type of pane to use, set the xsi:type value to either TaskPaneApp or ContentApp.
You should always use a unique identifier when creating an app. Websites are available, such as http://www.guidgen.com, that will generate a GUID for you.
In our Hello World sample, the store icon used is an online icon Microsoft has made available. But you can also use your own jpg file. The image should be small, about 32×32 pixels. Update IconURL with the full path to the image, like this:
<IconUrl DefaultValue="\workpcMyAppsHelloWorldmrexcellogo.jpg"/>
The SourceLocation tag is used to set the full path to the HTML file. If the HTML file cannot be found when the app is being installed, an error message will appear stating that the file couldn’t be found.
Note
If you make changes to the XML after you’ve already configured the location of the catalog or installed the app, be sure to click the Refresh link in the Apps for Office dialog. For example, if you switch between TaskPaneApp and ContentApp, the change might not be reflected even if you select to install the app again. To be safe, refresh the store.
Using JavaScript to Add Interactivity to Your App
JavaScript (JS) provides the wow factor behind an app. You can create a very useful reference with just HTML, but to make an interactive app, such as a function calculator, you need JavaScript. One limitation, though, is that you cannot specify cell addresses. The program interacts with what is selected on the sheet.
The following is a basic introduction to JS. If you are already familiar with JS, you can go ahead to “JavaScript Changes for Working in the Office App.”
Note
The document.getElementById("results").innerText command used in the examples in this section is the command for the code to put the returned value in the place reserved by the "results" variable in the HTML file.
The Structure of a Function
Your JS code will consist of functions called by the HTML code and by other JS functions. Just like VBA, each function starts with function followed by the name of the function and any arguments in parentheses. But unlike VBA, there is no End Function at the end; instead, curly braces are used to group the function. See the following subsection, “Curly Braces and Spaces,” for more information.
JS is case sensitive, including variable and function names. For example, if you create a function called writeData, but then try to call WriteData from another function, the code does not work. In one case, write is in lowercase and in the other it has a capital W. JS recognizes the difference. Create case rules for yourself, such as initial caps for each word in a variable, and stick to them. This helps reduce troubleshooting of JS code issues.
Curly Braces and Spaces
Curly braces ({}) are characters used by JS but not in VBA. They’re used to group blocks of code that should be executed together. You can have several sets of braces within a function. For example, you would use them to group all the code in a function; then, within the function, you would use them to group lines of code such as within an if statement.
After you have finished typing a line in VBA and gone to another line, you might notice that the line adjusts itself, adding or removing spaces. In JS, spaces don’t usually matter; the exceptions are spaces in strings and spaces between keywords and variables in the code. In the code samples in this section, notice that sometimes I have included spaces (a = 1) and sometimes I have not (a=1).
Semicolons and Line Breaks
You’ve probably noticed the semicolons (;) used in JS code. They might have appeared at the end of every line, or maybe only on some. Perhaps you noticed a line without a semicolon or you noticed a semicolon in the middle of a line. The reason the use of semicolons appears inconsistent is that, under normal circumstances, they are not required. A semicolon is a line break. If you use hard returns in your code, you are already placing line breaks and so the semicolon is not needed. If you combine multiple lines of code onto one line, though, then you need the semicolon to let the code know that the next piece of code is not part of the previous code.
Comments
There are two ways to comment out lines in JS. To comment out a single line, place two slashes (//) at the beginning of the line, like this:
//comment out a single line in the code like this
If you want to comment out multiple lines in VBA, you have to preface each line with an apostrophe. JS has a cleaner method. At the beginning of the first line to comment out, place a slash and asterisk (/*). At the end of the last line to comment out, place an asterisk slash (*/), like this:
/* Comment out
multiple lines of code
like this */
Variables
In VBA, you have the option of declaring variables. If you do declare them, you don’t have to declare the variable type, but after a value is assigned to the variable, it’s not always easy to change the type. In JS, you don’t declare variables, except for arrays (see the later subsection “Arrays” for more information). When a value is assigned to a variable, it becomes that type, but if you reference the variable in another way, its type might change.
In the following example, the string "123" is assigned to myVar. But in the next line, a number is subtracted. JS just goes with it, allowing you to change the variable from a string to a number. After the code has run, myVar would be 121. Note that myVar + 2 would not deliver the same result. See the next subsection, “Strings,” for more information.
myVar = "123"
myVar = myVar-2
If you need to ensure that a variable is of a specific type, use one of these functions to do so: Boolean, Number, String. For example, you have a function that is reading in numbers imported onto a sheet. As is common in imports, the numbers could be stored as text. Instead of having to ensure that the user converts the data, use the Number keyword when processing the values like this to force the number to be a number:
Number(importedValue)
Strings
As in VBA, in JS you reference strings using double quotations marks ("string"), but, unlike in VBA, you can also use single quotation marks ('string'). The choice is up to you—just don’t start a string with one type and end with another. The capability to use either set can be useful. For example, if you want to show quoted text, you would use the single quotes around the entire string, like this:
document.getElementById("results").innerText = 'She heard him shout, "Stay away!"'
The result in the pane would be this: She heard him shout, "Stay away!"
To concatenate two strings, use the plus (+) sign. This is also used to add two numbers. So what happens if you have a variable hold a number as text and add it to a number. For example,
myVar = "123"
myVar = myVar+2
You might think that the result is 125. After all, in the previous example in which we had -2, the result was 121. In this case, concatenation has priority over addition and the actual answer would be 1232. To ensure that the variable is treated like a number, use the Number function. If the variable it is holding cannot be converted to a number, the function returns NaN, Not a Number.
Arrays
Arrays are required for processing multiple cells in JS. Arrays in JS are not very different from arrays in VBA. To declare an unlimited size array, do this:
var MyArray = new Array ()
To create an array of limited size, for example, 3, do this:
var MyArray = new Array(3)
You can also fill an array at the same time that you declare it. The following creates an array of three elements, two of which are strings and the third of which is a number.
var MyArray = ['first value', 'second value', 3]
The array index always starts at 0. To print the second element, second value, of the preceding array, do this:
document.getElementById("results").innerText = MyArray[1]
If you’ve declared an array with a specific size but need to add another element, you can add the element by specifying the index number or by using the push() function. For example, to add a fourth element, 4, to the previously declared array, MyArray, do this (because the count starts at 0, the fourth element has an index of 3):
MyArray [3] = 4
If you don’t know the current size of the array, use the push() function to add a new value to the end of the array. For example, if I don’t know the index value for the last value in the preceding array, I can add a new element, fifth value, like this:
MyArray.push('fifth value')
Refer to the section “How to Do a For each..next Statement in JS” if you need to process the entire array at once. JS has other functions for processing arrays, such as concat(), which can join two arrays together, or reverse(), which reverses the order of the array’s elements. Because this is just a basic introduction to JS, these functions are not covered here. For a tip on applying a math function to an entire array with a single line of code, see the section “Math Functions in JS.”
JS for Loops
In the interactivity of the Hello World app, the following code summed the selected range. The two for loops processed the array, data, that was passed into the function, x being the row and y the column.
for (var x = 0 ; x < data.length; x++) {
for (var y = 0; y < data[x].length; y++) {
printOut += data[x][y];
}
}
A for loop consists of three separate sections separated by semicolons. When the loop is started, the first section, var x=0, initializes any variables used in the loop. Multiple variables would be separated by commas. The second section, x < data.length, tests whether the loop should be entered. The third section, x++, changes any variables to continue the loop, in this case, incrementing x by 1 (x++ is shorthand for x=x+1). This section can also have more than one variable, with a comma separating each one.
Tip
To break out of a loop early, use the break keyword.
How to Do an if Statement in JS
The basic if statement in JS is
if (expression){
//do this
}
Here, expression would be a logical function that would return true or false, just as in VBA. If the expression is true, the code would continue and do the lines of code in the //do this section. To execute code if the expression is false, you need to add an else statement, like this:
if (expression){
//do this if true
}
else{
//do this if false
}
How to Do a Select..Case Statement in JS
Select..Case statements are very useful in VBA as an alternative to multiple If..Else statements. In JS, similar functionality is found within the switch() statement. Typically, the syntax of a switch statement is:
switch(expression){
case firstcomparison : {
//do this
break;
}
case secondcomparison : {
//do this
break;
}
default : {
//no matches, so do this
break;
}
}
Here, expression would be the value you want to compare to the case statements. The break keyword is used to stop the program from comparing to the next statement, after it has run one comparison. That is one difference from a Select statement—whereas in VBA, after a comparison is successful, the program leaves the Select statement, in JS, without the break keyword, the program continues in the switch statement until it reaches the end. Use default as you would a Case Else in VBA—to cover any comparisons not specified.
The preceding syntax works for one-on-one comparisons. If you want to see how the expression fits within a range, the standard syntax won’t work. You need to replace the expression with true, forcing the code into running the switch statement. The case statements are where you use the expression compared to the range. The following code is the BMI calculator UDF from Chapter 14, “Sample User-Defined Functions,” converted to JS. It compares the calculated BMI to the various ranges and returns a text description to post to the task pane.
Office.initialize = function (reason) {
//Add any needed initialization.
}
function calculateBMI() {
Office.context.document.getSelectedDataAsync("matrix", function (result) {
//call the calculator with the array, result.value, as the argument
myCalculator(result.value);
});
}
function myCalculator(data){
var calcBMI = 0;
var BMI="";
//Do the initial BMI calculation to get the numerical value
calcBMI = (data[1][0] / (data[0][0] *data [0][0]))* 703
/*evaluate the calculated BMI to get a string value because we want to
evaluate range, instead of switch(calcBMI), we do switch (true) and then
use our variable as part of the ranges */
switch(true){
//if the calcBMI is less than 18.5
case (calcBMI <= 18.5) : {
BMI = "Underweight"
break;
}
//if the calcBMI is a value between 18.5 and (&&) 24.9
case ((calcBMI > 18.5)&&(calcBMI <= 24.9)): {
BMI = "Normal"
break;
}
case ((calcBMI > 24.9)&&(calcBMI <= 29.9)) : {
BMI = "Overweight"
break;
}
//if the calcBMI is greater than 30
case (calcBMI > 29.9) : BMI = "Obese"
default : {
BMI = 'Try again'
break;
}
}
document.getElementById("results").innerText = BMI;
}
How to Do a For each..next Statement in JS
If you have a collection of items to process in VBA, you might use a For each..next statement. One option in JS is for (... in ...). For example, if you have an array of items, you can use the following code to output the list. You can do whatever you need to each element of the array. In this example, you’re building a string to hold the element value and a line break so that when it prints to the screen, each element appears on its own line, as shown in Figure 27.6.
//set up a variable to hold the output text
arrayOutput = ""
/*process the array
i is a variable to hold the index value.
Its count starts as 0*/
for (i in MyArray) {
/*create the output by adding the element
to the previous element value.
is used to put in a line break */
arrayOutput += MyArray[i] + '
'
}
//write the output to the screen
document.getElementById("results").innerText = arrayOutput
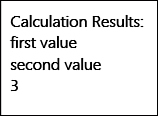
Figure 27.6. JavaScript has its own equivalent to many VBA looping statements, such as the for..in loop.
Mathematical, Logical, and Assignment Operators
JS offers same basic operators as VBA plus a few more to shorten your code. Table 27.1 lists the various operators. Assume x = 5.
Table 27.1. JavaScript Operators
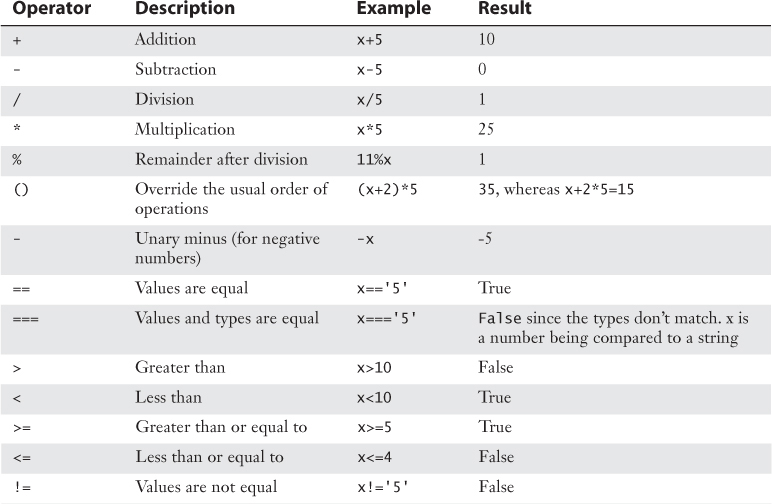

The increment and decrement operators are two of my favorite ones; I wish we had them in VBA. Not only do they reduce your code, but they offer a flexibility VBA lacks (post- and pre-increments). You might remember the use of x++ in the Hello World interactivity. This was used in place of x=x+1 to increment the for loop. But it doesn’t just increment the value. It uses the value and then increments it. This is called a post-increment. JS also offers a pre-increment. That is, the value is incremented and then used. So if you have x=5, both of the following lines of code return 6:
//would increment x then post the value
document.getElementById("results").innerText = ++x //would return 6
//would post the value of x (now 6 after the previous increment) then increment
document.getElementById("results2").innerText = x++ //would return 6
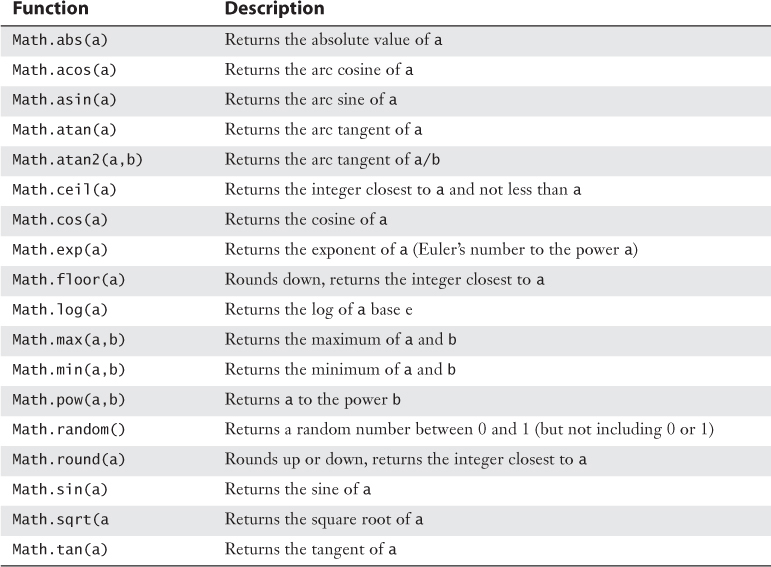
Math Functions in JS
JS has several math functions available, as shown in Table 27.2. Using one of the functions is straightforward. For example, to return the absolute value of the variable myNumber, do this:
result = Math.abs(myNumber)
Table 27.2. JavaScript Math Functions
Tip
If you need to apply a math function to all elements of an array, you can do this using the map() function and the desired Math function. For example, to ensure that every value in an array is positive, use the Math.abs function. The following example changes each element in an array to its absolute value and then prints the results to the screen as shown in Figure 27.7:
result = 0
arrayOutput = ""
arrNums = [9, -16, 25, -34, 28.9]
result = arrNums.map(Math.abs)
for (i in result){
arrayOutput += result[i] +'
'
}
document.getElementById("results").innerText = arrayOutput
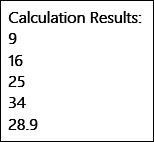
Figure 27.7. Arrays are a common way of storing data in JavaScript, which offers many functions for simplifying working with those arrays.
Writing to the Content or Task Pane
After you’ve processed the user’s data, you need to display the results. This can be done on the sheet or in the app’s pane. To write to the pane, do this:
document.getElementById("results").innerText
It writes data to the app’s pane, specifically to the results variable reserved in the HTML code. To write to the sheet, see the later subsection “Reading From and Writing To a Sheet.”
JavaScript Changes for Working in the Office App
The incorporation of JavaScript into Office Apps isn’t 100 percent. For example, you cannot use the alert or document.write statements. There are also some new statements for interacting with Excel provided in a JavaScript API you linked to in the HTML file with this line:
<script src = "https://appsforoffice.microsoft.com/lib/1.0/hosted/office.js">
</script>
As with APIs used in VBA, it gives you access to objects, methods, properties, and events JS can use to interact with Excel. This section introduces some of the more commonly used objects. For more information on these and other available objects, go to http://msdn.microsoft.com/en-us/library/office/apps/fp142185.aspx.
Initializing the App
The following event statement must be placed at the top of the JS script. It initializes the app to interact with Excel. The reason parameter returns how the app was initialized. If the app is inserted into the document, then the reason is inserted. If the app is already part of a workbook that’s being opened, the reason is documentOpened.
Office.initialize = function (reason) { /*any initialization*/}
Reading from and Writing to a Sheet
Office.context.document represents the object the app is interacting with—the sheet. It has several methods available, most important the two that enable you to read selected data and write to a range.
The following line uses the setSelectedDataAsync method to write the values in MyArray to the selected range on a sheet. The first argument, MyArray, is required. It contains the values to write to the selected range. The second argument, coercionType is optional. Its value, matrix, tells the code that you want the values treated as a one-dimensional array.
Office.context.document.setSelectedDataAsync(MyArray, {coercionType: 'matrix'});
The method to read from a sheet, getSelectedDataAsync, is similar to the write method. The first argument, matrix, is the coercionType and is required. It tells the method how the selected data should be returned—in this case, in an array. The second argument shown is an optional callback function, with result being a variable that holds the returned values (result.value) if the call was successful, and an error if not.
Office.context.document.getSelectedDataAsync("matrix", function (result) {
//code to manipulate the read data, result
});
To access the success of the call, use the status property, result.status. To retrieve the error message, do this: result.error.name.
Napa Office 365 Development Tools
You don’t need a fancy program to write the code for any of the files used in an app. The Notepad program that comes with Windows will do the job. But when you consider the case sensitivity of some programming languages, like JavaScript, using a program that will provide some help is a good idea. I spent a couple of hours in frustration over some of the samples in this chapter, wondering why they didn’t work when the code was perfect. Except the code wasn’t perfect. Again and again I missed the case sensitivity in JS.
To help you create distributable apps, Microsoft has released Napa Office 365 Development Tools. After you sign up for a developer site, Microsoft provides you with space on a SharePoint server and the tools for developing your app. Go to dev.office.com to get started. The tool also helps you release your apps through the app store.
Next Steps
Read Chapter 28, “What’s New in Excel 2013 and What Has Changed,” to learn about more features that have changed significantly in Excel 2013.