10. Userforms: An Introduction
In This Chapter
 User Interaction Methods
Userforms enable you to display information and allow the user to input information. InputBox and MsgBox controls are simple ways of doing this. You can use the userform controls in the VB Editor to create forms that are more complex.
This chapter covers simple user interfaces using input boxes and message boxes and the basics of creating userforms in the VB Editor.
→ To learn more about advanced userform programming, see Chapter 22, “Advanced Userform Techniques.”
Input Boxes
The InputBox function is used to create a basic interface element that requests input from the user before the program can continue. You can configure the prompt, the title for the window, a default value, the window position, and user help files. The only two buttons provided are the OK and Cancel buttons. The returned value is a string.
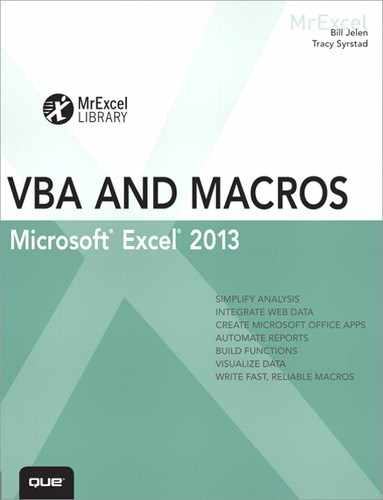
The following code asks the user for the number of months to be averaged. Figure 10.1 shows the resulting InputBox.
AveMos = InputBox(Prompt:="Enter the number " & _
" of months to average", Title:="Enter Months", _
Default:="3")
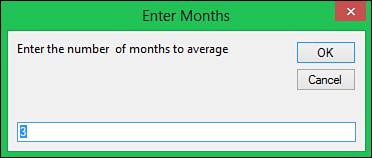
Figure 10.1. A simple but effective input box.
Message Boxes
The MsgBox function creates a message box that displays information and waits for the user to click a button before continuing. Whereas InputBox has only OK and Cancel buttons, the MsgBox function enables you to choose from several configurations of buttons, including Yes, No, OK, and Cancel. You can also configure the prompt, the window title, and help files. The following code produces a prompt to find out whether the user wants to continue. A Select Case statement is then used to continue the program with the appropriate action. Figure 10.2 shows the resulting customized message box.
myTitle = "Sample Message"
MyMsg = "Do you want to Continue?"
Response = MsgBox(myMsg, vbExclamation + vbYesNoCancel, myTitle)
Select Case Response
Case Is = vbYes
ActiveWorkbook.Close SaveChanges:=False
Case Is = vbNo
ActiveWorkbook.Close SaveChanges:=True
Case Is = vbCancel
Exit Sub
End Select
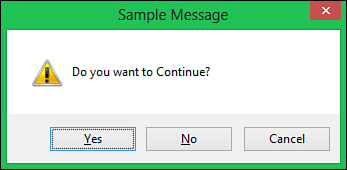
Figure 10.2. The MsgBox function is used to display information and obtain a basic response from the user.
Creating a Userform
Userforms combine the capabilities of InputBox and MsgBox to create a more efficient way of interacting with the user. For example, rather than have the user fill out personal information on a sheet, you can create a userform that prompts for the required data (see Figure 10.3).
Figure 10.3. Create a custom userform to get more information from the user.
Insert a userform in the VB Editor by selecting Insert, UserForm from the main menu. When a UserForm module is added to the Project Explorer, a blank form appears in the window where your code usually is, and the Controls toolbox appears.
You can resize the form by grabbing and dragging the handles on the right side, bottom edge, or lower-right corner of the userform. To add controls to the form, click the desired control in the toolbox and draw it on the form. You can move and resize controls at any time.
Note
By default, the toolbox displays the most common controls. To access more controls, right-click the toolbox and select Additional Controls. However, be careful; other users might not have the same additional controls as you do. If you send these users a form with a control they do not have installed, the program generates an error.
After you add a control to a form, you can change its properties from the Properties window. These properties can be set manually now or set later programmatically. If the Properties window is not visible, you can bring it up by selecting View, Properties Window. Figure 10.4 shows the Properties window for a text box.
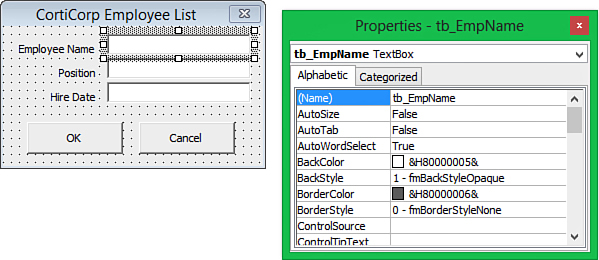
Figure 10.4. Use the Properties window to change the properties of a control.
Calling and Hiding a Userform
A userform can be called from any module. FormName.Show causes a form for the user to pop up:
frm_AddEmp.Show
The Load method can also be used to call a userform. This allows a form to be loaded but remain hidden:
Load frm_AddEmp
To hide a userform, use the Hide method. The form is still active but is hidden from the user. However, the controls on the form can still be accessed programmatically:
Frm_AddEmp.Hide
The Unload method unloads the form from memory and removes it from the user’s view, which means the form cannot be accessed by the user or programmatically:
Unload Me
Tip
Me is a keyword that can be used to refer to the userform itself. It can be used in the code of any control to refer to itself.
Programming the Userform
The code for a control goes in the Forms module. Unlike the other modules, double-clicking the Forms module opens up the form in Design view. To view the code, you can right-click either the module or the userform in Design mode and select View Code.
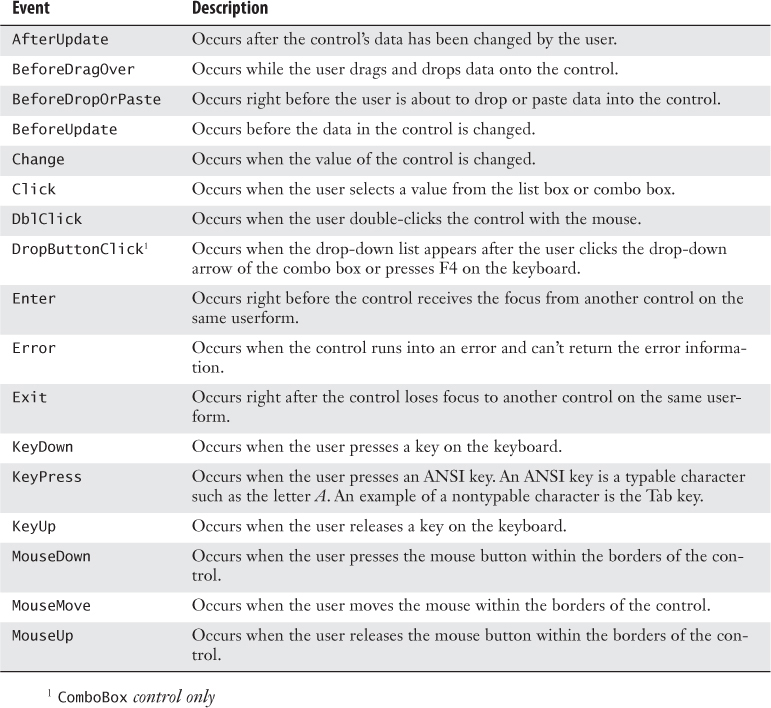
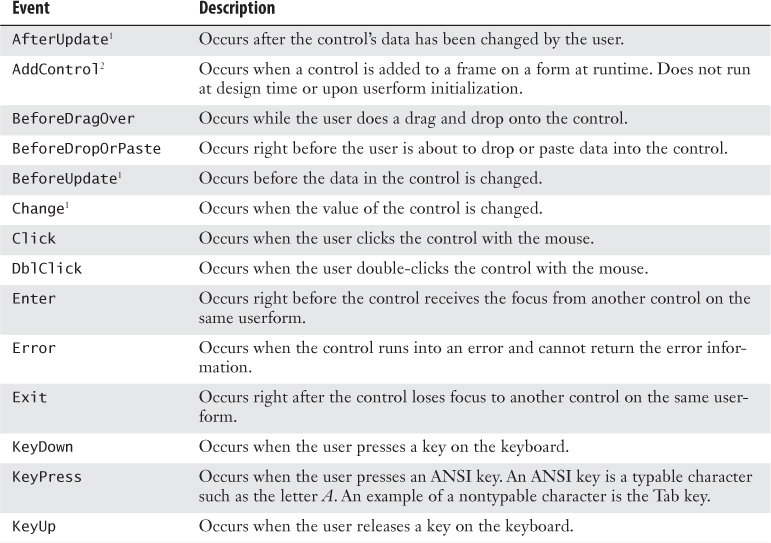
Userform Events
Just like a worksheet, a userform has events triggered by actions. After the userform has been added to the project, the events are available in the Properties drop-down list at the top right of the code window (see Figure 10.5); to access them, select UserForm from the Objects drop-down on the left.
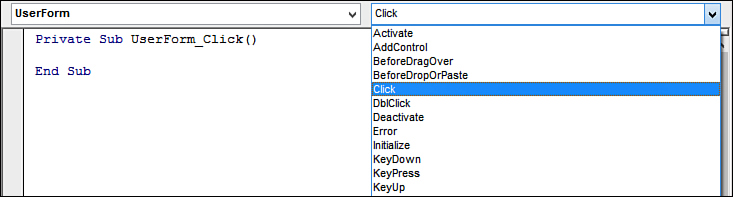
Figure 10.5. Various events for the userform can be selected from the drop-down list at the top of the code window.
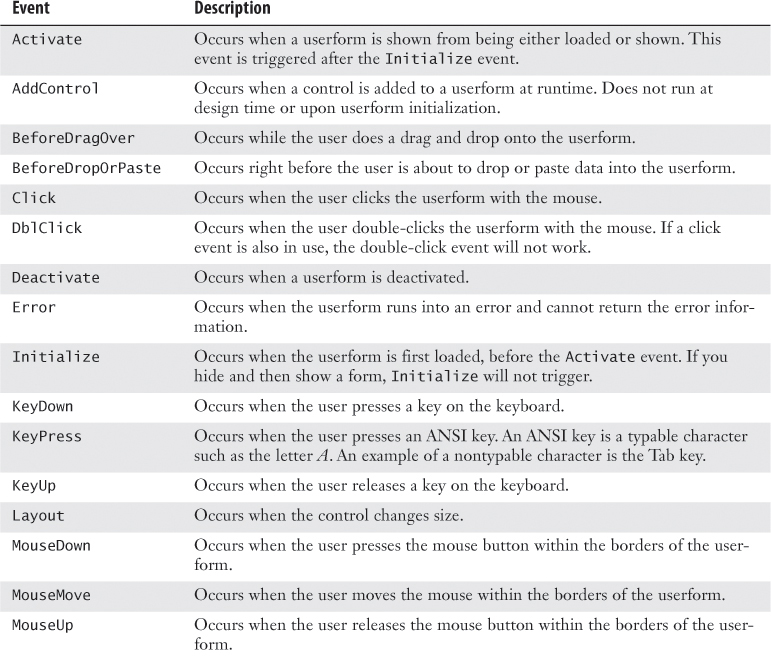
The available events for userforms are described in Table 10.1.
Table 10.1. The Events for Userforms
Programming Controls
To program a control, highlight the control and select View, Code. The footer, header, and default action for the control are entered in the programming field automatically. To see the other actions that are available for a control, select the control from the Object drop-down and view the actions in the Properties drop-down, as shown in Figure 10.6.

Figure 10.6. You can select various actions for a control from the VB Editor drop-downs.
The controls are objects, like ActiveWorkbook. They have properties and methods, dependent on the type of control. Most of the programming for the controls is done in the form’s module. However, if another module needs to refer to a control, the parent, which is the form, needs to be included with the object. Here’s how this is done:
Private Sub btn_EmpCancel_Click()
Unload Me
End Sub
The preceding code can be broken down into three sections:
• btn_EmpCancel—Name given to the control
• Click—Action of the control
• Unload Me—Code behind the control, which, in this case, is unloading the form
Tip
Change the (Name) property in the control’s Properties window to rename a control from the default assigned by the editor.
Using Basic Form Controls
Each control has different events associated with it, which enables you to code what happens based on the user’s actions. A table reviewing the control events is available at the end of each of the sections that follow.
 Using Labels, Text Boxes, and Command Buttons
The basic form shown in Figure 10.7 consists of labels, text boxes, and command buttons. It is a simple yet effective method of requesting information from the user. After the text boxes have been filled in, the user clicks OK, and your code adds the information to a sheet (see Figure 10.8), as shown in the following code.
Private Sub btn_EmpOK_Click()
Dim LastRow As Long
LastRow = Worksheets("Employee").Cells(Worksheets("Employee").Rows.Count, 1) _
.End(xlUp).Row + 1
Cells(LastRow, 1).Value = tb_EmpName.Value
Cells(LastRow, 2).Value = tb_EmpPosition.Value
Cells(LastRow, 3).Value = tb_EmpHireDate.Value
End Sub
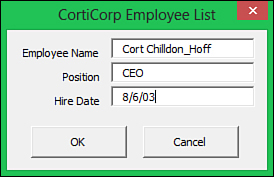
Figure 10.7. A simple form to collect information from the user.

Figure 10.8. The information is added to the sheet.
With a change in the code shown in the following sample, the same form design can be used to retrieve information. The following code retrieves the position and hire date after the employee’s name is entered:
Private Sub btn_EmpOK_Click()
Dim EmpFound As Range
With Range("EmpList") 'a named range on a sheet listing the employee names
Set EmpFound = .Find(tb_EmpName.Value)
If EmpFound Is Nothing Then
MsgBox "Employee not found!"
tb_EmpName.Value = ""
Else
With Range(EmpFound.Address)
tb_EmpPosition = .Offset(0, 1)
tb_HireDate = .Offset(0, 2)
End With
End If
End With
Set EmpFound = Nothing
End Sub
The available events for Label, TextBox, and CommandButton controls are described in Table 10.2.
Table 10.2. The Events for Label, TextBox, and CommandButton Controls

Deciding Whether to Use List Boxes or Combo Boxes in Forms
You can let users type in an employee name to search for, but what if they misspell the name? You need a way to make sure that the name is typed correctly. Which do you use: a list box or a combo box?
• A list box displays a list of values from which the user can choose.
• A combo box displays a list of values from which the user can choose and allows the user to enter a new value.
In this case, when you want to limit user options, you should use a list box to list the employee names, as shown in Figure 10.9.
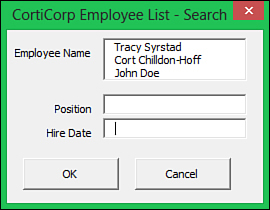
Figure 10.9. Use a list box to control user input.
In the RowSource property of the list box, enter the range from which the control should draw its data. Use a dynamic named range to keep the list updated if employees are added, as shown in the following code:
Private Sub btn_EmpOK_Click()
Dim EmpFound As Range
With Range("EmpList")
Set EmpFound = .Find(lb_EmpName.Value)
If EmpFound Is Nothing Then
MsgBox ("Employee not found!")
lb_EmpName.Value = ""
Exit Sub
Else
With Range(EmpFound.Address)
tb_EmpPosition = .Offset(0, 1)
tb_HireDate = .Offset(0, 2)
End With
End If
End With
End Sub
Using the MultiSelect Property of a List Box
List boxes have a MultiSelect property, which enables the user to select multiple items from the choices in the list box, as shown in Figure 10.10:
• fmMultiSelectSingle—The default setting allows only a single item selection at a time.
• fmMultiSelectMulti—This allows an item to be deselected when it is clicked again; multiple items can also be selected.
• fmMultiSelectExtended—This allows the Ctrl and Shift keys to be used to select multiple items.
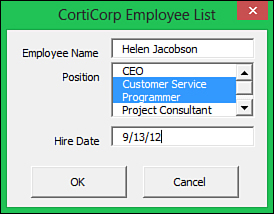
Figure 10.10. MultiSelect enables the user to select multiple items from a list box.
If multiple items are selected, the Value property cannot be used to retrieve the items. Instead, check to see whether the item is selected, and then manipulate it as needed using the following code:
Private Sub btn_EmpOK_Click()
Dim LastRow As Long, i As Integer
LastRow = Worksheets("Sheet2").Cells(Worksheets("Sheet2").Rows.Count, 1) _
.End(xlUp).Row + 1
Cells(LastRow, 1).Value = tb_EmpName.Value
'check the selection status of the items in the ListBox
For i = 0 To lb_EmpPosition.ListCount - 1
'if the item is selected, add it to the sheet
If lb_EmpPosition.Selected(i) = True Then
Cells(LastRow, 2).Value = Cells(LastRow, 2).Value & _
lb_EmpPosition.List(i) & ","
End If
Next i
Cells(LastRow, 2).Value = Left(Cells(LastRow, 2).Value, _
Len(Cells(LastRow, 2).Value) - 1) 'remove last comma from string
Cells(LastRow, 3).Value = tb_HireDate.Value
End Sub
The items in a list box start counting at zero. For this reason, if you use the ListCount property, you must subtract one from the result:
For i = 0 To lb_EmpPosition.ListCount - 1
The available events for ListBox controls and ComboBox controls are described in Table 10.3.
Table 10.3. Events for ListBox and ComboBox Controls
Adding Option Buttons to a Userform
![]() Option buttons are similar to check boxes in that they can be used to make a selection. However, unlike check boxes, option buttons can be configured to allow only one selection out of a group.
Option buttons are similar to check boxes in that they can be used to make a selection. However, unlike check boxes, option buttons can be configured to allow only one selection out of a group.
![]() Using the Frame tool, draw a frame to separate the next set of controls from the other controls on the userform. The frame is used to group option buttons together, as shown in Figure 10.11.
Using the Frame tool, draw a frame to separate the next set of controls from the other controls on the userform. The frame is used to group option buttons together, as shown in Figure 10.11.
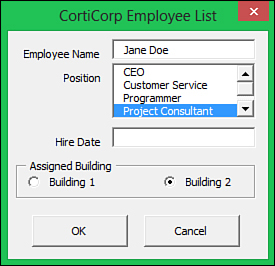
Figure 10.11. Use a frame to group option buttons together.
Option buttons have a GroupName property. If you assign the same group name, Buildings, to a set of option buttons, you force them to act collectively, as a toggle, so that only one button in the set can be selected. Selecting an option button automatically deselects the other buttons in the same group or frame. To prevent this behavior, either leave the GroupName property blank or enter another name.
Note
For users who prefer to select the option button’s label rather than the button itself, create a separate label and add code to the label to trigger the option button.
Private Sub Lbl_Bldg1_Click()
Obtn_Bldg1.Value = True
End Sub
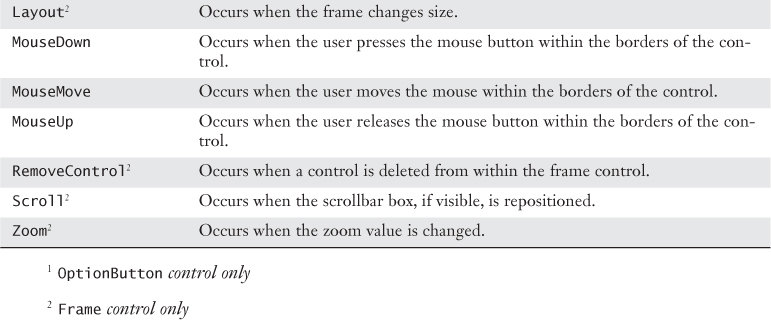
The available events for OptionButton controls and Frame controls are described in Table 10.4.
Table 10.4. Events for OptionButton and Frame Controls
 Adding Graphics to a Userform
A listing on a form can be even more helpful if a corresponding graphic is added to the form. The following code displays the photograph corresponding to the selected employee from the list box:
Private Sub lb_EmpName_Change()
Dim EmpFound As Range
With Range("EmpList")
Set EmpFound = .Find(lb_EmpName.Value)
If EmpFound Is Nothing Then
MsgBox "Employee not found!"
lb_EmpName.Value = ""
Else
With Range(EmpFound.Address)
tb_EmpPosition = .Offset(0, 1)
tb_HireDate = .Offset(0, 2)
On Error Resume Next
Img_Employee.Picture = LoadPicture _
("C:Excel VBA 2013 by Jelen & Syrstad" & EmpFound & ".bmp")
On Error GoTo 0
End With
End If
End With
Set EmpFound = Nothing
Exit Sub
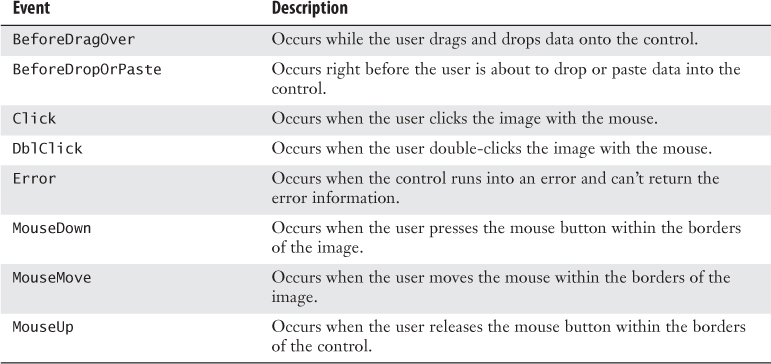
The available events for Graphic controls are described in Table 10.5.
Table 10.5. Events for Graphic Controls
Using a Spin Button on a Userform
As it is, the Hire Date field allows the user to enter the date in any format, including 1/1/1 or January 1, 2001. This possible inconsistency can create problems later if you need to use or search for dates. The solution? Force users to enter dates in a unified manner.
![]() Spin buttons allow the user to increment/decrement through a series of numbers. In this way, the user is forced to enter numbers rather than text.
Spin buttons allow the user to increment/decrement through a series of numbers. In this way, the user is forced to enter numbers rather than text.
Draw a spin button for a Month entry on the form. In the Properties, set the Min to 1 for January and the Max to 12 for December. In the Value property, enter 1, the first month. Next, draw a text box next to the spin button. This text box reflects the value of the spin button. In addition, you can use labels.
Private Sub SpBtn_Month_Change()
tb_Month.Value = SpBtn_Month.Value
End Sub
Finish building the form. Use a Min of 1 and Max of 31 for Day, or a Min of 1900 and a Max of 2100 for Year:
Private Sub btn_EmpOK_Click()
Dim LastRow As Long, i As Integer
LastRow = Worksheets("Sheet2").Cells(Worksheets("Sheet2").Rows.Count, 1) _
.End(xlUp).Row + 1
Cells(LastRow, 1).Value = tb_EmpName.Value
For i = 0 To lb_EmpPosition.ListCount - 1
If lb_EmpPosition.Selected(i) = True Then
Cells(LastRow, 2).Value = Cells(LastRow, 2).Value & _
lb_EmpPosition.List(i) & ","
End If
Next i
'Concatenate the values from the textboxes to create the date
Cells(LastRow, 3).Value = tb_Month.Value & "/" & tb_Day.Value & _
"/" & tb_Year.Value
Cells(LastRow, 2).Value = Left(Cells(LastRow, 2).Value, _
Len(Cells(LastRow, 2).Value) - 1) 'remove trailing comma
End Sub
The available events for SpinButton controls are described in Table 10.6.
Table 10.6. Events for SpinButton Controls

 Using the MultiPage Control to Combine Forms
The MultiPage control provides a neat way of organizing multiple forms. Instead of having one form for personal employee information and one for on-the-job information, combine the information into one multipage form, as shown in Figures 10.12 and 10.13.
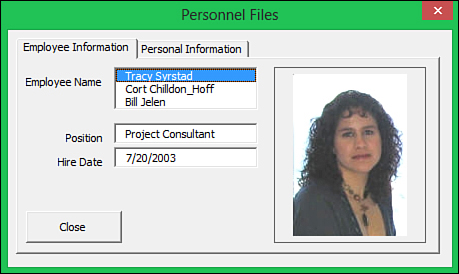
Figure 10.12. Use the MultiPage control to combine multiple forms. This is the first page of the form.
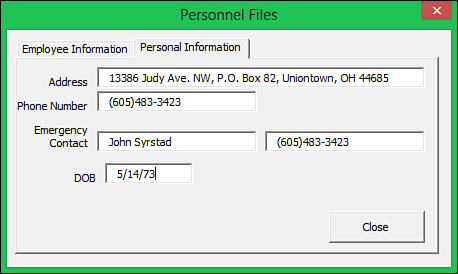
Figure 10.13. This is the second page of the form.
Tip
Adding multipage forms after the rest of the form has been created is not an easy task. Therefore, plan multipage forms from the beginning. If you decide later that you need a multipage form, insert a new form, draw the multipage, and copy/paste the controls from the other forms to the new form.
Do not right-click in the tab area to view the MultiPage code. Instead, right-click in the MultiPage’s main area to get the View Code option.
You can modify a page by right-clicking the tab of the page, which displays the following menu of options: New Page, Delete Page, Rename, and Move.
Unlike many of the other controls in which the Value property holds a user-entered or selected value, the MultiPage control uses the Value property to hold the number of the active page, starting at zero. For example, if you have a five-page form and want to activate the fourth page, do this:
MultiPage1.Value = 3
If you have a control you want all the pages to share, such as the Save, Cancel, or Close buttons, place the control on the main userform rather than on the individual pages, as shown in Figure 10.14.
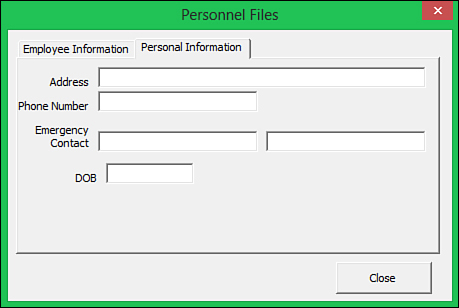
Figure 10.14. Place common controls such as the Close button on the main userform.
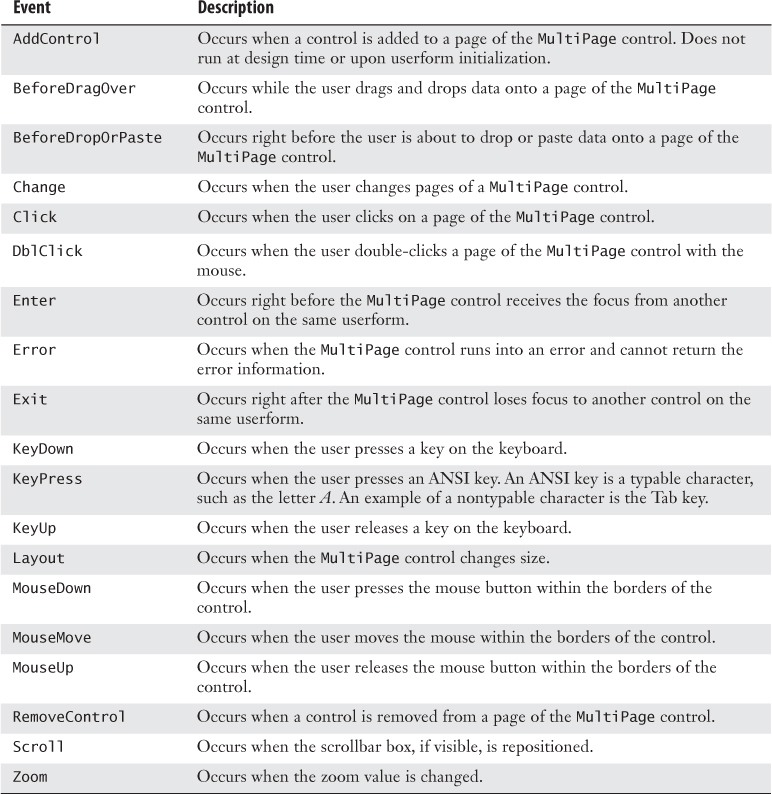
The available events for MultiPage controls are described in Table 10.7.
Table 10.7. Events for the MultiPage Control
Verifying Field Entry
Even if users are told to fill in all the fields, there is no way to force them to do so—except with an electronic form. As a programmer, you can ensure that all required fields are filled in by not allowing the user to continue until all requirements are met. Here’s how to do this:
If tb_EmpName.Value = "" Then
frm_AddEmp.Hide
MsgBox ("Please enter an Employee Name")
frm_AddEmp.Show
Exit Sub
End If
Illegal Window Closing
The userforms created in the VB Editor are not that different from normal windows; they also include the X close button in the upper-right corner. Although using the button is not wrong, it can cause problems, depending on the objective of the userform. In cases like this, you might want to control what happens if the user presses the button. Use the QueryClose event of the userform to find out what method is used to close the form and code an appropriate action:
Private Sub UserForm_QueryClose(Cancel As Integer, CloseMode As Integer)
If CloseMode = vbFormControlMenu Then
MsgBox "Please use the OK or Cancel buttons to close the form", vbCritical
Cancel = True 'prevent the form from closing
End If
End Sub
After you know which method the user used to try to close the form, you can create a message box similar to the one shown in Figure 10.15 to warn the user that the method was illegal.

Figure 10.15. Control what happens when the user clicks the X button.
The QueryClose event can be triggered in four ways:
• vbFormControlMenu—The user either right-clicks on the form’s title bar and selects the Close command, or clicks the X in the upper-right corner of the form.
• vbFormCode—The Unload statement is used.
• vbAppWindows—Windows shuts down.
• vbAppTaskManager—The application is shut down by the Task Manager.
Getting a Filename
One of the most common client interactions is when you need the client to specify a path and filename. Excel VBA has a built-in function to display the File Open dialog box, as shown in Figure 10.16. The client browses to and selects a file. When the client clicks the Open button, instead of opening the file Excel VBA returns the full path and filename to the code.
Sub SelectFile()
' Ask which file to copy
x = Application.GetOpenFilename( _
FileFilter:="Excel Files (*.xls*), *.xls*", _
Title:="Choose File to Copy", MultiSelect:=False)
' check in case no files were selected
If x = "False" Then Exit Sub
MsgBox "You selected " & x
End Sub
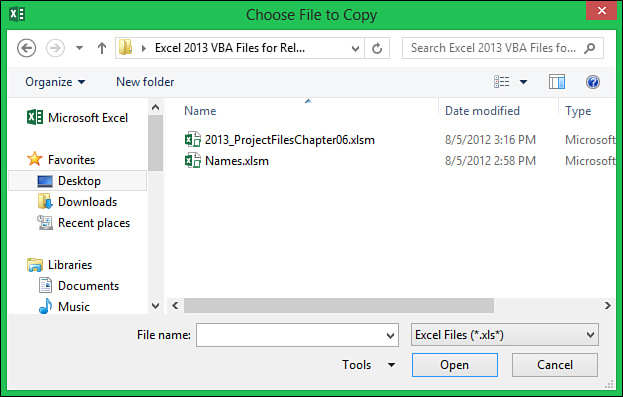
Figure 10.16. Use the File Open dialog box to allow the user to select a file.
The preceding code allows the client to select one file. If you want him to specify multiple files, use this code:
Sub ManyFiles()
Dim x As Variant
x = Application.GetOpenFilename( _
FileFilter:="Excel Files (*.xls*), *.xls*", _
Title:="Choose Files", MultiSelect:=True)
On Error Resume Next
If Ubound(x) > 0 Then
For i = 1 To UBound(x)
MsgBox "You selected " & x(i)
Next i
ElseIf x = "False" Then Exit Sub
End If
On Error GoTo 0
End Sub
In a similar fashion, you can use Application.GetSaveAsFileName to find the path and filename that should be used to save a file.
Next Steps
Userforms allow you to get information from the users and guide them on how they provide the program with that information. In Chapter 11, “Data Mining with Advanced Filter,” you’ll find out about using the Advanced Filter tools to produce reports quickly.