
3. Using OpenGL
Prior to iOS 5, OpenGL ES could be a challenge. Apple supplied a “boilerplate” template to get you started, but an in-depth knowledge of OpenGL ES was required for even the simplest of tasks. Many developers who wanted to add OpenGL to their projects were put off, and many developers simply avoided creating games.
Starting with iOS 5—and limited to the devices that run it—Apple introduced GLKit, a framework that simplifies creating OpenGL ES 2.0 apps, and makes it easier to port OpenGL ES 1.1 apps to 2.0.
Although it neglects older iOS devices, including any device prior to the iPhone 3GS, OpenGL ES 2.0 is currently the best platform choice for the foreseeable future.
In this chapter, you will apply OpenGL ES and Xcode to create a new project that will form the basis of the game.
Creating a New Project
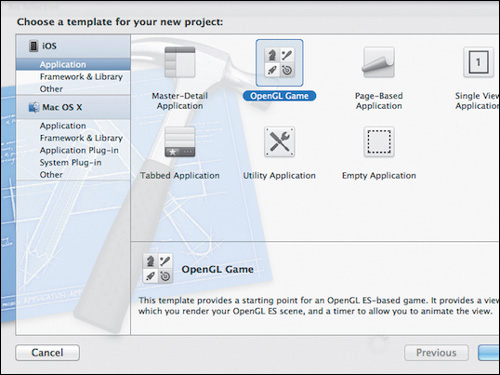
Let’s begin by opening Xcode and creating a new project based on the OpenGL game template. From the File menu, choose New Project. A window will open that looks like Figure 3.1.
Figure 3.1 Creating a new project
Click Next, and then enter Raiders for the project name (Figure 3.2). In Company Identifier, enter your web address or the URL you used if you signed up for the Apple developer program. If you don’t have a web address, enter a placeholder address such as com.yourname. It doesn’t really matter what you use at this point, but this entry will be important if you later join the developer program and want to run your game on an iOS device.
Figure 3.2 Entering the project name and company identifier
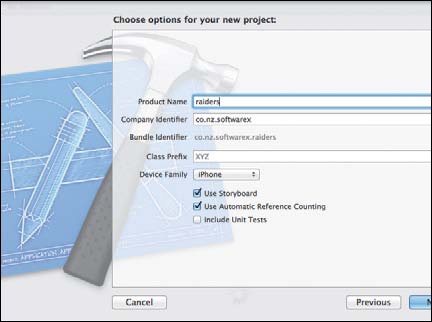
Class Prefix is an optional but useful addition to Xcode 4.2 that will add the prefix you enter to any new class file you create. Many companies prefix their classes with something like “cls” or a three-letter abbreviation of their company name. For example, if you entered ABC and created a new class called FooBar, the class in Xcode would be named ABCFooBar.
Under Device Family, choose iPhone and make sure Include Unit Tests is not selected. Use Storyboard and Use Automatic Reference Counting should be selected.
Now choose a folder in which to to save your project, and click Create.
Understanding the Basic Files
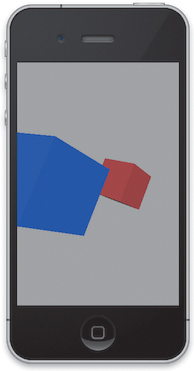
If you examine the new project, you’ll notice that quite a few files have already been created. These are the basic files needed to create an app for the iPhone. They will be detailed in the next section, but for a bit of fun, click the Run Button on the top left of the toolbar in Xcode.
Xcode will build the files and then open the Simulator, which will run the built app as if it were installed on an actual iOS device (Figure 3.3).
Figure 3.3 iOS simulator in action
To stop the app, click the Stop button in Xcode.
Examining Specific Files
If you look at the files listed in the left pane of Xcode, you will see a group of files as pictured in Figure 3.4.
Figure 3.4 A list of files in the project
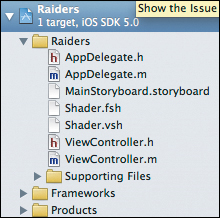
The AppDelegate and main.m files mentioned in the previous section don’t need to be altered.
The AppDelegate file is the appropriate place to store any initialization code, along with any code you may need to save the game state. Remember that an iOS game can be interrupted at any time by the operating system—to take a phone call, for example. iOS does multitask, of course, but you have no guarantee that the OS won’t kill your app to save memory when it is not in the foreground. As a result, you should never assume it is OK to not save the game state and rely on multitasking, because users expect to return to the exact place they were playing before the interruption.
The next file is the main Storyboard file. Storyboarding is new to the iOS 5 SDK, and provides a way to link ViewControllers graphically. It replaces the .xib file (pronounced nib) and makes it easier to move between views by removing the need to add a lot of navigation code.
Shader.fsh and shader.vsh are shader files, which are written in OpenGL ES Shader Language, a language similar to C. You can think of Shaders as little programs that describe how to render an object. While they are available to GLKit games, the shader files are not needed unless you are doing something complicated and need full control of the shaders.
As mentioned previously, the ViewController files (.h and .m) host interactions between the app and the view. Stated simply, in an OpenGL app, the core game code goes into these files.
Examining the Template App
To understand how an OpenGL ES app works, look at the template app. In the files window, click ViewController.m to open the file in the editor window.
You can ignore the first few lines of setup code at the moment. These numbers represent the vertex data for the two cubes. (A vertex is a set of points in space that describes an object. Vertices are discussed in Chapter 4.)
First, look at viewDidLoad. This method creates an OpenGL ES context and assigns it to the current view. Then it calls the setupGL method.
If you navigate to that method and examine it, you will see code prefixed with “gl”. All OpenGL methods are prefixed this way and are standard C methods—rather than Objective-C methods—and use the C style of round braces and unnamed parameters.
setupGL first loads the Shader files and sets up a standard lighting effect. The remaining code in the method creates an in-memory buffer and assigns the vertex data array to that buffer. This operation effectively loads the object information into memory to be rendered later.
The next two methods are delegate methods of GLKViewController and GLKView. update is called every cycle of the game. In this context, it applies the transformations to the scene that rotates the cubes around the x, y, and z axes.
glkView:drawInRect: renders the scene.
The rest of the file loads, checks, and compiles the shaders. But you don’t need to worry about shaders at the moment.
Making Modifications
The template app is an excellent starting point for building OpenGL ES apps because it adds a lot of the frameworks and setup code to save you a bit of time. However, for the purposes of Raiders, much of that code is not needed.
Raiders will rely on GLKit to handle most of the complex interactions with OpenGL ES 2.0, such as handling the functionality that would normally be required in the shaders. It’s important to understand that the shaders exist, and that they are incredibly powerful and useful. However, they are also beyond the scope of this book.
With that in mind, let’s delete the shader files. To do so, select and delete both shader.fsh and shader.vsh.
Open ViewController.m and navigate to the top of the file. Delete the section starting below #define and continuing down to, but not including, GLfloat gCubeVertexData.
Then, delete all but the two _vertex variables in the interface section, and retain only the two GL suffixed methods in the method section and the private float variable rotation.
@interface ViewController () {
float _rotation;
GLuint _vertexArray;
GLuint _vertexBuffer;
}
@property (strong, nonatomic) EAGLContext *context;
@property (strong, nonatomic) GLKBaseEffect *effect;
- (void)setupGL;
- (void)tearDownGL;
@end
Now remove [self loadShaders] from setupGL, and remove the if block in tearDownGL.
In update, delete all the code after the comment about “object rendered for ES2.” The method now looks like:
- (void)update
{
float aspect = fabsf(self.view.bounds.size.width / self.view.bounds.size.height);
GLKMatrix4 projectionMatrix = GLKMatrix4MakePerspective (GLKMathDegreesToRadians(65.0f), aspect, 0.1f, 100.0f);
self.effect.transform.projectionMatrix = projectionMatrix;
GLKMatrix4 baseModelViewMatrix = GLKMatrix4MakeTranslation (0.0f, 0.0f, -7.0f);
baseModelViewMatrix = GLKMatrix4Rotate(baseModelViewMatrix, _rotation, 0.0f, 1.0f, 0.0f);
// Compute the model view matrix for the object rendered with GLKit
GLKMatrix4 modelViewMatrix = GLKMatrix4MakeTranslation (0.0f, 1.0f, 0.0f);
modelViewMatrix = GLKMatrix4Rotate(modelViewMatrix, _rotation, 0.0f, 1.0f, 0.0f);
modelViewMatrix = GLKMatrix4Multiply(baseModelViewMatrix, modelViewMatrix);
self.effect.transform.modelviewMatrix = modelViewMatrix;
_rotation += self.timeSinceLastUpdate * 0.5f;
}
In glkView:drawInRect: remove all the code between the two glDrawArrays calls, thereby leaving:
- (void)glkView:(GLKView *)view drawInRect:(CGRect)rect
{
glClearColor(0.65f, 0.65f, 0.65f, 1.0f);
glClear(GL_COLOR_BUFFER_BIT | GL_DEPTH_BUFFER_BIT);
glBindVertexArrayOES(_vertexArray);
// Render the object with GLKit
[self.effect prepareToDraw];
glDrawArrays(GL_TRIANGLES, 0, 36);
}
Finally, delete the rest of the code in the file down to the last @end!. GLKit enables you to remove all of the shader code. Run the app and you should see a red cube rotating around the y-axis. You see only one red cube now, not red and blue cubes, because the default templates render the red cube with GLKit and the blue cube with standard OpenGL ES 2.0 using the standard shader system.
Wrapping Up
You now have a functional, albeit useless, OpenGL ES app. You’ve seen that GLKit reduces a lot of the setup work required for OpenGL ES, and you’ve removed a lot of code from the base project.
The creation of Raiders will proceed on the foundation of this chapter.