
11. Working with Your Database
In this chapter, we discuss the basics of SQL databases and how to work with them in Joomla!. We start with a “crash course” on SQL databases and how to work with a database outside of Joomla using phpMyAdmin. We discuss creating tables and then move on to an overview of SQL queries. Once we understand how SQL queries work outside of Joomla, we look at how queries are built and used inside Joomla. We cover how to use the JDatabaseQuery class to build queries that will work with any supported database. Then we look at how to execute a query and work with the query results inside Joomla.
We will use the MySQL database for our example, but the concepts apply to any SQL database. There are many aspects and subtleties of working with SQL databases that are beyond the scope of this book. There are a number of online and print resources for learning more about MySQL and SQL databases in general. Here we focus on the practical basics, especially as it relates to Joomla development.
In this chapter, we refer to tables with the old default prefix jos (for example, jos_categories) when working with tables outside Joomla. We use the standard #__ prefix when working with tables in Joomla code. Remember to always use the #__ prefix when referencing database tables inside a Joomla application.
If you are already familiar with SQL databases and MySQL, you might want to skip or just skim the first part of this chapter and focus on the section, “Working with the Database Inside Joomla.”
Database Overview
SQL databases (also known as relational databases) are the primary way to store data in Joomla and other content management system (CMS) packages. SQL is the language used to interact with SQL databases.
The basic idea of a SQL database is to allow a program or user to interact with the data purely from a logical point of view, without any regard for how the data is physically stored on the computer. The logical units of data storage are as follows:
• Database: A collection of tables. A Joomla site normally uses one database whose name is given when we first install Joomla. We don’t have to specify the database name once Joomla is running. Joomla automatically connects us to the correct database using the database name and login information from the configuration.php file.
• Table: A collection of rows. A table can be thought of as a spreadsheet, with rows and columns. Each row stores a set of data with one value for each column.
• Row: A set of data with one value for each column. A row has one or more columns of actual data. Each row has exactly the same column structure, just like a spreadsheet. Normally a row will have all the different pieces of data (also called attributes) for one thing. For example, a row might have the data for one article, one user, or one log entry.
• Column: A set of data with one value for each row. A column is a specific type of data (such as date, text, or integer). For example, one column might store the hit count of each article, the name of each user, or the timestamp (date and time) of each log entry.
Just as with a spreadsheet, we can think of tables either horizontally, by row, or vertically, by column. When we look at data by row, we generally see different types of information (for example, title, description, date created) about one thing. When we look at data by column, we see the same piece of information (for example, a title) for multiple items (for example, multiple articles).
The structure of a database table is rigid. Every row has exactly the same columns available. A column is always defined as one type of data—for example, a date, text, or integer. All the data in the column must be of this same type.
All the interaction with the database is done using SQL commands. These commands tell the database what to do, but leave it up to the database how to do it. For example, we don’t have to tell the database where on the file system the data is stored. The database finds the table for us. In fact, most programmers who write code for SQL databases have no idea what the physical file structure is for the database (for example, one file per table, one file for the database, or multiple files for a table) or where the files are stored on the server’s file system. The commands for working with SQL databases don’t change when we change operating systems or programming languages or if the database is moved to a different folder or server.
SQL commands fall into two general types. Data definition language (DDL) commands are used to create or modify the structure of tables. Data manipulation language (DML) commands are used to query, add, update, or delete the data inside tables. We use DDL commands to initially create the database structure and DML commands to work with the actual data.
Creating and Modifying Tables with DDL Commands
DDL commands are used to create or modify the structure of tables. In Joomla applications, we normally only use DDL commands when we install, uninstall, or update an extension. So DDL commands will normally only be in the install and uninstall scripts, not in the actual extension’s PHP code.
Although it is possible to use DDL commands dynamically during an execution cycle, it is normally not recommended. For most applications, the database tables should be created once, when an extension is installed or updated. For this reason, we don’t normally see DDL commands used during normal processing.
In Chapter 9, we created two scripts called sql/install.mysql.utf8.sql and sql/uninstall.mysql.utf8.sql. Note that these scripts are specific to the MySQL database. An install script for Microsoft SQL Server would be called sql/install.sqlserver.utf8.sql. Why do we need different scripts for different SQL databases?
The answer is that the DDL SQL command syntax, although similar, is slightly different across SQL databases, such as MySQL, Microsoft SQL Server, Oracle, and PostgreSQL. A script that works in one database may not work in another. The safest approach in this case is to use different scripts for different databases.
Our example extension install script uses the CREATE TABLE command to create the two tables for our example extension. The uninstall script uses the DROP TABLE command to drop or delete the table from the database. Note that it is normal convention to show SQL commands in uppercase. The commands can be entered in uppercase or lowercase.
In the Joomla core distribution, the file installation/sql/mysql/joomla.sql contains all the DDL commands used to create the entire Joomla database, including the core extensions. Note that this is again specific to the MySQL database. A different folder name would be used for a different database. Note also that this script also uses the DML INSERT command to load some data into the core tables. We discuss the INSERT command later in this chapter.
The most common DDL commands used for Joomla applications are CREATE TABLE, ALTER TABLE, and DROP TABLE.
CREATE TABLE Command
The CREATE TABLE command is the main command to understand for building a database. The syntax for this command in MySQL is as follows:
CREATE TABLE <table name> (<list of columns>, <list of indexes>)
<character set>
Let’s look at the command for creating the core table #__banner_clients, in the file installation/sql/mysql/joomla.sql. The code is as follows:
CREATE TABLE `#__banner_clients` (
`id` INTEGER NOT NULL auto_increment,
`name` VARCHAR(255) NOT NULL DEFAULT '',
`contact` VARCHAR(255) NOT NULL DEFAULT '',
`email` VARCHAR(255) NOT NULL DEFAULT '',
`extrainfo` TEXT NOT NULL,
`state` TINYINT(3) NOT NULL DEFAULT '0',
`checked_out` INTEGER UNSIGNED NOT NULL DEFAULT '0',
`checked_out_time` DATETIME NOT NULL default '0000-00-00 00:00:00',
`metakey` TEXT NOT NULL,
`own_prefix` TINYINT NOT NULL DEFAULT '0',
`metakey_prefix` VARCHAR(255) NOT NULL default '',
`purchase_type` TINYINT NOT NULL DEFAULT '-1',
`track_clicks` TINYINT NOT NULL DEFAULT '-1',
`track_impressions` TINYINT NOT NULL DEFAULT '-1',
PRIMARY KEY (`id`),
INDEX `idx_own_prefix` (`own_prefix`),
INDEX `idx_metakey_prefix` (`metakey_prefix`)
) DEFAULT CHARSET=utf8;
The first thing to note is that the table name uses the prefix “#__”. Recall that this is a placeholder prefix. Joomla will convert it to the actual database prefix for the specific Joomla site before the command is passed to the database.
Next, note that table name and the column names are enclosed in back quotes (`). This is not strictly necessary in many cases, but it is good practice. For example, reserved words can be used for table or column names, as long as you enclose the names in back quotes. If you use a reserved word without back quotes, you may get errors. MySQL has over 200 reserved words, such as BOTH, CHECK, CASCADE, and SENSITIVE, so it is easy to use one of them without realizing it. Also, new reserved words are sometimes added with new MySQL versions, so a word that was not reserved can suddenly become a reserved word. Later in this chapter, we will show you how to use phpMyAdmin to create DDL scripts that automatically include back quotes. The use of back quotes is specific to MySQL. Other databases may use different quote characters.
Primary Keys, Auto_Increment, and Foreign Keys
The first column in our table is defined as follows:
`id` INTEGER NOT NULL auto_increment
Typically, the first column in a table is an id just like this and plays a special role in the table. The data type is INTEGER and it has two attributes, NOT NULL and AUTO_INCREMENT. The NOT NULL attribute indicates that this column must have a value. The AUTO_INCREMENT attribute is special and is linked to the PRIMARY KEY definition, which we see defined further down in the script, after the last column definition.
A primary key is a unique value for each row in the table. If you try to insert a new row that duplicates an existing primary key value (in this example, an id that is the same as an existing id value), you will get an error message and the insert will fail. Primary keys are very useful. When we select a row based on the primary key, we know we will get at most one row that matches. Normally, the primary key column will not change. It is the identifier for that row as long as that row exists in the table.
Primary keys are often used as foreign keys. A foreign key is a column in table A that is the same value as the primary key in table B. For example, in the Joomla database, the #__weblinks table has a column called catid. This is a foreign key to the #__categories table. In the #__categories file, we use the id column as the primary key. In the sample data we have a category called Joomla Specific Links that has an id of 32. In the #__weblinks table, the foreign key column called catid matches the value of the id in the #__categories table. So when a Weblink is assigned to the Joomla Specific Links category, its catid column is set to 32 to match the id in the #__categories table. As we see later in this chapter, we use foreign keys to join multiple tables in a single query.
If every primary key value must be unique across the entire table, how do we make sure we use an id that is not already used for another row? That’s where the AUTO_INCREMENT attribute comes in. It tells the database to automatically create a unique value for this column (normally the next unused integer). When we insert a new row, we don’t have to worry about what the value of the id is. We can just leave it unset or set it to NULL. MySQL will get the next unused value for us and make sure we have a unique id column.
Note that we don’t do this in the joomla.sql and sample_data.sql scripts. In these scripts, we do supply specific values for primary key columns. This is a special case where we know we are starting with an empty table, so we can supply values for the primary key columns and know they will be unique. Once a database has been in use, we don’t know what id values may already be used, so we need to let the database provide the values for us.
It is good practice to define every table with a primary key. In most cases, it works well to use the scheme indicated here, using an INTEGER data type with NOT NULL, AUTO_INCREMENT, and defined as the primary key. We will discuss this more later in the chapter.
If we look at the rest of the column definitions, we see the data types VARCHAR, TEXT, TINYINT, and DATETIME. The different data types are discussed later in this chapter.
Indexes
The next part of the CREATE TABLE command defines the indexes. The first one is the PRIMARY KEY, which is specified as the `id` column. You can think of the primary key as the preferred way to find one row in the table. Often this uses an INTEGER column with the AUTO_INCREMENT attribute, as discussed earlier.
In this example we create two additional indexes, `idx_own_prefix` and `idx_metakey_prefix`. By convention, index names start with `idx_` to keep them different from column names or other names used in the database. Each index is defined as a list of one or more columns.
Indexes help speed up database queries. On the other hand, indexes make updates to the table slightly slower. So we only want to use indexes where it will help our queries. The subject of using indexes in database tables can get complicated, but there are some good general guidelines:
• The more rows a table will have, the more important indexes are. A table with only 10 or 20 rows doesn’t need any indexes (other than the primary key, which technically is an index).
• Index on columns that are used for selecting, ordering, or grouping. For example, in the #__content table, we have indexes on access, checked_out, state, catid, created_by, and language for this reason.
• Don’t index on columns that we normally just display and don’t use for selecting, ordering, or grouping. Also, don’t index on very long columns, such as columns of type TEXT or MEDIUMTEXT.
• As discussed earlier, using a UNIQUE index allows the database to require that a column or group of columns is unique in a table. This is a good technique for preventing duplicate data. For example, in the table #__menu we use a unique index to ensure that we can’t have two menu options (rows) at the same menu level with the same alias and language.
• If a column is a foreign key that will be used to join other tables, an index on this column can be helpful. This is another reason to have an index on catid, for example.
There are some potentially confusing things about the index syntax. The words INDEX and KEY are interchangeable. So, for example, we could use
KEY `idx_own_prefix` (`own_prefix`),
instead of
INDEX `idx_own_prefix` (`own_prefix`),
Also, if you substitute the word UNIQUE for INDEX, it tells MySQL to make sure that the value of this combination of columns is unique in the table. For example, in the definition of the `#__menu_types` table, we see this code:
UNIQUE `idx_menutype` (`menutype`)
If we try to add a row that duplicates the value of an existing `menutype` column, we will get a database error.
The last thing in the CREATE TABLE script is the character set—in this case, DEFAULT CHARSET=utf8. We always use the UTF-8 character set for Joomla tables, because this allows the database to store data in languages that use non-Latin characters.
Data Types
Deciding which data type to use for a column is normally straightforward. The following is a short discussion about the most commonly used types for Joomla applications.
INT/INTEGER
INT and INTEGER are exact synonyms and refer to the same data type. As discussed earlier, this is the type normally used for primary keys where you just need a unique id for a row. You should also use this data type when referring to a key column in another table. For example, we use the column catid to refer to the category id in several tables (for example, #__content and #__contacts). We define catid as INT to match the data type for id in the #__categories table.
INT can either be signed (positive and negative values) or unsigned (positive values only). When used with AUTO_INCREMENT, it is always unsigned.
Sometimes you will see INT or INTEGER as INT(10). In this case, the number 10 is used to indicate how big to display the column in a query. It does not affect the maximum value that can be stored in the column.
TINYINT
TINYINT is similar to INT except that it only allows for the numbers –127 to +127 (or 0 to 255 if unsigned). TINYINT is used for columns where there are a small number of valid values, such as published state or yes/no conditions.
Using integers for these types of values offers two important advantages over using text strings, like VARCHAR. First, when we retrieve integers from an untrusted source (such as a form or the URL), they are very easy to sanitize in PHP. We just use (int) to cast them as integers. Second, in Joomla, we normally want to translate any words used in the application. We can easily associate integers with language keys and make the meaning of each value language neutral and translatable.
VARCHAR
VARCHAR is used to store text fields up to a given length, to a maximum of 21,844 characters. The maximum number of characters allowed is specified by the number in parentheses. For example, VARCHAR(20) would allow up to 20 characters. VARCHAR columns are variable length and only use the amount of space required to store the entered data. If a column is VARCHAR(100) but only seven characters are entered, it only uses seven characters of storage on the disk.
As discussed earlier, we use the CHARSET=utf8 for all Joomla tables. Because UTF-8 characters can take up to three bytes to store one character, the maximum size for VARCHAR columns is 21,844 (instead of 65,535 for Latin characters).
CHAR
CHAR columns also store text fields but are fixed length. So a CHAR(100) column always uses 100 characters of storage. The maximum size of a CHAR field is 255 characters. In Joomla, the CHAR data type is rarely used and VARCHAR is normally preferred.
DATETIME
DATETIME does just what it says. It stores a date and time in the format 'YYYY-MM-DD HH:MM:SS'. There is also a data type called DATE if you just want to store the date and don’t need the time. Note that you can easily extract just the date portion of a DATETIME column using the date() function.
TEXT
The TEXT data type is similar to VARCHAR except that it always stores up to 65,000 characters. In Joomla, the TEXT data type is used for columns where the length could be more than, say, 2,000 characters but not more than about 10,000 characters. This includes columns such as parameters (JSON-formatted strings) and keywords. If a column will be used in an index, it should normally be VARCHAR and not text.
MEDIUMTEXT
MEDIUMTEXT is exactly like TEXT except that the maximum length is about 16 megabytes. MEDIUMTEXT is used only when the length of a text column can be very large. In Joomla, it is used for the text for articles and the category description, for example.
DECIMAL
If you are tracking exact decimal numbers, such as monetary amounts, use the DECIMAL data type. For example, to store dollar amounts to the nearest penny up to a maximum of 9,999,999,999.99, use DECIMAL(10,2).
FLOAT and DOUBLE
FLOAT is used for scientific calculations where you need a high level of precision. FLOAT provides 23 significant digits and DOUBLE provides up to 53 significant digits. You should not use FLOAT or DOUBLE when you need exact amounts, based on a fixed number of decimal places. Use DECIMAL instead. If you use FLOAT for dollar amounts, you can get small rounding errors that are difficult to debug.
Column Attributes
When you define a column, you can specify attributes as well as the data type. Common attributes include NOT NULL, AUTO_INCREMENT, DEFAULT, and unsigned.
NOT NULL
When you create a column, by default a null value is allowed in that column. Note that in SQL databases, a null value is different from a blank or zero value and may give results you don’t expect or want. For example, if you calculate a total on a numeric column and any of the values is null, the total will also be null.
In many cases, it is preferred to not allow a column to be null. To do this, include the attribute NOT NULL after the data type. Often, when you specify NOT NULL, you will also specify AUTO_INCREMENT or a DEFAULT value.
AUTO_INCREMENT
As discussed earlier, this attribute creates an automatic primary key number (normally 1, 2, 3, and so on). It is used in conjunction with an INTEGER data type and the NOT NULL attribute.
DEFAULT
This attribute specifies a default value for the column. This value is used if a new row is inserted without specifying a value for this column. For example, if we are tracking article hits or banner clicks, we want to start with zero, not null. So we specify that as follows:
`clicks` INTEGER NOT NULL DEFAULT '0'
That way, if we include this value in a calculation, it will be treated as zero and give us the desired result.
A similar technique is used with publish start and stop dates, where a “zero” value is treated like the beginning or end of time. In these cases, we see the following code to create the columns:
`publish_up` DATETIME NOT NULL DEFAULT '0000-00-00 00:00:00',
`publish_down` DATETIME NOT NULL DEFAULT '0000-00-00 00:00:00',
Note that we do not use a DEFAULT value when we have an AUTO_INCREMENT attribute set.
UNSIGNED
This attribute is used with INTEGER or TINYINT to tell the database to store the value as a positive integer. Setting an integer as unsigned allows it to store a higher maximum value. This is used, for example, when we have a foreign key.
ALTER TABLE Command
The ALTER TABLE command is similar to the CREATE TABLE command except that it is used to change the structure of a table. The most common examples in Joomla are either adding new columns to a table or changing the data type of an existing table. For example, in the file installation/sql/mysql/joomla_update_16beta13.sql, we see the following code:
ALTER TABLE `#__template_styles`
CHANGE `params` `params` varchar(10240) NOT NULL DEFAULT '';
ALTER TABLE `#__menu`
ADD COLUMN `client_id` TINYINT(4) NOT NULL DEFAULT 0 AFTER `language`;
ALTER TABLE `#__menu`
ADD UNIQUE `idx_alias_parent_id` (`client_id`,`parent_id`,`alias`);
The first command changes the data type for params to VARCHAR(10240). Running this command will not alter or remove data as long as the data in the table fits into the new data type. Normally, we are increasing the size of columns, not decreasing them. In this case, our existing data will be preserved.
The second command adds a new column to the #__menu table. Note that we have set it to NOT NULL DEFAULT 0. After this command is run, the client_id column will be zero for every row in the table (instead of NULL). Notice here we specify the default value as a zero without the single quotes whereas in a previous example we used zero inside single quotes. MySQL supports either usage, although the usage with single quotes is preferred.
The third command adds a unique index to the #__menu table. Note that this command will not succeed if there is existing data that is not unique. In this case, if there are two or more rows with the same client_id, parent_id, and alias, this command will fail with an error message.
DROP TABLE Command
The DROP TABLE command is simple and should be used with care. It deletes the table from the database and any data in the table is permanently deleted. The syntax for DROP TABLE is
DROP TABLE <table name>;
Using phpMyAdmin
You can use MySQL from the command line, but it is easier for most people to work with a program such as phpMyAdmin. phpMyAdmin is distributed as part of popular LAMP packages, such as XAMPP, and is available on most web hosts. You can also download it as a separate package from http://www.phpmyadmin.net. Complete documentation on how to use phpMyAdmin is available on their website. Here we will do a brief introduction to show you how you can use it to help you test and debug SQL queries, create DDL scripts, and back up or move your database to a different server.
Test and Debug SQL Queries
You normally start phpMyAdmin by clicking on a link from your host or from the local host page. Depending on your setup, you may need to log in with your MySQL user name and password. Figure 11.1 shows an example of the phpMyAdmin start screen.
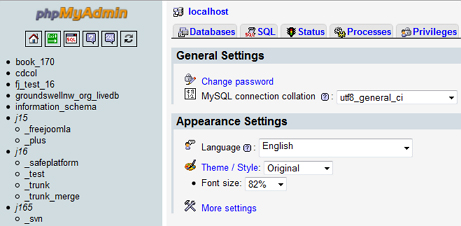
Figure 11.1. phpMyAdmin start screen
The left side of the screen shows the available databases that you have access to on this server. Normally, you will work in one database at a time. When you click on a database in the left, the screen will show something similar to Figure 11.2.

Figure 11.2. Screen with a database selected
Now that we have a database selected, we see the tables in the left column. Also, we can now do SQL queries without needing to specify which database to use.
If we click on the SQL tab at the top, we get an entry text box where we can enter and execute SQL commands. For example, if we enter the command
SELECT * FROM jos_content
and press the Go button in the lower right corner, we see a screen similar to Figure 11.3.

Figure 11.3. Results of SQL query
If the query is successful, we see a message “Showing rows . . .” that gives you the total number of rows returned by the query. We also see the first group of rows in a table. If there is an error in the query syntax, we would see the error message.
When we are working on the SQL queries we need for a Joomla programming project, it is often helpful to write the queries first in SQL and test them in this manner. That way, we know that the query works as expected.
You can also use phpMyAdmin to debug a Joomla query. You can do this with the following steps:
• Navigate to the System tab of the Global Configuration screen in the administrative back end of your Joomla site and set Debug System to “Yes”.
• Navigate to the screen where the desired query is executed. The SQL queries for the screen will display below the normal page display.
• Select and copy the desired query from the debug display and paste it into the SQL field in phpMyAdmin.
• Press the Go button to execute the query directly in phpMyadmin.
At this point, you can easily work with the query and test different options until you find the problem. Then you can go back to the Joomla PHP code and change the code to create the corrected query.
Create DDL Scripts
You can also use phpMyAdmin to simplify the process of writing the DDL scripts for creating or editing the structure of our tables. phpMyAdmin allows you to create or modify tables using a graphical interface. In the lower left corner, under the last database table, there is a link called Create Table. If you click this, you get a form that allows you to create a table and its columns. Figure 11.4 shows a screenshot where we are about to create a table with two columns.

Figure 11.4. Creating a table with phpMyAdmin
In the lower right corner are two buttons, Save and Go. Pressing the Save button saves the table. To add more columns, press the Go button.
You can also add, edit, or drop (delete) columns of an existing table. To do this, select a table and then click on the structure tab. Figure 11.5 shows the links for changing, deleting, or adding columns. Note that you can also add or edit indexes using the buttons in the lower part of the screen, under Indexes.
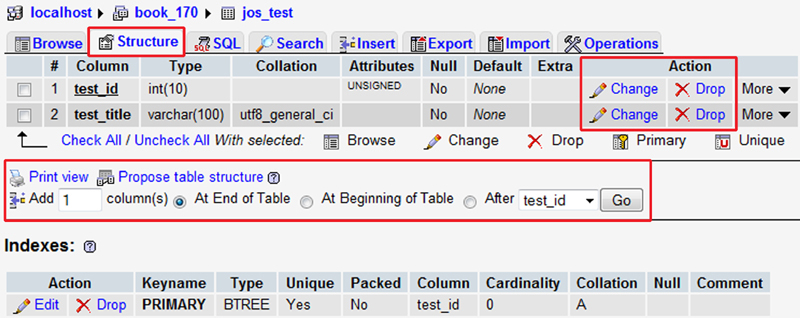
Figure 11.5. Add, change, or delete columns with phpMyadmin
Once you have a table defined the way you want it, you can have phpMyAdmin create the DDL script to create that table. To do this, click on the Export button. At this point, you get a form with the option for Quick or Custom. Select Quick and select SQL in the Format list. Then press Go.
phpMyAdmin will create the script and give you the option to open the file or save it. A text file will be created. Note that this file will have extra information you don’t need. However, the file will also contain a DDL script for your table. For example, the listing for the jos_test table is shown in the following:
--
-- Table structure for table `jos_test`
--
CREATE TABLE IF NOT EXISTS `jos_test` (
`test_id` int(10) unsigned NOT NULL AUTO_INCREMENT COMMENT 'Primary Key',
`test_title` varchar(100) DEFAULT NULL COMMENT 'Title',
PRIMARY KEY (`test_id`)
) ENGINE=MyISAM DEFAULT CHARSET=utf8 AUTO_INCREMENT=1 ;
When working with tables in phpMyAdmin, you need to use the actual table prefix for your current Joomla database (in this example, “jos_”). When you use the same script inside your Joomla application, remember to change the prefix to “#__” so that Joomla will automatically substitute the correct prefix for each site.
Backup and Copy a Database
Earlier in this chapter, we mentioned that with a SQL database, such as MySQL, we don’t need to know anything about where the physical data files are located or how they are organized. Given this, what do we do if we want to make a backup copy of a database or move a database from one server to another?
The answer is that we use the export and import feature of the database to accomplish this task. To make a backup of a database, we create an export file of the entire database. As we saw in the previous section, an export file contains a series of SQL commands that can be executed by any MySQL database. When we create an export file for an entire database, it contains all the SQL commands to re-create the database. This includes the DDL CREATE TABLE commands to create all the tables’ structure as well as the DML INSERT commands to insert all the data into these tables.
To export an entire database, follow these steps:
• From the phpMyAdmin Home screen, click on the desired database in the left-hand list. This will show all the database tables in the list, as shown in Figure 11.2.
• Click the Export tab in the top part of the screen and select Export Method: Quick and Format: SQL. Press the Go button.
• Click on Save File and choose a location and file name for the export file.
• Open the resulting file and look through it. It should contain a CREATE TABLE command for each table and an INSERT INTO command for each table that contains data.
Next, let’s use this export file to create a new database that is an exact copy of the exported database. To do this, we first need to create our new database, as follows:
• From the phpMyAdmin Home screen, select the Databases tab in the top part of the screen. This will show a field called Create new database.
• Select your database name (for example, jos_test_copy) and select utf8_general_ci for the collation. Note that “ci” stands for case insensitive. This means that uppercase and lowercase letters will be considered as equal for database sorting. We can still enter and save uppercase and lowercase letters and see them correctly. However, when we use the ORDER BY clause in a SQL command, uppercase and lowercase letters will be ordered as if they were all the same case. This is the default and preferred behavior for most SQL databases.
• Press the Create button. You should get a message saying that the database was created successfully.
• Select the new database and press the Import button in the top row of the screen.
• Browse to the export file created when we exported the entire database previously.
• Press the Go button. The system will work for a minute and then will give you a success message.
• Check that the new database now has all the tables and data that the original database had.
Using SQL Data with DML Commands
We work with the data in tables by writing queries. The main query commands are SELECT, UPDATE, INSERT, UNION, and DELETE. The subject of writing SQL queries is a large and complex one. Here we will cover the basics that will help you write most of the queries you will need for Joomla applications.
SELECT Queries
SELECT queries are the most frequently used in Joomla applications. They are used to retrieve data from the tables in the database. The data retrieved from a SELECT query is called a data set. The basic structure of a SELECT query is as follows:
SELECT <list of columns and expressions>
FROM <primary table>
JOIN <list of join clauses>
WHERE <where conditions>
ORDER BY <order by columns>
LIMIT <offset, row count>
A SELECT query doesn’t have to have all these clauses. However, if present, they must be in the order listed.
As we see later in this chapter, one of the benefits of using the Joomla JDatabaseQuery class for building queries inside our code is that we can build the query’s clauses in any order we like. However, when we run queries directly in the database (for example, with phpMyAdmin), we need to follow the required order of the different SQL clauses.
List of Columns
The first part of a SELECT query includes a list of columns and expressions that will display in the query. These will be the column headings for the rows that are returned. We normally use an alias to identify which table a column comes from. For example, in the query
SELECT a.id, a.name FROM jos_content AS a
we have identified a as the alias for jos_content. Note that, by convention, we type SQL key words in all uppercase. SQL queries are case insensitive, so this convention is just to make it easier to read the query.
We can also create aliases for column names. By default, the query column name is the same as the table column name. In many cases, this is fine. However, in some cases, we want the query column name to be different (for example, if two tables have the same column names or if we are using an expression for a column). We create an alias for the column name using the AS keyword, as follows:
SELECT a.id AS article_id, a.name FROM jos_content AS a
In this example, the id column will show as article_id. Note that because we use a period between the table alias and the column name, we can’t use periods in the column or alias names unless we enclose the alias in quotes.
If you like, you can omit the AS keyword and it will be assumed. For example, the following query is equivalent to the previous example:
SELECT a.id article_id, a.name FROM jos_content a
Explicitly including the AS command is generally preferred because it makes the query easier to read.
We can also use an asterisk (*) to indicate all the columns from a table. For example,
SELECT a.* FROM jos_content AS a
will return all the rows from a table. In this case, you cannot create column aliases.
Finally, we can include expressions as query columns. This is frequently done when we use the GROUP BY clause, discussed later in this section.
FROM Clause
In the FROM clause, we list one or more tables from which we will pull our data. One confusing thing about SQL syntax is that there are two equivalent ways to create joins between tables. One way is to list all the tables in the FROM clause and include the join conditions in the WHERE clause. The preferred method, at least for Joomla, is to use the JOIN command. It is preferred because it is clearer to the reader what the query is doing. So that is the syntax we will use here.
When we are using the JOIN statement for our secondary tables, the FROM clause will only include the primary table for the query. Which table is the primary table? In most cases, it is reasonably intuitive. Typically, we are trying to get information mainly for one thing, like articles or users. So we start with the main table for that item and then add related tables as needed to pull in related information. So that main table is the primary table for our query.
As mentioned earlier, we normally create a short alias using the AS command—for example, FROM jos_content AS a.
JOIN Clause
JOIN statements are used to combine columns from two or more different tables. This is something we do in most queries. When designing SQL databases, it is good practice to put only one type of data in one table. This means that we often need information from more than one table in a single query.
For example, in Joomla, we keep category data in a separate category table (jos_categories). In related tables, such as jos_content, we only store the category id (as a foreign key). When we write a query to see articles from jos_content, we will often want to display the category name or other category information, not just the category id. We do this by joining the category table to the query. Doing so gives us the ability to show the category name or any other category column.
JOIN statements can be confusing when you are learning about SQL queries. The two join types that are most frequently used are INNER joins and LEFT joins (sometimes referred to as LEFT OUTER joins). By default, if no join type is specified, an INNER join is assumed.
Let’s look at a simple query where we show articles and their categories, as follows:
SELECT a.title, c.title AS category_title
FROM jos_content AS a
INNER JOIN jos_categories AS c
ON a.catid = c.id
Here we are showing the article title and category title for each article. Note that we use the AS command to create an alias for each table and to create an alias for the category title. Otherwise, we would have two columns in the query called title.
Note that we use an INNER JOIN. We could simply use JOIN and get the same result, because INNER is assumed by default. However, it is preferred to explicitly state the type of join.
The last line, with the ON statement, is very important. Here we specify how the two tables are related for this query. We always have an ON statement with a JOIN clause. Otherwise, we don’t get the result we expect. In this example, if we omit the ON statement, we would get a row in our query for each combination of rows in the two tables. For example, in the version 2.5 sample data, we have 66 rows in the jos_content table and 69 rows in the jos_categories table, so if we omit the ON statement we get 4,554 rows in our query!
The ON statement often uses a foreign key column to relate the two tables. In this example, a.catid is a foreign key to the jos_categories table. There are many other examples of foreign key relationships in the Joomla database, including jos_banners to jos_categories, jos_banners to jos_banner_clients, jos_contact_details to jos_users, and so on.
Next, let’s explore the difference between an INNER join and a LEFT join. With an INNER join, we require that rows exist in both tables. In the previous, every article listed in the query will have a corresponding category. In a normal Joomla database, this will always be true. Every article has exactly one category. In this case, an INNER and LEFT join will give exactly the same results.
Let’s look at a different example. Say we wanted a list of articles including whether or not they are flagged for the front page featured blog. The table jos_content_frontpage contains a row for every featured article, including its id and an ordering number. Here is the first version of the query:
SELECT a.title, f.ordering
FROM jos_content AS a
INNER JOIN jos_content_frontpage AS f
ON a.id = f.content_id
Here we show the article’s title and its front-page ordering. By specifying an inner join, we only include articles with a row in the jos_content_frontpage table. With the version 2.5 sample data, we will get four rows as follows:
title ordering
Beginners 2
Professionals 4
Joomla! 1
Upgraders 3
Now let’s see what happens when we use A LEFT join, as follows:
SELECT a.title, f.ordering
FROM jos_content AS a
LEFT JOIN jos_content_frontpage AS f
ON a.id = f.content_id
Now we get all the articles from jos_content, even if they don’t have a corresponding row in jos_content_frontpage. In that case, the value for f.ordering is NULL (meaning it doesn’t exist).
We could change this query to indicate whether or not an article was flagged for the front page using an expression with the SQL CASE function, as follows:
SELECT a.title,
CASE WHEN (f.content_id IS NULL) THEN 'No' ELSE 'Yes' END AS front_page
FROM jos_content AS a
LEFT JOIN jos_content_frontpage AS f
ON a.id = f.content_id
The second line shows the use of an expression in the SELECT list. The CASE function allows us to display different values based on different boolean tests. Here we test whether the f.content_id is null. If so, we know that the article is not in the jos_content_frontpage table and we show a value of 'No'. Otherwise, we know it is in the table and show the value of 'Yes'. The first five rows returned by this query are as follows:
title front_page
Administrator Components No
Beginners Yes
Archive Module No
Banner Module No
Article Categories Module No
We can have as many JOIN clauses as we need to bring in the data from each of the desired tables. Each table alias must be unique in the query.
WHERE Clause
This is where we can filter the rows of the query to include only those rows that match specific conditions. WHERE clauses can be simple or complex. In the following example, we have added a WHERE clause to include only published articles:
SELECT a.title, c.title AS category_title
FROM jos_content AS a
INNER JOIN jos_categories AS c
ON a.catid = c.id
WHERE a.state = 1
We can connect multiple statements in the WHERE clause with AND or OR. For example, the following query will show articles that are published and have a nonzero publish_down date:
SELECT a.title, c.title AS category_title
FROM jos_content AS a
INNER JOIN jos_categories AS c
ON a.catid = c.id
WHERE a.state = 1
AND a.publish_up != '0000-00-00 00:00:00'
Recall that the publish_down column has a default value of '0000-00-00 00:00:00', which means never unpublish the article. In the sample data, no articles will fit these conditions. To test the query, go into the Article Manager and add a stop-publishing date to an article. When you rerun the query, it should show this article.
We can use OR to connect statements in a WHERE clause. In this case, it gives us rows that match any of the conditions. For example, the following query gives us rows where either the created-by alias is “Parks Webmaster” or the category title is “Plugins”:
SELECT a.title, c.title AS category_title, a.created_by_alias
FROM jos_content AS a
INNER JOIN jos_categories AS c
ON a.catid = c.id
WHERE a.created_by_alias = 'Parks Webmaster'
OR c.title = 'Plugins'
Note that we can use columns from any table in the WHERE clause.
If we need to use both AND and OR connectors in our WHERE clause, we group them using parentheses. For example, the following query includes rows from the previous example but adds the conditions that the article’s title must begin with the letters “Ed” or “Au”.
SELECT a.title, c.title AS category_title, a.created_by_alias
FROM jos_content AS a
INNER JOIN jos_categories AS c
ON a.catid = c.id
WHERE
(a.created_by_alias = 'Parks webmaster'
OR c.title = 'Plugins')
AND
(a.title LIKE 'Ed%'
OR
a.title LIKE 'Au%')
Note that LIKE allows us to use a wild-card match, where the percent sign means match any character. If we used a.title LIKE '%abc%' we would match any column that contained “abc” anywhere in the text, while a.title LIKE '%abc' would match any text ending with “abc”.
ORDER BY Clause
The ORDER BY clause is used to sort the query rows in the desired order. You can specify the direction of ordering, using ASC for normal ascending (A to Z) order or DESC for reverse or descending (Z to A) order. You can list more than one column, separated by commas. For example, the ORDER BY clause
ORDER BY a.created_by_alias ASC, d.created DESC
would cause the query rows to be ordered alphabetically by created_by_alias. If two or more articles had the same created_by_alias value, they would then be ordered by the date and time created, with the most recently created articles first.
LIMIT Clause
MySQL includes the option to limit the rows returned by a query with the LIMIT clause. This goes after the ORDER BY clause. The syntax is LIMIT xx, yy, which limits the query to the first yy rows, starting with row xx + 1.
For example, to limit our query to return the rows 6–15, we would add LIMIT 5, 10 to the query. We prepare the query, we skip the first five rows, and then we return the next ten rows. Similarly, LIMIT 0,10 would return the first ten rows. If you don’t want to skip any rows, you can omit the first argument and write LIMIT 10.
Aggregate Queries with GROUP BY
In normal SELECT queries, our rows are returned at the same level of detail as the tables being queried. If we want summarized data, we use the GROUP BY clause. A query that includes a GROUP BY clause is called an aggregate query. If present, the GROUP BY clause goes after the WHERE clause and before the ORDER BY.
Using a GROUP BY clause affects the columns you can list in the column list. You can only list (a) columns that are used for the grouping or (b) columns that are aggregate expressions. If we think about it, this makes sense. Because the query is summarizing multiple rows into one row, the database has to know how to summarize the values. Aggregate expressions tell the database how we want to do that.
Let’s look at an example. Let’s say we wanted to get a count of the articles for each created_by_alias value. The query is as follows:
SELECT a.created_by_alias, COUNT(*) AS article_count
FROM jos_content AS a
GROUP BY a.created_by_alias
This query returns the following result:
created_by_alias article_count
12
Fruit Shop Webmaster 4
Joomla! 40
Joomla! 1.5 1
Parks webmaster 9
This query has two columns, the created_by_alias and an aggregate function called COUNT. The argument for this function is “*”. This function counts the number of rows in the table for each different value of created_by_alias. Note that 12 of the articles don’t have a created_by_alias so they show as blank.
MySQL and other SQL databases provide a number of useful aggregate functions, including MIN(), MAX(), AVG(), SUM(), COUNT(), and COUNT(DISTINCT).
Let’s say we wanted to modify our query to show the most recent date for each author’s articles. We could just add the column
MAX(created) as last_create_date
to our query columns.
Say we wanted to exclude articles with no created_by_alias. We can do this by including a WHERE clause to check that we have something in this column. Here we get into a subtle point about SQL data columns. If we look at the definition for this column in the database, we see that NULL values are not allowed and that the default value is an empty string '' (two single quotes with no space in between). Because of this, we cannot test for NULL values—there won’t be any. Instead, we can test for the value being greater than an empty string.
Our query is as follows:
SELECT a.created_by_alias, COUNT(*) as article_count,
MAX(a.created) as last_create_date
FROM jos_content AS a
JOIN jos_categories AS c
ON a.catid = c.id
WHERE a.created_by_alias > ''
GROUP BY a.created_by_alias
This query omits the row showing the 12 articles with no created_by_alias.
What if we wanted to only show rows where we have at least two articles? We can’t do this in a WHERE clause, because that examines each row one at a time. At that point in the query, we don’t know how many articles we might end up with for each created_by_alias.
To solve this, SQL provides a HAVING clause that can come right after the GROUP BY and before the ORDER BY. The HAVING clause is like a WHERE clause except that it tests for the values of aggregate functions. To limit our query to only those rows having two or more articles, we modify the query as follows:
SELECT a.created_by_alias, COUNT(*) as article_count,
MAX(a.created) as last_create_date
FROM jos_content AS a
JOIN jos_categories AS c
ON a.catid = c.id
WHERE a.created_by_alias > ''
GROUP BY a.created_by_alias
HAVING COUNT(*) >= 2
Now the query will only show rows where the count is two or more.
We can also use aggregate functions in our ORDER BY. Say we want to order the list showing the rows with the most articles first. To do this, we add
ORDER BY COUNT(*) DESC
to the end of the query. Now we get the rows ordered from the highest article count to the lowest count.
UPDATE Queries
UPDATE queries allow you to modify the contents of columns in a table. The general form of an UPDATE query is as follows:
SET <list of column names and values>
WHERE <where conditions>
For example, to do a search-and-replace for the created_by_alias column, you would do the following query:
UPDATE jos_content
SET created_by_alias = 'Site Administrator'
WHERE created_by_alias = 'Joomla!'
To update more than one column, you separate the column-value pairs with a comma. For example, the following query would also update the date_created to January 1, 2014:
UPDATE jos_content
SET created_by_alias = 'Site Administrator',
created = '2014-01-01 12:00:00'
WHERE created_by_alias = 'Joomla!'
The WHERE clause syntax for UPDATE queries is exactly the same as for SELECT queries.
INSERT Queries
INSERT queries are used to add new rows into a database table. The general form of an INSERT query is as follows:
INSERT INTO <table>
(<column1, column2, . . . >)
VALUES (<value list for row 1>), (<value list for row 2>)
If you omit the column list, it is assumed that the values list includes all the columns in the order defined for the table.
We can see many examples of INSERT queries in the file joomla.sql and sample_data.sql files in the folder installation/sql/mysql and in the export file we created earlier in this chapter. For example, the export file includes this INSERT query for the jos_content_frontpage table:
INSERT INTO `jos_content_frontpage` (`content_id`, `ordering`) VALUES
(8, 2),
(35, 4),
(24, 1),
(50, 3);
Note that table name and column names are enclosed in back quotes. As discussed previously, this is good practice although it is not necessary unless you use a key word or special character in the name (like a period or a space).
One important thing to be aware of when inserting rows is the possibility of duplicate keys or duplicate indexes. If you have a primary key defined and you try to insert a row with a primary key that is a duplicate of an existing row, you will get an error.
Also, if you have a primary key defined as AUTO_INCREMENT, you can specify a value of NULL for that key and the database will automatically put the next available value into the column. This is what you normally need to do when you are inserting a row into a table of an existing database, where you don’t know what primary keys are already in the table. As discussed earlier, when we are creating a new table and we know it is empty, we can specify the id column. This is the case in the joomla.sql and sample_data.sql scripts and also in our backup script.
DELETE Queries
DELETE queries are used to permanently delete rows from the database. The general form of a DELETE query is as follows:
DELETE FROM <table name>
WHERE <where conditions>
For example, the syntax to delete one row from the jos_content_frontpage table would be as follows:
DELETE FROM jos_content_frontpage
WHERE content_id = 35
The syntax of the WHERE clause is the same as for SELECT queries. Warning: if you omit the WHERE clause, all rows in the table will be deleted.
UNION Queries
UNION queries allow you to combine like columns in two or more tables into one query. They are rarely used in Joomla applications. The general form of a UNION query is as follows:
<SELECT query 1>
UNION
<SELECT query 2> . . .
For example, to see a list of all Weblink and news feed items in one query, you could do a UNION query as follows:
SELECT 'Weblink' as type, w.title AS title
FROM jos_weblinks w
UNION
SELECT 'Newsfeed' as type, n.name as title
FROM jos_newsfeeds n
In a UNION query, the column names for each SELECT query must be the same and in the same order.
Expressions in Queries
Expressions can be used instead of column names in most places. Exceptions are where you are using a column name to designate where a value is to be written, such as the SET clause of an UPDATE or INSERT query.
MySQL and other SQL databases provide a number of useful functions. These include string functions like UPPER(), LOWER(), LENGTH(); date and time functions like DATE_ADD(), DATE(), and DATEDIFF(); and the CASE() function, as seen earlier, for conditional logic. For a complete list of expressions available in MySQL, check the MySQL documentation at http://dev.mysql.com/doc/refman/5.1/en/functions.html.
Designing the Table Structure
Designing the table structure is an important part of designing a Joomla extension. The general idea of database design is to have a table for every type of entity in the database, and to only have one type of entity in a given table.
Let’s consider the example of a database for a school. The purpose of the database will be to track students, teachers, and their classes. We can divide the types of tables into groups based on the type of information they will hold. Three typical table types are as follows:
• Reference table: Typically holds static information about an entity. Examples include customers, contacts, and articles. Reference tables will typically be maintained by users entering and editing rows—for example, with a form.
• Mapping table: Used to map from one table to another. Examples include mapping users to groups or mapping students to classes. Mapping tables will typically be maintained by the system, based on user actions.
• History table: Used to record detailed information. Examples include event logs, purchase history, or class history. History tables will typically be written to automatically by the system.
We will show examples of these different table types.
Reference Tables
In our example, we will start with four reference tables, as follows:
• Students: All static information for each student, such as name, address, age, and grade level would go into the students table. We will not include dynamic information, such as classes taken or past grades.
• Teachers: All static information for each teacher, such as name, address, department, and pay rate. Again, we will not include dynamic or historical information here.
• Classes: All static information for each class, such as class title, description, department, meeting time, room number, dates held, and maximum students allowed.
• Department: All static information for each department. This might include the department name and description.
Each of these tables has a simple structure. One row in the table will represent one student, teacher, class, or department. The system users will typically add and edit these tables directly using forms.
Key Fields and Foreign Keys
In the tables just listed, it makes sense to identify each entity using an id column. The standard way this is done in Joomla is using an auto-incrementing integer as the primary key, as discussed earlier in this chapter.
In our example, each teacher is a member of exactly one department. In this case, we can include the key field for the department table (for example, department id) as a column in the teacher department. If we need to get other information from the department table, we can add a JOIN on this column in our query.
If the tables are expected to contain a large number of rows (for example, more than 1,000), we would probably want to create indexes on the foreign key columns. This will speed up queries where we join tables based on these columns.
Mapping Tables
Foreign keys work well to relate one row in one table to one row in another table. In some cases, however, we need to map multiple rows in one table to multiple rows in a second table.
In our example, consider the relationship of the students and classes tables. Each student will take multiple classes and each class will have multiple students assigned to it. This is known as a many-to-many relationship. The normal way to handle this is with a mapping table. In this case, we could create a table called student_class_map with two columns, student_id and class_id. We would create a primary key that combines the two columns. In other words, a given student could be assigned to a given class only once.
Each time a student is added to a class, a new row with the student and class id columns is added to the table automatically by the system. If a student drops the class, the row could be deleted automatically.
With the mapping table, we can easily do two types of queries. We can get a list of students in a single class (class id = 123) with the following query:
SELECT c.class_name, s.student_name
FROM student_class_map AS m
INNER JOIN classes AS c ON m.class_id = c.id
INNER JOIN students AS s ON m.student_id = s.id
WHERE m.class_id = 123
ORDER BY s.student_name;
Similarly, we can get a list of all classes that a student (id = 234) is enrolled in with the following query:
SELECT s.student_name, c.class_name
FROM student_class_map AS m
INNER JOIN classes AS c ON m.class_id = c.id
INNER JOIN students AS s ON m.student_id = s.id
WHERE m.student_id = 234
ORDER BY c.class_name;
Note that we use the student_class_map table as the primary table in both of these queries, even though the displayed columns come from the other tables. This is because we want one row in our query for each row in the student_class_map table.
We could have a similar mapping table mapping teachers to classes. This is also a many-to-many relationship. As with the reference tables, we might want to create indexes on the class_id and student_id columns to speed up queries where we use these columns as foreign keys.
History Tables
A third type of table is a history or transaction table. In our example, one such table would be a history of the classes completed by students. In most cases, an AUTO_INCREMENT primary key column works well for this type of table. A partial structure for the student class history table might be as follows:
• history_id: INT, AUTO_INCREMENT, PRIMARY KEY
• student_id: foreign key to students table
• class_id: foreign key to classes table
• semester: varchar(6) (format: yyyyxx, where yyyy is the year and xx is 01, 02, 03)
• date_completed: date
• class_grade: varchar(2)
• comments: varchar(1024)
At the completion of each class, when the final grade is posted, a row would be added for each student and class combination. We could get a student transcript (list of completed classes) with the following query:
SELECT c.name, h.semester, h.class_grade
FROM student_class_history AS h
INNER JOIN students AS s ON s.id = h.student_id
INNER JOIN classes AS c ON c.id = h.class_id
WHERE h.student_id = 234
ORDER BY h.semester ASC, c.name ASC
A similar history table could be added to record the classes taught by each teacher.
For the history table, we might want to include indexes on student_id and class_id. Because we might build queries to filter the rows by semester_id, this could also be a candidate for an index. Similarly, if we expected to query based on date_completed, we could do an index on this column as well.
Working with the Database Inside Joomla
Now that we have a good understanding of how SQL queries work, we can look at how we create and work with queries inside Joomla.
In Joomla applications, we work mostly with SELECT queries. The SQL queries for INSERT, UPDATE, and DELETE tasks are often done for us by the JTable class. In our example component, this was the case for our #__joompro_subscriptions table. However, in the case of our #__joompro_sub_mapping table, we had to create our own INSERT, UPDATE, and DELETE queries.
In Joomla, the JDatabaseQuery class is used to create the SQL queries, and the JDatabase class is used to execute the query and return the query results.
Using JDatabaseQuery
The JDatabaseQuery class was introduced in Joomla version 1.6 to make it easier to create SQL queries in Joomla version 2.5 introduced the classes needed to support multiple databases. This includes subclasses for each supported database (for example, JDatabaseQueryElementMySQLi for the MySQLi driver, JDatabaseQuerySQLSrv for Microsoft SQL Server). These subclasses deal with the subtle SQL syntax differences among different supported databases. The great news for developers is this: as long as we use the JDatabaseQuery class to build our query and follow a few simple rules, our query will automatically work across all supported databases! We can still build our queries manually if we prefer, but if we do they will not support multiple databases.
Creating the JDatabaseQuery Object
We create our query object using the getQuery() method of the JDatabase object. For example, this code will create an empty query object:
$query = JFactory::getDbo()->getQuery(true);
Including the boolean true as an argument erases any prior query and gives you a blank query to start with, which is what you normally want.
Recall that we create our JDatabase object using the code JFactory::getDbo(). This gives us the type of database object for our configured database driver. In turn, the database object knows how to create the correct JDatabaseQuery object for our configured database.
Note that we do not want to use the following code to create an empty query:
$query = new JDatabaseQuery(); // Do NOT use this code!
This will not create the correct type of object for different database drivers and therefore will not work correctly with different databases.
SELECT Queries with JDatabaseQuery
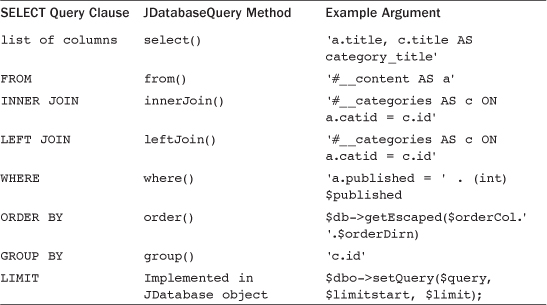
If we understand how to create SELECT queries in SQL, creating them with JDatabaseQuery is very easy. Table 11.1 shows the JDatabaseQuery method for each clause in a SELECT query.
Table 11.1. JDatabaseQuery Methods for Select Queries
As discussed earlier, the ordering of the various query clauses in SQL is rigid. With JDatabaseQuery, we can build our query object in any order we prefer. When the query is passed to the database, the __toString() method of JDatabaseQuery puts the clauses in the correct order for us.
Similarly, we can easily add more columns to our query. For example, we could start with the following list of columns:
$query->select('a.id, a.title'),
Later on, perhaps when we have added the category table to the query, we could add more columns as follows:
$query->select('c.id AS catid, c.title AS cat_title'),
This allows us to create the query in a way that is easy to understand and that follows the flow of the program code.
This is also true of the join methods. Note that we have separate methods for INNER and LEFT joins and then we pass the ON conditions in the argument. We can do the joins one at a time and, if we prefer, add the columns from the joined table at that point in the code.
In the where() method, we can specify a connector (AND or OR) in the second argument. The default is AND. If we need to create complex WHERE clauses—for example, with an OR condition nested inside an AND condition—we do this with parentheses just like we would in a SQL WHERE clause. For example, to reproduce the following SQL WHERE clause
WHERE
(a.created_by_alias = 'Parks Webmaster'
OR c.title = 'Plugins')
AND
(a.title LIKE 'Ed%'
OR
a.title LIKE 'Au%')
we would use the following code:
$query->where('(a.created_by_alias = 'Parks Webmaster'
OR c.title = 'Plugins')'),
$query->where('(a.title LIKE 'Ed%' OR a.title LIKE 'Au%')'),
Here we pass the nested OR conditions as arguments with the default AND connector. Note that we use parentheses to make sure the expressions are evaluated the way we want. In the select() and order() methods, each column name or expression is separated by a comma. In the order() method, you specify the sort order using ASC or DESC, just as in the SQL code.
Protecting against Hackers
When we use JDatabaseQuery to build queries, we still need to protect ourselves from hackers entering malicious code. For example, if a value used in a WHERE or ORDER BY clause comes from an untrusted source, such as an HTML form or the URL (both of which can be used by hackers to enter malicious code), we need to sanitize the value before we use it in a query. If a value in a WHERE clause should be an integer, we should cast it as an integer using (int). In the following example, we know that $catid should be an integer, so we make sure it is, as follows:
$query->where('a.catid = ' . (int) $catid);
If the value is text, we should use the quote() method of JDatabase to put quotes around it and to “escape” any special characters. Escaping text means to check for characters that have special meaning for a particular language—in this case, SQL. When we escape a value, we display any special characters in a way so that they lose their special meaning for the language. In SQL, for example, this is done by putting a back slash (“”) in front of quote characters (single and double quotes). This allows the quote to be displayed, but it tells the database not to interpret it as a special character. Escaping text values prevents a hacker from using quotes or other special characters to change the meaning of our query and inject their own SQL into our code. As we have seen in other chapters, we can also escape text with respect to HTML or JavaScript.
Let’s say we use a variable called $created_by in our WHERE clause, and say this variable comes from an untrusted source. In this case, we would do something like the following:
$query->where('a.created_by_alias = ' . $db->quote($created_by));
If a hacker puts malicious code into $created_by, it will be rendered harmless by the quote() method and our query will be safe.
If we are using a variable as part of a WHERE clause with a wild card, we need to take care about where we put the quotes. For example, say we want to do a WHERE clause as follows:
WHERE a.title LIKE '%abc%'
where 'abc' is from a user-entered variable called $search. In this case, we need to make sure to put the percent signs inside the argument passed to the quote() method, as follows:
$query->where('a.title LIKE ' . $db->quote('%' . $search . '%'));
That way, the quotes end up outside the percent signs, but the $search value is still escaped.
Where passing untrusted data to an ORDER BY clause, we have to make sure that the values are valid column names. Otherwise, we get a SQL error that can disclose information about our site to potential hackers. We discussed one way to do this in Chapter 10, using the model’s constructor to create an array of valid column names and then checking the input against this list.
Method Chaining
The JDatabaseQuery methods return a value of $this, which means that they support method chaining. So, for example, the following code snippet
$query = JFactory::getDbo()->getQuery(true);
$query->select('a.id, a.title'),
$query->from('#__content AS a'),
$query->where('a.catid = ' . (int) $catid);
does the same thing as this snippet:
$query = JFactory::getDbo()->getQuery(true);
$query->select('a.id, a.title')->from('#__content AS a')
->where('a.catid = ' . (int) $catid);
In the second example, the select() method returns a JDatabaseQueryElement object, so it can be used to call the from() method. Again, the from() method returns an object that can call the where() method. In the Joomla core, the first approach is used in most places, but you will see examples of the second approach as well.
The LIMIT clause of the query is not created in the JDatabaseQuery class. Instead it is done when the query is passed to the JDatabase object for processing. That is covered later in this chapter.
Group by Queries with JDatabaseQuery
Aggregate queries (queries with the GROUP BY clause) are created using the group() method. This works just like the GROUP BY clause. When you create an aggregate query, you need to make sure that only columns that are used for grouping, as well as expressions using aggregate functions, are present in the column list (created by the select() method).
For example, the following SQL query
SELECT a.created_by_alias, COUNT(*) AS article_count
FROM jos_content AS a
GROUP BY a.created_by_alias
could be written using JDatabaseQuery as follows:
$query = JFactory::getDbo()->getQuery(true);
$query->group('a.created_by_alias'),
$query->from('#__content AS a'),
$query->select('a.created_by_alias, COUNT(*) AS article_count'),
Insert Queries with JDatabaseQuery
JDatabaseQuery provides two alternatives for creating INSERT queries. One uses the set() method to set each column individually. The second method uses the columns() and values() methods to set the columns as a group.
The following is a SQL INSERT query for adding a row to the jos_joompro_sub_mapping table:
INSERT INTO jos_joompro_sub_mapping
(subscription_id, user_id, start_date, end_date)
VALUES (123, 234, '2014-01-01 12:00:00', '2014-12-31 12:00:00'),
Here is the code for building the same query using the set() method of JDatabaseQuery:
$query = $db->getQuery(true);
$query->insert('#__joompro_sub_mapping'),
$query->set('subscription_id = ' . (int) $subID);
$query->set('user_id = ' . (int) $userID);
$query->set('start_date = ' . $db->quote($startDate));
$query->set('end_date = ' . $db->quote($endDate));
The argument for the set() method is a string containing the column name, an equals sign, and the literal value to use for the column. In this example, each column is set with a separate set() method. We can also set multiple columns in one line by putting the strings together in a comma-delimited list.
Alternatively, we can use the columns() and values() methods to accomplish the same thing. Here is the code for doing this:
$query = $db->getQuery(true);
$query->insert('#__joompro_sub_mapping'),
$query->columns('subscription_id, user_id, start_date, end_date'),
$query->values((int) $subID . ',' . (int) $userID . ','
. $db->quote($startDate) . ',' . $db->quote($endDate));
Here we use the columns() methods to name the columns that will be set. If we omit this, the entire column list for the table is assumed. Then we use the values() method to create a comma-delimited list of values for each column.
Update Queries with JDatabaseQuery
UPDATE queries with JDatabaseQuery use the update(), set(), and where() methods to create a query. Here is an example UPDATE query using SQL:
UPDATE jos_joompro_sub_mapping
SET start_date = '2015-01-01 12:00:00', end_date = '2015-12-31 12:00:00'
WHERE subscription_id = 123 AND user_id = 234;
Here is the same query using JDatabaseQuery:
$query = $db->getQuery(true);
$query->update('#__joompro_sub_mapping'),
$query->set('start_date = ' . $db->quote($startDate));
$query->set('end_date = ' . $db->quote($endDate));
$query->where('subscription_id = ' . (int) $subID);
$query->where('user_id = ' . (int) $userID);
We use the set() method to set the value of each column to be updated. We use the where() method to indicate which rows to update. As with INSERT queries, the set() method can either set one column or multiple columns. To set multiple columns, we separate each column-value pair with a comma.
Delete Queries with JDatabaseQuery
Creating DELETE queries uses three methods: delete(), from(), and where(). The delete() method has no arguments. It just tells the class that we are creating a DELETE query.
The from() method names the table from which to delete the rows. The where() method has the usual syntax for creating the WHERE clause, so select the rows to be deleted.
Here is an example SQL DELETE query to remove one row from the jos_joompro_sub_mapping table:
DELETE FROM jos_joompro_sub_mapping
WHERE subscription_id = 98 AND user_id = 76;
The same query would be created in JDatabaseQuery with the following code:
$query = $db->getQuery(true);
$query->delete();
$query->from('#__joompro_sub_mapping'),
$query->where('subscription_id = ' . (int) $subid);
$query->where('user_id = ' . (int) $userid);
Union Queries with JDatabaseQuery
At this time, JDatabaseQuery does not support UNION queries. As discussed earlier, these queries are rarely used in Joomla applications.
Working with Query Data
Once we have built our query, we need to pass it to the database, execute it, check for errors, and return the query results, if any.
The query is passed to the database using the setQuery() method. For INSERT, UPDATE, or DELETE queries, we need to execute the query and check for errors. For SELECT queries, we also need to return the query results to the program.
INSERT, UPDATE, and DELETE Queries
These queries modify the database but do not return any data to the calling program. The steps for executing a query of this type are as follows:
• Use the setQuery() method to pass the query to the database object.
• Use the query() method to execute the query.
• Check for any database errors and process them if needed.
The following is a typical example of code used to accomplish this. In this example, an UPDATE query has been created and loaded into the variable $query.
$db->setQuery($query);
if ($db->query()) {
return true;
} else {
$this->setError(JText::_('COM_JOOMPROSUBS_ADD_MAP_ROW_FAIL'));
return false;
}
The first line passes our query to the database object. If $query is a JDatabaseQuery object, its __toString() method is executed automatically. This method creates the query with the required syntax for the specific database in use.
The query() method executes the query and returns a boolean true if the query is executed successfully. So we can use the return value to check for database execution errors. If found, we handle the error condition. Note that we can use the methods $db>getErrorNum() and $db->getErrorMsg() to get more information about the database error.
SELECT Queries
The steps needed to process a SELECT query are as follows:
• Use the setQuery() method to pass the query to the database object. We also use this method to optionally limit the number of rows returned by the query.
• Use one of the load methods to process the query and return the results to a PHP variable.
• Check for any database errors and process them if needed.
The following is a typical example of code to accomplish this:
$db->setQuery($query, $limitstart, $limit);
$data = $db->loadObjectList();
if ($db->getErrorNum()) {
$this->setError(JText::_('COM_MYCOMPONENT_ERROR_MSG'));
return false;
} else {
return $data;
}
As before, the first line passes the query to the database object. Here we have also included the optional arguments ($limitstart and $limit). These values are designed to support pagination and to otherwise limit the query’s data set to a fixed number of rows.
In this example, $limitstart tells the database how many rows in the query’s data set to skip. The value of $limit tells the database the maximum number of rows to return. For example, if $limitstart is 0 and $limit is 15, we would return up to the first 15 rows of the data set. If $limitstart is 15 and $limit is 5, we would skip the first 15 rows and return up to the next 5 rows (16–20), assuming the query’s data set had that many rows. If $limitstart is greater than the number of rows in the data set, no rows will be returned by the query.
The second line uses the loadObjectList() method to return the rows of the query results as an array of objects. We discuss the different options for returning SELECT query results in the next section.
In the third line, we use the the getErrorNum() method to check for a database error. If we find an error, we set the error message and return a false. Otherwise, we return the results of the query in the variable called $data. Whether we check for database errors and how we respond to them depends on the situation. In some cases, we continue with normal processing. In others, we report an error to the user. Going forward with the new logging functionality in the platform, we will implement logging of noncritical database errors so the site administrator can correct these without adversely affecting the user’s experience.
Returning Query Results
SELECT queries return rows and columns of data. Depending on the query, a single value, a single row, or multiple rows may be returned. The JDatabase class provides a number of methods we can use to retrieve the data from a SELECT query. Table 11.2 lists the most commonly used methods for returning the results of SELECT queries.
Table 11.2. JDatabase Methods for Returning Query Data

The most frequently used load methods in Joomla are loadObjectList() and loadResult(). The loadObjectList() is used when the query can return multiple rows and columns. The return type is an indexed array (0-n) of standard objects. The fields in the standard objects are the column names and the values are the column values.
To use the return value in PHP, we could use a foreach loop as illustrated in the following code:
$data = $dbo->loadObjectList();
foreach ($data as $row) {
$title = $row->get('title'),
$id = $row->get('id'),
. . .
Here $row is the standard object for one row of the query’s data set. We can use the get() method of the standard object to get the different columns of data for the row, based on the column name from the query.
The loadResult() method is normally used when we expect the query to return only one value (one row with one column). An example might be getting the title for a single category. In this case, we just assign it to a single variable.
The loadObject() method is similar to the loadObjectList() method except that only the first row from the query is returned. We would use this when we only expect one row from the query (or we only care about the first row). The results are returned as a standard object, again with the object field names set to the query’s column names.
The loadAssocList() method is very similar to the loadObjectList() method. The loadAssocList() method returns an array where each array element is an associative array containing the data for one row. The following code illustrates how to use this type of result:
$data = $dbo->loadAssocList();
foreach ($data as $row) {
$title = $row['title'];
$id = $row['id'];
. . .
This code is the same as that for the loadObjectList() method except that each row’s data is accessed as an associative array instead of a standard object.
The loadAssoc() method is like the loadObject() method. Both methods return only the first row of the query. The loadAssoc() returns the row as an associative array.
The loadRowList() is like the loadAssocList() method except that it returns an indexed array instead of an associative array. The following code illustrates how to use this type of result:
$data = $dbo->loadRowList();
foreach ($data as $row) {
$first_column = $row[0];
$second_column = $row[1];
. . .
The loadColumn() method allows you to work with one column of the data set as an indexed array. This would normally be used when the query contains multiple rows with one column each. This method returns an indexed array where each element is this column’s data for the row for that index value. For example, if the query returned three rows, $data[0] would be the value for the first row, $data[1] for the second row, and $data[2] for the third row.
Summary
In this chapter, we covered basic information about SQL databases in general, including how to create and design database tables and how to write SQL queries to update and access database data. We also covered the specifics of how to write queries inside a Joomla application and how to retrieve and use the data from these queries.