
15. Integrating Device Data
Over the past 20 years, the Hypertext Markup Language has come a long way and is constantly evolving through the work of browser creators and various groups such as the W3C working groups. HTML5 as we know it is a collection of HTML tags and attributes, JavaScript APIs, and CSS styles. In this book, we have covered many of the extension APIs created as part of HTML5. However, the work effort to further the browser experience for users, especially as users use more and more mobile devices, has not stopped and in fact is stronger than ever. In the past couple years, there has been an explosion of new mobile devices with a fundamental difference from the mobile phones of the past. No longer is the device a mobile phone with numerous other features but instead is a mobile device with the phone as just one feature.
In this chapter, you will learn about one of the most exciting and new areas of the browser experience: integration with device features such as cameras, microphones, gyroscopes, accelerometers, and device applications such as contact databases, calendaring apps, and picture galleries. With these device APIs, it is expected that web pages will be able to perform a wide range of functions including video conference calls, appointment scheduling in a user’s calendar, insertion of pictures from a user’s gallery, battery level checks, or other tasks that have typically been limited to native device applications or specialized plug-ins. Very shortly web developers will also have the benefit of tying into this functionality.
Brief Device APIs History
The W3C Device APIs and Policy Working Group was formed in May 2009 to create a set of client-side APIs and events to interact with device hardware and applications. The group defined in its original charter several different APIs that were quite broad and overlapped several other groups. The expected end date of the group’s charter was set for July 2011. However, the group for various reasons re-chartered in November 2010 with a more focused set of APIs. The group is now labeled the Device APIs Working Group and is expected to create several APIs focused on device integration between November 2010 and the new end date of June 2013.
As you can imagine, the breadth of API coverage for a topic such as device APIs is quite broad. The working group is making great headway in creating API and event specifications for use by browser manufacturers. Even though it is early, some browsers have already begun including these APIs. The API set and events of the Device APIs Working Group include the following:
• Application Registration API: Provides the ability for web applications to register as an application in the system and allow the application to handle calls with a registered data string identifier
• Battery Status event*: Provides an event for battery status changes, including the battery level and plugged in status
• Beep API: Provides control of the device system beeps
• Calendar API*: Provides read access to the calendar events on the device
• Contacts API*: Provides read access to contacts and their information from the device’s contact storage application
• Gallery API*: Provides access to the gallery of the device, which could include audio, video, and image files
• Generic Sensor API: Provides integration and support for various sensors on the device
• HTML Media Capture*: Provides attributes and HTML abilities to capture media live on the device such as audio, video, and images
• Media Capture API*: Provides a programmatic interface for capturing media via the camera and microphone of a device
• Menu API: Provides control of the application device menus
• Messaging API*: Allows a client page to send an mms, sms, or mailto URI scheme-based message
• Network Information API*: Retrieves the current network connection type for the device
• Tasks API: Provides access to the personal tasks managed on the device
• Vibration API: Provides control of the vibration of the device
At this point, the APIs listed are very young and any that have been implemented in a browser are the exceptions. In fact, at the time of writing this book, only the Contacts API has made it to the state of a last call on the specification draft. The specifications marked with an asterisk (*) have some form of draft published on the www.w3.org site. By the end of 2011, many of these APIs are expected to have working draft versions of their specifications. In this chapter, we will go through a portion of these APIs, showing some of the more evolved ones, along with some recipes with API implementations that are available now. Note that given the nascence of these APIs, it is too early to say which browser platforms will support what features.
Contacts API
The Contacts API is designed to allow the user interacting with a browser page to share information about a contact (or contacts) from their local contact application with the page. The user may choose to share only particular fields with the page. In addition, the user can select to only provide contacts that match the criteria requested by the page, such as those that have an address state value of “CA.” The API is a read-only API, so new entries cannot be added at this time. The Contacts API specification recommends the use of current industry formats such as a vCard to add or update contacts in a user’s contact repository. Because the API provides access to personal and confidential information, the browser agent is required to ask permission of the user prior to providing access to the Contact APIs.
If permission is given, then the JavaScript on the page can use a Contacts interface to begin finding contacts. The Contacts interface has one method, find, which allows the script to find one or more contacts, as shown here, in the find method signature:
void find (DOMString[] fields, ContactFindCB successCB, optional ContactErrorCB errorCB, optional ContactFindOptions options);
The parameters to the find function are explained here:
• DOMString[] Fields: An array of DOMStrings representing the contact record fields to be returned
• successCB: The success callback function to launch on success
• errorCB: An optional callback function to be launched on failure
• Options: Search options to match contact records on, such as first name
To prevent blocking the page while searching contacts, the find method uses call-back functions on success or failure. If there are matching contacts and fields to be returned, then the success callback function will be launched with a results variable containing an array of the results. If the find method executed without error but no results are returned, then a null value will be passed into the success callback function, representing that no matching contact records were found.
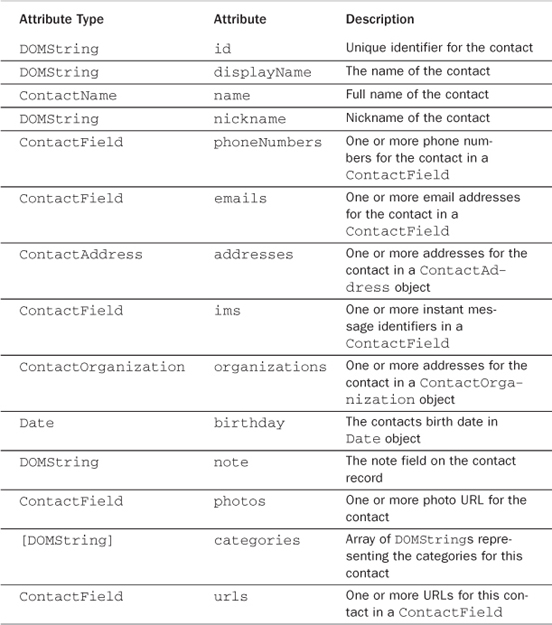
The contact record returned is an instance of the Contacts interface, which contains several attributes and other contact interface subtypes such as ContactName, ContactAddress, and so on, since a contact could realistically have multiple subcomponents such as multiple addresses. Table 15.1 shows the attributes for the Contacts interface. We will not describe all the subinterfaces here, but they can easily be referenced in the W3C draft of the Contacts API at www.w3.org/TR/contacts-api.
Table 15.1 The Contacts Interface Attributes
Note
At this time, the Contacts API is not known to be supported by any browser agent. However, it is expected that browser agents will support this API shortly and possibly prior to the publication of this book. We are providing the following recipe as an example; it may contain errors or differences to actual implementations that may take form.
Beginner Recipe: Retrieving All Contacts and Mobile Numbers
Even though it would probably not be recommended to retrieve all contacts of a user, sometimes this may be applicable. This recipe will use the find method of the Contacts interface with the success and error callback functions to retrieve all contacts, check whether the contact has a mobile number, and display the contact’s name and mobile number in a div on the page. To create this recipe, perform the following steps, resulting in Listing 15.1:
1. Create a blank HTML page with a button element and the result div. Add the click handler to the button to launch the findAllContacts method.
2. Add the script tags to the page and the findAllContacts method, which launches the contacts request.
3. Add the contactsFindSuccess callback function and the contactsError callback function to handle success and failure events from the contacts request, respectively.
Listing 15.1 Retrieving and Displaying all Contact Mobile Numbers
<!DOCTYPE html>
<html>
<head>
<meta charset="UTF-8" />
<title>15.1 Retrieve All Contacts</title>
<script>
// Initialize the page function
function init() {
// set the button handler
var btnFindAll = document.getElementById('findAll'),
btnFindAll.addEventListener('click',findAllContacts,false);
}
// Success callback function for finding contacts
function contactsFindSuccess(contacts) {
// Get reference to our div for displaying the results
var divResults = document.getElementById('divResults'),
// Loop through the contacts results
for (var i in contacts) {
// For each contact loop through any phone numbers
for (var j in contacts[i].phoneNumbers) {
// Check if the phone number is a mobile number
if (contacts[i].phoneNumbers[j].type === 'mobile') {
// Display the contact name and phone number
divResults.innerHTML += contacts[i].displayName + '(' + contacts[i].phoneNumbers[j].value + ')';
}
}
}
}
// Error callback function for finding contacts
function contactsError(error) {
// Handle the error appropriately, in this case just display
alert(error.code);
}
// Function to find the contacts
function findAllContacts() {
// Check if the Contacts API is available
if (navigator.contacts) {
// set the array of fields to retrieve
var arrFields = ['displayName', 'phoneNumbers'];
// perform the find method on the contacts
navigator.contacts.find(arrFields, contactsFindSuccess, contactsError);
} else {
// let the user know that the Contacts API is not supported
alert('The Contacts API is not supported in this browser... yet'),
}
}
// Initialize the page on load
window.addEventListener('load',init,false);
</script>
</head>
<body>
<h1>Retrieve all contacts with mobile phone numbers</h1>
<button id="findAll">Find All Contacts</button>
<div id="divResults"></div>
</body>
</html>
In this example, when the user clicks the Find All Contacts button, the findAllContacts function will be called to make a request on the Contacts interface. In the findAllContacts function, the code first checks to see whether the Contacts interface is available. If the interface is not available, then an alert will be shown, but you could replace this with alternative logic as required by your solution. If the Contacts interface is available, then the code creates the array of fields that you want to have returned by the Contacts find method. The code then calls the find method and provides the array of fields, a success callback function, and an error callback function.
The phoneNumbers field that is retrieved via the Contacts interface is structured as a ContactField interface. The ContactField interface is comprised of type, value, and pref attributes, as shown in Table 15.2.
Table 15.2 The ContactField Interface Attributes

The type attribute is a DOMString, and with a type of phoneNumbers, the type attribute can be either home or mobile. The value attribute is the actual number, and the pref attribute is a boolean value that lets you know whether the value is the preferred value or primary value for this contact. When the success callback function, contactsFindSuccess, is called, a result set is passed to the function. This result set is an array of contact interface instances that you can then loop through. In this case, we have named the results variable contacts.
In the success callback, the recipe first creates a reference to the result div on the page so that you can display any matching results. Next, the function loops through the contacts array. For each contact, the recipe loops through the phoneNumbers for that contact. For each phone number, the code checks the type to see whether the phone number is a mobile number. If the phone number is a mobile, then the code displays the name and the phone number in the result div.
The Contacts find method used in this recipe asks for all contacts with success and error callback functions. The find method can take a fourth parameter that is optional, of type ContactFindOptions. Based on the Contacts API specification, this interface implementation is up to the specific browser agent. However, the basics of this interface is the creation of a filter that is matched on the contact fields requested. This is a simple filtering method and will match any of the fields requested and in any position in the values. For example, if the filter value “son” is provided and the fields displayName and emails are retrieved, then any contact that has the string “son” in either set of fields will match, such as “son[email protected]” or “Chuck Hudson.” The expected statement of this example would be as follows:
{filter: 'son'}
Until a browser agent actually implements the Contacts API with filtering, we can only guess at the extent of control we will have over the filtering, but it appears that the filter will provide at least some basic screening of the contacts on the device.
Note
The Contacts API is designed purely as a read-only service of the contacts data on the device. To perform addition and update of contacts in the data store on the device, you would put the contact information into a standard format for the contact application such as a text-based vCard and then reference this card text through an href element so that a user can download the card into their contact application.
Messaging API
The Messaging API is designed to allow a page to use the sms, mms, and mailto URI schemes to send messages to a particular address. The API is quite simple because it has one interface and one method: device and sendMessage. The device interface is expected to be part of the navigator interface, so to check for the support of the Messaging API, you can use this:
if (navigator.device.sendMessage) {
... your sendMessage code here ...
}
If the browser agent supports the Messaging API, then you can use the sendMessage method to send a message to a given recipient. The structure of the sendMessage method is shown here:
void sendMessage (DOMString to [,Blob attachments] [, messagingErrorCB]);
The to parameter takes a URI scheme that matches either the sms, mms, or mailto scheme and can accept querystrings that include body elements and the like. The attachments field can be for pictures or videos, and the final parameter is an optional error handler. So, to send a basic message via SMS, you might call sendMessage as follows:
navigator.device.sendMessage('sms:+17705551212?body=Hi%20Tom'),
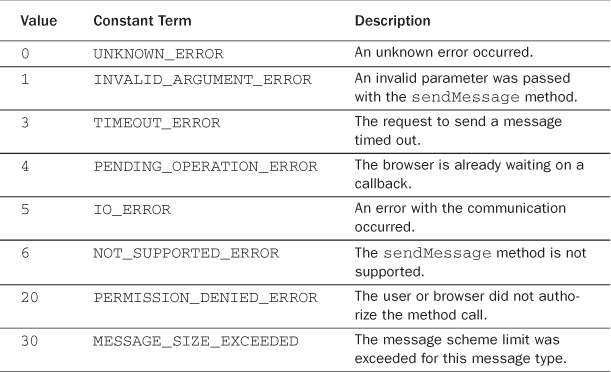
If an error callback function is added, which would be recommended because otherwise you would not know that a sendMessage failed, then an error object will be passed to the handler with an error code. Table 15.3 provides the list of possible error codes.
Table 15.3 The Messaging API Error Code Values
Even though the Messaging API is a short specification, the implications are extraordinary. Now client pages will be able to send text messages, videos, and pictures through MMS messages and email straight from the device’s browser.
It is expected that the sendMessage method will be implemented in browser agents to support the URI functionalities so that features such as multiple recipients will be enabled. If this is the case, then it would be easy to send a message to multiple SMS recipients by just separating the numbers with commas, as in “sms:+17705551212,+18025551212....”
Network Information API
Determining the connection speed of a browser is important to be able to throttle data and functionality for better user experiences. The Network Information API aims to expose a simple type attribute that will signify the type of connection that the device currently has. Based on this value, a page could change its behavior to fit the size and speed of the data pipe that is available. The value of the type of connection can be one of the following: unknown, ethernet, wifi, 2g, 3g, 4g, and none. A new interface is provided called Connection, which has one attribute associated with it: type. So, to retrieve the current connection type, you would use the following:
var connectionType = navigator.connection.type;
Knowing the type of connection, you can dynamically change style sheets between full and light versions or change the logic on the page to retrieve only partial results when on a slower connection.
In addition to the Connection interface, there are two new events: online and offline. These events are tied to the window object and can be used to check a change in the connection type if online is fired or handle the device if it goes offline.
Tip
An online event could be sent multiple times as a user changes connection types. Your code should be streamlined to minimize the functionality that is run on this event since the event could be repeatedly sent based on rapid connection type switching.
Battery Status Events
The Battery Status events allow you to capture events associated with the device’s battery state. In the Battery Status Event Specification, there are two status changes possible that will trigger an event. The first status change is triggered when the device is either plugged into a power source or unplugged from the power source. The second event signifies a change in the battery charge level by 1 percent or more. In either case, a battery status event will be dispatched. The event will then have attributes available: isPlugged, which is a boolean value, and level, which is a float and ranges from 0 to 100, with 100 meaning that the battery is fully charged. If the level is null, then the browser was not able to report the battery level.
To sign up for handling a battery status event, an onbatterystatus property and an event batterystatus are available. Either of the following examples is valid:
window.addEventListener('batterystatus', function (event) {
alert(event.level);
}
window.onbatterystatus = function (event) {
alert(event.level);
}
In either case, the level of the current battery will be alerted to the user. If you wanted to alert the user if the plugged-in status changed, then you could use event.isPlugged to retrieve the boolean value if the device is plugged in.
Note
If the browser is not able to determine the current battery level, between 0 and 100 inclusive, then a null value will be assigned to the level property.
HTML Media Capture
HTML Media Capture is designed to instruct browser agents to launch media capture tools based on new parameters and attributes to the file input element. By providing information on what types of information to accept for the file input and a recommendation of what to use to “capture” the input, the browser agent can launch the appropriate device capture mechanism. The capture could take the form of a video, audio, or picture because they are all forms of media that are typically available on devices with cameras and microphones such as smartphones, tablets, and laptops.
Normally, the file input element opens the file-browsing window to select an appropriate file to be submitted. HTML Media Capture uses the accept attribute of the file input to recommend a file picker that is appropriate, such as the camera for accepting an image. The following are the three different accept attribute values available:
• image/*: For accepting images from the camera or user’s gallery of images
• audio/*: For accepting audio input through recording via the device microphone
• video/*: For accepting video files recorded through the device camera and microphone
An additional attribute can be added to suggest what method the browser should use to capture the input. The capture attribute can take one of four values: camera, camcorder, microphone, or filesystem. The default value, if a capture attribute is not provided, is filesystem. So, a sample file input element for capturing audio from a microphone would be as follows:
<input type="file" accept="audio/*" capture="microphone">
Between the accept and capture attributes, you will be able to use the device microphone and camera in some interesting ways. Already there are groups working to implement streaming of full duplex audio/video calls between devices using HTML Media Capture and other HTML5 technologies such as WebSocket.
Intermediate Recipe: Capturing Pictures with File Input
In this recipe, you will use the accept and capture attributes on the file input element to have the browser launch the device’s built-in camera picture capture screen, have the user take the picture, and then return the picture to the page. With the picture file returned to the page, HTML Media Capture will take the file and load it into a new image element that is scaled as a thumbnail and added to the page. To create the code in Listing 15.2, follow these steps:
1. Create a blank HTML page with the file input element and thumbnails div.
2. Add the script tags to the page and the handleCapture function, which handles the file that is delivered via the onChange method of the file input.
At the time of writing, this example runs on devices with Android 3.0 and newer, which support HTML Media Capture. Thus, the screenshots for this recipe are from an Android tablet.
Listing 15.2 Capturing a Camera Image
<!DOCTYPE html>
<html>
<head>
<meta charset="UTF-8" />
<title>15.2 HTML Media Capture</title>
<script>
// Function to handle the HTML media capture of a file
function handleCapture(files) {
// Set the image matching pattern
var imageType = /image.*/;
// We expect only one picture at a time but loop through any files provided
for (var i = 0; i < files.length; i++) {
// Retrieve the file from those passed in
var file = files[i];
// Check if the file is an image type
if (file.type.match(imageType)) {
// Create our new image element
var newImg = document.createElement("img");
newImg.classList.add("obj");
newImg.file = file;
newImg.style.maxHeight = "100px";
newImg.style.maxWidth = "100px";
// Append the new image element to the thumbnails area
var thumbnails = document.getElementById('thumbnails'),
preview.appendChild(newImg);
// Load the image element with the contents of the file
var reader = new FileReader();
reader.onload = (function(aImg) {
return function(e) { aImg.src = e.target.result; };
})(newImg);
reader.readAsDataURL(file);
}
}
}
</script>
</head>
<body>
<h2>Media Capture - Camera</h2>
<input type="file" accept="image/*;capture=camera"
capture="camera"
onChange="handleCapture(this.files)"></input>
<div id="thumbnails"></div>
</body>
</html>
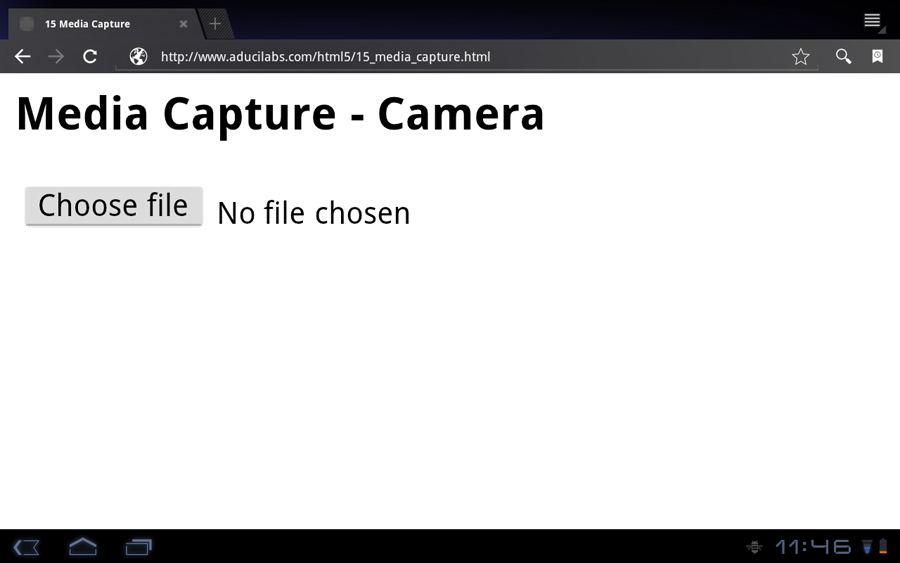
When the page is loaded in the browser, the normal “Choose file” prompt is provided, as shown in Figure 15.1.
Figure 15.1 Sample output from Listing 15.2 showing the page ready to capture an image
When the user clicks “Choose file,” the browser is told through the accept and capture attributes to launch the camera selector, which in this case launches the Android picture-taking screen, as shown in Figure 15.2.
Figure 15.2 The default camera screen is brought up by the device for capturing the image.

Once the picture is taken, a picture file is sent to the page, and the handleCapture function is called with the file passed as an argument. In the handleCapture function, you first check the file to verify that it is an image type and then create a new image element that you add to the page and load with the file. In Figure 15.3, the “Choose file” button has been clicked a couple times, and the resulting pictures that were taken have been added as thumbnails to the div for viewing.
Figure 15.3 After the image has been taken, the user is automatically returned to the web app, and the thumbnail is displayed.

Device Orientation and Motion Events
Device Orientation and Motion Events originally started as a specification in the Device API Working Group but was later moved into the Geolocation working group, so you will not see it in the current list of the Device API Working Group. We have left it as part of this chapter since it is specifically focused on integrating with the internal gyroscope of the device that the user may be using at the moment. Many phones, tablets, and even computers have this internal gyroscope built into the hardware, and browser agents such as Chrome have already implemented the events into their JavaScript engines.
The Device Orientation specification from the W3C organization specifies three new events, as listed here:
• deviceorientation: Provides orientation in an alpha, beta, gamma format showing the spatial positioning of the device
• compassneedscalibration: An event fired by the browser agent that states that the compass of the device is in need of calibration
• devicemotion: Provides acceleration, acceleration including gravity, rotation rate, and interval used for device movement
All three of the events in the device orientation are fired on the window object and are registered for as any normal event on the window object. The deviceorientation event provides through event data passed into your handler four attributes that can be read: alpha, beta, gamma, and absolute. The alpha, beta, and gamma properties correspond to orientation of the device such as the tilt or rotation of the device. The alpha property represents the rotation, while the beta and gamma correspond to the tilt left/right and front/back. For example, a laptop sitting on the desk would have a beta of 0 and a gamma of 0, while the alpha would have a value representing its orientation. For a laptop, the orientation is based on the keyboard, not on the screen, while the orientation of a mobile phone would be the phone itself. The absolute property signifies whether the browser is able to provide absolute values for the orientation angles. If the device is not able to set the value absolutely, then this value will be false. In most of our testing, this value was indeed false, although the beta and gamma angles were absolute, and the alpha was set to an arbitrary 0 when the page was executed.
The compassneedscalibration event is a straightforward event that notifies the window that the internal compass of the device is in need of calibration. The event, according to the specification, may be canceled by the website or application, and the default device calibration user interface could be replaced by a custom calibration provided by the web application. However, the details on this event are still to be determined.
The devicemotion event is a more complicated event because it contains attributes for the acceleration, rotation, and interval. The acceleration attribute is an instance of a new interface, DeviceAcceleration, which provides the acceleration attributes x, y, z in a double data type format to show the X, Y, Z directional acceleration. The rotation rate is also an interface instance, but of DeviceRotationRate, which provides the rotation in the format of alpha, beta, gamma. All attributes of the devicemotion event appear as optional attributes in the specification. Table 15.4 shows the attributes of the devicemotion event in more detail.
Table 15.4 The devicemotion Event Attribute Values

Intermediate Recipe: Creating a Bubble Level
If you have had the opportunity to play in the mobile device programming area, you will most likely have seen a bubble level sample native app that is available on most mobile platforms to show the orientation of the device. The deviceorientation event can be used to provide the same type of functionality in client-side JavaScript by looking at the beta and gamma event fields. (You do not need the alpha field since the bubble level does not use the rotation of a device.) In this recipe, you will create a rudimentary bubble level using layered canvas elements to build up a composite bubble level and display the beta and gamma values, as shown in Figure 15.4.
Figure 15.4 Sample output showing the bubble level canvas layers and beta/gamma values on a laptop while being tilted

You could improve the algorithms for positioning to add features such as bounding the bubble to the circle, but this recipe will show the basics of handling device orientation data. To create this bubble level, use Listing 15.3 and perform the following steps:
1. Create a blank HTML page with the three canvas elements that comprise the bubble level and add the spans for displaying the beta and gamma values.
2. Add the style section for styling the canvas elements.
3. Add the init function, which includes the definition of the deviceorientation event handler in the script tags.
4. Add the launching of the init function when the page loads with the window.addEventListener.
Note
This recipe requires that your browser support the canvas element and that the device you launch this page on has an internal gyroscope for providing the beta and gamma values.
Listing 15.3 Creating a Bubble Level with Beta and Gamma Values
<!DOCTYPE html>
<html>
<head>
<meta charset="UTF-8" />
<title>15.3 Bubble Level</title>
<style>
#canvas {
height:100px;
width:100px;
}
</style>
<script>
// canvas and context reference variables for drawing
var cvsBackground;
var ctxBackground;
var cvsBubble;
var ctxBubble;
var cvsCircle;
var ctxCircle;
// Variable holders for the beta and gamma values
var tempBeta = 0;
var tempGamma = 0;
// The canvas location and center variables
var canvasX;
var canvasY;
var canvasXCenter;
var canvasYCenter;
// Initialize the canvas object references and orientation event handler
function init() {
// Grab references to the canvas objects and their contexts
cvsBackground = document.getElementById('background'),
ctxBackground = cvsBackground.getContext('2d'),
cvsBubble = document.getElementById('bubble'),
ctxBubble = cvsBubble.getContext('2d'),
cvsCircle = document.getElementById('circle'),
ctxCircle = cvsCircle.getContext('2d'),
// Set the canvas coordinates and center coordinates
canvasX = parseInt(cvsBackground.offsetLeft);
canvasY = parseInt(cvsBackground.offsetTop);
canvasXCenter = parseInt(cvsBackground.width/2);
canvasYCenter = parseInt(cvsBackground.height/2);
// Draw the bubble level background
ctxBackground.fillStyle='#0c0';
ctxBackground.beginPath();
ctxBackground.arc(canvasXCenter,canvasYCenter,50,0,Math.PI*2,true);
ctxBackground.closePath();
ctxBackground.fill();
// Draw the bubble
ctxBubble.fillStyle='#0FF';
ctxBubble.beginPath();
ctxBubble.arc(canvasXCenter,canvasYCenter,10,0,Math.PI*2,true);
ctxBubble.closePath();
ctxBubble.fill();
// Draw the center circle to designate level
ctxCircle.strokeStyle='#fff';
ctxCircle.lineWidth='5';
ctxCircle.beginPath();
ctxCircle.arc(canvasXCenter,canvasYCenter,20,0,Math.PI*2,true);
ctxCircle.closePath();
ctxCircle.stroke();
// Add the listener for deviceorientation events
window.addEventListener('deviceorientation', function(event) {
// Check if the beta or gamma have changed
if (parseInt(event.beta)!=tempBeta||parseInt(event.gamma)!=tempGamma) {
// Set our beta and gamma variables
tempBeta = parseInt(event.beta);
tempGamma = parseInt(event.gamma);
// Set the adjustment variables
var adjX = 0;
var adjY = 0;
var adjFactor = 3; // Scaling factor for bubble movement
var adjMax = 40; // Maximum adjustment for bubble
// Determine the new position of the bubble
if (tempBeta*adjFactor > adjMax) {
adjY = -adjMax;
} else if (tempBeta*adjFactor < -adjMax) {
adjY = adjMax;
} else {
adjY = tempBeta*adjFactor * -1;
}
if (tempGamma*adjFactor > adjMax) {
adjX = -adjMax;
} else if (tempGamma*adjFactor < -adjMax) {
adjX = adjMax;
} else {
adjX = tempGamma*adjFactor * -1;
}
// Move the bubble to the new position
cvsBubble.style.left = canvasX+adjX+'px';
cvsBubble.style.top = canvasY+adjY+'px';
// Set our span values for displaying the beta and gamma
var spanBeta = document.getElementById('betaValue'),
var spanGamma = document.getElementById('gammaValue'),
spanBeta.innerHTML = tempBeta;
spanGamma.innerHTML = tempGamma;
}
}, true);
}
// call the init function on page load
window.addEventListener('load',init,false);
</script>
</head>
<body>
<h1>Chapter 15 Bubble Level</h1>
<!-- The canvas elements are layered as defined below -->
<canvas id="background" style="position:absolute; left:100px; top:150px;">
The bubble level background.
</canvas>
<canvas id="bubble" style="position:absolute; left:100px; top:150px;">
The bubble which moves to show the level.
</canvas>
<canvas id="circle" style="position:absolute; left:100px; top:150px;">
The overlaid circles to show the center of the level.
</canvas>
<br>
Beta Value: <span id="betaValue"></span><br>
Gamma Value: <span id="gammaValue"></span>
</body>
</html>
When the page loads in your browser and the init function is called, the script will first create the various components of the bubble level. The bubble level is comprised of three canvas elements: the background, the bubble, and the foreground center ring. The purpose of having the bubble level split into these three components is twofold. First, this allows for a layering to take place with the bubble above the background but below the center ring to look like a real bubble level. Second, this allows you to programmatically move the bubble without having to redraw the elements with each movement.
After drawing the bubble level components, the script sets the event handler for the deviceorientation event. The function for the event handler is designed to first check whether there has been any change in the beta and gamma values and then set the temporary holding variables to the new values if there is a change. Next, the function sets some position adjustment variables, which are used in the calculations for positioning the bubble canvas. The adjFactor variable is used to “accelerate” the movement away from the center the farther the bubble gets, while the adjMax variable is the maximum distance the bubble can be moved. After calculating the new top and left coordinates of the bubble canvas, you move the canvas and display the updated beta and gamma angles. Notice that when dealing with the beta and gamma angles, you use just the integer portion of the double value provided with the event. In our testing, the angles provided are extremely granular, so to prevent moving the canvas on the minutest change of the angle; we opt to move the canvas only when a whole degree of change has occurred.
Summary
In this chapter, you learned about some of the new and upcoming APIs and event specifications that are being created to provide access to all types of device information and features. It is only a matter of time before these specifications are complete, published, and available for use in the various browser platforms. web applications in the end will have many of the integrations that native device applications provide. There are still several specifications to be completed around the device APIs, but the efforts show how HTML5 continues to grow in its functionality.