

Planning and deployment of BLU Acceleration shadow tables for mixed workload environments
In this chapter, we introduce the DB2 shadow table feature that consolidates DB2 online transaction processing (OLTP) with BLU-accelerated online analytic processing (OLAP) optimizations into a single Online Transactional Analytical Processing (OLTAP) database.
The following topics are covered:
3.1 Overview
DB2 with BLU Acceleration introduces a new innovative feature that allows businesses to further simplify their IT landscape. Businesses can now perform complex analytic processing within their OLTP environments. Shadow tables exploit the revolutionary performance of DB2 with BLU Acceleration technologies to make analytic processing faster, simpler, and easier for OLTP systems.
3.1.1 Data environments with mixed workloads
Traditionally, businesses have relied on both OLTP and OLAP systems to meet their business requirements. OLTP systems process simple, ongoing transactions such as, creating and processing orders and the processing of data in real-time. OLAP systems are used for more complex processing of aggregated and multi-dimensional data from multiple sources to support business intelligence. Each system works independently to provide a key part of the overall data processing needs.
There is a growing need to combine the processing of daily transactions with continuous or on-demand analytics, to improve decision making in key business areas. These environments require a convergence of OLTP and OLAP workloads into a new hybrid system that processes both. OLTAP systems have the ability to run complex analytic queries on real-time transactional data. By bringing together the processing of day-to-day transactions and complex analytics, OLTAP systems reduce the complexity of processing mixed workloads, making the system more agile with minimal trade-off.
Figure 3-1 on page 55 shows how DB2 handles different type of workloads. For purely transactional processing, DB2 pureScale is optimized to provide continuous availability and exceptional scalability. When working with data warehouses, data mining, or other OLAP queries, the DB2 Database Partitioning Feature (DPF) provides the performance boost to query processing, roll-in and roll-out of large data sets. The ground-breaking in-memory, column-organized processing in DB2 with BLU Acceleration further enhances the processing of analytic workloads. Now, DB2 introduces a new feature to truly transform how mixed workloads are handled. Systems that require analytic reporting in a predominantly OLTP environment, can now benefit from columnar processing technologies for their row-organized data.

Figure 3-1 Workloads and DB2
Before shadow tables, mixed workloads within predominantly OLTP systems used multiple indices to allow for OLAP workloads to be run alongside OLTP workloads. The new shadow table feature introduced with DB2 Cancun Release 10.5.0.4 uses BLU Acceleration to eliminate the overhead that is involved in the traditional handling of mixed workloads.
3.1.2 DB2 with BLU Acceleration and shadow tables
DB2 with BLU Acceleration technologies allow mixed workloads to be processed faster by combining traditional row-organized with column-organized tables in the same database. Hybrid workloads demand high transactional rates (OLTP) while also reporting on the same data using more complex queries (OLAP). DB2 offers the ability to use an OLTP and OLAP optimized query execution environment at the same time using the BLU Acceleration technologies.
By allowing table data to be stored as both row and column-organized tables, the DB2 optimizer is able to choose the best suitable execution environment for different queries that access the same table data. This new feature illustrated in Figure 3-2 is called shadow tables. Shadow tables allow an existing source table organized by row to be “shadowed” by a column-organized table. The shadow table is maintained by replication from the source table. Being column-organized, it builds the foundation to be used with the column data engine that is part of the BLU Acceleration technologies. With the use of shadow tables, OLTP queries, continue to rely on row-organized tables, while OLAP queries have the advantage of being transparently re-routed to the column-organized “shadows”.

Figure 3-2 Shadow tables overview
From a usage perspective, these database changes are transparent to the application. Applications would continue to formally query the same row-organized table while not requiring any changes to their SQL statement text. When a query is submitted to the database engine, the DB2 optimizer chooses which execution environment to use based on the nature of the query, the estimated cost and the user-defined latency limits of the replication. When suitable, it will transparently reroute (and rewrite) the query to run against the shadow table, so it can use BLU Acceleration to heavily parallelize the execution. The end result is that queries, either OLAP or OLTP in nature, can always be run using an optimal execution environment within a single database.
Shadow table definitions include either all columns or just a subset of columns of their source tables. Replication from the source to the shadow tables is maintained through InfoSphere Data Replication Change Data Capture (InfoSphere CDC) Version 10.2.1 as shown in Figure 3-3. InfoSphere CDC captures changes to source tables by reading the database’s transaction log stream. It then applies the changes asynchronously to the shadow table and if configured to do so, can feed latency information back to DB2. The DB2 optimizer can then utilize a user set time limit to base the routing decision on how current the data in the shadow tables is.

Figure 3-3 Latency based routing and InfoSphere CDC Replication
Figure 3-4 shows DB2 and the InfoSphere CDC components in more detail. This replication solution uses a single InfoSphere CDC instance and Datastore for the source and target side. The InfoSphere CDC Replication Engine for DB2 for Linux, UNIX, and Windows (DB2 for LUW) performs the database transaction log reads to capture changes on the source table and to apply them to the target table. The InfoSphere CDC Access Server maintains the access control metadata used by the Replication Engine, that is, database connection details, and InfoSphere CDC-specific user accounts used to secure the management access.
Replication can be managed through a command-line based tool CHCCLP that is part of the InfoSphere CDC Access Server or through a graphical front-end called the InfoSphere CDC Management Console. By using these tools tables can be subscribed for replication according to table mappings that define the source and target table associations.
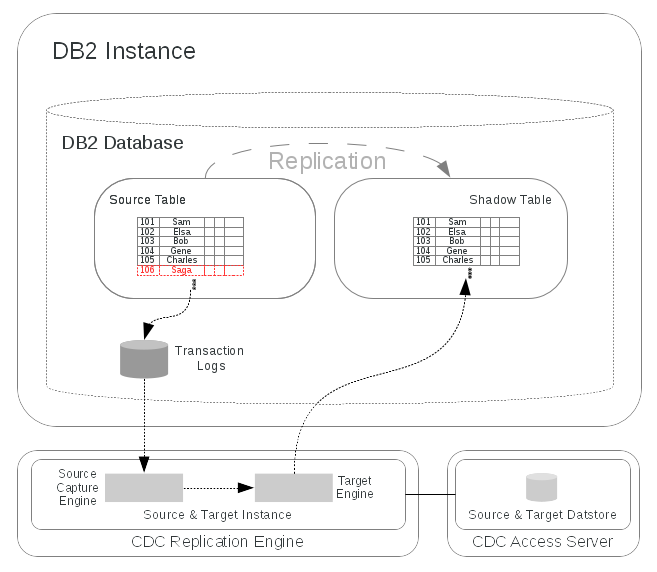
Figure 3-4 DB2 and InfoSphere CDC Components
3.2 Prerequisites
To use shadow tables in your environment, you must install and configure InfoSphere CDC Replication Engine, InfoSphere CDC Access Server to work with DB2 with BLU Acceleration. This section covers the necessary requirements for installation and information about the tasks that must be completed before using InfoSphere CDC for maintaining shadow tables. The user must complete all of the tasks before installing and configuring InfoSphere CDC.
The components for the replication solution can be installed in the same host or separate hosts. The topology suggested comprises these elements:
•The InfoSphere CDC Replication Engine and InfoSphere CDC Access Server installed on the same server as the DB2 instance.
•The InfoSphere CDC Management Console, a graphical replication management tool, installed on a dedicated Windows server or workstation.
3.2.1 Supported versions, platforms, and system requirements
The following list provides information about the supported platforms and software versions for the shadow tables feature:
•IBM DB2 for Linux, UNIX, and Windows (DB2 for LUW) Cancun Release 10.5.0.4
– Supported platforms are listed in 2.4.1, “DB2 system requirements” on page 20.
•IBM InfoSphere Data Replication V10.2.1
– Change Data Capture for DB2 for LUW with Interim Fix 12 or later releases
– InfoSphere CDC Access Server V10.2.1 Interim Fix 5 and later releases
– (Optional) InfoSphere CDC Management Console (Interim Fix 5 and later releases)
For system requirements for InfoSphere Data Replication V10.2.1, go to the following web address:
3.2.2 User accounts and groups
Before installation, the user accounts listed in Table 3-1 are to be created. A separate operating system user is to be defined for the DB2 instance and the InfoSphere CDC installations.
Table 3-1 User accounts and groups
|
Users
|
Description
|
Primary group
(example)
|
Secondary groups (example)
|
|
db2inst1
|
DB2 instance owner created during a DB2 instance creation.
|
Default SYSADM group (that is, the default db2iadm1)
|
-
|
|
cdcuser
|
InfoSphere CDC user that installs, runs and configures the InfoSphere CDC for DB2 LUW Replication Engine and the CDC Access Server.
This user must have access to the local database directory for the DB2 instance relevant for replication, for example, db2-instance-dir/db2-instance/
NODE0000/sqldbdir. To access DB2, this user requires to be authorized with DATAACCESS and either SYSADM or DBADM.
|
cdc-user-group
|
-
|
3.2.3 Paths, storage space requirements, and permissions
Table 3-2 shows the suggested installation paths and space requirements for the shadow table feature.
Table 3-2 Path, storage space, and permissions requirements
|
Description
|
Path Examples
|
Minimum Space Requirements
|
Permissions
|
|
Total space requirements for temporary installation files
|
3.5 GB
|
|
|
|
DB2 Product Install Files (compressed + extracted)
|
|
3 GB
|
Read/Write to all users
|
|
InfoSphere CDC Access Server (compressed + extracted)
|
|
370 MB
|
|
|
InfoSphere CDC Replication Engine (compressed + extracted)
|
|
370 MB
|
|
|
|
/tmp
|
2 GB
|
DEFAULTS
|
|
|
/var
|
512 MB
|
DEFAULTS
|
|
DB2 for LUW
|
|||
|
DB2 Product Installation
|
/opt/ibm/db2/v10.5
|
1.2 GB
|
DEFAULTS
|
|
DB2 Instance
|
/home/db2inst1
|
50 MB
|
DEFAULTS
|
|
DB2 Database path
|
/db2/db2instl1_db1
|
variable1
|
Read/Write to DB2 SYSADM and readable to the cdc user
|
|
InfoSphere Change Data Capture
|
|||
|
InfoSphere CDC Replication Engine Installation
|
/home/cdc/opt/ReplicationEngineforIBMDB2
|
260 MB
|
DEFAULTS
|
|
InfoSphere CDC Access Server Installation
|
/home/cdc/opt/AccessServer
|
360 MB
|
DEFAULTS
|
|
InfoSphere CDC Refresh Loader Path
|
For better I/O
performance, specify a path on a separate file system.
|
variablea
|
Read/Write for DB2 instance owner and cdc user
|
3.2.4 Selecting candidates for shadow tables
You can use the Optim Query Workload Tuner, discussed in Chapter 4, “Optim Query Workload Tuner and BLU Acceleration” on page 137, to analyze existing queries and tables to determine which source tables would benefit from the shadow table feature.
3.3 Deployment
This section covers the installation and configuration process for setting up and using IBM InfoSphere CDC to maintain and administer shadow tables. We assume that all prerequisites have been met and that necessary user accounts and file paths are created as indicated in 3.2, “Prerequisites” on page 59.
3.3.1 Roadmap
The tasks involved in setting up and administering your shadow tables are outlined in the following list:
1. Install DB2 for LUW Cancun Release 10.5.04 as root user.
2. Create a DB2 instance.
3. Create and configure a database with the required parameters from Table 3-3 on page 65.
4. Install and configure InfoSphere CDC.
a. Install InfoSphere CDC Access Server Version 10.2.1 with Interim Fix 5 or later.
b. Install InfoSphere CDC for DB2 for LUW Version 10.2.1 with Interim Fix 12.
c. (Optional) Install the InfoSphere CDC Management Console Version 10.2.1 with Interim Fix 5 or later.
d. Create the InfoSphere CDC for DB2 LUW Replication Engine instance.
e. Configure a data store.
5. Create shadow tables.
6. Configure and begin replication to shadow tables.
a. Create an InfoSphere CDC subscription and table mappings.
b. Start the InfoSphere CDC subscription and replicate data to a shadow table.
7. Enable query routing to shadow tables.
a. Enable query routing within a DB2 command line processor (CLP) session.
b. Enable query routing at the application level or using connect procedure.
8. Perform administration tasks.
a. Monitor your InfoSphere CDC subscription.
b. Tune the performance of your database system.
3.3.2 Installation
This section identifies the basic DB2 and InfoSphere CDC product installation documentation for the InfoSphere CDC for DB2 LUW (Replication Engine) and the InfoSphere CDC Access Server. It only describes the configuration. Make sure to use the versions shown in 3.2.1, “Supported versions, platforms, and system requirements” on page 59.
After the basic InfoSphere CDC product installation is complete, you can use Table 3-4 on page 68 as an overview of the most important configuration parameters, their descriptions, and suggested value examples. It is suggested to leave all other values at defaults.
As shown in 3.2, “Prerequisites” on page 59, it is suggested to install and run the InfoSphere CDC for DB2 LUW (Replication Engine) and the InfoSphere CDC Access Server on the same host, sharing the same user for both installations. Suggestions for installation paths with required minimum permissions and space requirements can be taken from Table 3-2 on page 60.
DB2 for LUW
For details about how to install DB2 Cancun Release 10.5.0.4, see the IBM Knowledge Center at the following web addresses:
InfoSphere CDC Access Server
Refer to the following documentation to learn how to install the InfoSphere CDC Access Server Version 10.2.1 Interim Fix 5 or later:
After installed the Access Server, process must be started using the dmaccessserver command. Its documentation can be found at this web address:
On UNIX and Linux environments, start the Access Server as background process and independent of the terminal as shown in Example 3-1 on page 63.
Example 3-1 Starting the InfoSphere CDC Access Server on UNIX and Linux
# Run these system commands as CDC user, that is, cdcuser
cd [...]InfoSphereChangeDataCapture/AccessServer/bin/
nohup ./dmaccessserver &
InfoSphere CDC Replication Engine
The InfoSphere CDC product installation procedures for the InfoSphere CDC Replication Engine for DB2 LUW are explained in the official InfoSphere CDC documentation, found at the following web address:
Ensure that the InfoSphere CDC for DB2 LUW base version 10.2.1 is installed prior to installing the Interim Fix 12 or later.
|
Note: When installation is complete, do not start the InfoSphere CDC configuration tool.
|
InfoSphere CDC Management Console
The InfoSphere CDC instance can be managed using the command-line interface CHCCLP directly from the InfoSphere CDC Access Server. Alternatively, there is the option to use the graphical InfoSphere CDC Management Console on the Windows platform. To install the Management Console, consult the installation documentation, found at the following web address:
Database and InfoSphere CDC Instance
There is a single DB2 instance to CDC instance setup used for shadow tables. The shadow table feature is designed to operate within a single database and replicate data using a single InfoSphere CDC instance for all shadow tables within this database. Before configuring the InfoSphere CDC instance, the database must be configured to enable it for shadow tables. This is detailed in 3.3.3, “Database and database manager configuration for shadow tables” on page 64.
3.3.3 Database and database manager configuration for shadow tables
In a DB2 database that uses shadow tables, the database is configured assuming that the predominant workload is OLTP in nature with changes made to optimize it for shadow tables. Before the creation of shadow tables, you must ensure that the database is configured for their use.
Some of the prerequisite configuration parameters and registry variables that must be in effect are listed in Table 3-3. See 3.4.2, “DB2 configuration parameters” on page 79 for more details.
Table 3-3 Summary of required DB2 configuration parameters
|
Attribute
|
Value
|
Description
|
|
Code set
|
UTF-8
|
Support codepage and collating sequence for databases with column-organized tables.
|
|
Collating Sequence
|
IDENTITY
IDENTITY_16BIT
|
|
|
DB2_WORKLOAD
|
NOT set to ANALYTICS
|
In an OLTAP environment with shadow tables, a predominant workload is still assumed to be OLTP.
|
|
“Intra-Partition Parallelism”
|
Application level
|
Enabling intra-partition parallelism on the application level is a preferred method for shadow table environments.
|
|
sortheap
|
Fixed value only
|
Column-organized data processing requires large values for sortheap and sheapthres_shr
(set to some fraction of database_memory). |
|
sheapthres_shr
|
||
|
instance_memory
|
AUTOMATIC
|
Size the memory allocation of the DB2 instance to about 75-95% of the main memory available to the operating system.
|
|
util_heap_sz
|
AUTOMATIC with high base value
|
Large value to support the LOAD command.
|
|
logarchmeth1
|
LOGRETAIN or other archiving method
|
Primary log archive method is required for InfoSphere CDC replication.
|
|
pagesize
|
32K
|
Retain default page size for database, and set table space level page size to 32K for table space containing column-organized tables
|
|
Note: Sizing guidelines for memory parameters are mentioned in 3.4.2, “DB2 configuration parameters” on page 79.
|
As discussed in Table 3-3 on page 65, the values for memory parameters must be larger than those that are typically used in OLTP configurations. The mixed OLTAP environment must be tailored for both row-organized and column-organized data. Although a larger sheapthres_shr value is expected for any system that uses column-organized tables, a larger sortheap value could potentially cause access plan changes for existing OLTP queries. If you want to avoid such changes, you can override the sortheap value by specifying the OPT_SORTHEAP_EXCEPT_COL token and a value for the DB2_EXTENDED_OPTIMIZATION registry variable (Example 3-2). This override value only affects compiler query optimization for generating plans that do not reference any column-organized table and will not dictate the amount of actual memory that is available at run time.
Example 3-2 Set sortheap value for row-organized tables only
# Run this DB2 system command as DB2 instance user
db2set DB2_EXTENDED_OPTIMIZATION="OPT_SORTHEAP_EXCEPT_COL 10000"
|
Note: Before setting appropriate values for the util_heap_sz, sheapthres_shr, and sortheap database configuration parameters, record the original values in case you want to revert back to them later.
|
3.3.4 Shadow table creation
To create a shadow table, the source table candidate must be selected. The process of selecting an appropriate source table is discussed in Chapter 4, “Optim Query Workload Tuner and BLU Acceleration” on page 137.
When creating a shadow table, the source table can be replicated entirely to its column-organized counterpart or you can choose to only replicate a subset of columns that are relevant to your query workload. Example 3-3 on page 66 shows the DDL for a row-organized table named ROWT on which a shadow table is created.
|
Note: The source table must have a primary key constraint or unique constraint whose column set must be included in the select list for the shadow table.
|
Example 3-3 DDL of source (row-organized) table
-- Execute this SQL statement from DB2 CLP or Data Studio as DB2 user
create table rowt(
c1 integer not null,
c2 integer,
data char(254)
) organize by row;
alter table rowt
add constraint rowt_pk primary key(c1);
To create a shadow table, issue the CREATE TABLE statement with the MAINTAINED BY REPLICATION clause. This clause identifies the table as a shadow table. Example 3-4 shows the CREATE TABLE statement.
Example 3-4 Creating table
-- Execute this SQL statement from DB2 CLP or Data Studio as DB2 user
create table rowt_shadow as
(select * from rowt)
data initially deferred
refresh deferred
enable query optimization
maintained by replication
organize by column
Upon creation, the new shadow table is in the set integrity pending state. Issue the SET INTEGRITY statement, specifying the IMMEDIATE UNCHECKED clause, to bring the shadow table out of the pending state, as shown in Example 3-5.
Example 3-5 Bring shadow table out of pending state
-- Execute this SQL statement from DB2 CLP or Data Studio as DB2 user
set integrity for rowt_shadow
all immediate unchecked
A primary key that matches the enforced primary or unique constraint on the source table (in both column list and key sequence) is required on the newly created shadow table. A one-to-one mapping is required for each row in both tables. Issue the ALTER TABLE statement to define a primary key on the shadow table, as shown in Example 3-6 on page 67.
Example 3-6 Add primary key constraint on shadow table
-- Execute this SQL statement from DB2 CLP or Data Studio
alter table rowt_shadow
add constraint rowt_shadow_pk primary key (c1);
3.3.5 Replication setup
All changes made on the source tables can be replicated to shadow tables through the use of the InfoSphere Change Data Capture product. InfoSphere CDC uses the InfoSphere CDC for DB2 for LUW Replication Engine component to capture changes made to the tables in the source database and to apply them to the tables in the target database. In this solution, the source and target database are one-and-the-same.
The additional InfoSphere CDC Access Server component stores and manages the datastore, which holds metadata representing the connection details that are needed by the InfoSphere CDC Replication Engine to connect to the actual database. The InfoSphere CDC Access Server also manages InfoSphere CDC-specific credentials used to authenticate users that manage the InfoSphere CDC replication through either the graphical InfoSphere CDC Management Console or the command-line driven CHCCLP utility that is built into the Access Server.
After the InfoSphere CDC Access Server (AS) and the InfoSphere CDC Replication Engine (RE) components are installed, you can use the RE command dmconfigurets to add and start a new instance of the InfoSphere CDC Replication Engine and configure the parameters from Table 3-4. The command is in the following directory:
[...]/InfoSphereChangeDataCapture/ReplicationEngineforIBMDB2/bin/
For information about how to invoke this command, see the InfoSphere CDC documentation at the following web address:
Table 3-4 Examples of most relevant InfoSphere CDC instance configuration parameters
|
Parameter
|
Example
|
Description
|
|
Name
|
cdcinst1
|
This is a name of the instance you want to create.
|
|
Staging Store Disk Quota (GB)
|
variable
|
Staging storage on the source.
|
|
DB2 instance
|
db2inst1
|
Contains the database with the tables that are to be replicated.
|
|
Database Name
|
oltpdb
|
This is the name of the database that you want to replicate data to or from and contains all of the tables for replication.
|
|
Username
|
db2inst1
|
This is a user name for the specified database; use the same user name that you used while adding an Access Server connection.
|
|
Password
|
<password to db2inst1>
|
This is a password for the user specified in Username.
|
|
Metadata schema
|
db2inst1
|
This is a schema name used by the InfoSphere CDC for DB2 for metadata table; typically the same as the Username.
|
|
Refresh loader path
|
/db2/db2inst1_db1/cdc_refresh_loader
|
The path “cdc_refresh_loader” is used later for a staging location for table refreshes with InfoSphere CDC data replication.
|
As the next step, configure the newly created instance with the following InfoSphere CDC instance parameters. The settings shown in Example 3-7 are explained in 3.4.3, “InfoSphere CDC instance configuration parameters” on page 85. The command dmset is used to set these parameters. The documentation for this command can be found at the following web address:
Example 3-7 Setting InfoSphere CDC instance parameters
# Execute these system commands as CDC user, that is, cdcuser
cd [...]/InfoSphereChangeDataCapture/ReplicationEngineforIBMDB2/bin/
./dmset -I cdcinst1 acceptable_latency_in_seconds_for_column_organized_tables=5
./dmset -I cdcinst1 maintain_replication_mqt_latency_table=true
./dmset -I mirror_auto_restart_interval_minutes=2
After configuring, start the CDC instance by using the dmts64 command. On UNIX and Linux platforms, we suggest to use the nohup command to have this process continue running in the background without a terminal attachment. For more details about these two commands, see the following web addresses:
or
Example 3-8 shows how to start the instance with the dmts64 command.
Example 3-8 Starting the CDC instance
# Execute these system commands as CDC user, that is, cdcuser
cd [...]/InfoSphereChangeDataCapture/ReplicationEngineforIBMDB2/bin/
nohup ./dmts64 -I cdcinst1 &
The suggested configuration used in Example 3-7 on page 69 implies the use of the latency based routing algorithm that is part of the Shadow Table feature.
This configuration parameter instructs InfoSphere CDC to propagate the replication’s latency details to DB2 by writing it to a database table, SYSTOOLS.REPL_MQT_LATENCY, which must be created manually. The DB2 Optimizer uses this information to decide when data in the shadow table is current enough to reroute queries from the source to the shadow table. Example 3-9 shows how to create this table in a custom table space “TBSP4K” using a SQL statement to DB2 system stored procedure call.
This configuration parameter instructs InfoSphere CDC to propagate the replication’s latency details to DB2 by writing it to a database table, SYSTOOLS.REPL_MQT_LATENCY, which must be created manually. The DB2 Optimizer uses this information to decide when data in the shadow table is current enough to reroute queries from the source to the shadow table. Example 3-9 shows how to create this table in a custom table space “TBSP4K” using a SQL statement to DB2 system stored procedure call.
Example 3-9 Creating the SYSTOOLS.REPL_MQT_LATENCY table
-- Execute this SQL statement from DB2 CLP or Data Studio
CALL SYSPROC.SYSINSTALLOBJECTS('REPL_MQT', 'C', 'TBSP4K', CAST (NULL AS VARCHAR(128))) ;
|
Note: Specify the same table space that contains the InfoSphere CDC TS_BOOKMARK table so that these tables can be backed up, restored, and rolled forward together.
|
Within the InfoSphere CDC Access Server, you must create a single datastore that identifies the replication engine to the Access Server. You can then create an Access Server admin ID and configure a datastore connection which grants access for the datastore, previously created, to this admin ID. The Access Server admin ID controls who can replicate what data. Table 3-5 lists the suggested parameters.
Table 3-5 Access Server parameters
|
Parameter
|
Example value
|
Description
|
|
Admin user creation using the dmcreateuser command
|
||
|
Username
|
admin
|
Name of the user
|
|
Fullname
|
N/A
|
Full name for the user
|
|
Description
|
N/A
|
Description for the user
|
|
Password
|
<See Note below>
|
Password for the user
|
|
Role
|
sysadmin
|
One of SYSADMIN, ADMIN, OPERATOR or MONITOR (case insensitive)
|
|
Manage
|
true
|
User has access manager privileges (TRUE/FALSE, case insensitive)
|
|
ChangePassword
|
false
|
Password must be changed on first login (TRUE/FALSE, case insensitive)
|
|
PasswordNeverExpires
|
false
|
Password never expires (TRUE/FALSE, case insensitive)
|
|
Datastore creation using the dmcreatedatastore command
|
||
|
DatastoreName
|
ds1
|
Name of the datastore
|
|
Description
|
db2inst1 OLTPDB Shadow Tables
|
Description for the user
|
|
Hostname
|
<Hostname or IP Address of the database server>
|
Host name of the datastore
Example uses “prod01” |
|
Port
|
10901
|
Port of the datastore
|
|
Connection mapping using the dmaddconnection command
|
||
|
DatastoreName
|
ds1
|
Name of the datastore
|
|
UserName
|
db2inst1
|
Name of the user
|
|
Database
|
OLTPDB
|
Database name
|
|
DatabaseOwner
|
db2inst1
|
Database owner name
|
|
DatabasePassword
|
<See Note below>
|
Database password
|
|
alwaysPrompt
|
false
|
Always prompts with the connection dialog at login (TRUE/FALSE, case insensitive)
|
|
showParams
|
true
|
Displays the connection parameters in the connection dialog (TRUE/FALSE, case insensitive)
|
|
writeProtected
|
false
|
Makes the connection parameters write protected (TRUE/FALSE, case insensitive)
|
|
saveParams
|
true
|
Saves the connection parameters input in the connection dialog (TRUE/FALSE, case insensitive)
|
|
Note: Ensure the password is at least six characters long and contains at least two alphabetic characters and at least two non-alphabetic characters to avoid an error later when trying to connect to the Access Server.
|
Run the commands in Example 3-10 to create an admin ID using the parameter values suggested in Table 3-5 on page 70. The commands are accessible from the bin subfolder of your InfoSphere CDC Access Server installation.
Example 3-10 Configuring Access Server
# Execute these system commands as CDC user, that is, cdcuser
cd [...]InfoSphereChangeDataCapture/AccessServer/bin/
dmcreateuser admin "N/A" "N/A" p@ssw0rd sysadmin true false false
dmcreatedatastore ds1 "db2inst1 OLTPDB Shadow Tables" prod01 10901
dmaddconnection admin ds1 oltpdb db2inst1 pa$$w0rds false true false true
3.3.6 Subscriptions and table mappings
InfoSphere CDC uses subscriptions to logically group source and target table mappings. With the shadow tables feature, all table mappings must be placed in a single subscription. Subscriptions can be created using the graphical Management Console or interactively and non-interactively using the command-line driven CHCCLP utility.
Example 3-11 on page 73 shows the interactive use of the CHCCLP utility to create a subscription “sub1” in our previously created datastore “ds1”. In the example, we also marked the new subscription as persistent.
Persistent subscriptions are automatically restarted when the replication engine is restarted after shut down or after the subscription has ended with a recoverable error.
Example 3-11 Creating a InfoSphere CDC subscription
# Execute these system commands as CDC user, that is, as cdcuser
cd [...]InfoSphereChangeDataCapture/AccessServer/bin/
./chcclp
set verbose;
connect server hostname prod01 port 10101 username admin password p@ssw0rd;
connect datastore name ds1;
add subscription name sub1 persistency true;
disconnect datastore name ds1;
disconnect server;
exit;
|
Note: Make sure to only create one synchronization point by creating a single subscription for all shadow tables in the same database.
|
For each source and target (shadow) table mapping, you can use the command in Example 3-12 to map the source table to the shadow table.
Example 3-12 Creating a InfoSphere CDC Table Mapping
# Execute these system commands as CDC user, that is cdcuser
cd [...]InfoSphereChangeDataCapture/AccessServer/bin/
./chcclp
set verbose;
connect server hostname prod01 port 10101 username admin password p@ssw0rd;
connect datastore name ds1;
select subscription name sub1;
add table mapping sourceSchema BASE sourceTable ROWT targetSchema BASE targetTable ROWT_SHADOW targetIndexMode index targetIndexName BASE.ROWT_SHADOW_PK type standard method mirror;
start mirroring method continuous;
disconnect datastore name ds1;
disconnect server;
exit;
3.3.7 InfoSphere CDC event notification setup
As an operational preferred practice, we suggest to set up event notifications as part of the shadow table deployment to monitor replication on an on-ongoing basis. It is imperative to have any communication regarding interruptions in replication to be passed on to the database administrator as there are no CDC warnings or messages to be expected in DB2 diagnostic logs. In the event that replication is disrupted, queries continue to run against the source table, but might not route to shadow tables. This can occur when the last replication update applied to the shadow table is older than the user-defined latency as described in “Query routing to shadow tables” on page 81, causing queries to run against source tables without using BLU Acceleration.
To set up InfoSphere CDC event notifications, complete the following steps:
1. Determine the SMTP server name by consulting the network administrator.
2. Log in to the InfoSphere CDC Management Console as the CDC Access Server admin user.
3. Stop mirroring and end replication on the subscription for your shadow tables.
InfoSphere CDC does not allow any configuration changes while a subscription is active.
a. Click Monitoring → Subscriptions.
b. Right-click the subscription, select End Replication → Normal, and click OK.
4. Set email notifications at the datastore level:
a. Click Configuration and navigate to Datastores on the bottom left pane.
b. Right-click the ds1 data store for your shadow tables and select Notifications.
c. Click the Source tab.
d. Within Notifications-ds1, select the first category from Notification Categories, for which you want to enable notifications. We select Scrape/Refresh → Error as shown in Figure 3-5 on page 75.

Figure 3-5 Set up events notifications for ds1
e. Select the INTERNET MAIL box, and enter the following information:
• SMTP Mail Host: Enter the name of the outgoing mail server on the host name field.
• Alert Account: Enter the email addresses or distribution list that you want to notify.
• Sender Mail Address: Enter the email address.
• Sender Mail Password: Enter the password of the sender.
f. Click Copy Setting to copy the notification settings to all other notification categories that apply.
g. As the source and the target are the same data store for shadow tables, scroll down to the Target section to copy notification settings to its notification categories.
h. Select the Apply → Information notification category to copy the notification settings and click OK to enable notifications for the subscription
i. Click OK to the notifications window and return to the main Configuration view.
j. Set the latency threshold notification by right-clicking the SUB1 subscription in the subscriptions sub-pane and select Latency Thresholds, as shown in Figure 3-6.

Figure 3-6 Setting latency threshold notifications
i. Check Notify when latency crosses these thresholds.
ii. Specify a warning threshold in minutes. A good value is 75% of the value of the CURRENT REFRESH AGE special registry.
iii. Specify a problem threshold in minutes. The value must be greater than the warning threshold. A good value is 90% of the CURRENT REFRESH AGE.
iv. Click OK. Do not click Set Notification, because you specified all the required notification settings in step 4 on page 74.
5. Set event filtering to disable event notification for events that are not important for monitoring. Enabling Target Informational events to capture latency threshold notifications returns notifications for event IDs that you might not be interested in:
a. Click Configuration → Subscriptions.
b. Right-click the subscription and select Notifications.
c. In the Notification Categories window, click the Target tab.
d. Click Datastore defaults → Filter Messages. The event ID filtering applies to all the categories of the target datastore.
e. In the list, enter the event IDs that you do not want to be notified of (one event on each line), and select the Do not send these messages option.
f. Filter the same event IDs for the source datastore, because it is the same as the target datastore.
6. Start mirroring to start receiving event notifications by email:
a. Click Configuration → Subscriptions.
b. Right-click the subscription name and select Start Mirroring.
c. In the Start Mirroring window, specify the mirroring method by selecting Continuous, and click OK.
For more details about setting up event notifications and event listings, see the CDC documentation at the following web address:
3.3.8 Connection setup
DB2 features a general purpose mechanism that can be used to automate the configuration of those connections intended to submit analytical queries that benefit from shadow tables. It allows a user-defined stored procedure to be registered with the database configuration parameter CONNECT_PROC, so that each time a database connection is established the database, the stored procedure is run automatically within the connection’s first transaction.
The stored procedure can be designed to identify a connection based on custom attributes, for example, the connection-configured application name. It can also prepare those connections for BLU Acceleration and configure parameters important to shadow tables. This typically includes enabling per-connection intra-partition parallelism and parameters that fine-tune the automatic query routing to shadow tables.
Example 3-13 on page 78 demonstrates such a stored procedure based on a set application name “bizreport”. See “Query routing to shadow tables” on page 81 for more details.
Example 3-13 CONNECT_PROC stored procedure
create or replace procedure DBGUEST1.REPL_MQT_SETUP()
begin
declare applname varchar(128);
set applname = (SELECT APPLICATION_NAME FROM
TABLE(MON_GET_CONNECTION(mon_get_application_handle(), -1)));
if (applname = 'bizreport') then
call sysproc.admin_set_intra_parallel('yes'),
set current degree 'ANY';
set current maintained types replication;
set current refresh age 500;
end if;
end@
All users IDs that are in need of running the “bizreport” workload must be granted the EXECUTE privilege. Example 3-14 shows the SQL statements run through the db2 command to deploy the stored procedure from Example 3-13 on page 78 after storing its text into a file called connect_proc.ddl and to grant the EXECUTE privilege to the public.
Example 3-14 Deploying the stored procedure
# Execute these system commands as DB2 user with DBADM authority
db2 td@ -v -f connect_proc.ddl
db2 “grant execute on procedure DBGUEST1.REPL_MQT_SETUP to public”
3.3.9 Setup validation
For setup validation, use the steps described in “Checking query routing to shadow tables” on page 106 and “Troubleshooting query routing using EXPLAIN” on page 107.
3.4 Configuration preferred practices
This section discusses DB2 and InfoSphere CDC configuration options, their meanings, and how they relate to each other. It gives insight into DB2 and InfoSphere CDC memory sizing and tuning, storage considerations, the operation of latency based query routing, and the start and shut down procedures.
3.4.1 DB2 and InfoSphere CDC sizing guidelines
We suggest to start the sizing of physical memory and the number of processor cores based on the current needs of the OLTP part of your workload. With the shadow table feature, we suggest to start with a minimum of 3-4 GB additional main memory for InfoSphere CDC. Also consider additional main memory for DB2 shared memory as needed for queries using BLU Acceleration against shadow tables based on the data volume, query complexity, and concurrency.
For the DB2 with BLU Acceleration preferred practices, see Chapter 2, “ Planning and deployment of BLU Acceleration” on page 17 and the DB2 for LUW best practices document “Optimizing analytic workloads using DB2 10.5 with BLU Acceleration”, found at the following web address:
InfoSphere CDC performance tuning is discussed in the InfoSphere documentation, found at the following web address:
3.4.2 DB2 configuration parameters
The following DB2 configuration parameters are important to tune your mixed workload environment for the shadow tables feature.
Database creation
A general requirement to use DB2 with BLU Acceleration is that the database must support automatic storage, the UNICODE code set and IDENTITY (or IDENTITY_16BIT) collation. All these settings are implicit default values for databases created in DB2 10.5.
Intra-partition parallelism
Intra-partition parallelism is vital to enable BLU Acceleration. This form of parallelism allows DB2 to run a suitable query much faster by splitting into multiple parts and by running these parts in parallel by using multiple threads. In a mixed workload environment such as the shadow table feature that is designed to support OLTP and OLAP workloads at the same time, it should only be enabled on a connection basis to not negatively affect queries that are not suitable for this execution environment. We strongly suggest to use the mechanism represented by the CONNECT_PROC database configuration parameter and the SYSPROC.ADMIN_SET_INTRA_PARALLEL procedure to enable intra-partition parallelism as explained in 3.3.8, “Connection setup” on page 77.
SYSPROC.ADMIN_SET_INTRA_PARALLEL
This DB2 built-in stored procedure can enable (through argument value “yes”) and disable (through argument value “no”) the intra-partition parallelism for the current connection as shown in Example 3-15. In the shadow table context, we advise to use the method described in 3.3.8, “Connection setup” on page 77 to enable this form of parallelism automatically and transparent to the application code when possible.
Example 3-15 SQL statement to enable Intra-Partition Parallelism using the stored procedure SYSPROC.ADMIN_SET_INTRA_PARALLEL
call sysproc.admin_set_intra_parallel('yes'),
DB2_WORKLOAD, INTRA_PARALLEL
Use the DB2 registry parameter DB2_WORKLOAD only with a value other than ANALYTICS to support the OLTP portion of the workload running against your database. When setting up a database tuned for an analytics workload environment using the BLU-Acceleration technologies, this registry parameter is often set to a value of ANALYTICS. However, among other settings, this would enable intra-partition parallelism for all connections by default, even those that run OLTP-type queries that might not be suitable for this execution environment. For the same reason, we suggest against enabling the instance wide database manager configuration parameter (DBM CFG) INTRA_PARALLEL.
See “SYSPROC.ADMIN_SET_INTRA_PARALLEL” on page 80 for more details.
MAX_QUERYDEGREE, DFT_DEGREE, and DEGREE
The degree of intra-partition parallelism can be controlled through the DBM CFG parameters MAX_QUERYDEGREE, database configuration (DB CFG) parameter DFT_DEGREE, and the precompile option DEGREE. We suggest to use the default values, so that DB2 can choose a suitable level of parallelism.
General parameters
This section includes the general parameters that are important to tune in your mixed workload environment for the shadow tables feature.
LOGARCHMETH1
The InfoSphere Change Data Capture component replicates data from transactions that it captures from the database’s transaction log. To replicate information from non-active logs, the database’s transaction logs must be at least retained. Set the LOGARCHMETH1 DB CFG parameter to a value of LOGRETAIN or other (DB2) supported log retention methods, such as DISK, TSM, and so on.
CONNECT_PROC
This DB CFG parameter allows a user-defined stored procedure to be registered and triggers the database to call that stored procedure on an incoming database connection. As shown in 3.3.8, “Connection setup” on page 77, this function can be used to automatically and transparent to the application configure specific connections to enable the use of shadow tables.
DFT_TABLE_ORG
With the main focus on OLTP-type queries, we suggest to set this DB CFG parameter to the default of row organization. This means all CREATE TABLE statements that are not explicitly specifying the ORGANIZE BY keyword will implicitly create row-organized tables.
Page size
We suggest to use 32 K page size for shadow tables, just as for regular column-organized tables. Traditional row-organized tables can be sized as usual. There is no clear default page size that would be useful to set the DB CFG parameter PAGESIZE to. Create the database with the most common page size required for your tables.
Extent size
A good default for extent size for shadow and column-organized tables is a value of 4 pages. Otherwise, the general DB2 best practices can be followed to tune this parameter. As with the page size, there is no clear all round value in a mixed workload environment that could be used to set for the DB CFG parameter DFT_EXTENT_SZ, to indicate an implicit, default extent size.
Query routing to shadow tables
Example 3-16 shows the sample SQL statements required to enable latency based query routing to shadow tables. The following sections discuss the individual parameters included in these statements.
Example 3-16 SQL statements enable query routing to shadow tables
call sysproc.admin_set_intra_parallel('yes'),
set current degree 'ANY';
set current maintained types replication ;
set current refresh age 500 ;
CURRENT MAINTAINED TABLE TYPES FOR OPTIMIZATION
This special register defines the types of tables that can be considered by the optimizer when processing dynamic SQL queries. Make sure to only include the value REPLICATION.
CURRENT REFRESH AGE <value>
This special register defines the acceptable age of replicated data that allows the shadow tables with this data to still be considered for query execution. Use a value other than 0 to enable query routing. A value of ANY ignores latency information and always route the shadow table. The value you choose should be made based on your business requirements on how current the data needs to be.
This parameter specifies a time stamp duration value with a data type of DECIMAL(20,6). The value must be 0, 99 999 999 999 999 (ANY), or a valid time stamp duration between that range. The valid format for the range is yyyymmddhhmmss.nnnnnn,
where:
•yyyy is the number of years and can have values in the range of 0 - 9999 (inclusive)
•mm is the number of months and can have values in the range of 0 - 11 (inclusive)
•dd is the number of days and can have values in the range of 0 - 30 (inclusive)
•hh is the number of hours and can have values in the range of 0 - 23 (inclusive)
•mm is the number of minutes and can have values in the range of 0 - 59 (inclusive)
•ss is the number of seconds and can have values in the range of 0 - 59 (inclusive)
•nnnnnn is the number of fractional seconds (the fractional seconds portion of the value is ignored and therefore can be any value)
The leading zeros for the entire value and the trailing fractional seconds do not need to be included. However, individual elements that have another element to the left must include the zeros such as using 500 to represent 5 minutes, and 0 seconds.
CURRENT QUERY OPTIMIZATION <value>
Set a query optimization value of 2, 5-9. The default value is 5.
Memory parameters
This section describe the memory related configuration parameters that are important to tune in your mixed workload environment for the shadow tables feature.
DB2_EXTENDED_OPTIMIZATION
The processing of analytical workloads uses more operations to benefit from increased sort memory heaps as queries are more complex and often join and aggregate more tables. From a memory tuning perspective you can distinguish between the sort memory available to transactional workloads running against row-organized tables and analytical queries using column-organized tables.
The sort memory heap considered by the SQL compiler and optimizer for column-organized tables can be set through overall DB CFG parameter SORTHEAP. By adding the text OPT_SORTHEAP_EXCEPT_COL=<value> to the DB2_EXTENDED_OPTIMIZATION registry variable, the value specified here limits the amount of sort heap memory for queries not running against column-organized tables.
The sort memory heap considered by the SQL compiler and optimizer for column-organized tables can be set through overall DB CFG parameter SORTHEAP. By adding the text OPT_SORTHEAP_EXCEPT_COL=<value> to the DB2_EXTENDED_OPTIMIZATION registry variable, the value specified here limits the amount of sort heap memory for queries not running against column-organized tables.
INSTANCE_MEMORY
We suggest to use the AUTOMATIC setting for this DBM CFG configuration parameter because it sizes the memory allocation of the DB2 instance to about 75-95% of the main memory available to the operating system.
DATABASE_MEMORY
This DB CFG parameter can be left at the default AUTOMATIC setting. While setting it to automatic, you might want to consider setting an initially size value at the same time that is big enough to hold all memory areas.
A good starting point to divide the overall database memory into the biggest memory areas is as follows:
•Use about 40-50% of the total available database memory (DATABASE_MEMORY) for the total amount of shared memory (SHEAPTHRESH_SHR)
– As a starting point, assign 5-20% of the total amount of shared sort memory (SHEAPTHRES_SHR) to the sort heap available to each SORT operation (SORTHEAP)
– With an increasing number of connections, you might benefit from reducing the SORTHEAP parameter to allow more SORT operations succeed
– Increase SORTHEAP with increasing query complexity when SORT operations are spilling to disk
•Use about 40% of the remaining database memory for buffer pools
– Associated 10% of that memory to buffer pools associated to table spaces storing column-organized tables only.
– The remaining 90% should be assigned to buffer pools associated with table spaces storing traditional tables.
SHEAPTHRES
You can disable private memory sorts to restrict the total amount of sort memory available to the value specified by the SHEAPTHRES_SHR DBM CFG parameter.
SHEAPTHRES_SHR
This DB CFG parameter controls the total amount of sort memory available to all SORT operations. See “DATABASE_MEMORY” on page 83 about how to size this parameter.
SORTHEAP
The amount of sort memory available to each SORT operation can be set with this DB CFG parameter. For sizing guidelines, see “DATABASE_MEMORY” on page 83.
DB_MEM_THRESH
We suggest to configure DB2 to not release any unused database shared memory by setting the DB_MEM_THRESH DB CFG parameter to a value of 100.
CATALOGCACHE_SZ
DB2 maintains a synopsis table with each column-organized table to allow data ranges to be easily skipped. This requires lookups on synopsis tables that are faster when this data is kept within the catalog cache. Compared to a purely OLTP-type database we suggest to increase this memory DB CFG parameter by about 10% to keep more of this data in cache.
UTIL_HEAP_SZ (DB CFG)
In the context of the Shadow Table feature this parameter affects data LOAD operations as they are used for replicating data to shadow tables by InfoSphere CDC. The suggestion is to set to AUTOMATIC with a starting value of at least 1 million (4 K pages). Starting with 128 GB of main memory use a value of 4 million (4 K pages). Increase the DB CFG parameter UTIL_HEAP_SZ while adding more shadow tables as there will be more concurrent LOAD operations requiring this memory heap.
Default query concurrency management
DB2 has a built-in concurrency control as part of its Workload Management feature that can protect the system to be overloaded from fewer long running queries by prioritizing the more frequent short running queries. A default query concurrency mechanism that is part of the SYSDEFAULTMANAGEDSUBCLASS service subclass can be put in place by enabling the SYSDEFAULTCONCURRENT threshold using the statement shown in Example 3-17.
Example 3-17 SQL statement to enable the default query concurrency management
alter threshold SYSDEFAULTCONCURRENT enable ;
Automatic maintenance
This section describes the automatic maintenance related configuration parameters that are important to tune in your mixed workload environment for the shadow tables feature.
AUTO_RUNSTATS (DB CFG)
By default, automatic maintenance is enabled, which includes automatic runtime statistics collection. If you prefer to perform this task manually, we suggest to specify the WITH DISTRIBUTION AND SAMPLED DETAILED INDEX ALL clause with the RUNSTATS command. This will collect both basic statistics and distribution statistics on columns, and extended statistics on all table indexes.
AUTO_REORG (DB CFG)
This DB CFG parameter can enable automatic table and index reorganization for a database, by default AUTO_REORG is not enabled. To manually perform these operations specify the RECLAIM EXTENTS clause with the REORG command on indexes and tables to reclaim extents that are not being used. Use the value of the RECLAIMABLE_SPACE column that is returned by a query to the ADMINTABINFO administrative view or the ADMIN_GET_TAB_INFO table function. This value is the amount of free space that was determined the last time that you ran the RUNSTATS command.
3.4.3 InfoSphere CDC instance configuration parameters
The following parameters can be set using the dmset command as shown in Example 3-7 on page 69.
acceptable_latency_in_seconds_for_column_organized_tables
This value indicates the intended latency in seconds to InfoSphere CDC when replicating to column-organized shadow tables. This value should be less than the value of the CURRENT REFRESH AGE special register.
maintain_replication_mqt_latency_table
When set to a value of true, InfoSphere CDC attempts to maintain latency information in a table SYSTOOLS.REPL_MQT_LATENCY. The table must be first created through a DB2 stored procedure, shown in Example .
Example 3-18 SQL statement to create the DB2 table holding replication latency information
CALL SYSPROC.SYSINSTALLOBJECTS(’REPL_MQT’, ’C’, CAST (NULL AS VARCHAR(128)),CAST (NULL AS VARCHAR(128))) ;
mirror_auto_restart_interval_minutes
You can define the interval in minutes before InfoSphere CDC attempts to automatically restart continuous mirroring for persistent subscriptions. See Example 3-7 on page 69 for details.
3.4.4 Startup and shutdown procedures
The startup and shutdown of the components used in this solution should occur in a specific order to allow the replication from source to shadow tables to properly start and stop.
Before starting the InfoSphere CDC components, make sure the DB2 instance managing the database that contains the tables mapped for replication is started. Then start the InfoSphere CDC Access Server followed by the InfoSphere CDC Replication Engine instance as shown in Example 3-19.
Example 3-19 Console output showing a sample DB2 and InfoSphere CDC startup procedure
[martin@imde01 ~]$ su - db2inst1
[db2inst1@imde01 ~]$ db2start
04/28/2014 17:26:04 0 0 SQL1063N DB2START processing was successful.
SQL1063N DB2START processing was successful.
[db2inst1@imde01 ~]$ db2 activate db MyDB
DB20000I The ACTIVATE DATABASE command completed successfully.
[db2inst1@imde01 ~]$ db2 connect to MyDB && db2 unquiesce db
Database Connection Information
Database server = DB2/LINUXX8664 10.5.4
SQL authorization ID = DB2INST1
Local database alias = MyDB
DB20000I The UNQUIESCE DATABASE command completed successfully.
[db2inst1@imde01 ~]$ su - cdcuser
[cdcuser@imde01 ~]$ nohup [...]/AccessServer/bin/dmaccessserver &
[cdcuser@imde01 ~]$ nohup [...]/ReplicationEngineforIBMDB2/bin/dmts64 -I cdcinst1&
As part of the shutting down procedure, first stop replication, then shut down the InfoSphere CDC, and finally deactivate the database.
Example 3-20 shows the execution of the dmendreplication command while logged in as InfoSphere CDC user to stop all (-A) replication for the instance (-I) “cdcinst1” employing the default method (-c). Similarly, the instance is shut down using the dmshutdown command. Finally, after logged in as DB2 instance owner, you can quiesce and deactivate the database.
Example 3-20 Console output showing a sample InfoSphere CDC and DB2 shutdown procedure
[db2inst1@imde01 ~]$ su - cdcuser
[cdcuser@imde01 ~]$ [...]/ReplicationEngineforIBMDB2/bin/dmendreplication -I cdcinst1 -c -A
[cdcuser@imde01 ~]$ [...]/ReplicationEngineforIBMDB2/bin/dmshutdown -I cdcinst1
[cdcuser@imde01 ~]$ [...]/AccessServer/bin/dmshutdownserver
[cdcuser@imde01 ~]$ su - db2inst1
[db2inst1@imde01 ~]$ db2 connect to MyDB && db2 quiesce db immediate
Database Connection Information
Database server = DB2/LINUXX8664 10.5.4
SQL authorization ID = DB2INST1
Local database alias = MyDB
DB20000I The QUIESCE DATABASE command completed successfully.
[db2inst1@imde01 ~]$ db2 terminate
DB20000I The TERMINATE command completed successfully.
[db2inst1@imde01 ~]$ db2 deactivate db MyDB
DB20000I The DEACTIVATE DATABASE command completed successfully.
|
Note: Depending on the size of the CDC pending-job queue, time to complete the dmendreplication command can vary. A useful command to add immediately after dmendreplication is dmshowevents to check the list of pending jobs:
dmshowevents -I cdcinst1 -a -c 10
|
3.4.5 Buffer pool and storage considerations
We suggest to structure row and column-organized tables in separate buffer pools, table spaces, and storage groups associated with different I/O subsystems for better management and performance due to different I/O access patterns. Example 3-21 shows a full set of DB2 statements that can be used to implement this setup. The end result is a set of buffer pools and table spaces in various page sizes from 4 K-32 K to store row-organized tables typically used for OLTP workloads and a 32 K buffer pool table space storing column-organized tables for column-organized tables.
Example 3-21 SQL statements to create dedicated storage groups, table spaces, and buffer pools
CREATE BUFFERPOOL bp4k SIZE AUTOMATIC PAGESIZE 4 K ;
CREATE BUFFERPOOL bp8k SIZE AUTOMATIC PAGESIZE 8 K ;
CREATE BUFFERPOOL bp16k SIZE AUTOMATIC PAGESIZE 16 K ;
CREATE BUFFERPOOL bp32k SIZE AUTOMATIC PAGESIZE 32 K ;
CREATE BUFFERPOOL bp32kcol SIZE <~4% of SHEAPTHRES_SHR> AUTOMATIC PAGESIZE 32 K ;
CREATE STOGROUP row_sg ON '/db2/instv105_oltpdb/datafs_row1' ;
CREATE STOGROUP col_sg ON '/db2/instv105_oltpdb/datafs_col1' ;
CREATE TABLESPACE tbsp4k PAGESIZE 4k MANAGED BY AUTOMATIC STORAGE USING STOGROUP row_sg BUFFERPOOL bp4k ;
CREATE TABLESPACE tbsp8k PAGESIZE 8k MANAGED BY AUTOMATIC STORAGE USING STOGROUP row_sg BUFFERPOOL bp8k ;
CREATE TABLESPACE tbsp16k PAGESIZE 16k MANAGED BY AUTOMATIC STORAGE USING STOGROUP row_sg BUFFERPOOL bp16k ;
CREATE TABLESPACE tbsp32k PAGESIZE 32k MANAGED BY AUTOMATIC STORAGE USING STOGROUP row_sg BUFFERPOOL bp32k ;
CREATE TABLESPACE tbsp32kcol PAGESIZE 32k MANAGED BY AUTOMATIC STORAGE USING STOGROUP col_sg BUFFERPOOL bp32kcol ;
The example uses a method to store table spaces in different storage groups based on their use of either storing row-organized or column-organized tables. This way, row-organized tables can be stored in the table spaces tbsp4k, tbsp8k, tbsp16k, and tbsp32k that are using the I/O subsystem associated with the storage group row_sg.
The additional table space called tbsp32kcol can be used with column-organized tables only and is part of the storage group col_sg. For best performance, the file system paths used for the storage groups row_sg and col_sg should correspond with file systems (mount points) on different I/O subsystems. When needed, additional storage paths can be separately added to each storage group later to extend its available space. By doing so DB2 can automatically stripe table spaces across the multiple paths.
Note that buffer pools are also divided to allow for better tuning in a mixed OLTAP workload environment. Just like the table spaces and storage groups, we suggest to also use dedicated buffer pools for column-organized tables.
The size of buffer pools associated with table spaces storing specifically column-organized tables should be increased compared to typical transactional sizes as BLU Acceleration technologies can considerably benefit from keeping as much pages in memory as possible. We suggest to assign a total of about 40% of the database shared memory (SHEAPTHRES_SHR) to buffer pools in general while using 10% of that memory for buffer pools dedicated to column-organized tables and the rest of all other buffer pools (for row-organized tables).
3.4.6 Enabling latency based routing
The routing (rewrite) of queries by the DB2 optimizer allows a query formally written to access the row-organized table to be run transparently against a shadow table under specific conditions.
The routing decision is generally based on replication latency. It compares the user-defined latency with the actual replication latency information supplied to DB2 by InfoSphere Change Data Capture. The optimizer takes the user-defined latency from the value stored in the CURRENT REFRESH AGE special register while it can read the actual replication latency information from the table SYSTOOLS.REPL_MQT_LATENCY, which is maintained by InfoSphere CDC.
If the actual latency is below the user-defined latency, the optimizer considers the data stored in the shadow table to be current enough compared to its source table. In this case, the statement text of the query gets rewritten to use the name of the shadow table instead of its source table. Due to the column organization of the shadow table, the query can be optimized to be run by the Column Data Engine that incorporates the BLU Acceleration optimizations.
This entire routing mechanism depends on multiple conditions and parameters:
•A shadow table must be in place, which specifically is a column-organized materialized query table that is maintained by (external) replication and enabled for query optimization.
•Replication through InfoSphere CDC must be in continuous mirroring mode, which implies, that there is a subscription in place that maps the source table to a shadow table. InfoSphere CDC might be instructed to maintain the replication latency table (InfoSphere CDC instance parameter maintain_replication_mqt_latency_table).
•The optimizer must be directed to only consider tables maintained by replication. This can be done explicitly through the special register CURRENT MAINTAINED TABLE TYPES FOR OPTIMIZATION or implicitly through the database configuration parameter DFT_MTTB_TYPES.
•The optimizer requires a user-defined latency limit defined through the special register CURRENT REFRESH AGE.
•The optimizer must be advised of a valid query optimization level (levels 2 or 5-9) through the special register CURRENT QUERY OPTIMIZATION.
•Intra-partition parallelism needs to be enabled for the connection submitting the query (using stored procedure SYSPROC.ADMIN_SET_INTRA_PARALLEL). The value for the special register CURRENT DEGREE specifying the degree of intra-partition parallelism should be set to ANY to allow the database manager to determine a suitable value.
|
Note: Businesses that can tolerate latency can use shadow tables without having to record and rely on latency information within DB2. They do not need to use the REPL_MQT_LATENCY table. In that case, queries set the DEFAULT REFRESH AGE to “NY” and the DB2 Optimizer does not take latency into consideration.
|
Example 3-22 lists sample statements to enable a connection for latency based query routing. These statements can be either set manually or automatically as described in 3.3.8, “Connection setup” on page 77.
Example 3-22 SQL statements to enable connections for latency based query routing
CALL SYSPROC.ADMIN_SET_INTRA_PARALLEL(’YES’) ;
SET CURRENT DEGREE ’ANY’ ;
SET CURRENT MAINTAINED TABLE TYPES FOR OPTIMIZATION REPLICATION ;
SET CURRENT REFRESH AGE 500 ;
Enabling latency-based routing in Cognos
Users that use Cognos BI as their analytic reporting application can optionally enable routing to shadow tables, on the application level. Cognos BI allows users to pass on database commands to be run as it opens a connection session to a data source by using command blocks.
The following example demonstrates how to define the Cognos command block to enable Cognos connection sessions for latency based query routing to shadow tables.
1. Launch IBM Cognos Administration studio.
2. Click the Configuration tab and select Data Source Connections on the left menu.
3. A list of data source connections are listed. Click the Set Properties icon ( ) beside the data source connection that you want latency based query routing enabled, as shown in Figure 3-7.

Figure 3-7 Set Properties icon for a DB2 data source connection
4. In the Set Properties panel, click the Connection tab. A list of database events that can have a Cognos XML command block specified is displayed. Set the Open session commands by clicking Set... or Edit... beside it, as shown in Figure 3-8.

Figure 3-8 Set open session commands for a Cognos data source connection
5. Cognos command blocks are formatted in XML. Example 3-23 on page 92 shows a sample command block syntax to enable latency based routing every time Cognos opens a database session to the DB2 data source.
Example 3-23 Cognos command block example to enable latency based routing
<commandBlock>
<commands>
<sqlCommand>
<sql>
CALL ADMIN_SET_INTRA_PARALLEL('YES'),
</sql>
</sqlCommand>
<sqlCommand>
<sql>
SET CURRENT DEGREE 'ANY'
</sql>
</sqlCommand>
<sqlCommand>
<sql>
SET CURRENT MAINTAINED TABLE TYPES FOR OPTIMIZATION REPLICATION
</sql>
</sqlCommand>
<sqlCommand>
<sql>
SET CURRENT REFRESH AGE 500
</sql>
</sqlCommand>
</commands>
</commandBlock>
6. Click OK to leave the open session commands window and return to the connection properties.
7. Click OK to leave the connection Set Properties panel and return to IBM Cognos Administration.
With the sample Cognos open session command block demonstrated in this section, latency based routing to shadow tables is set every time Cognos opens a database session to the database.
3.4.7 Optimizing compression dictionaries
Shadow tables are fundamentally column-organized tables that, due to their implementation, always apply data compression. Columnar table compression works by creating dictionaries on a column level and on a page level when data is loaded or inserted into the table. During a table load operation, all column values are being analyzed for frequently occurring patterns from which the column-level dictionaries are built. For column-level compression dictionaries to be optimized, make sure there is a larger number of rows being initially loaded with data that is representative enough to optimize the column-level compression dictionary.
In the context of shadow tables, we suggest that it can be beneficial for the row-organized source table to already contain a large row set to initially load the shadow table with this set of rows to optimize the compression dictionary. This can happen either manually through a LOAD operation followed by a SET INTEGRITY ... ALL IMMEDIATE UNCHECKED command or by directly setting up and starting the InfoSphere CDC replication that uses load operations against the shadow tables.
The load operation employed by InfoSphere CDC uses the fast load apply mode to perform a refresh operation on a target table. InfoSphere CDC first lines up a number of rows defined by the fastload_refresh_commit_after_max_operations system parameter and then loads this data using bulk loads into the shadow table using the db2Load API.
The suggestion is to size the fastload_refresh_commit_after_max_operations to the largest source table row count or the maximum supported value for the system parameter (2147483647) so that all that data is used to refresh your shadow table in a single bulk load operation. When the row count of the source table is larger than the parameter value, InfoSphere CDC has to split the operation into multiple committed bulk loads, where only the initial load operation would contribute to the quality of the column-level compression dictionary.
In Example 3-24, we set the mentioned parameter to 10 million rows.
Example 3-24 Modifying the FASTLOAD_REFRESH_COMMIT_AFTER_MAX_OPERATIONS system parameter
# Execute this system command as CDC user, i.e. cdcuser
cd [...]/ReplicationEngineforIBMDB2/bin/
dmset -I cdcinst1 fastload_refresh_commit_after_max_operations=10000000
3.4.8 Latency and throughput
InfoSphere CDC replication requires changes in the source tables to be asynchronously applied to their respective shadow tables. When shadowing multiple row-organized source tables in your environment, the change apply process can be a performance bottleneck. Fast apply is an InfoSphere CDC product feature that optimizes throughput and reducing latency.
Fast apply provides four different algorithms (or modes) to choose from that are appropriate for varying replication needs. In this section, we talk about two modes. For more information about each fast apply mode and how each is appropriate for your needs, refer to the InfoSphere CDC documentation.
To improve the performance of your shadow tables, it is suggested that you enable the Group By Table fast apply mode for your subscription. In this mode, InfoSphere CDC will reorder a set of operations creating lists of operations for each table, and then attempt to apply them to the target tables. The following list outlines the steps to enable fast apply using the InfoSphere CDC Management Console:
1. Log in to the InfoSphere CDC Management Console, select Configuration → Subscriptions, right-click the subscription, and select End Replication.
2. Select Normal and click OK.
3. Right-click the subscription and select User Exits. A user exit lets you define a set of actions that InfoSphere CDC can run before or after a database event occurs on a specified table.
4. Specify com.datamirror.ts.target.publication.userexit.fastapply.GroupByTable as the class name and 10000 as the parameter. The value signifies the number of transactions grouped together as a unit of work.
5. Select Configuration → Subscriptions, right- click the subscription, and select Start Mirroring.
6. Select Continuous and click OK.
If your environment still experiences latency issues, you can change the fast apply mode to Parallelize by table. It is similar to Group by table, but the reordered operations are applied concurrently using multiple database connections. With this mode, it is important to monitor the replication activity of tables to determine parallel connections that do not impede performance. When enabling this mode using the InfoSphere CDC Management console, you have to select the number of database connections and the threshold value as shown in Example 3-25.
Example 3-25 Parallelize by table, set with 3 connections and 10000 transactions
class name com.datamirror.ts.target.publication.userexit.fastapply.ParallelizeByTable
Parameter
3:10000
|
Note: Using fast apply to improve performance will often result in an increased resource footprint of InfoSphere CDC in form of processor and memory. You should keep this in mind when deciding if this feature is appropriate for your environment. The suggested minimum memory allocated for the InfoSphere CDC instance is 3.5 GB.
|
3.5 Operational preferred practices
Using shadow tables in an OLTAP environment leads to certain changes in how database operations are carried out. This section covers certain guidelines and suggestions when performing regular administration tasks such as database backup, restore, reorganization, monitoring, and redesign.
3.5.1 Backup and recovery
When using the shadow table feature, the source tables and their column-organized counterparts should be backed up together. To ensure that complete backups are created, perform a backup on the full set of table spaces that contain the source-shadow table pairs and their indexes. It is optional to include the table space that contains the InfoSphere CDC metadata tables in the backup image, although it is strongly suggested that it be included for correct recovery from unintended corruption to the table space.
As part of the backup and recovery strategy, it is preferred to back up the InfoSphere CDC replication configuration data for your CDC instance. The replication configuration data is stored in a metadata database, as files within the cdc-installation-dir. This data differs from the metadata tables that are stored in the DB2 database. You should always back up the metadata after the initial setup of the subscription for shadow tables and when there are changes to your subscription such as adding or dropping a table mapping.
Example 3-26 shows the dmbackupmd command, which creates the backup within the InfoSphere CDC installation directory under [...]/cdc-installation-dir/cdc-replication-engine-files/instance/cdc-instance/conf/backup.
Example 3-26 CDC backup command
cd [...]/InfoSphereChangeDataCapture/ReplicationEngineforIBMDB2/bin/
./dmbackupmd -I cdcinst1
With the replication configuration data backed up, we should back up all the table spaces that contain the source-shadow pair and their relevant information. To back up all the necessary table spaces, first verify the required table spaces by running the following query on the system catalog, as shown in Example 3-27 on page 96.
Example 3-27 SQL statement to list all table spaces containing shadow tables
WITH TABLELIST as (
SELECT TABSCHEMA, TABNAME
FROM SYSCAT.TABLES
WHERE SUBSTR(PROPERTY,23,1) = ’Y’
OR TABNAME IN (’TS_AUTH’, ’TS_BOOKMARK’, ’TS_CONFAUD’,
’TS_DDLAUD’)
UNION SELECT BSCHEMA as TABSCHEMA, BNAME as TABNAME
FROM SYSCAT.TABLES, SYSCAT.TABDEP
WHERE SUBSTR(SYSCAT.TABLES.PROPERTY,23,1) = ’Y’
AND SYSCAT.TABLES.TABNAME = SYSCAT.TABDEP.TABNAME
AND SYSCAT.TABLES.TABSCHEMA = SYSCAT.TABLES.TABSCHEMA
)
SELECT substr(SYSCAT.TABLES.TABSCHEMA,1,30) as TABSCHEMA,
substr(SYSCAT.TABLES.TABNAME,1,30) as TABNAME,
substr(TBSPACE,1,30) as TBSPACE,
substr(INDEX_TBSPACE,1,30) as INDEX_TBSPACE,
substr(LONG_TBSPACE,1,30) as LONG_TBSPACE
FROM SYSCAT.TABLES, TABLELIST
WHERE SYSCAT.TABLES.TABNAME = TABLELIST.TABNAME
AND SYSCAT.TABLES.TABSCHEMA = TABLELIST.TABSCHEMA;
Use the BACKUP DATABASE DB2 command to make sure that the backup includes the full set of table spaces that contain the tables and indexes associated with your source-shadow table pair. Table spaces corresponding to one or more source-shadow pairs can be backed up individually or together in one image.
|
Note: it is important that the table spaces for a source table and its associated shadow table are in the same backup image.
|
Example 3-28 shows the BACKUP DATABASE command for a single source-shadow table pair when the source table t_row is in a SOURCE table space, and the shadow table t_shadow is in a SHADOW table space along with the REPL table space holding all InfoSphere CDC metadata tables.
Example 3-28 DB2 statement to back up source-shadow table pairs through table spaces level backups
BACKUP DATABASE oltpdb TABLESPACE (SOURCE, SHADOW, REPL) ONLINE ;
3.5.2 Restoring table space backups for shadow tables
Table spaces that contain the source-shadow pair must always be restored together, although they can be restored independently of other source-shadow table pairs. When you restore table spaces, use a backup image that contains the full set of table spaces that are involved in the source-shadow pairing.
If the source table space, alone, is restored to a previous point in time, it can cause the shadow table to be placed in a drop-pending state. Else, if the table space that contains the shadow table is independently restored, the shadow table is placed in an integrity-pending state.
|
Note: As mentioned earlier, the backup and recovery of the table space containing the InfoSphere CDC metadata tables is optional and only required in cases of table space corruption, such as disk failure. If you recover the table space that contains the metadata tables, you must flag all source tables for refresh before you start mirroring.
|
To restore the table spaces for your source-shadow pairing, InfoSphere CDC replication must be stopped. Example 3-29 shows the command that stops replication for a subscription that is named SUB1 in an InfoSphere CDC instance named cdcinst1.This command has to be issued as the InfoSphere CDC user.
Example 3-29 Stopping replication of a specific subscription
# Execute these system commands as CDC user, i.e. cdcuser
cd [...]/ReplicationEngineforIBMDB2/bin/
dmendreplication -I cdcinst1 -s SUB1
Next, you ar required to reset the values in the SYSTOOLS.REPL_MQT_LATENCY table within the database oltpdb, by running the command shown in Example 3-30. This prevents inaccurate latency information from being communicated to DB2 from the latency table.
Example 3-30 SQL statement to reset values in repl_mqt_latency
UPDATE SYSTOOLS.REPL_MQT_LATENCY SET (COMMIT_POINT,DELAY_OFFSET) = (0,0)
Now we are ready to restore the table spaces for our source-shadow pairs. Example 3-31 describes the RESTORE DATABASE command run when the source table t_row is in a SOURCE table space, shadow table t_shadow is in a SHADOW table space. After the restore is complete, the table spaces will be in a rollforward pending state.
Example 3-31 Restore table spaces
RESTORE DATABASE oltpdb TABLESPACE (SOURCE, SHADOW) ONLINE
To take the table spaces out of the rollforward pending state, you will run the ROLLFORWARD DATABASE command. It is possible to roll forward to a specific point in time or to the end of logs. Example 3-32 takes the table spaces out of the rollforward pending state without replaying recent changes from the log files.
Example 3-32 Rollforward database to end of backup
ROLLFORWARD DATABASE oltpdb TO END OF BACKUP AND STOP TABLESPACE (SOURCE, SHADOW, REPL) ONLINE
|
Note: Unless rollforward was to end of logs, all restored table spaces are now in a backup-pending state and are not accessible until a new backup image is captured.
|
With the table spaces restored, if necessary, the InfoSphere CDC replication configuration can be restored, next. The InfoSphere CDC replication configuration should be restored to a point in time as close as possible to that of the restored table spaces. Restoring from this backup ensures that the table descriptions that are stored in the replication configuration data match the table information in the DB2 system catalog. The InfoSphere CDC metadata that was backed up, as part of the backup process, is restored within the InfoSphere CDC instance. Example 3-33 copies the files that are associated with restore point t1 into the instance directory for the instance cdcinst1.
Example 3-33 Restore metadata content for InfoSphere CDC instance
cp [...]/InfoSphereChangeDataCapture/ReplicationEngineforIBMDB2/instance/cdcinst1/conf/backup/t1/* [...]/InfoSphereChangeDataCapture/ReplicationEngineforIBMDB2/instance/cdcinst1/conf/
When you restore the InfoSphere CDC replication configuration, the current instance configuration is overwritten by the version that is captured by the dmbackupmd backup command.
|
Note: It is not mandatory to restore the replication configuration of your InfoSphere CDC instance. However, when restoring the shadow tables to a point in time in the past, it is imperative that you restore the replication configuration data from a backup that was made at that point in time.
|
If the CDC metadata tables were restored, we need to flag the newly restored source tables for refresh. Example 3-34 flags the source table DTW.T_ROW in a subscription that is named SUB1 for the InfoSphere CDC instance cdcinst1 for refresh.This command is issued as the InfoSphere CDC user.
Example 3-34 Flag the source tables for refresh
# Execute this system command as CDC user, that is, cdcuser
cd [...]/ReplicationEngineforIBMDB2/bin/
dmflagforrefresh -I cdcinst1 -s SUB1 -t DTW.T_ROW
To complete the restore process, restart the InfoSphere CDC replication by using the dmstartmirror command. Example 3-35 shows how to restart the subscription SUB1.
Example 3-35 Restart replication for subscription SUB1
# Execute this system command as CDC user, that is, cdcuser
dmstartmirror -I cdcinst1 -s SUB1
|
Note: For Windows users, they can stop/restart the subscription and flag tables for refresh using the InfoSphere CDC Management Console, instead of using the command line.
|
3.5.3 Moving InfoSphere CDC metadata tables to a specific table space
If you want to move the InfoSphere CDC metadata tables to a specific table space of your choice, use the ADMIN_MOVE_TABLE procedure. Example 3-36 shows an example of a query to display the table space where the metadata tables were created.
Example 3-36 SQL statement to query to display the table space of the metadata tables
SELECT TBSPACE
FROM SYSCAT.TABLESPACES
WHERE TBSPACEID IN (
SELECT TBSPACEID
FROM SYSCAT.TABLES
WHERE TABNAME LIKE ’TS_%’
AND TABSCHEMA = db2-metadata-schema-name);
Move the metadata tables with the ADMIN_MOVE_TABLE procedure to a specific table space of your choice. Example 3-37 shows how to move the TS_AUTH metadata table to the SHADOW table space.
Example 3-37 SQL statement to move meta-data tables to table space SHADOW
CALL ADMIN_MOVE_TABLE(‘db2-metadata-schema-name’, ’TS_AUTH’,
’SHADOW’,’SHADOW’,’SHADOW’,’’,’’,’’,’’,’’,’MOVE’);
3.5.4 Reorganizing shadow tables
Similar to regular column-organized tables, it is suggested to enable automatic reorganization for shadow tables. If automatic reorganization is not enabled, then the REORG command with the RECLAIM EXTENTS option must be run to reorganize shadow tables. Example 3-38 shows how to manually reorganize the T_SHADOW table. It is good practice to update statistics after reorganizing your tables, as shown under 3.5.5, “Table statistics”.
Example 3-38 Manually reorganizing the T_SHADOW table
REORG TABLE DTW.T_SHADOW RECLAIM EXTENTS
3.5.5 Table statistics
Up-to-date table statistics, including shadow table statistics are vital for query performance. The optimizer needs accurate statistics to make well-informed decisions when determining execution plans. It is advisable to keep the auto_runstats database configuration parameter enabled for up-to-date database statistics.
If the parameter is not enabled, you must manually perform RUNSTATS on shadow tables after they are initially populated with data and periodically thereafter. shows an example of collecting statistics on a shadow table with the appropriate options.
Example 3-39 SQL statement to update table statistics for shadow table
RUNSTATS ON TABLE t_shadow WITH DISTRIBUTION ON ALL COLUMNS AND DETAILED INDEXES ALL;
3.5.6 Monitoring replication
As shadow tables use InfoSphere CDC components for replication, you will want to monitor and analyze the replication activities to ensure that data is consistent across your source and shadow table. You can use the InfoSphere CDC Management Console or the command line CHCCLP to better understand the various characteristics of your replication environment and diagnose potential problems.
The Management Console supports the monitoring of replication operations and latencies, the collection of various statistics about source and target data stores, and event detection and notification.
Monitoring replication using CHCCLP
The InfoSphere CDC user can use CHCCLP to monitor the status of the InfoSphere CDC subscriptions and collect information that can assist in resolving any issues that might arise with the replication setup. Example 3-40 shows the commands to launch CHCCLP. CHCCLP is launched from the bin folder within the InfoSphere CDC access server installation folder.
Example 3-40 Run CHCCLP for monitoring InfoSphere CDC replication
# Execute these system commands as CDC user, i.e. cdcuser
cd [...]InfoSphereChangeDataCapture/AccessServer/bin/
./chcclp
chcclp session set to cdc;
set verbose;
[CDC1004]: Verbose output enabled.
connect server hostname linux-host port 10101 username admin password p@ssw0rd;
[CDC1101]: Connected to Access Server linux-host@10101.
connect datastore name ds1;
[CDC1201]: Connected to datastore ds1.
select subscription name SUB1;
[CDC1308]: Current subscription context set to SUB1 from datastore ds1 to datastore ds1.
Table 3-6 provides descriptions of some important commands that can be run using CHCCLP. If a name is not provided with commands, the subscription that is currently identified as the context will be used.
Table 3-6 Commands to check replication state using CHCCLP
|
Command
|
Description
|
|
monitor replication
|
Monitors the replication state and latency of subscriptions.
|
|
monitor subscription activity
|
Shows activity metrics for current subscription since mirroring started.
|
|
monitor subscription latency
|
Retrieves the latency information for current subscription e.g latency threshold, latency in seconds.
|
|
show latency thresholds
|
Shows the latency threshold for the subscription, if it is enabled. It is the value for how long it takes InfoSphere CDC to apply data to the target datastore.
|
|
monitor subscription busy tables name SUB1
|
Shows statistics around the busiest tables within the named subscription. Shows number of bytes replicated, and percentage of activity for each table.
|
|
show subscription event details
|
Displays the full text of truncated messages and event details for the subscription.
|
|
list subscription events count [1..100..]
|
Lists the events of the shadow table subscription.
|
Monitoring using InfoSphere CDC Management Console
You can use the InfoSphere CDC Management Console to monitor your InfoSphere CDC subscription. It can provide information about events and system messages that relate to the subscription for your shadow tables. The Management Console is composed of a number of windows and tabs that are referred to as perspectives and views.
To monitor the InfoSphere CDC subscription, log in to the InfoSphere CDC Management Console with the InfoSphere CDC Access Server user. After logging in, you see three perspectives, the Configuration perspective, the Monitoring perspective, and the Access Manager perspective, from which you can access a number of different views depending on your role and access level.

Figure 3-9 InfoSphere CDC Management Console
The subscription summary page shown displays the status of your subscription, which should be in mirroring mode. This mode displays a summary of replication states and latency on the left, and a list of subscriptions on the right.
To gather information regarding your replication activity, right-click the SUB1 subscription SUB1 and select Collect Statistics. Figure 3-10 shows the statistics pane on the bottom of the main window.

Figure 3-10 Enable statistics on subscription to gather information
The summary page shows a graphical view of latencies, activities, and event counts. You can drill down further by using one of the three views in the summary pane ( ).
).
•Latency view shows detailed replication latency information, as seen in Figure 3-11.

Figure 3-11 Latency view
•Activity view shows subscription activity statistics.The chart in Figure 3-12 shows the amount of data (in bytes) or the number of apply operations that are being processed by InfoSphere CDC.

Figure 3-12 Activity view
•Events view shows a sortable view of subscription events. This view can be used to get more information regarding particular events that lead to a subscription failing or behaving abnormally. Events for subscription SUB1 are shown in Figure 3-13 on page 105.

Figure 3-13 Events log for current subscription
To view the busiest table in your subscription, right-click the subscription in the main view and select Show in performance view. When the view opens, right-click the subscription and select Busy tables..
Analyzing subscription events
To get more detail about a subset of subscription events, click Retrieve Events in the events view of the InfoSphere CDC Management Console and select an appropriate length of time (such as the last 24 hours). The Events pane is populated with information regarding each event. To read the full message, you can right-click an event and select Event Details. You can also get to the events view, by right-clicking the subscription for shadow tables in the summary page and selecting Show Event Details.
To further improve monitoring capabilities, set up event notifications against your subscription. Notifications are most useful when you are troubleshooting replication activities and you want to detect particular events that are happening in the source and target datastores, and subscriptions. To set up notifications, you must stop mirroring and end replication on the subscription for shadow tables, as described in 3.3.7, “InfoSphere CDC event notification setup” on page 74.
To learn more about the process of monitoring your subscription and setting event notifications, refer to the IBM Knowledge Center, found at the following web address:
3.5.7 Troubleshooting shadow tables
When troubleshooting issues with shadow tables, the best approach is to verify both the DB2 database and InfoSphere Change Data Capture. We suggest that the user checks the status of replication and its settings in DB2 and InfoSphere CDC to resolve problems that are specific to shadow tables. This section discusses important issues to verify when encountering any problems with shadow tables.
The following is a list of some reasons why shadow tables might not be used in the query plan for a statement:
•Special registers allowing queries to use shadow tables might not be set correctly: See “Checking DB2 special register settings” on page 109.
•Latency might be out of date: See “Checking current latency status” on page 110.
•The EXPLAIN utility might be used to determine reasons why a shadow table might not have been chosen, for example, query references row-organized tables with no associated shadow tables: See “Troubleshooting query routing using EXPLAIN” on page 107.
•Replication might be stopped: See “Diagnosing issues with InfoSphere CDC replication” on page 111.
Checking query routing to shadow tables
Monitoring table functions can be used to gather information about which tables were used in the query plan for statements that are in cached memory.
Run the query shown in Example 3-41 to view a list of all the objects (tables or indexes) that are used in the query plan for a statement. The statement-text in italics is where the query statement would be placed.
Example 3-41 List of objects used in query plan
SELECT DISTINCT stmt.EXECUTABLE_ID, OBJECT_TYPE,
substr(OBJECT_NAME,1,25) as OBJECT_NAME,
substr(OBJECT_SCHEMA,1,25) as OBJECT_SCHEMA
FROM
table(MON_GET_PKG_CACHE_STMT(NULL,NULL,NULL,-1)) AS stmt,
table(MON_GET_SECTION_OBJECT(stmt.EXECUTABLE_ID,NULL,NULL,NULL,NULL,-1)) AS object
WHERE
STMT_TEXT = 'statement-text';
Example 3-42 shows the edited result for a query similar to the preceding query run against a statement.
Example 3-42 Result for a query against objects used in a query plan
EXECUTABLE_ID OBJECT_TYPE OBJECT_NAME OBJECT_SCHEMA
-------------- ----------- ------------ --------------
x'0100..7#################' TA T1_SHADOW ONLINE
1 record(s) selected.
To view the list of statements that are currently cached in memory where a particular shadow table was used, use the query shown in Example 3-43.
Example 3-43 List of statements for shadow table t_shadow in schema DWH
SELECT DISTINCT
object.EXECUTABLE_ID,
substr(STMT_TEXT,1,200) as STMT_TEXT
FROM
table(MON_GET_SECTION_OBJECT(NULL,NULL,'DWH',NULL,'T_SHADOW',-1)) AS object,
table(MON_GET_PKG_CACHE_STMT(object.EXECUTABLE_ID,NULL,NULL,-1)) AS stmt
If the statement is no longer cached in memory, or more detailed information is required regarding the query plan, use the EXPLAIN utility.
Troubleshooting query routing using EXPLAIN
The EXPLAIN utility can be used to diagnose issues that result in shadow tables not being used for query optimization. The EXPLAIN output for a query that is being assessed contains information that includes extended diagnostic information that can be used when troubleshooting query routing issues.
To use the EXPLAIN utility, you must go through a series of steps to create the explain tables, enable explain capture, collect the diagnostic information about the query in question, and format the output. These steps are outlined in the DB2 Knowledge Center at:
The following examples in this section outline information returned by the EXPLAIN utility for shadow tables and the reasons they might occur.
•Queries that run under isolation level RS or RR are not routed to shadow tables. Example 3-44 shows that the isolation level of the materialized query table prevented the table from being used in the query.
Example 3-44 Isolation level does not allow routing to shadow tables
Extended Diagnostic Information:
--------------------------------
Diagnostic Identifier: 1
Diagnostic Details: EXP0053W
The materialized query table "DTW"."T_SHADOW" was not considered for querymatching because the isolation level of the query is higher than the isolation level of the materialized query table.
•Queries are routed to shadow tables only when all source tables referenced in the query have associated shadow tables. Example 3-45 shows the message that is returned when a query references some row-organized tables which do not have shadow tables associated.
Example 3-45 Query references some source tables with no shadow tables
Extended Diagnostic Information:
--------------------------------
Diagnostic Identifier: 1
Diagnostic Details: EXP0076W
No materialized query table matching was performed on the statement during query rewrite because there is a shadow table defined on at least one, but not every, row-organized table referenced in the query...
•Example 3-46 output shows the message that is returned when query routing to the shadow table does not happen because the current latency between the source table and the shadow table does not fall within the user-defined limit that is specified by the value of the CURRENT REFRESH AGE special register.
Example 3-46 Current latency between source and shadow tables out of limit
Extended Diagnostic Information:
--------------------------------
Diagnostic Identifier: 1
Diagnostic Details: EXP0087W
No materialized query table matching was performed on the statement during query rewrite because there is a shadow table defined on one of the tables in the query and the current replication latency is larger than the time value specified in the CURRENT REFRESH AGE special register.
Checking DB2 special register settings
Special registers are used to store information for applications that can be referenced in SQL statements. To ensure that shadow tables are considered for query optimization, the CURRENT REFRESH AGE and CURRENT MAINTAINED TABLE TYPES special registers are to be set to appropriate values for your connection as discussed in 3.4.2, “DB2 configuration parameters” on page 79.
|
Note: Values returned might not be the same as the settings applied to concurrent applications, as these settings are applied at the connection level.
|
To check the value for CURRENT REFRESH AGE while a query was in process, issue the query as show in Example 3-47.
Example 3-47 SQL statement to query the current refresh age
SELECT
stmt.EXECUTABLE_ID,
( SELECT substr(VALUE,1,24)
FROM table(COMPILATION_ENV(COMP_ENV_DESC))
WHERE NAME = 'REFRESH_AGE'
) as REFRESH_AGE,
( SELECT substr(VALUE,1,24)
FROM table(COMPILATION_ENV(COMP_ENV_DESC))
WHERE NAME = 'MAINTAINED_TABLE_TYPE'
) as MAINTAINED_TYPES
from
table(MON_GET_PKG_CACHE_STMT(null,null,null,-1)) AS stmt
where
STMT_TEXT = statement_text;
Example 3-48 shows the output of a query similar to the one shown in Example 3-47.
Example 3-48 Query output for current refresh age value for query statement
EXECUTABLE_ID REFRESH_AGE MAINTAINED_TYPES
----------------------- ------------------------ ---------------------
x'0100######## 000#########3188' +00000000001000.000000 REPLICATION
1 record(s) selected.
|
Note: The QUERY OPTIMIZATION level must also be set to 2 or a value greater than or equal to 5.
|
Checking current latency status
InfoSphere CDC replication must be up to date for shadow tables to be considered by the optimizer. It is advisable to compare the values in the latency table REPL_MQT_LATENCY with the current time stamp to ensure that the latency is not out of date.
Example 3-49 shows the query that can be used to check latency.
Example 3-49 SQL statement to query to check latency and its sample output
SELECT
COMMIT_POINT, DELAY_OFFSET,
int( CURRENT TIMESTAMP - (
timestamp('1970-01-01') + (COMMIT_POINT - DELAY_OFFSET) seconds + CURRENT TIMEZONE
) ) as LATENCY
FROM
SYSTOOLS.REPL_MQT_LATENCY;
COMMIT_POINT DELAY_OFFSET LATENCY
-------------------- -------------------- -----------
1405089689 0 28
1 record(s) selected.
Check the latency table when troubleshooting issues regarding InfoSphere CDC sending latency information to DB2. If there is an issue in sending information or access issues with InfoSphere CDC and the latency table, this can be verified with the latency table. If there is a row in the latency table, with the value 0 in the COMMIT_POINT column, you should verify the conditions, shown in Table 3-7, that might causing the issue.
Table 3-7 Issues with latency and their resolution
|
Issue
|
Resolution
|
|
Subscription does not start: latency table does not exist but the maintain_replication_mqt_latency_table registry parameter is set to true.
|
Create the SYSTOOLS.REPL_MQT_LATENCY table and then start the subscription.
|
|
InfoSphere CDC not sending information to DB2: InfoSphere CDC was started when the maintain_replication_mqt_latency_table registry parameter was set to false.
|
Stop the subscription, set the maintain_replication_mqt_latency_table registry to true, and then restart the subscription.
|
|
InfoSphere CDC is not sending information to DB2: InfoSphere CDC user does not have permissions to update latency table.
|
Ensure the correct permissions are set for InfoSphere CDC user.
|
|
Latency table is not being updated: The table space that contains the latency table is not in a state where it can be updated. For example, the latency table is in the backup-pending state.
|
Ensure that the table space is not in backup-pending state.
|
|
InfoSphere CDC replication has stopped or table is not accessible: If calculated LATENCY value is large but DELAY_OFFSET is small.
|
Verify access to table and proceed to diagnose issues that might be causing the DELAY_OFFSET value changes.
|
|
InfoSphere CDC is lagging behind the changes to the source tables: The value of DELAY_OFFSET is large or increasing.
|
Check issues that might cause the replication to be slow.
|
Diagnosing issues with InfoSphere CDC replication
Queries might not be routed to shadow tables if InfoSphere CDC replication stops. To verify the status of InfoSphere CDC replication using the command line, run the commands in the following examples as the InfoSphere CDC user. The examples use cdcinst1 as the InfoSphere CDC instance name and SUB1 as the subscription name.
|
Note: To learn more about the usage of the InfoSphere CDC commands, add “-?” after each command name, for example, ./dmgetsubscriptionstatus -?.
|
Example 3-50 shows that the InfoSphere CDC user navigates to the bin folder for InfoSphere CDC replication installation and issues a command to monitor subscription status.
Example 3-50 Check the status of the InfoSphere CDC subscription
# Execute these system commands as CDC user, that is, cdcuser
cd [...]InfoSphereChangeDataCapture/ReplicationEngineforIBMDB/bin
./dmgetsubscriptionstatus -I cdcinst1 -p -s SUB1
Subscription : SUB1
Status : Running
Example 3-51 shows that the InfoSphere CDC user can run the dmshowevents command to check the InfoSphere CDC event log for a summary of errors that might affect replication. You can use this command as an alternative to the Event Log view in Management Console as seen in 3.5.6, “Monitoring replication” on page 101. The command shown here limits the number of events reported to a maximum of 100.
Example 3-51 Check InfoSphere CDC event log for details regarding subscription events
# Execute these system commands as CDC user, that is, cdcuser
cd [...]InfoSphereChangeDataCapture/ReplicationEngineforIBMDB/bin
./dmshowevents -I cdcinst1 -s SUB1 -c 100
TIME|AGENTTYPE|SUBSCRIPTION|EVENTID|SEVERITY|EVENTPROGRAM|EVENTTEXT
2014-05-01 16:04:38.483000000000|S|SUB1|2922|Information| |Subscription SUB1 has started using the single scrape staging store. Subscription bookmark: Journal name 0 Journal bookmark
000701;0000000000001125000000000004039e;5362a8d4000000000000;0000000000000000112500000000 0004039e Staging store oldest bookmark: Journal name 0 Journal bookmark INVALIDBOOKMARK Staging store newest bookmark: Journal name 0 Journal bookmark INVALIDBOOKMARK
2014-05-01 16:04:38.470000000000|S|SUB1|44|Information||Mirroring has been initiated for table INSTV105.T1.
To get more information regarding the datastore objects, the user can issue the dmgetstagingstorestatus command to check the status of the InfoSphere CDC datastore objects. If replication is not running, restart replication by using the dmstartmirror command, as shown in Example 3-52.
Example 3-52 Restart replication
# Execute this system command as CDC user, i.e. cdcuser
cd [...]InfoSphereChangeDataCapture/ReplicationEngineforIBMDB/bin
./dmstartmirror -I cdcinst1 -s SUB1
|
Note: See 3.5.6, “Monitoring replication” on page 101 for more detail regarding gathering information and diagnosing issues with InfoSphere CDC.
|
Checking the values of InfoSphere CDC system parameters
Verify that InfoSphere CDC system parameters are set to appropriate values so that query plans can use shadow tables. View the current settings by issuing the dmset command as the InfoSphere CDC user, and make sure the values are as set under 3.3.5, “Replication setup” on page 68. Example 3-53 on page 113 shows how to run dmset command.
Example 3-53 Using dmset command
cd [...]/InfoSphereChangeDataCapture/ReplicationEngineforIBMDB2/bin/
./dmset -I cdcinst1
The value of the system parameter, acceptable_latency_in_seconds_for_column_organized_tables, must be less than the value of the CURRENT REFRESH AGE special register. The maintain_replication_mqt_latency_table parameter should be set to true, and the mirror_auto_restart_interval_minutes system parameter should be set to a value greater than 0 (a value of 1 or 2 is preferred for most environments).
3.5.8 Restoring replication when restricted DDL is applied to a table
InfoSphere CDC maintains and uses metadata that describes source and shadow tables; any changes caused to the structure of the source table results in a disruption in replication. As a result of DDL changes to the source table, InfoSphere CDC can no longer read the database log records during mirroring. In this scenario, the metadata must be updated and the source tables have to be reorganized before replication can continue.
Stop replication using the InfoSphere CDC Management Console, or command line and run the required DDL operations on the source table after dropping the current associated shadow table. After the DDL operations are applied, reorganize the source table, and then re-create the shadow table. Example 3-54 on page 114 shows the sequence of steps discussed.
Example 3-54 SQL statements to apply DDL changes to source table and restore replication
drop db DTW.T_SHADOW ;
-- Perform DDL operations on the source table
alter table DTW.T_ROW alter column i1 set data type bigint ;
--Reorganize the table after the alter command
reorg table DTW.T_ROW ;
--Recreate the shadow table
create table DTW.T_SHADOW as
(select * from DTW.T_ROW)
data initially deferred
refresh deferred
maintained by replication
organize by column;
set integrity for DTW.T_SHADOW all immediate unchecked ;
alter table DTW.T_SHADOW add constraint DTW.T_SHADOW_pk primary key (pk);
After the Shadow table is recreated, it is necessary to update the table definitions in the InfoSphere CDC data store. If the DDL statement applied to the source table is not RENAME TABLE, update table definitions by using the Management Console or command line. Here, we discuss the Management Console.
Navigate to tab Configuration → Datastores, right-click the datastore object, and select Replication Tables. Within Replication Tables, select the source table and click Update and Close.
If the DDL statement applied to the source table is RENAME TABLE, you are required to delete the table mapping and re-create it because InfoSphere CDC must reference the name change. To do so, navigate to tab Configuration → Table Mappings, right-click the table mapping for the shadow table, and select Delete and click Yes. In our example, the DTW.T_ROW/ DTW.T_SHADOW table mapping is deleted. After deletion, re-create the table mapping for the shadow table with the new source table name.
Resume mirroring after the process is complete. Using the Management Console, navigate to Configuration → Subscriptions, right-click the subscription, and select Start Mirroring. Select Continuous and click OK.
3.5.9 Preventing disruption to replication with restrictive DDL applied to the source table
InfoSphere CDC replication can be impacted and stopped by certain DDL operations or a load being applied to the source table. To prevent this situation, follow the procedure described in this section.
Stop replication using the CDC Management console, or the command line, and apply the DDL operations. In case of DDL changes, complete the DDL operation and reorganize the source table. Example 3-55 shows an example of the DDL changes. In case of a load, complete the load.
Example 3-55 SQL statements to apply DDL changes to source table and restore replication
alter table DTW.T_ROW add column i3 integer ;
reorg table DTW.T_ROW ;
After the DDL changes are applied, update table definitions by using the Management Console or command line. Here, we discuss the Management Console.
Navigate to tab Configuration → Datastores, right-click the data store, and select Replication Tables. Within Replication Tables, select the source table and click Update and Close.
After the definitions are updated, the table mappings must be refreshed to start replication. Navigate to Configuration → Table Mappings, right-click the table mapping for the source-shadow, DTW.T_ROW/ DTW.T_SHADOW, and select Flag for Refresh and click Yes. Select Standard Refresh as the refresh option.
Resume mirroring after the process is complete. Using the Management Console, navigate to Configuration → Subscriptions, right-click the subscription, and select Start Mirroring. Select Continuous.
3.6 Shadow tables and HADR
Shadow tables in an HADR environment is based on the combination of the shadow tables feature with the support for HADR in column-organized tables. Figure 3-14 shows a topology where the shadow tables are implemented in an HADR environment.

Figure 3-14 Topology of an HADR environment with shadow tables
This implementation includes the following components:
•DB2 HADR primary server:
– DB2 instance including the HADR primary database
– InfoSphere CDC instance (Access Server and Replication Engine for DB2) and metadata
•DB2 HADR standby server:
– DB2 instance including the HADR standby database
– InfoSphere CDC passive instance (Access Server and Replication Engine for DB2) and metadata
•Shared elements
As part of this initial setup, it is suggested to use a shared log archive. When using HADR with shadow tables, a shared archive is even more essential to ensure that CDC log capture has access to all of the log files and the possibility that CDC will invoke log retrieve after a failover is quite high.
These elements must be accessible to all servers included in the configuration (shared storage, shared file system, or GPFS™ file system):
•Shared log archive for DB2 for HADR (shared file system or IBM Tivoli Storage Manager (TSM) can be used)
•Shared file space for InfoSphere CDC load refresh images
3.6.1 Shadow tables configuration
As part of shadow tables configuration, InfoSphere CDC must be installed on all HADR servers including primary, standby, and any additional auxiliary standby.
As seen in 3.3, “Deployment” on page 61, to install InfoSphere CDC, the following components are used:
•InfoSphere CDC Access Server
•InfoSphere CDC Replication Engine for DB2
•InfoSphere CDC Management Console
There are some considerations for the deployment of these three components when shadow tables are deployed in an HADR environment.
InfoSphere CDC Access Server
In the disaster recovery (DR) scenarios where DB2 with HADR is used, we suggest using a virtual IP address that always corresponds to the HADR primary server. In case of failover, using virtual IP can make the transition easier and it would be even simpler for applications to connect to the active database.
In an HADR configuration with shadow tables defined, using a separate InfoSphere CDC Access Server is a simpler approach for operation. The Access Server can monitor the InfoSphere CDC instances on both HADR servers. Because the Access Server is not part of the HADR configuration, it will not be affected when there is failure on the HADR servers.
When shadow tables are implemented in an HADR environment, there are different options to deploy the InfoSphere CDC Access Server.
•InfoSphere CDC Access Server collocated with InfoSphere CDC Replication Engine on each HADR server
•InfoSphere CDC Access Server deployed outside of the HADR cluster
•InfoSphere CDC Access Server deployed outside of the HADR cluster using a virtual IP address for the primary database
InfoSphere CDC Replication Engine for DB2
Because each HADR server might become primary at some point, InfoSphere CDC Replication Engine is configured on each HADR server (primary, standby, and auxiliary standby, if any).
InfoSphere CDC Management Console
This InfoSphere CDC component can be installed on a notebook, workstation, or any server or virtual machine. Therefore, deploy the InfoSphere CDC Management Console in a separate system other than the HADR servers.
3.6.2 HADR considerations
The preferable HADR configuration practices are applicable to an HADR environment with shadow tables. Some of the practices are described in 2.7.8, “HADR best practices” on page 51. For an HADR with a shadow table environment, the following items are even more important:
•Use dedicated, high performing disks and file systems for the database logs.
•Use a shared location for DB2 archive logs accessible to primary and standby.
•Have a dedicated network for the HADR primary-standby connection.
•Consider using a virtual IP for the database server.
•Consider using automatic client reroute.
For more information about the HADR best practices, see High Availability Disaster Recovery at the following web address:
3.6.3 InfoSphere CDC considerations
This section explains certain considerations regarding InfoSphere CDC metadata and how it is managed when shadow tables are deployed in an HADR environment.
With InfoSphere CDC, there are two types of metadata that are used to synchronize the source and target tables:
•Operational metadata
The operational metadata is information such as the instance signature and bookmarks. This metadata is stored in the database and is replicated by HADR to the standby.
•Configuration metadata
The configuration metadata is information such as subscriptions and mapped tables. This metadata is stored in the CDC home directory, so it is not replicated by HADR. Therefore, after you have set up HADR with shadow tables, any configuration changes made to the shadow tables on the primary must be propagated to the standby using a scheduled CDC metadata backup-and-copy.
Operational metadata
The operational metadata used in InfoSphere CDC is stored inside the DB2 database. This situation means that operational metadata is synchronized and replicated to the standby database as part of the HADR replication, so there is no need to take care of this metadata separately.
Configuration metadata
The configuration metadata for InfoSphere CDC includes table mapping change information and table modification information. This information is stored in a file system directory on the InfoSphere CDC instance deployed on the HADR primary server. These types of changes on table mappings or changes to tables (such as adding or dropping a column) must be kept synchronized across all InfoSphere CDC instances deployed on the HADR standby servers. These InfoSphere CDC instances are idle instances that must have the latest copy of the configuration metadata to ensure that no configuration or subscription details are lost during failover.
InfoSphere CDC instance
In a scenario with shadow tables and HADR, you must set up InfoSphere CDC on each standby database of the HADR environment. Each standby database is kept synchronized with the primary database. In the primary database, an active InfoSphere CDC instance maintains the shadow table functionality for the primary database. Because the standby databases do not require the shadow table feature when in the standby mode, the InfoSphere CDC instance on each standby database is deactivated or in passive mode. The metadata for InfoSphere CDC is replicated across all standby databases. When a takeover occurred, the InfoSphere CDC instance on the standby database that becomes the new primary is activated with the most recent configuration metadata.
3.6.4 Standby server considerations
The configuration of shadow tables in an HADR environment is similar to what must be done in a standard shadow table configuration. There are, however, some considerations related to the standby database server.
Prerequisites
Other than the prerequisites already mentioned for shadow tables and InfoSphere CDC in general, there are few other items applicable to the standby database configuration and setup.
The InfoSphere CDC instance on each standby database server remains in passive mode and stopped. The configuration metadata is kept in synchronization with the active InfoSphere CDC instance on the primary database server. Because the operational metadata is replicated with HADR, the operational metadata is the same as on the primary instance.
On the DB2 standby instance, the following parameters must be kept the same as on the primary server:
•DB2 instance and database name
•HADR service port (SVCENAME)
•Connection parameters (user, password, port)
•Log location (LOGARCHMETH1)
|
Shared location: Use a shared location for archive logs that are accessible from all servers in the HADR environment.
|
For the InfoSphere CDC instance on a standby server, the following prerequisites apply:
•Identical InfoSphere CDC installation location ($CDC_HOME) as on the primary instance.
•InfoSphere CDC refresh loader directory on the primary server must be accessible from all HADR servers. The DB2 instance owner and the InfoSphere CDC user must have read and write permission for this directory.
•InfoSphere CDC user name (that is, cdcuser) must be the same as the user name on the primary server instance. For Linux and UNIX environments, the user ID must be the same (that is, 1000).
•In Linux and UNIX environments, InfoSphere CDC user must have the same primary group (and group ID) as the DB2 instance owner (that is db2iadm1) on each server (primary and standby).
These prerequisites ensure that all the InfoSphere CDC instances on a DB2 standby instance are ready to become active if the DB2 standby database is changed to the primary database.
Restrictions
There are no additional restrictions for HADR with shadow tables other than the shadow tables restrictions and the HADR support for read on standby on column-organized tables.
To avoid any potential incompatibility in the metadata from different versions, use the same version of InfoSphere CDC on all HADR servers.
3.6.5 Installation and configuration
This section explains how to configure and enable shadow tables in an HADR environment.
HADR initial state
An HADR environment must be in place first before setting up the shadow tables. For the HADR configuration, see 2.7.3, “Configuring primary and standby databases” on page 43.
For this section, the assumption is that the HADR is already set up and its configuration and failover were verified already. Another possible scenario is to have already enabled shadow tables on the HADR primary server only. In that particular case, to perform the HADR configuration, it is easier to start with a full backup of the primary database. It will already include the InfoSphere CDC metadata information and that backup can be restored on the standby database as the step to configure HADR.
InfoSphere CDC installation
In an HADR configuration, the InfoSphere CDC component “InfoSphere CDC for DB2 for Linux, UNIX, and Windows” must be installed on all HADR servers (primary, standby, and any auxiliary standby).
For installation details, see 3.3, “Deployment” on page 61.
The following items should be noted when InfoSphere CDC for DB2 uses the same location for InfoSphere CDC on each server ($CDC_HOME):
•Run InfoSphere CDC configuration tool only on the active InfoSphere CDC instance after the installation.
•On Linux and UNIX platforms, the user for InfoSphere CDC installation must be the same on all HADR servers.
User ID and group ID for the InfoSphere CDC user must match on all HADR servers (primary, standby and auxiliary standby if applicable).
•The InfoSphere CDC user primary group on each HADR server must be the same primary group as the DB2 instance owner.
•The InfoSphere CDC user profile (/home/cdcuser/.bashrc) must be modified to alter the default privileges for directory creation as shown in Example 3-56.
Example 3-56 umask setting to be added to the InfoSphere CDC user profile
[cdcuser@db2pure04 cdcuser]$ cat /home/cdcuser/.bashrc
# .bashrc
# Source global definitions
if [ -f /etc/bashrc ]; then
. /etc/bashrc
fi
# User specific aliases and functions
#UMASK ADDED TO ALLOW DB2 USER access CDC_REFRESH_LOADER_BACKUP_PATH
umask 007
InfoSphere CDC Access Server
As described in 3.6.1, “Shadow tables configuration” on page 117, there are three possible deployment scenarios for InfoSphere CDC Access Server. Because on the InfoSphere CDC Access Server, a datastore is defined pointing to the InfoSphere CDC Replication Engine located on the actual HADR primary server, the following must be considered when configuring the InfoSphere CDC Access Server according to these three scenarios:
•InfoSphere CDC Access Server collocated with InfoSphere CDC Replication Engine on each HADR server
In this case, each datastore can be configured using the host name “localhost”, because the InfoSphere CDC Replication Engine is always on the same server as the InfoSphere CDC Access Server.
•InfoSphere CDC Access Server deployed outside of the HADR cluster
In this case, the datastore on the InfoSphere CDC Access Server is configured using the IP address or host name of the InfoSphere CDC Replication Engine located on the HADR primary server. However, after a failover, this datastore definition must be updated to use the InfoSphere CDC Replication Engine on the new HADR primary server.
•InfoSphere CDC Access Server deployed outside of the HADR cluster using a virtual IP address for the primary database
When a virtual IP address is used to point to the current HADR primary server, the datastore definition uses this virtual IP address. With this configuration, after the datastore is set to use the Virtual IP address, it will always point to the correct InfoSphere CDC Replication Engine on the current HADR primary server.
After InfoSphere CDC and its components are installed, you need to configure the active InfoSphere CDC instance, located on the HADR primary server.
InfoSphere CDC configuration on the primary instance
The initial InfoSphere CDC active instance is configured on the HADR primary server. Complete the following steps to configure the InfoSphere CDC active instance:
1. Run InfoSphere CDC configuration tool, dmconfigurets.
2. Create an InfoSphere CDC instance on the primary HADR server.
3. During the instance configuration, a file system path must be selected for the InfoSphere CDC “refresh loader path”. This file system path must be created on the primary server and on all the standby HADR servers.
The InfoSphere CDC configuration metadata is created under the product home directory. The operational metadata is created inside the database itself so the configuration metadata is synchronized and replicated to all standby servers. The operational metadata is replicated to all standby servers as part of the HADR replication.
For more details about adding a new instance of InfoSphere CDC for DB2 for LUW (Windows), see the IBM Knowledge Center at the following web address:
Configuring Refresh Loader for InfoSphere CDC
In the InfoSphere CDC refresh process, the default option is to use LOAD with the NONRECOVERABLE option. To avoid placing the table space where the table is in backup pending mode, it is necessary to use LOAD with the option COPY YES. With this change, you can avoid having the table space in backup pending state but still retain the ability to roll forward logs on the HADR standby database.
|
CDC system parameters: The InfoSphere CDC system parameters must be set before starting the InfoSphere CDC instance.
|
Use the command in Example 3-57 to apply the COPY YES option in the InfoSphere CDC refresh.
Example 3-57 dmset options for InfoSphere CDC refresh loader for HADR
dmset -I <cdc_inst_name> refresh_loader_with_backup_copy=true
dmset -I <cdc_inst_name> refresh_loader_cleanup_backup_copy=false
dmset -I <cdc_inst_name> refresh_loader_backup_path=<cdc_refresh_loader_path>
It is important to mention that both InfoSphere CDC and DB2 users require read and write permissions to the directory where the load files are stored, <cdc_refresh_loader_backup_path>. This directory can be the same directory specified earlier during the instance creation of cdc_refresh_loader.
For this directory path, the file system must use the same mount point on all HADR servers (that is, /cdc/refresh_loader) and must be accessible from all HADR standby nodes (primary, standby, and any auxiliary standby).
Each time the InfoSphere CDC Replication Engine creates a new directory under the <cdc_refresh_loader_path>/BACKUP_COPY/ directory for DB2 load copies, the directory is created with the InfoSphere CDC user ownership. The directory is used to keep the LOAD copies across the different HADR servers.
Because DB2 needs read and write privileges on the directory, the DB2 instance owner and the InfoSphere user must have the same primary group on all HADR servers. In addition, it is necessary to ensure that the DB2 user under the same primary group as the InfoSphere CDC user can access the LOAD directory created by InfoSphere CDC. To allow this situation, the InfoSphere CDC user profile has to be set as indicated in Example 3-56 on page 122 on each HADR server (primary, standby and auxiliary standby if any).
Starting InfoSphere CDC instance on the primary server
At this point, you can start the InfoSphere CDC instance on the active server by following the steps described in 3.3.5, “Replication setup” on page 68.
When both the Access Server and the Replication Engine are started, the next step is to create a single subscription and map the tables. Use “One-to-One mapping” and “Standard” as the mapping type. For more details about these operations, see 3.3.6, “Subscriptions and table mappings” on page 72.
The next step after setting up the mapping is to start mirroring. Select “Continuous” as the mirroring method.
When the table mapping under the subscription becomes active, all shadow tables are refreshed and ready.
Setting InfoSphere CDC instance on the standby server
To set up an InfoSphere CDC instance on the standby server, you can copy the instance directory from the primary server to each HADR standby server.
The following steps set up the InfoSphere CDC instance on the standby server:
1. Stop replication and the InfoSphere CDC instance on the primary server.
You can use InfoSphere CDC Management Console or the InfoSphere CDC for DB2 commands to stop replication and the InfoSphere CDC instance.
The following InfoSphere CDC for DB2 commands stop replication and the InfoSphere CDC instance:
– Stop InfoSphere CDC replication (Example 3-58).
Example 3-58 Command to stop InfoSphere CDC replication on the subscription
dmendreplication -I <cdc_inst_name> -c -s <cdc_subscription_name>
The “-c” option specifies that InfoSphere CDC end replication in a controlled manner. This option lets InfoSphere CDC complete all in-progress operations and apply pending changes to the target table.
– Stop InfoSphere CDC instance (Example 3-59).
Example 3-59 Command to shutdown InfoSphere CDC instance
dmshutdown -I <cdc_inst_name>
When using the command instead of the Management Console, verify that the subscription has stopped by checking the InfoSphere CDC instance logs in $CDC_HOME/instance/<cdc_inst_name>/log.
•Copy the entire instance directory, $CDC_HOME/instance from the primary server to each standby server.
One way to do this is by creating a tar file and copying it over to each HADR standby server and extracting the tar file into the $CDC_HOME/instance directory.
Example 3-60 shows the command to compress the active InfoSphere CDC instance directory from the HADR primary server.
Example 3-60 Compress the instance directory
cd $CDC_HOME/instance/
tar -zcvf cdc_inst_<instance_name>.tar.gz <instance_name>
Example 3-61 shows the command to uncompress the tar file on the HADR standby server.
Example 3-61 Uncompress the instance directory
cd $CDC_HOME/instance/
tar -zxvf cdc_instance<instance_name>.tar.gz
Verifying InfoSphere CDC and HADR configuration
After the active InfoSphere CDC instance is configured, verify that the actual configuration is functional by completing the following tasks:
1. Perform an HADR takeover (TAKEOVER HADR) and verify that HADR is in the “PEER” state. For information about how to check HADR status, see 2.7.3, “Configuring primary and standby databases” on page 43.
On the HADR standby server, run the following command to start the takeover process:
db2 takeover hadr on database $DATABASE
2. Start the InfoSphere CDC instance on the standby server using the following command:
nohup ./dmts64 -I cdcinst1 &
The instance name is the same as the one configured on the primary HADR server.
3. Change host name and IP address of the connection to the data source and update the subscriptions using that data source connections.
4. Start InfoSphere CDC replication using the command line or the InfoSphere CDC Management Console and verify that all table mappings become active.
After verifying that the InfoSphere CDC and HADR configuration is working as expected, you can failback to the old primary to use it as the HADR primary server.
To failback to the old primary server, complete the following steps:
1. Stop the replication and InfoSphere CDC on the new primary server.
2. Failback HADR to the old primary.
From the old primary, enter the following command to start the fallback process:
db2 takeover hadr on database $DATABASE
3. Verify that HADR is in the PEER state from the primary database.
4. When the HADR is in the PEER state, start InfoSphere CDC, activate the subscription, and perform the steps required to start mirroring.
At this point, the main configuration for shadow tables in an HADR environment can be considered completed.
3.6.6 Shadow tables configuration and metadata
An important consideration when implementing shadow tables for an HADR environment is how the InfoSphere CDC metadata is kept in synchronization with the primary server on each standby server.
There are two types of InfoSphere CDC metadata. The operational metadata is stored within the database and it is replicated to each standby server as part of HADR replication. For InfoSphere CDC configuration metadata (table mapping change information), the replication must be implemented manually to ensure that each standby server has the latest copy of the configuration metadata used on the primary.
To maintain the configuration metadata, consider the following two methods:
•On-demand metadata synchronization
•Programmed synchronization
On-demand metadata synchronization
On the HADR primary server, the configuration metadata can be synchronized to each HADR standby server using scp, rsync, or similar commands. Example 3-62 shows how to synchronize the configuration metadata with the rsync command.
Example 3-62 Synchronization for InfoSphere CDC configuration metadata
export INSTANCE=cdcinst1
export CDC_HOME=/home/cdcuser/bin/ReplicationEngineforIBMDB2/
rsync -avz $CDC_HOME/instance/$INSTANCE/conf/md* cdcuser@hadrstandby:$CDC_HOME/instance/$INSTANCE/conf
You also can use the dmbackupmd command to back up configuration metadata to the backup directory located in $CDC_HOME/instance/<instance_name>/bX, as shown in Example 3-63. This directory can have multiple backup files; use the latest backup file.
Example 3-63 Taking a backup of the configuration metadata with dmbackupmd
[cdcuser@db2pure06 bin]$ ./dmbackupmd -I cdcinst1
[cdcuser@db2pure06 bin]$ cd /home/cdcuser/bin/ReplicationEngineforIBMDB2/instance/cdcinst1/conf/backup/
[cdcuser@db2pure06 backup]$ ls -ltrh
total 144K
drwxrwx--- 2 cdcuser db2iadm1 4.0K Aug 11 10:27 b1
-rw-rw---- 1 cdcuser db2iadm1 135K Aug 11 10:29 dmbackupdir.tar.gz
drwxrwx--- 2 cdcuser db2iadm1 4.0K Aug 15 12:53 b2
[cdcuser@db2pure06 backup]$ cd b2/
[cdcuser@db2pure06 b2]$ ls
md$1.wal md.dbn
Compress the backup directory in a tar file to synchronize it with each standby server as shown in Example 3-64.
Example 3-64 Compressing and transferring the metadata backup to the standby server
cd $CDC_HOME/instance/<instance_name>/conf/backup
tar -zcvf cdcdmbackupdir.tar.gz bnX
(Note: X refers to the most recent directory)
scp cdcdmbackupdir.tar.gz cdcuser@db2shadowt:$CDC_HOME/bin/RE/instance/cdcinst1/backup
After the configuration metadata backup file is copied to each HADR standby server, uncompress the backup file by using the command shown in Example 3-65.
Example 3-65 Replacing standby configuration metadata on the standby
cd $CDC_HOME/instance/<instance_name>/conf/
tar -zxvf dmbackupdir.tar.gz
Consider keeping the log history synchronized across the standby servers by copying the database event file in $CDC_HOME/instance/<instance_name>/events/* to the standby servers. Use the same method of copying the configuration metadata.
Programmed synchronization
You can also create a script and schedule a job to automate the configuration metadata synchronization process. Example 3-66 shows a script with the rsync command for synchronizing the configuration metadata.
Example 3-66 Sample script to synchronize configuration metadata
# cdc_md_sync.sh
#Sample script for instance metadata synchronization
#
#!/bin/bash
export INSTANCE=cdcinst1
export CDC_HOME=/home/cdcuser/bin/ReplicationEngineforIBMDB2/
rsync -avz $CDC_HOME/instance/$INSTANCE/conf/md* cdcuser@hadrstandby:$CDC_HOME/instance/$INSTANCE/conf
Any job scheduler such as, cron can run the script. When you run the script with a scheduler, understand that the remote login to the standby system might be required.
The following cron command runs the synchronization script every15 minutes:
*/15 * * * * /home/cdcuser/cdc_md_sync.sh
The frequency set for this synchronization determines the gap in the configuration metadata between the primary InfoSphere CDC instance and the standby InfoSphere CDC instance.
3.6.7 Considerations for an HADR role switch
In addition to the steps required to perform a role switch (or takeover) in an HADR environment, some extra steps are required to failover the InfoSphere CDC active configuration to the new active HADR server.
Planned failover
In case of a planned failover (takeover), use the following steps to stop InfoSphere CDC on the active server (HADR primary) and start it again on the passive server (new active):
1. Stop replication for the subscription on the HADR primary server where the InfoSphere CDC active instance is located. Run the following command:
[cdcuser@db2pure06 bin]$ ./dmendreplication -I cdcinst1 -c -s SUB1
Command for SUB1 successfully executed
2. Stop the active InfoSphere CDC instance on the HADR primary using the following command and wait until it finishes gracefully.
[cdcuser@db2pure06 bin]$ ./dmshutdown -I cdcinst1
The messages you should receive are:
Waiting for the single scrape change log to be persisted to disk. This may take a while...
IBM InfoSphere Change Data Capture has successfully shutdown.
3. From the HADR standby server, perform the DB2 HADR takeover command to failover to the HADR standby server.
[cdcuser@db2pure04 bin]$db2 takeover hadr on database $DATABASE
4. After the HADR takeover is completed and the new primary is started, restore the latest copy of InfoSphere CDC configuration metadata from the old primary as described in 3.6.4, “Standby server considerations” on page 119.
5. Start the InfoSphere CDC instance on the new HADR primary server (ensure that configuration metadata was restored before this step).
nohup ./dmts64 -I cdcinst1 &
6. Update the host name or IP address of the connection to the datastore using the Management Console and update the subscriptions using the new datastore connection details.
7. Clear the staging store for the instance using the dmclearstagingstore command:
[cdcuser@db2pure04 bin]$ ./dmclearstagingstore -I cdcinst1
Command executed successfully
8. Restart the subscription, selecting the Start Mirror option from Management Console or using the dmstartmirror command from the command line.
[cdcuser@db2pure06 bin]$ ./dmstartmirror -I cdcinst1 -s SUB1
Command for SUB1 successfully executed
Unplanned failover
For an unplanned failover where the HADR primary server is not reachable or fails, the failover procedure is the same as what is described in “Planned failover” on page 129 except for the first two steps. The HADR takeover command must use the BY FORCE option.
In the unplanned failover scenario when the HADR primary server is unavailable, it is important to consider that the InfoSphere CDC configuration metadata is the last copy of what was synchronized to the former standby server (now primary) before the failover event. If any table-mapping in the subscription was changed since that last synchronization, it is necessary to reapply these changes before clearing the staging store and restarting the subscriptions.
3.6.8 Considerations for InfoSphere CDC Access Server after a failover
After a failover procedure on the environment, take these considerations according to the three deployment scenarios of InfoSphere CDC Access Server:
•InfoSphere CDC Access Server collocated with InfoSphere CDC Replication Engine on each HADR server
In this scenario, the datastore already points to the InfoSphere CDC Replication Engine on the same server. There is no need to update the datastore properties as each datastore is local to the Replication Engine.
It is necessary, however, to update the connection IP address or host name when connecting with InfoSphere CDC Management Console after a failover. In this scenario, InfoSphere CDC Management Console points to the InfoSphere CDC Access Server on the previous HADR primary server (now standby). Therefore, the IP address or host name of the new primary server that hosts the InfoSphere CDC Access Server should be used when connecting from the InfoSphere Management console after a failover.
•InfoSphere CDC Access Server deployed outside of the HADR cluster
In this scenario, the InfoSphere CDC Access Server is deployed outside of the HADR cluster using a third server. After failover, the datastore definition still points to the InfoSphere CDC Replication Engine located on the old primary HADR server, now HADR standby. Therefore, the datastore connection must be updated to point to the correct InfoSphere CDC Replication Engine on the new HADR primary server.
For this scenario, it is not necessary to update the connection defined on the InfoSphere CDC Management Console. Using a unique InfoSphere CDC Access Server external to the HADR cluster, the connection defined on InfoSphere CDC Management Console is always pointing to the only InfoSphere CDC Access Server defined on the environment.
•InfoSphere CDC Access Server deployed outside of the HADR cluster using a virtual IP address for the primary database
In this scenario, no change is required to the datastore. After a failover, the virtual IP address points to the actual HADR primary server. InfoSphere CDC Access Server datastore is defined used this virtual IP address so it will automatically point to the actual HADR primary and its CDC Replication Engine.
It is also not necessary to update the connection defined on the InfoSphere CDC Management Console. Because there is a single InfoSphere CDC Access Server external to the HADR cluster, the connection defined here always points to the only InfoSphere CDC Access Server defined on the environment.
Updating InfoSphere CDC Access Server datastore connection
When a failover is performed on an HADR environment where shadow tables are used, it might be necessary to update the datastore connection defined on InfoSphere CDC Access Server to point to the InfoSphere CDC Replication Engine located on the current HADR primary server.
To update the connection defined in the datastores, use the following steps:
1. Using the InfoSphere CDC Management Console, connect to the InfoSphere CDC Access Server. In case of multiple InfoSphere Access Servers, connect to the one deployed on the current HADR primary Server (Figure 3-15).

Figure 3-15 Login to connect to the new active Access Server (on HADR primary)
2. On the datastore properties panel (Figure 3-16), select Update Related Subscriptions to update the datastore properties and its subscription.

Figure 3-16 Datastore properties panel
3. The tool might show the change on the host name detected on the subscription (Example 3-17). If necessary, update the host name or IP address to point to the InfoSphere CDC Replication Engine located on the current HADR primary.

Figure 3-17 Update Related Subscriptions message notifies about the host name change
4. After the subscription is updated, the Management Console shows that the subscription is in an inactive state. To activate the subscription, select the subscription and use the Start Mirroring option as shown in Figure 3-18.

Figure 3-18 Starting the replication on the subscription by using the Start Mirroring option
When InfoSphere CDC mirroring starts to synchronize the source table with its shadow table, all functionality of the shadow table feature becomes available on the new HADR primary database.
From this point, applications and queries can benefit from the advantage of shadow tables after either a planned or an unplanned failover.
..................Content has been hidden....................
You can't read the all page of ebook, please click here login for view all page.