3. Drupal Installations Explained
This chapter shows you where and how to install Drupal. When you finish, you should have a Drupal site that you can use through this book. That is where you can practice everything else you do in upcoming chapters.
At the end of this chapter, you should be able to
![]() Choose the best place to host Drupal.
Choose the best place to host Drupal.
![]() Choose the best way to install Drupal.
Choose the best way to install Drupal.
![]() Install Drupal automatically.
Install Drupal automatically.
![]() Install Drupal manually.
Install Drupal manually.
![]() Get help if you’re stuck with installing Drupal.
Get help if you’re stuck with installing Drupal.
Hosting Your Drupal Site Explained
Drupal is not like many other software programs. It can’t just run on any computer. It requires a server to run successfully. That means you normally have the choice of installing Drupal in one of three places:
![]() A local server installed on your computer
A local server installed on your computer
![]() A web server that you own or rent
A web server that you own or rent
![]() A web server hosted by Drupal specialists
A web server hosted by Drupal specialists
Choosing the best place to install Drupal is important, so here is an explanation of the difference between the three options.
A Local Server Installed on Your Computer
We do not recommend that beginner Drupal users use a local server.
It can be tempting to choose this route. More advanced users find several useful advantages to working on your computer:
![]() Working offline: You can work without an Internet connection.
Working offline: You can work without an Internet connection.
![]() Privacy: Your Drupal site will be safe and private, accessible only to people who can access that computer.
Privacy: Your Drupal site will be safe and private, accessible only to people who can access that computer.
![]() Free: There are no fees to pay.
Free: There are no fees to pay.
However, there are also several important disadvantages to using a computer:
![]() Extra installations needed: You need to download and configure special software for your computer.
Extra installations needed: You need to download and configure special software for your computer.
![]() Difficult to get help: You can’t easily show it to other people and ask for help.
Difficult to get help: You can’t easily show it to other people and ask for help.
![]() Only one computer: You can access it only from the computer you used to install it.
Only one computer: You can access it only from the computer you used to install it.
![]() Need to move to launch: When you’re ready to make your site public, you need to move everything to a web server and adjust for any differences between the two locations.
Need to move to launch: When you’re ready to make your site public, you need to move everything to a web server and adjust for any differences between the two locations.
Because of these disadvantages, installing on your computer can present significant obstacles for a beginner. Do not take this route until you have more experience.
However, if you do feel comfortable overcoming these obstacles, you can find instructions on how to install Drupal on a PC at http://www.drupal7explained.com/pc and on a Mac at http://www.drupal7explained.com/mac.
A Web Server That You Own or Rent
Unlike your computer, a web server is specifically designed for hosting websites so that they are easy to visit for anyone who’s online.
If you work for a company, it might provide a server. However, many people need to rent space from a hosting company.
There are two common types of web server: Linux and Microsoft. Both require PHP, because that is the language Drupal is written in, and MySQL, because it is the type of database Drupal normally uses. These are the minimum versions needed:
![]() MySQL: 5.0.15 or above
MySQL: 5.0.15 or above
Linux servers also require Apache, a type of web server software. The minimum version for that is 1.3 and above. You can find more details on Drupal’s technical requirements at http://drupal.org/requirements.
To run Drupal, Apache has long been the favorite choice. Microsoft is working hard to make Drupal run as smoothly as possible on its servers, but for now, Apache is still recommended.
Most hosting companies now support Drupal, but it’s worth choosing carefully. Some hosting companies are much better than others. Here is some advice before picking your host:
![]() Search http://www.drupal.org/forum for other people’s experiences with that host.
Search http://www.drupal.org/forum for other people’s experiences with that host.
![]() Contact the hosting company’s customer support and ask what it knows about Drupal. One of our training students actually called the phone numbers of several hosts and timed their response. After all, in an emergency you don’t want to be on hold for an hour or to be talking to someone that knows nothing about Drupal.
Contact the hosting company’s customer support and ask what it knows about Drupal. One of our training students actually called the phone numbers of several hosts and timed their response. After all, in an emergency you don’t want to be on hold for an hour or to be talking to someone that knows nothing about Drupal.
For more Drupal hosting advice, visit http://www.drupal7explained.com/hosting.
A Web Server That’s Hosted by Drupal Specialists
You just saw that you can install Drupal on almost any server that has PHP and MySQL installed. However, you can also host on servers that are fine-tuned for Drupal.
There are many advantages to choosing Drupal-specific hosting services:
![]() They are managed by Drupal experts who know exactly what Drupal sites need to run well.
They are managed by Drupal experts who know exactly what Drupal sites need to run well.
![]() They can keep your web server up to date, which greatly increases security. Some also keep your Drupal site up to date for you.
They can keep your web server up to date, which greatly increases security. Some also keep your Drupal site up to date for you.
![]() They provide extra features that make it easier to install and manage a Drupal site.
They provide extra features that make it easier to install and manage a Drupal site.
We recommend you consider using a Drupal-specific hosting service. you can find a recommendation at http://drupal7explained.com/hosting. However, we’re not going to use one in this book. This is for two main reasons:
![]() Some of these services add a lot of extra features when they install Drupal. Those features will be confusing as you try to follow along with the book.
Some of these services add a lot of extra features when they install Drupal. Those features will be confusing as you try to follow along with the book.
![]() To keep your site safe and secure, these services may restrict access to some of your Drupal site’s files, which will cause problems in later chapters of this book.
To keep your site safe and secure, these services may restrict access to some of your Drupal site’s files, which will cause problems in later chapters of this book.
Installation Recommendations Explained
Although you can install Drupal in other ways, two methods are recommended:
![]() Install Drupal automatically on a web server.
Install Drupal automatically on a web server.
![]() Install Drupal manually on a web server.
Install Drupal manually on a web server.
If you use one of these two methods, it is easier to follow along with this book.
Installing Drupal automatically is a fast and easy method to start with Drupal, but you need to make sure this method is supported by your hosting company.
If you choose to install Drupal manually, you’ll be moving Drupal files to the web server. For that, you’ll need File Transfer Protocol (FTP) software. One good choice is Filezilla, which is free to download and can work on Windows, Mac, or Linux computers. To download it, go to http://www.filezilla-project.org, and click Download Filezilla Client.
You will see both recommended ways to install Drupal. If you’re in a hurry, use the One-Click option explained in the section, “Install Drupal Automatically.”
If you’d like to be geeky and take the time to install Drupal yourself, use the steps explained in the section, “Manual Drupal Installations Explained.”
Automatic Drupal Installations Explained
Automatic installers are often called One-Click installers. Actually, One Click is a bit of an exaggeration. Installing Drupal this way takes approximately five clicks. There are many different versions of automatic installers. You’re going to use perhaps the most popular version, which is called Fantastico. Your hosting company may offer an alternative that looks a little different but works in a similar way.
The following are steps to install Drupal automatically:
1. Login to your web hosting account: Each hosting account looks a little different, but there are often similarities. CPanel and Plesk are two popular types of software used for an account. In this example, you use CPanel, as shown in Figure 3.1.

2. Find the Fantastico button and click it: You can find the button on any of the rows, but you can normally find it by looking for the blue smiley face, as shown in Figure 3.2.

3. View the Fantastico Control Panel: After clicking the Fantastico button, the main Fantastico Control Panel displays, as shown in Figure 3.3. Click Drupal on the left.

4. Choose to install Drupal: You now see a screen like the one in Figure 3.4 with a brief introduction to Drupal. Click New Installation to proceed.

5. Enter your new site details: Fantastico now asks for the details of your new site. Here’s what you need to know:
![]() Install on domain: Unless you’re an experienced website builder, you can leave this field alone.
Install on domain: Unless you’re an experienced website builder, you can leave this field alone.
![]() Install on directory: You can leave this blank if you’d like the site to be accessible directly via your domain (for example: http://www.drupal7explained.com). The recommended alternative for learning with this book is to use a subfolder. If you do this, it’s not difficult to move your site if you later want to make it accessible directly via your domain. So, go ahead and enter Drupalville into this field.
Install on directory: You can leave this blank if you’d like the site to be accessible directly via your domain (for example: http://www.drupal7explained.com). The recommended alternative for learning with this book is to use a subfolder. If you do this, it’s not difficult to move your site if you later want to make it accessible directly via your domain. So, go ahead and enter Drupalville into this field.
![]() Admin: This is a username you use on your site. Don’t use “admin,” because that is too easy for other people to guess.
Admin: This is a username you use on your site. Don’t use “admin,” because that is too easy for other people to guess.
![]() Password: This is the password you use to log in. Don’t use “admin” here! Don’t use “password,” “1234,” or “iloveyou,” either. A good combination of numbers, punctuation, and uppercase and lowercase letters is vital.
Password: This is the password you use to log in. Don’t use “admin” here! Don’t use “password,” “1234,” or “iloveyou,” either. A good combination of numbers, punctuation, and uppercase and lowercase letters is vital.
![]() Admin email: Enter your email address here. If you forget your password, this is where it will be sent.
Admin email: Enter your email address here. If you forget your password, this is where it will be sent.
![]() Admin full name: Enter your name here.
Admin full name: Enter your name here.
![]() Site name: Enter Drupalville here. This is what people see when they get emails from your site. For example, the email will say: Thank You for Registering at Drupalville.
Site name: Enter Drupalville here. This is what people see when they get emails from your site. For example, the email will say: Thank You for Registering at Drupalville.
![]() Install sample data: Make sure that this box is unchecked. You are not going to use any sample data for your Drupal sites in this book.
Install sample data: Make sure that this box is unchecked. You are not going to use any sample data for your Drupal sites in this book.
Enter those details in the screen, as shown in Figure 3.5.

6. Confirm your installation details: After you enter all your information and click Install, a confirmation screen displays, as shown in Figure 3.6. Click Finish Installation to complete the install.

7. Bookmark your new site addresses: The final Drupal screen in Fantastico displays. Your installation has completed. There will be two links, as shown in Figure 3.7:
![]() The full URL to the admin area (bookmark this!)
The full URL to the admin area (bookmark this!)
![]() The full URL to this installation of Drupal
The full URL to this installation of Drupal

Take its advice, and click both links; then bookmark them in your browser. You’ll use both of those links often!
8. Visit your new site: Click the links, as shown in Figure 3.7. In the example you previously saw, the links can take you to http://www.drupal7explained.com/drupalville. You now see a new website, as shown in Figure 3.8.
9. Try logging in to your new site: You can log in to your site by using the login area shown in Figure 3.9. Log in using the username and password you created earlier.

10. View the Drupal Control Panel: If you entered your username and password correctly, you’ll now see a black and gray administration menu across as the top of your site, as shown in Figure 3.10.
11. Congratulations! You can now go straight to the end of this chapter. Most of the rest of this chapter will be spent installing Drupal manually, but even many experienced Drupal users prefer to do things automatically using an automatic installer.
Manual Drupal Installations Explained
An old-fashioned HTML website consists only of one part: files. It doesn’t need anything else to run.
However, a Drupal website is different because it consists not only of files but also includes a database to store all the site’s information. You must set up both the files and the database and then connect them together. So, the process of installing Drupal manually is like this:
Step 1: Create a database.
Step 2: Download the Drupal files, and upload them to your web server.
Step 3: Complete the Drupal installation by connecting the database and files together.
Step 1: Create a Database
The first step is to create a database to store all the unique information about your site.
A database is basically a group of tables with letters and numbers stored in its rows and columns. Think of it as several spreadsheets. There’s a spreadsheet with all the articles you write. There’s another for all of the users who register on your site. The database makes it easy for Drupal to easily handle large amounts of data. If a new article or user is added, Drupal just needs to add an extra row to the appropriate spreadsheet. Drupal uses a particular type of database known as MySQL.
Now go ahead and set up a database for your new Drupal site:
1. Log in to your web hosting account: Each hosting account looks a little different, but there are often similarities. CPanel and Plesk are two popular types of software used for hosting accounts. In this example, you use CPanel, which looks like Figure 3.11.

2. Find the button that says MySQL Databases and click it: The button has the MySQL name and the blue dolphin logo, as shown in Figure 3.12.

3. Create a new database: Choose a name that is relatively easy to remember, and click Create Database. Be sure to write this name down and note that it’s likely to have your hosting account name before it. In Figure 3.13, your new database is called drupal7e_drupalville.

4. Create a database user: The next step is to create a user account so that you can access the database. Without password protection, anyone might log in and see your site’s important information. Here’s what you need to do:
![]() Choose a username: Enter a short username here, different from anything you’ve used before. This example uses dbuser. The username is a little confusing because your hosting account name is added also, so in Figure 3.14, your full username will be drupal7e_dbuser.
Choose a username: Enter a short username here, different from anything you’ve used before. This example uses dbuser. The username is a little confusing because your hosting account name is added also, so in Figure 3.14, your full username will be drupal7e_dbuser.

![]() Choose a password: Some versions of CPanel can help you choose a password that is difficult to guess. If you set your own choice, use a combination of numbers, punctuation, and uppercase and lowercase letters so that the password is hard to guess.
Choose a password: Some versions of CPanel can help you choose a password that is difficult to guess. If you set your own choice, use a combination of numbers, punctuation, and uppercase and lowercase letters so that the password is hard to guess.
![]() Be sure to record both your username and password safely: You need them again soon.
Be sure to record both your username and password safely: You need them again soon.
![]() Click Create User: You should see a message saying the user has been created successfully.
Click Create User: You should see a message saying the user has been created successfully.
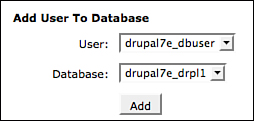
5. Allow the new user access to the database: Now you need to allow your new user to log in to the database. There should be an area called Add User to Database. Choose your database name and then your username before clicking Add, as in Figure 3.15.
6. Give your user permission to modify the database: The final step in this process is to decide what your new user can and cannot do with the database. Give them All permissions so that your Drupal site can make whatever changes it needs to the database. Click Make Changes to finish the process, as shown in Figure 3.16.

Step 2: Download the Drupal Files and Upload Them to Your Web Server
Now that you have the database ready, you can upload the Drupal files. These contain all the code and images that Drupal needs to run:
1. Find the Drupal download area: Go to http://www.drupal.org and click the Get Started with Drupal button, as shown in Figure 3.17.

2. Find the Drupal download page: You now see a page with information on getting started with Drupal. Click the Download Drupal 7.14 button, as shown in Figure 3.18. The number 7.14 may have increased by the time you read this, but don’t fear: Click this button, and you can always download the latest and recommended version of Drupal.

3. Download Drupal: Drupal download pages have green, yellow, and red areas. It works like a traffic light. The green areas have safe downloads; the yellow areas have downloads you should be cautious about; and the red areas have experimental downloads that shouldn’t be used on a live site. Remember also that you’re using Drupal 7. So, you want the download for Drupal 7 from the green area, as shown in Figure 3.19. Click the zip link, and a download starts. You receive a .zip file with a name like this: drupal-7.14.zip. It contains all the files you need to install Drupal, so look after it! Save it to your desktop, your downloads folder, or somewhere you can find it easily.

4. Uncompress the .zip file: On a Windows computer you can right-click the file and choose Extract Here. On a Mac you can click File, Open With, and choose Archive Utility. When that’s complete, you should have a folder on your desktop that looks like Figure 3.20. The folder should have a name similar to drupal-7.14.

5. Access your web server: You’re now going to start the process of moving your files on to your web server.
The first step is to open your FTP software such as Filezilla. Then log in to your FTP account, and browse to the folder where you want to install Drupal. Often, this is the root directory, which often has a name such as /public_html/, /www/, or /htdocs/.
6. Move the Drupal files to your webserver: Open the folder that just downloaded and extracted and Select All the Files. Move all the files, via your FTP software, into the folder where you’re installing Drupal. With Filezilla, this is as simple as dragging and dropping the files. Uploading might take from 5 to 30 minutes or more depending on your Internet connection.
7. Double-check your database information: Before you go any further, stop to make sure you have all the information. Here’s what you need:
![]() Hostname: This is often localhost, but some hosting companies such as GoDaddy have a different hostname. You can find it in your hosting account or by contacting customer support.
Hostname: This is often localhost, but some hosting companies such as GoDaddy have a different hostname. You can find it in your hosting account or by contacting customer support.
![]() Username: The username for your database. In this example, it was Drupalex_dbuser.
Username: The username for your database. In this example, it was Drupalex_dbuser.
![]() Password: The password for your database.
Password: The password for your database.
![]() Database name: The name of your database. In this example, it was Drupalex_dbuser.
Database name: The name of your database. In this example, it was Drupalex_dbuser.
Got all that? Then move to Step 3 and wrap up your Drupal installation.
Step 3: Complete the Drupal Installation by Connecting the Database and Files Together
You’ve now successfully set up the two halves of your Drupal site: the database (Step 1) and the files (Step 2). The final step is to connect those two halves together. You do that now:
1. Drupal Web Installer Step 1: Select an installation profile. Start your browser and visit the URL where you uploaded the files. In the example used, that was http://www.drupal7explained.com/drupalville/.
You should see an installation screen like Figure 3.21. This is the first step in Drupal’s easy-to-use installation manager. There are several steps to go through. The first one is simple: You just need to choose the Standard installation option and then click Save and Continue.

2. Drupal Web Installer Step 2: Choose language. If you have been following along, you have the option to install only English. Click Save and Continue, as shown in Figure 3.22.

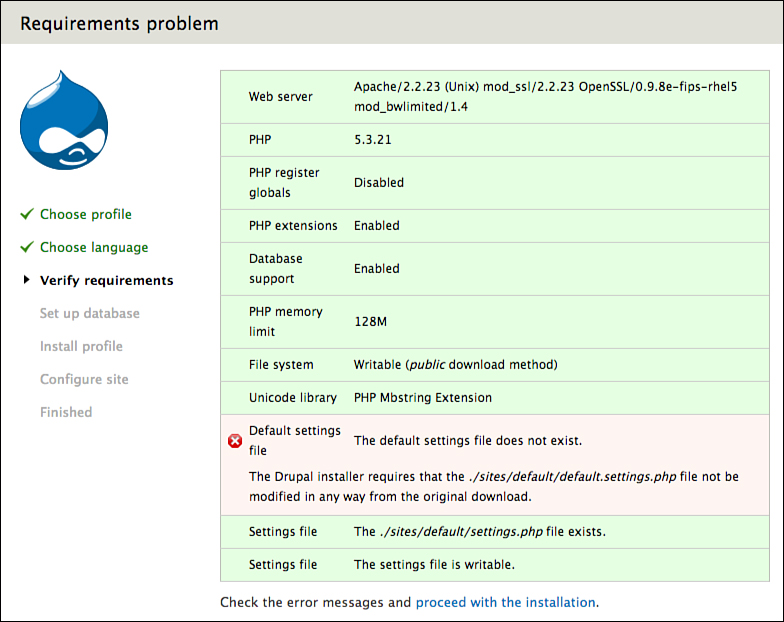
3. Drupal Web Installer Step 3: Verify requirements. For many of you, Drupal skips this step entirely. However, if your server isn’t correctly set up for Drupal, you see an error message, as shown in Figure 3.23. Drupal explains what needs to be fixed before you can proceed. If the instructions don’t make sense to you, your best options are to talk to the people running your server or to ask for help at http://www.drupal.org/forum/1.
4. Drupal Web Installer Step 4: Set up database. This is the most important step. This is where you connect your files and database together. You need the details you collected when you created the database earlier. You can see a screen, as shown in Figure 3.24:
![]() Database type: Leave this as the default setting.
Database type: Leave this as the default setting.
![]() Database name: Enter the details you collected earlier.
Database name: Enter the details you collected earlier.
![]() Database username: Enter the details you collected earlier.
Database username: Enter the details you collected earlier.
![]() Database password: Enter the details you collected earlier.
Database password: Enter the details you collected earlier.

Click Save and Continue when you finish. If you made a mistake, Drupal sends you back to try again.
There are also some advanced options. If you have serious problems getting passed this step, talk with your hosting company and ask them for help filling in the Database host and Database port fields.
5. Drupal Web Installer Step 5: Configuration. The screen shown in Figure 3.25 is the final place where you need to enter any information. Be sure to make a careful note of the email, username, and password that you enter:
![]() Site name: Enter Drupalville here. This is what people see when they get emails from your site. For example, the email will say, Thank you for Registering at Drupalville.
Site name: Enter Drupalville here. This is what people see when they get emails from your site. For example, the email will say, Thank you for Registering at Drupalville.
![]() Username: This is the username you use on your site.
Username: This is the username you use on your site.
![]() Email address: Enter an email address that you want to use for your personal account on the site.
Email address: Enter an email address that you want to use for your personal account on the site.
![]() Admin password: This is the password you use to log in. Please don’t use “admin” here! Don’t use “password,” “1234,” or “iloveyou” either. There are plenty of good free password generators available if you do a quick look on your favorite search engine.
Admin password: This is the password you use to log in. Please don’t use “admin” here! Don’t use “password,” “1234,” or “iloveyou” either. There are plenty of good free password generators available if you do a quick look on your favorite search engine.

Click Save and continue.
6. Drupal Web Installer Step 5: Finish. You finished the Drupal web installer, and you should see a message saying Congratulations, You Installed Drupal! Visit Your New Site. Click the Visit Your New Site link, and you can see your new Drupal site, as shown in Figure 3.26.

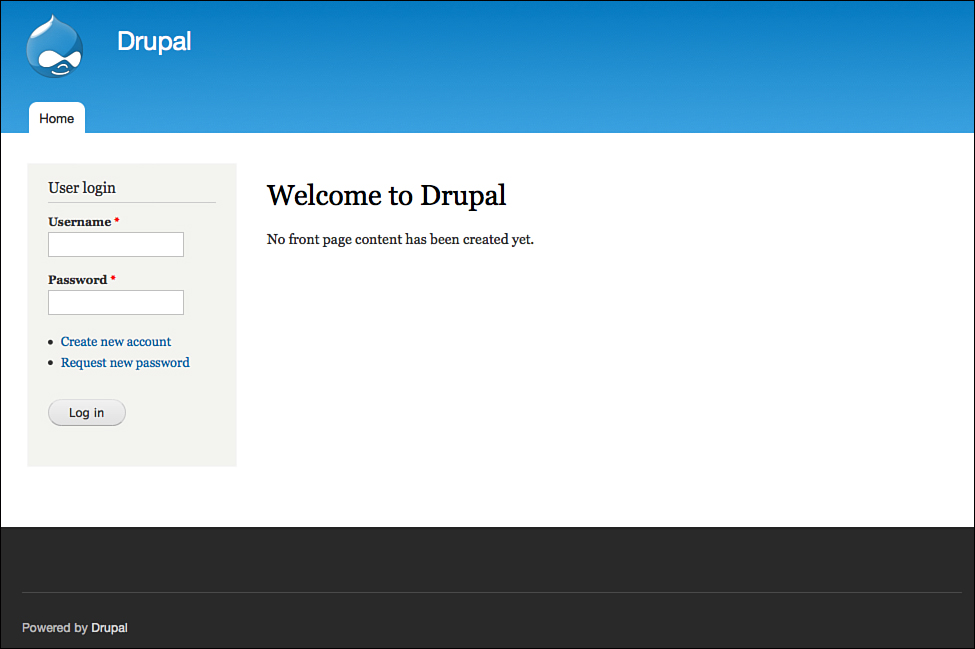
If you’re in the right place, you’ll see a login screen, as shown in Figure 3.27. Log in using the username and password you created earlier.

7. View the Drupal Control Panel. If you entered your username and password correctly, you’ll now see a black and gray administration menu across as the top of your site, as shown in Figure 3.28.

8. Congratulations! You’ve installed Drupal, and you’re ready for the rest of this book.
Getting Help with Installations
There are three places you should go if you need help at any point during this chapter:
![]() The Drupal Forum: It’s almost guaranteed that someone has experienced the same Drupal installation problem as you and has asked about it on http://www.drupal.org/forum/1/. It’s a great place to search for solutions and ask for help.
The Drupal Forum: It’s almost guaranteed that someone has experienced the same Drupal installation problem as you and has asked about it on http://www.drupal.org/forum/1/. It’s a great place to search for solutions and ask for help.
![]() The Drupal help site: There’s an installation manual available for Drupal 7 at http://www.drupal.org/documentation/install.
The Drupal help site: There’s an installation manual available for Drupal 7 at http://www.drupal.org/documentation/install.
![]() Drupal 7 Explained: http://www.drupal7explained.com has video tutorials and more to help with your installation.
Drupal 7 Explained: http://www.drupal7explained.com has video tutorials and more to help with your installation.
What’s Next?
You now have a Drupal site ready to use. In the next chapter, you tour your new site and are introduced to the most important things you need to know. Are you ready? Turn the page to continue.