Chapter 3. DDoS Mitigation and Countermeasures
We already know that the effects of a DDoS can be catastrophic for your service, business, and infrastructure. In the last chapter, we looked at various ways we can detect a potential or ongoing attack. In this chapter, we will explore ways to mitigate the attacks.
Even though we can detect the attack by macro or micro behavior, from our experiences, for mitigation, we need to dig into the low-level, nitty-gritty of the attack to devise a mitigation strategy. Like doctors who need to prescribe precise medicine based on the symptoms and predicted disease, the mitigation strategy needs to match the type of attack you are experiencing. A payload filter targeted to stop an HTTP GET flood, for example, will do no good to stop a TCP SYN flood.
Generally speaking, the DDoS attacks consist of the same type of exploit repeated over many times. For example, the TCP SYN Flood attack consists of one type of packet, TCP SYN, repeated from different sources arriving at your network over and over again. The challenge for mitigating the attack is in the volumetric and differentiation aspects of the attack. The mitigation consists of differentiating the legitimate request (in this case, TCP SYN) from the malicious sources, and doing so at an extremely high traffic rate.
Multivector Attacks
It is worth noting that we are seeing a rise of multivector attacks which combine multiple types of DDoS attacks. From a mitigation perspective, it is important to separate them out and mitigate them individually. The packets might arrive at your network edge simultaneously, but you need to treat them as if they are several separate attacks.
The options for DDoS mitigation are plentiful, and implementing the right solution against the exact attack at hand is key. We typically favor tools and features in the equipment common to all networks. Sometimes, however, you need higher performance, purpose-built DDoS mitigation systems. The value of these systems comes from their precision, visibility, learning, and deterministic performance.
The biggest question that you have to answer is how much collateral damage you are willing to take on. Like a lizard who discards its own tail in order to get away from a trap, when your entire network is down due to an ongoing DDoS attack, you might be willing to sacrifice part of your network in order to preserve other parts of your business. On the other hand, given the choice, the countermeasure should mitigate the attack with the least amount of impact.
Collateral Damage
It is often a hard pill to swallow, especially from a business perspective, to accept the fact that sometimes you need to make choices about which asset to protect while giving up other assets.
It is important to prioritize different sections of your business before the attack happens. For an e-commerce website, perhaps the search-and-order pipeline is driving your sales, and protecting the hosts responsible for that feature is more important than others. On the other hand, a nonprofit organization might place more emphasis on their landing page, which explains their mission statement.
The point is to prioritize as much as you can and get a consensus among your stakeholders within your organization.
To begin with, we should go through a few basics in the traffic flow of these common attacks such as floods, spoofing, and reflection. Having a good sense of the flow of traffic will then help us understand an appropriate deployment topology. We will discuss the general categories of mitigation techniques, including network and application mitigations. We will then apply the knowledge by diving into two of the most common DDoS attacks and their associated mitigations.
This is one of the most important chapters of this book. In a sense, we are all here to learn about how to stop DDoS attacks when they happen. Without further ado, let’s look at the DDoS terms and traffic flow.
DDoS Terms and Traffic Flow
Before moving on, we should examine some of the most common types of DDoS traffic flow and terms. They will help us understand the more complex attacks covered in later sections. We briefly covered spoofing and reflection in Chapters 1 and 2; here we will review them in more depth, as well as introduce new concepts.
Traffic Flood
As we covered previously, traffic floods consist of attacks that consume resources such as bandwidth and packet processing capacity. If you imagine an internet connection as being a water pipe and the traffic being water inside of the pipe, the flood of traffic will be a momentary burst of water that fills up the whole water pipe.
One might ask the question, “Why not just get a bigger pipe?” It is true that the problem can be mitigated at this point in time by adding capacity, but that solution will not scale as attacks grow in size. Please also keep in mind that there is a monetary cost to adding this additional capacity. If this capacity is merely “attack insurance” then it is more challenging to justify.
Source Spoofing
While IP source spoofing is not an attack on its own, it is an important concept to understand. As explained by Wikipedia:
In computer networking, IP address spoofing or IP spoofing is the creation of Internet Protocol (IP) packets with a false source IP address, for the purpose of hiding the identity of the sender or impersonating another computing system.
An attacker can spoof the source address of the attack when connected to an ISP or a provider that allows this. “How can the ISPs be so careless and trusting to allow spoofed IPs?”, you ask. Well, if you go back to the early days of the internet, it was a wide-area network connecting local academic and research networks that were mainly trustworthy. Therefore, the basic design of the IP protocol and infrastructure do not generally take into consideration the fact that some malicious user can create fake source IP address for the purpose of attacking others.
It is important to point out that when sending traffic from spoofed addresses, the attackers have no intention of receiving a response. We can use this fact to our advantage when we try to identify spoofed IPs and mitigate against the attacks.
Reflection and Amplification
The mechanics of reflection relies on a system to source a reply from the reflection point to direct the response to the spoofed source. If you recall our favorite pizza shop example from Chapter 1 (Figure 1-6), our bad guy friend is pretending to be Mike (spoofed source) and calling the pizza shop (reflection point). If successful, Mike and the pizza shop are both victims, with Mike sustaining a loss of productivity and the pizza shop potentially losing money and resources.
If we apply the same concept in the digital world, when we have a UDP-based service that does not validate source IP, coupled with an attacker’s ability to spoof IP, they form the basis of a large-scale DDoS attack. We have already seen an example of the UDP reflection flow in Figure 1-7 back in Chapter 1.
In Figure 3-1, we can see that the majority of the flood attacks consist of amplification floods.

Figure 3-1. Attack protocol frequency (source: http://ddosmon.net/insight)
Digging into amplification as a method, we can break down the popularity of different protocols used. Each has its own qualities that make it more enticing to the attacker. In Figure 3-2, the graphic gives us an idea of the popularities of amplification protocols as of this writing. DNS makes up half of the amplification attack traffic seen on the internet, with NTP, CLDAP, Chargen, and SSDP following close behind.

Figure 3-2. Frequency of protocols used for reflection (source: http://ddosmon.net/insight)
This amplification and reflection would be particularly damaging when a small request produces a large response. There are lots of well-documented attacks using this reflection and amplification method with DNS, NTP, and SNMP.
DDoS Mitigation Topology
Now that we understand a bit about the DDoS traffic flow and terminology, we can assess our general approach toward mitigation. The first mitigation approach we can take is to build our own mitigation solution. With this approach, we take full control of evaluating the equipment, setting it up, and making sure it does its job.
Of course, in today’s world of cloud computing and anything-as-a-service, another approach is to utilize the various cloud-based DDoS mitigation providers. This will generally be pay-as-you-go at the expense of lesser control and potentially higher-cost per mitigation. If you do decide to take this approach and outsource your DDoS mitigation to a cloud-based provider, it is worthwhile to use this chapter and understand the mitigation technology. After all, the cloud-based mitigator uses similar technologies to perform mitigation. They just rent the capacity out when the customers need them.
For both on-premise and cloud approaches, or a hybrid approach, you should examine existing topology and pressure points where mitigation can be applied. In this chapter, we will focus on mitigation and discuss in detail cloud-based DDoS mitigation in Chapter 4.
Reactive Versus Proactive Always-On Mitigation
The first driver for your mitigation topology is to determine if you want a reactive or proactive always-on approach. The main trade-off is the infrastructure cost. Your network and system’s first job is to accomplish your business goals, whether that is to attract business leads, communicate your mission, or to sell items online. In order to accomplish that, your infrastructure needs to run as lean as possible. If you were to place an always-on mitigation solution by watching the network traffic at all times, this would translate to additional overhead and cost. Since this device is the gatekeeper, it needs to be provisioned with as much capacity as your network, with the same availability goals; otherwise, it will become a bottleneck.
In a proactive always-on mitigation, your mitigation device might be a purpose-built device that watches over all the traffic. This device or layers of devices will need to be placed in between the external and internal network to prevent external threats.
On the other hand, if you were to choose a reactive mitigation, you might be able to scale out the solution better. You can use routing protocols to divert traffic toward the mitigation layer only when needed. Since the mitigation devices are only used when needed, you only need capacity that can sustain the attack volume and not necessarily your overall network capacity.
The downside of a reactive mitigation compared to a proactive model might be the added complexity and additional delay introduced. The added complexity of routing requires additional planning, configuration, and knowledgeable staff. The delay occurs between the time we detect an attack and the time it takes for routing to kick in and onramp the traffic toward the mitigation device. This delay is also realized as service impacting if the attack is large enough to overwhelm the target resources.
Potential Points of Attack Mitigation
Regardless of whether the mitigation approach is proactive or reactive, it makes sense to place the DDoS mitigation devices as close to the attack source as possible. You do not need to carry all the “dirty” traffic across your network just to drop them deep within your network, where other scale problems could come to light, making it a waste of network resources. Therefore it is beneficial to drop all the traffic you need to drop as early as possible. In a typical network where the attacks are coming in from the internet, the mitigation should be as close to the edge as possible.
DDoS Mitigation Outside Your Network
With so many services hosted outside of traditional network boundaries, such as in the cloud, it is a good idea to define the term “network” as befits your network. For example, the edge border might include the virtual router device you deployed in your cloud virtual private network.
In Figure 3-3, we are placing a dedicated, purpose-built, reactive mitigation system between the internet edge and the core portion of the network. When you need to mitigate, the traffic is redirected toward the mitigation systems, and clean traffic is passed back to the network.
If you utilize cloud-based mitigation, the redirection will almost always take place outside your network border. The traffic is redirected via DNS or BGP before they ever reach your border device, and clean traffic is returned back to your premise via physical or virtual tunnel links. In this case, the mitigation point is outside your organization.

Figure 3-3. Asymmetric reactive mitigation (source: http://bit.ly/2DW99GD)
It is worth noting that the actual mitigation technique could be a feature on your existing devices such as IPTables or an Access List instead of dedicated scrubbing hardware. If facing a choice of where to turn on mitigation, the same general approach should be taken. The mitigation feature should be enabled as close to the internet edge as possible.
Effective DDoS attack mitigation involves more than just one control and data plane tool. In most infrastructure, there are tools already at your disposal that you should take advantage of. In other cases, a dedicated mitigation device should be deployed. The key is to find the right tool to take care of the right attack. Let’s explore some common tools in the following sections.
Network-Level Mitigation Tools
Your network consists of routers and switches that connect your hosts together. Switches and routers can be extremely powerful systems to deal with volumetric attacks. Mitigation at the network layer, compared to higher layers such as the application or presentation layer, is faster. Mitigating an application is done in software and therefore performance takes a hit. These dataplane units generally employ forwarding application-specific integrated circuit (ASIC) with connected ternary content-addressable memory (TCAM) that are capable of filtering at line rate.
Common protocol anomalies are built into some network device forwarding ASICs. These per-packet anomalies include IP protocol version or invalid TCP flags. The good news is these features are built in and you do not need to do anything to enable them; the bad news is you might need to check with the equipment vendor on which anomalies are being checked.
However, the line-rate switching benefit of the ASICs with TCAM is also one of the downsides when it comes to DDoS mitigation. Anything done completely in hardware is often not particularly flexible and difficult to get telemetry from. Also, switches and routers do not track protocol state. This makes mitigating anything that requires state, such as session exhaustion, impossible.
At the network level, we can configure access lists to pass, drop, and in some cases rate-limit traffic. In most cases, your routers and switches already have access lists as a feature to be used for dropping traffic if needed. You want to pay close attention to the resource limitation on your network equipment, such as the number of access lists it can handle. The limitation is not as straightforward as a hard set of numbers when you take into account IPv6 versus IPv4 access lists, extended versus standard access lists, as well as the various TCP flags that you can configure your access lists to inspect.
A common method for dealing with DDoS attacks is through methods employed in IP routing. As standard IP routing is destination-based, we can use routing to route the packets toward a destination of null, the routing equivalent of a black hole. If BGP is involved, we can use Remote Triggered Blackhole (RTBH) to remotely signal our upstream router to route the particular destination into a NULL route. As network vendors would tell you, they have no problem dropping as many packets as you would like (joking!).
BGP FlowSpec
Standard BGP limits you to policy based on IP addresses alone. With BGP Flowspec defined in RFC 5575 we gain the ability to influence behavior based on a much broader set of criteria. We can match up more fields supported by BGP Flowspec (source and destination, IP protocol, source and destination port, ICMP code, and TCP Flags), as well as more dynamic actions such as drop or rate-limit.
Unfortunately, BGP Flowspec is not supported by all providers. You also need a device that is Flowspec-capable, which tends to be higher-priced, more feature-rich routers.
RTBH creates a large amount of collateral damage. In this case, you are trying to reduce the blast radius of the attack by blackholing the IP address that is being attacked. In theory, the rest of the IPs that you are using are not going to have to take the hit. In a way, the attacker wins in this scenario because you are giving up on the attacked IP. Along the same lines, you can also use IP routing to announce a prefix toward a device or interface that has uRPF enabled. This allows you to programmatically add source IPs to drop. Being more surgical with BGP requires Flowspec as we stated previously.
One of the latest trends in networking is the rise of software defined networking (SDN). One aspect of SDN, such as OpenFlow, is the separation of control and data plane. One of the benefits of the separation, as applicable to DDoS, is the ability to gain greater insights into OSI Model Layer 4 properties and to filter accordingly without losing the switching performance.
Session-Level Mitigation Tools
In many cases, attacks are meant to break a particular application or service by exhausting the resources that keep application-state information, such as the number of sessions. State exhaustion here refers to any attack that is attempting to occupy and hold open resources on your service. For example, a TCP stack may hold open resources after an SYN-ACK is sent in response to an attacker’s SYN.
Session exhaustion can sometimes be used in conjunction with the flood attacks. In the previous example of the TCP SYN flood attack, it is effectively an attack that targets both packet processing and state in your infrastructure. It will achieve its goal of bringing down your resource if either method succeeds.
Let us take a look at the tools you can use to mitigate session-level attacks. The common ones are firewalls, application delivery controllers, hosts, and purpose-built mitigation devices. We will look at each of the tools as a standalone device, but keep in mind that they can and should be used in conjunction with each other in a tiered approach.
In most networks, stateful firewalls are typically used alongside routers and switches to inspect traffic that requires higher fidelity. The value of firewalls generally is their ability to maintain state and apply interesting policy down to the source/destination pair. Because of this sometimes complex set of policies, the firewall is normally constrained by packet-per-second and memory. Therefore, firewalls can mitigate DDoS attacks to a certain point, but when the limits are reached, they became the bottleneck in any DDoS mitigation strategy.
Some firewalls have higher hardware capacities, but the fact of the matter is that if you are learning every source IP, an attack that includes spoofing will almost always overload the firewall. With IoT-based botnets, we are seeing more stateful attacks that are based on real public IP connections, so tracking the sessions would be even more taxing for the firewalls.
Application delivery controller (ADC; sometimes known as load balancers) have both stateful and stateless features. However, to get the most value out of an ADC, the consumer would need to enable the stateful features and even add some OSI Layer 7 scripting. All of the additional features will reduce the performance of the ADC.
Of course, the most important and vulnerable link in this chain is your host. The host has the highest visibility in terms of application awareness, so they have the most knobs and granular control you can utilize. However, in a typical data center, you can sometimes have hundreds of thousands of hosts; managing and fine-tuning all of them could be a challenge.
Purpose Built DDoS Mitigation Devices
These systems are the most flexible but carry a higher price tag than their network device peers. They can provide both stateless and stateful functions. Since they are purpose-built, they are focused and effective in dealing with most of the common DDoS attacks we have seen in this book. However, the downside is they are yet-another-device that you have to manage and another skill set you have to staff for. Also, due to the high price tag, they are generally reserved for entities who can justify the dollars spent.
In the following sections, we will apply the theories we have learned so far in this chapter and apply them toward mitigating two of the most common DDoS attacks: combating the classic flood and combating the state exhaustion scenario.
Example 1: Combating the Classic Flood
By now, we have already learned that one of the most common DDoS attacks is to congest your network. This congestion can happen at your internet egress or at some other bottleneck in your network; if you recall, what matters most is the weakest link in your end-to-end connection from customer to the resources you are providing. The pre-mitigation step against these flooding scenarios, as with any other mitigation techniques, requires you to understand what your current capacities are. This can be your bandwidth capacity and packets-per-second capabilities. This information will be matched to the flood level you are observing, at which point you need to initiate the various mitigation tools you have. Let’s dig deeper into the problem, understand the toolbox, and review a few potential solutions depending on your situation.
Note About This Example
We will dive into more depth and detail in this example to illustrate our points with graphs and data points. We will go from attack formation to analyzing the data, and from there we will form our mitigation response.
Please feel free to skip to the next example if you feel you already have a firm grasp of the information at hand.
Imagine you are the potential DDoS attacker who wishes to flood your target, Rich’s Bank’s network pipe. What is the first question the would-be attacker wants to ask? Probably how big your network’s internet connection is. How easy is it to find the answer to this question? Sometimes a simple traceroute from publicly available service is all it takes (Example 3-1):
Example 3-1. Traceroute from a public cloud provider to Rich’s Bank
rg:~ ddosresearch$ traceroute richs-bank.com

traceroute to richsbank.com (10.20.30.40), 64 hops max,
52 byte packets

7  xe-3-1-1.cr0-protect.ip4.you.net (1.1.1.1)
120.828 ms  120.228 ms  124.684 ms
From the traceroute output, an experienced attacker would be able to safely guess that the internet connection is likely a Juniper router with a 10-gigabit Ethernet interface (xe-3-1-1). Furthermore, since this traceroute was completed from multiple public IP addresses at different cloud providers with the same output, the attacker can assume with high certainty that Rich’s Bank is indeed behind a single 10-gigabit interface. The attacker now can have a goal to generate 11 gigabits of traffic per second toward the target and the legitimate requests will get dropped.
The next step for the attacker would be to figure out how to generate more than 10 gigabits of traffic toward the target. If the attacker follows the traditional path of buying internet connections from service providers, say 11 x 1Gb connections, and launch the attack, the attack would not last very long or successful. Why? Because it would be pretty easy to block only 11 different sources for Rich’s Bank, not to mention the attacker’s ISP would be legally required to terminate his or her service in most parts of the world.
You might be quick to point out that the attacker can use the UDP amplification method that we discussed earlier—and you would be absolutely correct! Recall from earlier in the chapter, the amplification method is the most common technique used in flood attacks when the majority of the attack consists of DNS reflection.
In Figure 3-4, we dig a bit deeper into the amplification factor of the various protocols.

Figure 3-4. Amplification bandwidth factor (source: http://bit.ly/2s4HFcD)
What you can see is DNS has a bandwidth amplification factor of up to 54x while NTP is 556x! This is quite a large difference. Would our attacker pick NTP amplification over DNS? Not necessarily. The complexity involved in identifying and dropping attacks under DNS amplification is relatively similar to any legitimate response to DNS queries. On the other hand, it is easy to block off-net NTP traffic. Our would-be attacker would use the DNS as the amplification and reflection attack of choice.
The Discoveries of Amplification Points
You might be wondering how the attacker finds these amplifiers. Generally, they are discovered by scanning the internet and executing the exact query to test for amplification.
The simple workflow of the DNS amplification attack is as follows: the attacker identifies the attack target, spoofs the IP address of the target, and makes a DNS Request to the amplifier. The amplifier then responds with many times the packet from the requests to the attack target. This manifests as a large number of DNS responses from potentially millions of endpoints around the globe.
Analyzing the Attack
Let us take a look at a snapshot of a DNS amplification attack packet in Figure 3-5 as seen by the attack target for the purpose of device a mitigation strategy.

Figure 3-5. DNS amplification packet
A few key characteristics can be identified:
All of the packets in question are from UDP source port 53 (normal for DNS responses) with a trailing set of IP fragments.
All packets are large for UDP DNS (not necessarily bad).
The DNS responses are for an ANY query.
There are a very large number of answers.
Each response is for the same domain name. The domain name itself is unimportant. The attacker has found one that behaves to their liking and they use it as a packet generator.
Let us zoom out and look at the packet distribution in this “lag” attack that was sent in pulses with a variety of attacks in Figure 3-6. The green line (top line) in this case, represents the DNS responses with fully formed DNS headers. The blue line (second line) shows all of the trailing IP fragments. The red line (third line) is the attack target server, which is not listening on any destination ports. It is sending back ICMP port unreachable messages in 100 ms increments.

Figure 3-6. Packet distribution of attack
From the packet trace and packet distribution analysis, we can see that the DNS behavior is not what you would expect. If the DNS ANY response is large, the DNS server should have switched the conversation from UDP to TCP. To successfully carry out the attack, the whole transaction must be in UDP and use an open DNS resolver that supports extension mechanisms for DNS or EDNS0.
We are now ready to construct our mitigation strategy.
Mitigation Strategy
To successfully mitigate this attack, it is important to understand if it is your internet edge that is saturated or if it is a bottleneck that leads to a service that you are protecting. Protecting the internet edge in this scenario is challenging with on-premise techniques. If you have a 10-Gb per-second internet connection, and there is greater than 10-Gb per-second traffic destined to your company, there is little you can do with on-premise equipment.
Let us explore some of the options on hand:
We can try to reduce the dependency on off-net DNS transactions.
This is probably easier said than done. The reason that this is imperative is that these are DNS responses, and most of our legitimate DNS responses will look similar to the attack aside from the fact that you may have responses from millions of previously unknown DNS servers
You can drop or rate-limit UDP source port 53 at the internet edge.
This is a reasonable measure especially if you do it during attack time as a reactive measure. To aid this effort, perhaps you can have an off-net DNS server that is explicitly allowed but rate limited. To drop UDP source port 53 traffic, you have a few options:
Call your upstream provider and tell them to drop source port 53 during the attack.
Make the list of source ports to drop more dynamic using BGP Flowspec, if your provider supports such feature, so the blocked list is only constructed during time of attack.
Blackhole
You can instruct your upstream provider to blackhole or null route the attacked destination. This is probably the last option resort, as you are letting the attacker take out the host/device/service that is under attack; however, it may be more important to save the rest of the hosts in the network.
Let us take a look at a second example of combating the state exhaustion DDoS attacks.
Example 2: Combating State Exhaustion
Bandwidth and packet saturation isn’t the only type of attack that can bring down your service. Even when network monitoring tools show everything in the green, you can be the victim of an attack that is focused on state tracking in your infrastructure. It’s important to understand your entire path from the internet to service and back again to see where these sorts of problems can occur.
State exhaustion here refers to any attack that is attempting to occupy and hold open resources on your service. For example, a TCP stack may hold open resources after a SYN-ACK is sent in response to an attacker’s SYN. This is a base premise of the SYN flood and why it is effectively both as an attack that targets packet processing as well as state exhaustion in your infrastructure. When the attacker is spoofing an entire internet worth of sources, you can see how any stateful system might run out of resources pretty quickly.
Hosts are not alone in their ability to fall victim to this. Firewalls, application delivery controllers, and other devices that employ some stateful inspection or translation have similar limitations. Unfortunately, a session exhaustion attack is not easy to mitigate reactively, especially if your goal is to maintain high uptime. Some preparation to hardening your service must happen. One such attack we will dig deeper into here is called Slowloris.
Attack Dynamics and Analysis
According to Wikipedia:
Slowloris tries to keep many connections to the target web server open and hold them open as long as possible. It accomplishes this by opening connections to the target web server and sending a partial request. Periodically, it will send subsequent HTTP headers, adding to—but never completing—the request. Affected servers will keep these connections open, filling their maximum concurrent connection pool, eventually denying additional connection attempts from clients.
In Figure 3-7, we have dissected the packets coming in from a Slowloris attack.

Figure 3-7. Slowloris packet capture
What you see here is a session generated by slowhttptest. It is important to notice a few properties of the attack:
-
The length of the entire session is 30 seconds due to the RST sent by the server. The attacker could have kept the session open for much longer if this didn’t happen. This shows the intent of keeping sessions open for quite a while.
-
The TCP window size of the attacker is quite small but not unreasonably small at first, especially considering windows advertised by mobile devices.
-
The page that is being served by the target is just the Apache default page. However, the transmission is stretched across many packets at a slow interval due in part to the small window size.
-
The attacker’s advertised window hits 0 and stays there after the 4-seconds mark.
The effect in the test environment of one attacker versus one server is pretty telling. Notice the behavior of Apache after 20 seconds of slowhttptest traffic in Figure 3-8.
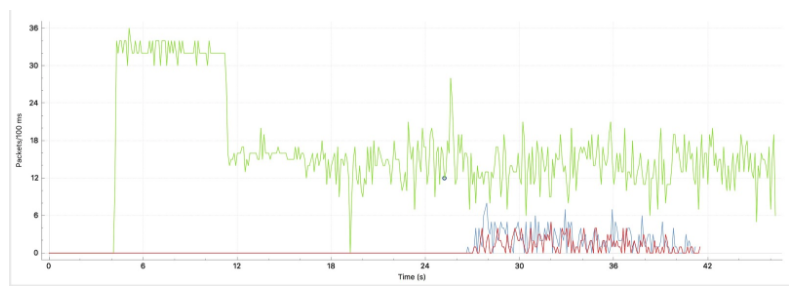
Figure 3-8. SlowLoris packets per second
The green line (top line) shows our attacker sending HTTP GETs to the server. The server reached its own threshold at approximately 12 seconds into the test. At approximately 27 seconds, we see the effects clearly as out-of-order packets (represented in red) increase and Apache sends a 504 code for as many GET requests as it can handle. Finally, Apache dies at 41 seconds while the tool continues to run.
Let us devise a mitigation strategy appropriate for the session exhaustion attack.
Mitigation Strategy
We will focus on using the host as a mitigation strategy. In our scenario, Apache has a few features that can be tweaked to help with this type of attack.
The mod_reqtimeout Apache module, shown in Example 3-2, has a few options that give you insight into how it may help with the attack.
Example 3-2. mod_reqtimeout (source: http://bit.ly/2GBistv)
<IfModule mod_reqtimeout.c>

  RequestReadTimeout header=20-40,MinRate=500 body=20-40,MinRate=500

</IfModule>
This configuration instructs Apache to wait for 20 seconds to complete the HTTP header transfer. If the client maintains sending the header at 500-bytes per second, then the server will wait for up to 40 seconds for the header to complete.
The purpose of modQOS is to add some constraints around server resources and the types of clients that you wish to serve. A few configuration options of note that are helpful for this attack follow:
- QS_SrvMaxConnPerIP
Slowloris does not require a large number of sources to be effective. In fact, it is one of the selling points of the attack that an attacker could take down a server with a low-powered PC. This feature places a ceiling on the number of connections established per source IP address.
- QS_SrvMinDataRate
Slowloris achieves its goal primarily by launching many slow connections and trying to maintain them for as long as possible. This option allows the server to drop a connection based on a minimum speed
You can find out more information on mod-qos at http://mod-qos.sourceforge.net/.
Emulate DDoS Attacks for Better Response
Needless to say, it is extremely stressful when you are under a DDoS attack. You are racing against the clock to determine the type of attack and the right mitigation approach, and to carry out the implementation. These steps are often done under the nervous eyes and breath of the service owner and business managers.
To avoid any surprises during the actual attack, you should use attack emulation as we have done in this chapter with slowhttptest. You can also hire other legitimate stress testers to emulate DDoS attacks and do a dry run for your mitigation strategy. This will prepare the staff so they can practice running the standard operating procedure during peacetime.
Hping3 is a high-level tool that can carry out a variety of penetration testing, including small-scale DDoS attacks. You can find more Hping3 examples on the Hping3 website.
Scapy is another open source tool written in Python that can craft packets from the ground up. As you have total control over your packet header and payload, you are able to do a lot of fuzzing with Scapy. You can find more Scapy examples on our GitHub repository.
Summary
We covered a lot of ground in this chapter. We started out by looking at the general mindset and approach for DDoS mitigation, defining the terms and traffic flow of some of the common DDoS attacks, and DDoS mitigation topologies.
We also looked at the network- and application-level mitigation techniques that we can use, before combining what we learned and studying how to combat classic flood and state exhaustion attacks.
In the next chapter, you will learn to evaluate different cloud-based mitigation vendors.