
IN THIS CHAPTER
“Software suppliers are trying to make their software packages more user-friendly…Their best approach, so far, has been to take all the old brochures, and stamp the words, 'user-friendly' on the cover.” | ||
| --Bill Gates | ||
Apache, in the Unix-server tradition, is configured via text-based files. This has several advantages, including:
You only need a simple text editor such as vi or emacs to modify the configuration of an Apache server.
It is possible to access the machine through a remote shell (using telnet or ssh, a secure version of the Unix remote shell command).
The bandwidth requirements are small and you can administer servers over slow links. You can connect a modem to a serial port and be able to dial-in and administer the machine remotely, even if it is unreachable from the Internet.
You can put the configuration files under a source control system such as CVS, and keep track of who changed what and when. You can easily maintain different configuration versions and revisions, and you can safely return to the last set of configuration files known to work.
The Apache configuration file format enables insertion of comments alongside directives. This provides valuable information about the configuration and provides administrators the opportunity to document, in detail, specific settings. This is useful in environments where more than one administrator modifies the same set of Apache server configuration files.
You can automate the generation and modification of the configuration files using shell commands of scripting languages such as Perl or Tcl. This is useful if the same task has to be repeated over time, for example for different ISP customers. The configuration files are usually generated via template files from customer information stored in relational databases or LDAP directories.
Text-based configuration systems have several disadvantages. The following reasons are why GUI or Web-based installation and configuration tools are useful, especially for new or inexperienced administrators.
The configuration file formats vary significantly from one program to another. Even if you are familiar with the Apache configuration syntax, other popular server packages such as Sendmail or Samba use different configuration formats. A well-designed GUI will provide you with a centralized, consistant interface to a variety of server programs, thus lowering the learning curve.
The number of available directives is overwhelming. Setting up a server such as Apache usually involves reading a long set of documentation and manual pages. This is necessary even if you only need a handful of options to configure a typical installation. A well-designed GUI will organize the options in a sensible, task-oriented interface that will guide the user, collect the information needed, and produce the appropriate configuration.
Other advantages of well-designed, GUI-based administration tools are context-sensitive help, delegated administration, and the capability to abstract the specific configuration syntax details.
Poorly designed GUIs have disadvantages. A GUI can be unstructured, offering configuration screens with a myriad of options that confuse the user. Some GUIs can only configure a limited set of functionality, thus being useful only for initial configurations. When users need the advanced functionality, they must access the configuration files directly, defeating the purpose of the GUI. In some cases the GUI does not interact nicely with the underlying configuration files, keeping its own metadata and overwriting the configuration files when needed. Thus, any configuration changes done by editing the file directly will be lost because the GUI will not recognize those changes.
This chapter introduces you to two popular GUI configuration tools for Apache. You will learn how to install and use them to configure your server.
Webmin is a Web-based administration system for Unix-like operating systems. It is Open Source under the GPL license and James Cameron is the main author. It is written in Perl and is extensible, meaning that developers can write modules to configure different programs, including one to configure Apache.
In this section you will learn how to install and configure Webmin and use it to perform basic Apache-administration tasks. These tasks include starting and stoping the server, changing server parameters, creating new virtual servers, protecting directories, and so on.
Before using Webmin or any other configuration utility make sure you backup your Apache configuration files. In particular you need to backup httpd.conf and any other files referenced in it via the <Include> directive.
You might have Webmin already installed if you are using a recent Linux distribution. You can use package management utility of your distribution to check if Webmin is already installed.
Tip
If your system is rpm-based (such as the ones from Red Hat, Suse, or Mandrake) you can check if Webmin is already installed by issuing the rpm -q webmin at a shell prompt.
If you do not have Webmin installed, please proceed to the next section where you can learn the steps necessary to get Webmin up and running.
Webmin is accessed via a Web browser. Before you can do so, you need to start the Webmin Web server. The Webmin application is protected by a password.
To change the Webmin default password issue the following command:
/usr/share/webmin/changepass.pl /etc/webmin/ admin newpassword
Substitute newpassword with the new password to protect access to Webmin. The command needs to be executed as root.
Tip
Each distribution places files in a slightly different location. You can check where the files are installed in your system by issuing the following command:
# rpm –q –l webmin | more
If you want to know where changepass.pl was installed in your system, you can issue the following command:
# rpm –q –l webmin | grep changepass.pl
If you don't have Webmin installed in your system, you can download it from http://www.webmin.com/webmin/
Users of any of the BSD-Unix variants such as FreeBSD or OpenBSD have Webmin available via the ports collection.
You can download an rpm package from the Webmin site. If you are using an rpm-based Linux distribution you might want to check if your distribution already includes a Webmin rpm and install that one instead. You can check your vendor's Web site or an rpm repository like http://rpmfind.net. In any case, make sure to check the Webmin Web site for the latest version, to make sure your rpm is up to date.
Issue the following command as root to install a new rpm in your system:
# rpm –q –i webmin*.rpm
Webmin is written in Perl, so you need to have a version of Perl installed in your system. You can verify that you have Perl installed in your system by typing perl in the command-line prompt. Executing the command which perl will give you the exact path of the program being executed.
If you do not have Perl installed in your system, you can install the package that came with your Unix distribution or visit http://www.perl.com. The Webmin Web site also provides precompiled packages for Solaris and HP-UX.
The installation of Webmin is straightforward. The steps need to be performed as root. After you have downloaded the Webmin compressed sources package (tarball) from the Webmin Web site, you need to uncompress it and execute the installation script:
# gunzip < webmin-xxx.tar.gz | tar xvf -
# cd webmin-xxx
# ./setup.sh
xxx needs to be replaced by the version of Webmin you are installing.
You will be prompted for the information Webmin needs:
You need to specify where Webmin will install its configuration and log files:
/etc/webmin, /var/webminYou need to enter the path to the Perl interpreter, which you already learned about earlier in this section.
You need to provide the specific vendor name and version for your operating system. This is necessary because each operating system distribution places configuration files in a different place.
Finally, you provide the required values for the Webmin server such as the listening ports and the username and password, to protect the pages.
Webmin usually listens on port 10000 and the Web server might or might not allow for secure access depending on whether the appropriate libraries were installed in the system. You might want to change this port number if you are concerned about people scanning your computer for services at specific ports.
You can access the specific configuration of your Webmin server via the miniserv.conf file, located in /etc/webmin.
To access Webmin, assuming it is configured with the defaults outlined in the previous sections, you need to type the following URL in your Web browser:
If your Webmin server has SSL support, the URL changes from http:// to https://.
This will take you to the Webmin login page if Webmin is already running. Webmin can be configured to run at startup time. You can start and stop Webmin manually with the following commands:
/etc/webmin/start
/etc/webmin/stop
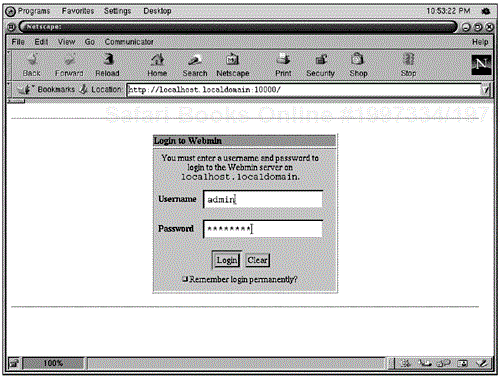
You need to enter the appropriate username and password to access Webmin (see Figure 5.1). After a successful login you can access the main Webmin page. Here you can configure different aspects of Webmin itself. It even includes support for themes.
You can navigate the different sections by clicking on the different tabs (see Figure 5.2). The System tab enables you to configure the underlying operating system, including users, file systems, and packages. The Hardware section enables for configuration of bootloaders, disk partitions, networking, and printers.
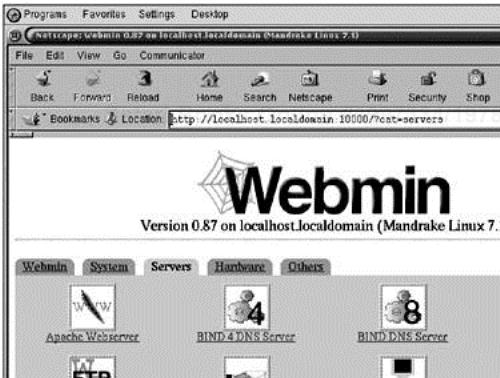
In the Others section you can access Webmin modules that permit the execution of remote commands, a Web-based file manager, and so on.
You can find Apache under the Servers section, together with the configuration options for mail, DNS, and FTP servers.
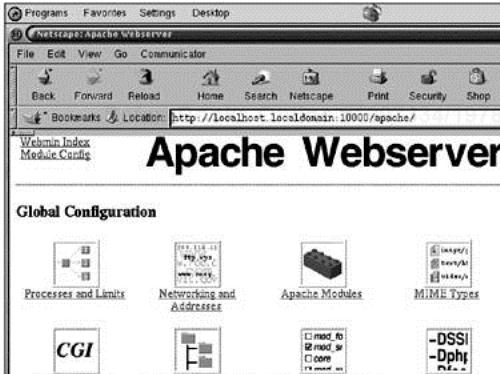
You can click in the Apache icon to enter the main Apache configuration page.
The first time you enter Apache configuration you might be asked to provide information about available third-party Apache modules. If you are not sure about what modules are installed click OK because Webmin tends to guess right and you can always change that selection afterwards.
The page is divided in three different areas, as shown in Figure 5.3:
Top area, where you can find links to configure the Apache instances being managed and links to start the server.
Global Configuration, with links to configuration options.
Virtual Servers, which is a list of all the available servers to be configured.
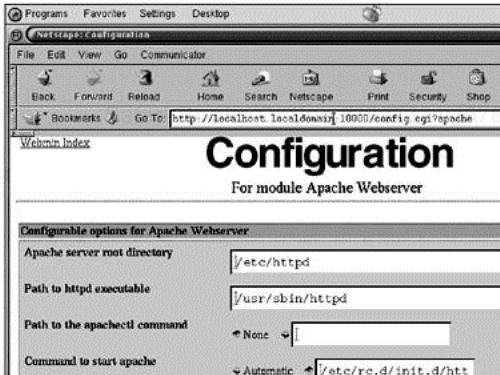
If the Apache Web server came installed with your operating system distribution then Webmin knows how to find it and you can configure it right away. If you are using a custom installed Apache you can specify the location of the relevant files by clicking on the module configuration link (see Figure 5.4). You need to provide the commands for starting and stopping the server, the location of the httpd executable, and the root directory of Apache. Other options enable you to specify how virtual hosts will be displayed in the Web interface.
You can start the Apache Web server by clicking the link on the top-right corner (see Figure 5.3). After Apache has been started, a new link will appear that enables you to stop the running server.
You can configure parameters that affect the server as a whole via the links in this area. Most of the options here are usually required only for advanced configuration scenarios. The default settings are usually appropriate for most situations. Under the Processes and Limits section you can configure the number of Apache processes and the number of requests these servers will process. You can define which modules will be loaded by the Web server at the Apache modules section.
Apache enables you to specify certain configuration options on a per-directory basis, via special files called .htaccess. You can configure them in the per-directory options files section.
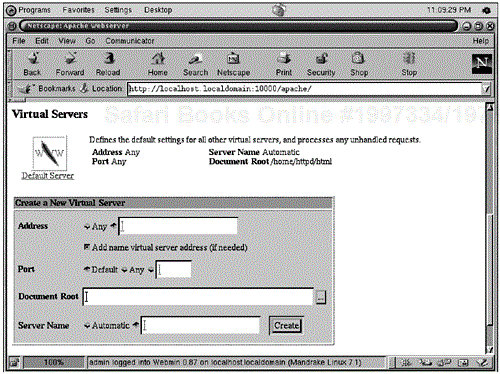
Here you have access to a list of virtual hosts available for your Apache installation. You can configure the default Web server. Other virtual hosts will also inherit the properties specified here.
You can add a new virtual host (see Figure 5.5) by providing the address and port the new server will listen to, the document root where documents will be served, and the server name for the host.
You can delete a virtual server by clicking the virtual server link, server configuration, and then selecting to delete the server.
You can configure the properties of the virtual server via the configuration links. Some of the practical configuration parameters include:
Error Handling: You can customize the pages to be displayed in your Web site when an error occurs. For example, when a document is not found you can present the user with a page that explains the error and allows them to search the Web site for similar documents.
Log files: You can define the location of the files where Apache will log the Web server accesses, the possible errors encountered, and the format of the information recorded.
Aliases and redirects: You can associate directories in the hard disk with specific URLs that are easier to remember and type. You can also specify the permanent or temporary redirection of certain URLs in your Web site. This is useful if the Web site has gone through layout changes. Your users will not encounter “Document not found” errors, they will be redirected to the appropriate page instead.
Show directives and Edit directives: These allow you to have a direct look at the underlying configuration directives. You can edit specific directives or even add new directives for custom or not supported modules.
CGI: You can mark certain directories as containing and allowing the execution of CGI scripts.
You can configure directory, location, and file sections in each of the virtual servers. As well as define specific portions of the URL space that you can configure separately.
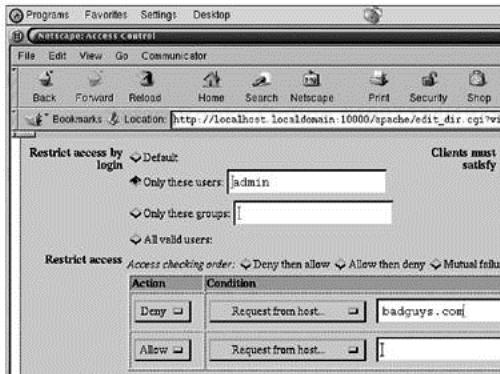
You can configure these sections by clicking them and then selecting one of the links. The Access Control (See Figure 5.6) section enables you to restrict access based on the IP address the user is coming from, its username and password, or the browser he is using.
More than one user can administer the Apache installation with Webmin. You can restrict access and configuration rights on a per-user or per-group basis
You can accomplish this by following these steps:
Create a new Webmin user: Click the Webmin tab, select Webmin users, and then select Create a new Webmin user. Select Apache module as part of the creation process.
Restrict configuration: You can now select the created user link and configure the level of configuration access. You can restrict the ability of the user to start or stop the server, change addresses, pipe logs to programs, or manage only a certain virtual Web server (See Figure 5.7).

You can also create Webmin groups and set policies based on them.
You can learn more about Webmin by visiting the following Web sites:
Official Webmin site: http://www.webmin.com/webmin
Joe Cooper's Webmin guide: http://www.swelltech.com/support/webminguide/index.html
Comanche stands for Configuration Manager for Apache. It is a standalone GUI (not Web-based) distributed under an Apache-style license, and its primary author is Daniel Lopez. It is written in the Tcl/Tk scripting language and works on Unix and Windows platforms. Although it can be extended to easily configure other servers, its primary focus is Apache.
Before using Comanche or any other configuration utility make sure you backup your Apache configuration files.
You can download Comanche from the Comanche Web site at http://www.comanche.org.
You can download binaries for a variety of Unix and Windows platforms.
If you want to download the source, you need to make sure you have a recent version of Tcl/Tk installed in your system, together with the [incr Tcl] object-oriented extension to the Tcl language. You can get this software at the Tcl developer exchange http://tcl.activestate.com/.
After you have downloaded the tarball, you need to uncompress it, change your working directory to the newly created directory, and start Comanche:
# gunzip < comanche-xxx.tar.gz | tar xvf -
# cd comanche-xxx
# ./comanche-xxx
Where xxx is the Comanche version.
If you downloaded the source distribution itkwish main.tcl is the command you need to start Comanche.
The first time you start Comanche no Apache installations will be available. You can press the New Installation link to provide Comanche with the location of the Apache Web server. You can select one of three options—you compiled Apache manually, you are using the Apache bundled with your installation, or you are using a custom Apache installation. After you have provided the data, you are ready to proceed with the configuration of the server.

You need to have Apache installed in your system prior to installing Comanche in Windows. Comanche supports Windows 95/98/NT/ME/2000, but you should only run production Apache versions on server versions of Windows, such as Windows 2000.
The Windows binary is contained in a zip file. You can use Winzip or any other Windows compression utility to extract the contents of the archive.
You can start Comanche by double-clicking the Comanche.exe icon. Comanche will read the location of Apache installations directly from the registry, so you do not need to perform any extra configuration steps.
The Comanche configuration screen is divided in two main areas (see Figure 5.9). The left area is a tree-like structure that enables you to navigate Comanche nodes. The right pane displays information about the selected nodes. You can create, delete or perform actions on nodes by right-clicking them.

The Apache Web server node enables you to add or remove Apache installations.
Each one of the Apache installations contains a node called Server management. Under Server management you can start or stop Apache (only in Unix), as well as create and restore backups of the configuration files.
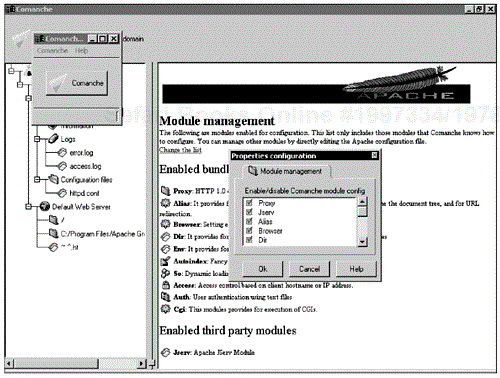
Under Server management you can find several nodes:
Module management: Enables you to select which Apache modules Comanche will configure (See Figure 5.10). Selecting a module here means that the associated options will appear later when configuring Apache. Deselecting a module means that those options will be preserved in the configuration file, but you will not see them when configuring Apache.
Information: Displays information about the Apache instance being configured (only in Unix).
Logs: Provides access to the log files being configured.
Configuration files: Provides access to the contents of the configuration files.
Each Apache installation contains a Default server node. You can configure the properties of the default Web server in this node. The other virtual hosts will inherit most properties, but some properties, such as number of processes, apply to the server as a whole and you can only configure them here.
You can configure the default server by clicking on the properties link in the right pane or by right-clicking on the node and selecting the properties entry in the pop-up menu. A window containing different property pages will appear. When you are done configuring properties you can press Ok and the changes will be applied to the configuration file. You need to restart the server before the changes affect a running server.
Under basic properties (see Figure 5.11) you can configure the document root for the default server. This is where Apache looks for requested documents. If the document root is /usr/local/apache/htdocs then a request for http://localhost.localdomain/index.html will return /usr/local/apache/htdocs/index.html.
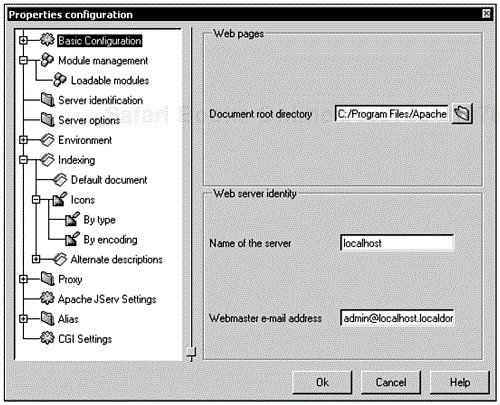
You can also define the server hostname and the administrator e-mail address. Under the basic properties node, in the listening properties node, you can configure the addresses and ports you want Apache to listen to.
You can create virtual hosts by right-clicking the Default Server and selecting New virtual host.
You can configure the virtual host properties by right-clicking the virtual host node and selecting properties.
You can define basic and advanced parameters. The changes will be incorporated when you press OK.
Some of the advanced parameters include options for redirecting links, associating files with MIME types and directory listen formatting.
You can create location, directory, and file nodes. They relate to the corresponding <directory>, <location> and <file> sections in the Apache configuration file. This enables you to apply specific configuration directives to certain portions of the filesystem or URL space. For example, by clicking on the security node on the directory or location property pages window, you can restrict access based on where the client is coming from (IP-based access is shown in Figure 5.12), or who he claims to be (User auth).

Containers can be created by right-clicking Virtual hosts or other containers and selecting the add option in the pop-up menu.
Comanche provides context-sensitive help. In any of the property pages you can press Help to have access to the Apache directives related to the information present on the screen. In the basic properties screen you will get information about the ServerRoot, ServerAdmin and ServerName directives.
In this chapter we have described two of the most popular GUI tools for configuring Apache. You can find other tools at Open Source sites such as http://freshmeat.net and http://sourceforge.net. We have analyzed the drawbacks and advantages of GUI tools. Whether or not you use them depends a lot on your personal level of comfort with Apache, Unix, and command-line tools. As the tools mature, they become more and more attractive, even for experienced system administrators.
Webmin is a powerful tool for configuring Apache. Its main strength is the capability to remotely configure the server.
Webmin respects the original Apache configuration file structures and contents. It is possible to alternate between the configuration of Apache via Webmin and editing the configuration files directly. Indeed, it is possible to edit those files via Webmin itself.
Webmin only runs on Unix, but it includes support for a wide variety of platforms, providing a consistent, easy-to-use interface for a variety of system configurations and popular Internet servers.
Comanche provides a powerful cross-platform tool for configuring Apache. Its main strengths are structured, user-friendly interface, and context-sensitive help.
You can still edit Apache configuration files with a file editor. Comanche will detect and incorporate those changes.
Comanche can be easily extended via XML files to support additional directives.