
We're definitely going to use one of the big advantages of the Code-First approach and start writing our entity classes immediately, without worrying too much about the database engine we're going to use.
Note
Truth be told, we already know something about what we're eventually going to use. We won't be adopting a NoSQL solution, as they are not supported by EF yet; we also don't want to commit ourselves into purchasing expensive license plans, so Oracle and the commercial editions of SQL Server are most likely out of the picture as well.
This leaves us with relatively few choices: SQL Server Compact Edition, SQL Server Express, MySQL, or other less-known solutions such as PostgreSql. That being said, adopting the code-first approach will give us the chance to postpone the call until our data model is ready.
Select the OpenGameListWebApp project from the Solution Explorer, then do the following tasks:
- Create a
/Data/folder: this will be where all our EF-related classes will reside. - Create a
/Data/Items/folder. - Right-click on that folder and select Add... | New Item.
- From the Visual C# items | Code | Class.
- Name the new class
Item.csand create it.

As for the source code, we could start with something like the following:
using System;
using System.Collections.Generic;
using System.ComponentModel.DataAnnotations;
using System.ComponentModel.DataAnnotations.Schema;

namespace OpenGameListWebApp.Data.Items
{
    public class Item
    {
        #region Constructor
        public Item()
        {

        }
        #endregion Constructor

        #region Properties
        [Key]
        [Required]
        public int Id { get; set; }
        [Required]
        public string Title { get; set; }
        public string Description { get; set; }
        public string Text { get; set; }
        public string Notes { get; set; }
        [Required]
        public int Type { get; set; }
        [Required]
        public int Flags { get; set; }
        [Required]
        public string UserId { get; set; }
        [Required]
        public int ViewCount { get; set; }
        [Required]
        public DateTime CreatedDate { get; set; }
        [Required]
        public DateTime LastModifiedDate { get; set; }
        #endregion Properties
    }
}
Note the presence of the UserId foreign key. We'll get to them soon.
Note
It's also worth noting that we used a lot of Data Annotations attributes, those being the most convenient way to override the default the code-first conventions.
If you want to know more about Data Annotations in the EF Core, we strongly suggest reading the official documentation at the following URL:
As we can easily see, this entity class is very similar to the ItemViewModel class we created in Chapter 2, ASP.NET Controllers and Server-Side Routes. That's perfectly fine because that class was originally meant to resemble the public properties of the Web API underlying model, which is precisely what we're defining now.
The following diagram can help to better understand this:

As we can see, we're creating the entity that will be used by EF to generate the database (using the code-first approach) and also translate (using property mapping) into the ItemViewModel we'll be using to serve our content to our Angular client.
As we might guess, the Item entity alone will hardly be enough. In order to complete our initial requirements we need to define a couple more entity classes:
Comments, where we can store the comments related to eachItem(if any).Users, which will serve as the main reference for all items and comments and also handle the authentication/login phase.
Let's start with the first one by doing the following:
- Create a
/Data/Comments/folder. - Right-click to that folder and select Add... | New Item.
- From the Visual C# items | Code | Class.
- Name the new class
Comment.csand create it.
As for the code itself, here's a good start:
using System;
using System.Collections.Generic;
using System.ComponentModel.DataAnnotations;
using System.ComponentModel.DataAnnotations.Schema;

namespace OpenGameListWebApp.Data.Comments
{
    public class Comment
    {
        #region Constructor
        public Comment()
        {

        }
        #endregion Constructor

        #region Properties
        [Key]
        [Required]
        public int Id { get; set; }
        [Required]
        public int ItemId { get; set; }
        [Required]
        public string Text { get; set; }
        [Required]
        public int Type { get; set; }
        [Required]
        public int Flags { get; set; }
        [Required]
        public string UserId { get; set; }
        public int? ParentId { get; set; }
        [Required]
        public DateTime CreatedDate { get; set; }
        [Required]
        public DateTime LastModifiedDate { get; set; }
        #endregion Properties
    }
}
That's it. Notice that we have three foreign keys here:
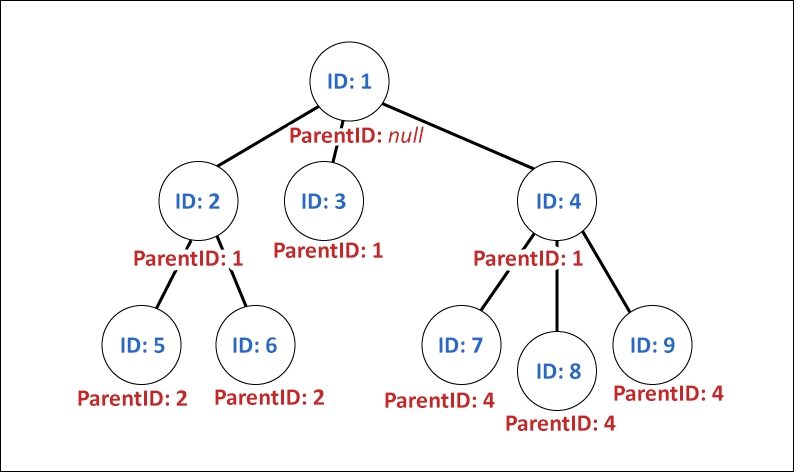
ItemId, pointing to the specific item a comment is about. This is a required field, since there won't be any comment without a related item.UserId, pointing to the comment's author, which is something we'll arguably set when we'll define theUserentity later on. This is also a required field, as we're not planning to support any comment without an author.ParentId, pointing to the master comment this entry is replying to, or null if the comment is not a reply. This is a classic implementation of the standard recursive foreign key pattern (also known as the root-leaf or parent-child), which is one of the most common ways to handle threading.
To better understand how ParentId will work, consider the following image:
It's time to add the ApplicationUser entity. Create a new /Data/Users/ folder, add an ApplicationUser.cs class and fill it up with the following code:
using System;
using System.Collections.Generic;
using System.ComponentModel.DataAnnotations;
using System.ComponentModel.DataAnnotations.Schema;
using System.Linq;
using System.Text;
using System.Threading.Tasks;

namespace OpenGameListWebApp.Data.Users
{
    public class ApplicationUser
    {
        #region Constructor
        public ApplicationUser()
        {

        }
        #endregion Constructor

        #region Properties
        [Key]
        [Required]
        public string Id { get; set; }
        [Required]
        [MaxLength(128)]
        public string UserName { get; set; }
        [Required]
        public string Email { get; set; }
        public string DisplayName { get; set; }
        public string Notes { get; set; }
        [Required]
        public int Type { get; set; }
        [Required]
        public int Flags { get; set; }
        [Required]
        public DateTime CreatedDate { get; set; }
        [Required]
        public DateTime LastModifiedDate { get; set; }
        #endregion Properties
    }
}
Here we go. Note that there are no foreign keys here, since the one-to-many relations with items and comments will be handled on the other side.
Note
We could ask ourselves why we used the ApplicationUser class name instead of User. The answer is pretty simple: ApplicationUser is the conventional name given to the class of the custom implementation of the IdentityUser base class used by the ASP.NET Identity module. We're using it in compliance with that convention, as we plan to implement this module later on.