
Chapter 11. Router
This chapter covers the following subjects:
• Authentication Proxy on IOS Routers
• Authentication Proxy Authorization
• Configuring Downloadable ACLs for Authentication Proxy
Chapter 10, “Cut-Through Proxy AAA on Pix/ASA,” covered the limitations of IP address-based restrictions and the need for per-user based access restriction. Similar to the cut-through proxy authentication method on ASA/PIX, IOS-based routers provide the Authentication Proxy feature to restrict access based on user profiles.
When Authentication Proxy is enabled, traffic flowing through the router is intercepted and the authentication cache is checked to see whether the user is already authenticated. If a valid authentication entry exists for the user, the connection is completed with no further intervention by the Authentication Proxy. If no entry exists, the Authentication Proxy responds to the connection with an authentication challenge. The credentials provided by the user are checked with a TACACS+ or RADIUS server. Upon successful authentication, an entry is added to the authentication cache and the session is allowed to go through normally. The session is not allowed to go through unless authentication is successful. Figure 11-1 illustrates how Authentication Proxy works.
Figure 11-1. Authentication Proxy

Note
Authentication Proxy can only intercept traffic passing through the router. Traffic destined to the router itself will not be intercepted.
In addition to authenticating the user, Authentication Proxy can download per-user-based access lists during authorization. This access list serves as a restriction to what services the user can access.
All this sounds familiar? Yes, this is very similar to how cut-through authentication works on ASA/PIX; however, the similarities end here. Recall from Chapter 10 that ASA/PIX can authenticate HTTP(s), FTP, and Telnet directly. For the rest of the services, virtual Telnet, virtual HTTP, and HTTP redirection can be used. Like cut-through authentication, authentication proxy can intercept HTTP, FTP, and Telnet traffic, but does not provide any mechanism to authenticate any other service. So, only these three services can be authenticated using Authentication Proxy. The rest of the services can be denied using an interface access list. After a user authenticates using any of these three services, a per-user access list can be used to allow other services.
Note
Though Authentication Proxy was introduced in Cisco IOS Software Release 12.0(5)T, support for FTP and Telnet services was added in Release 12.3(1).
Prerequisites for Authentication Proxy
Prior to configuring Authentication Proxy, you should ensure the following:
• If HTTP authentication is required, the HTTP server on the router should be enabled. The server can be enabled using the ip http server global configuration command. IOS uses its HTTP server to communicate with the client.
• If FTP authentication is required, the FTP server on the router should be enabled. The server can be enabled using the ftp-server enable global configuration command. IOS uses its FTP server to communicate with the client and the destination FTP server.
Note
As per Cisco Security Advisory ID cisco-sa-20070509-iosftp, the FTP server feature was removed from many IOS versions. Authentication proxy for FTP will not work on versions that do not have the FTP server feature. Cisco IOS Software Release 12.3(3i) was used for the FTP Authentication Proxy section of this chapter.
If Telnet authentication is required, at least one virtual telnet (vty) line should allow incoming Telnet connections. These Telnet connections can be allowed by using the transport input telnet command in line configuration mode. IOS uses its Telnet server to communicate with the client.
AAA should be enabled on the router using the aaa new-model global configuration command.
The default login authentication method should be using the server group for which you want to use Authentication Proxy. Authentication Proxy can use only the default login method for authentication. You can configure the default login authentication list with the aaa authentication login default group { radius | tacacs+ | group-name} global configuration command.
Note
Chapter 6, “Administrative AAA on IOS,” covers the basic AAA configuration on IOS in detail, including enabling AAA and creating method lists.
Authenticating HTTP Sessions
When Authentication Proxy for HTTP is enabled on a router, it will intercept all HTTP sessions going through it. If the source IP address is not found in the authentication cache, the router will reply back with a web page containing an authentication prompt.
Note
For those who are familiar with HTTP, the page returned by the router is not a 401 message but a web page containing a form for the credentials. In other words, IOS spoofs the destination address. This is different from the cut-through authentication behavior seen in PIX/ASA.
Users must enter their username and password in the web page and click OK. When authentication succeeds, the user will see a pop-up window indicating that authentication is successful. On closing the pop-up window, the user will be redirected to the original web server if JavaScript is enabled in the browser. If JavaScript is not enabled, the user will be asked to refresh the page. When the page is refreshed, a new HTTP session is initiated by the browser. This new session is allowed go through the router because an entry exists in the authentication cache.
To configure Authentication Proxy for HTTP, follow these steps:
Step 1. Create an Authentication Proxy rule using the following command:
ip auth-proxy name auth-proxy-name http [list {acl | acl-name}]
This command associates connections initiating HTTP protocol traffic with an Authentication Proxy name. If you provide an ACL number or name, only traffic that matches the ACL will be intercepted.
Step 2. Apply the Authentication Proxy named rule to the interface that will receive the traffic using the following interface configuration mode command:
ip auth-proxy auth-proxy-name
Authentication proxy is enabled in the incoming direction only. It will not intercept traffic leaving an interface.
Example 11-1 shows Authentication Proxy configured for HTTP sessions initiated from the 192.168.1.0/24 subnet and received on the FastEthernet0/0 interface.
Example 11-1. HTTP Authentication Proxy Configuration

Authenticating FTP Sessions
When Authentication Proxy for FTP is enabled on a router, it will intercept all FTP sessions going through it. If the source IP address is not found in the authentication cache, the router will redirect the FTP sessions to its internal FTP server. This server will prompt users for their credentials.
The client must respond with the username and password in the following format:
proxy_username@ftp_username
and
proxy_passwd@ftp_passwd:
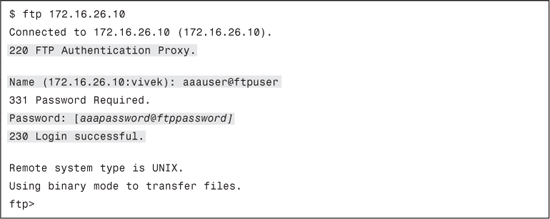
The Authentication Proxy will use the proxy username and password to verify the client’s profile against the AAA server’s user database. After the client is successfully authenticated with the AAA server, an entry will be added in the cache and the ftp_username and ftp_password will be sent to the destination server. If the destination server authenticates the user, the session will continue normally between the client and the remote server.
If the user fails authentication with the destination FTP server, an error is sent to the client and the session is disconnected. If the user reinitiates the connection, the router will not challenge the user because an entry exists in the cache. Example 11-2 shows an FTP session in which the user fails FTP server authentication. Example 11-3 shows a session where authentication succeeds.
Example 11-2. Authentication Proxy Failure on Remote FTP Server

Example 11-3. Successful Authentication Through Authentication Proxy
To configure Authentication Proxy for FTP, follow these steps:
Step 1. Create an Authentication Proxy rule using the following command:
ip auth-proxy name auth-proxy-name ftp [list {acl | acl-name}]
This command associates connections initiating FTP protocol traffic with an Authentication Proxy name. If you provide an ACL number or name, only traffic that matches the ACL will be intercepted.
Step 2. Apply the Authentication Proxy named rule to the interface that will receive the traffic using the following interface configuration mode command:
ip auth-proxy auth-proxy-name
Authentication proxy is enabled in the incoming direction only. It will not intercept traffic leaving an interface.
Example 11-4 shows Authentication Proxy configured for FTP sessions initiated from the 192.168.1.0/24 subnet and received on the FastEthernet0/0 interface.
Example 11-4. FTP Authentication Proxy Configuration

Note
Authorization is mandatory for FTP Authentication Proxy. If authorization is not configured, then the session will not be allowed through. Authorization is covered later in this chapter.
Authenticating Telnet Sessions
Similar to HTTP and FTP authentication, when Telnet Authentication Proxy is enabled, the router intercepts all Telnet connections going through it. If the source address is not found in the authentication cache, the router redirects the request to its internal Telnet server, which prompts the user for the proxy username and password.
After successful authentication, an entry is added in the cache and the session is allowed to go through normally. At this stage, the remote Telnet server will prompt the user for authentication. This authentication is different from the proxy authentication because its result has no bearing on Authentication Proxy. Even if the user fails the authentication with the Telnet server, the router will allow Telnet sessions to go through if an entry exists in the cache.
To configure Authentication Proxy for Telnet, follow these steps:
Step 1. Create an Authentication Proxy rule using the following command:
ip auth-proxy name auth-proxy-name telnet [list {acl | acl-name}]
This command associates connections initiating Telnet protocol traffic with an Authentication Proxy name. If you provide an ACL number or name, only traffic that matches the ACL will be intercepted.
Step 2. Apply the Authentication Proxy named rule to the interface that will receive the traffic using the following interface configuration mode command:
ip auth-proxy auth-proxy-name
Authentication proxy is enabled in the incoming direction only. It will not intercept traffic leaving an interface.
Example 11-5 shows Authentication Proxy configured for Telnet sessions initiated from 192.168.1.0/24 subnet and received on the FastEthernet0/0 interface.
Example 11-5. Telnet Authentication Proxy Configuration

Note
Authorization is mandatory for Telnet Authentication Proxy. If authorization is not configured, then the session will not be allowed through. Authorization is covered later in this chapter.
Configuring ACS for Authentication Proxy
Configuring ACS 4.2 and 5.1 for cut-through authentication requires the steps you followed for configuring administrative authentication on IOS devices. See Chapter 6 to recall the steps you used. A summary of steps required is as follows:
Step 1. Add router as an AAA client with correct shared key and protocol.
Step 2. Add a user.
Step 3. For ease of learning, ensure that you use a new group or access service so that the previous configuration does not cause problems.
Viewing and Maintaining Authentication Proxy Cache
As mentioned earlier, when Authentication Proxy is configured, traffic is intercepted and the user is prompted for authentication if the source address is not present in the Authentication Proxy cache. On successful authentication, an entry is added in this cache. As long as the entry exists in the cache, the user will not be prompted for authentication again.
The Authentication Proxy cache can be viewed using the show ip auth-proxy cache command. The Authentication Proxy cache lists the host IP address, the source port number, the timeout value for the Authentication Proxy, and the state of the connection. Example 11-6 shows a sample entry in the Authentication Proxy cache.
Example 11-6. show ip auth-proxy cache Output

Note the timeout value shown in the output in Example 11-6. This value, in minutes, denotes the period of inactivity after which the entry will be removed from the cache. After the entry is removed, the user will need to authenticate again.
Authentication proxy enables you to configure an inactivity timer and an absolute timer for the cache entries. These timers can be configured globally for all Authentication Proxy types and rules using the following commands:
ip auth-proxy absolute-timer minutes
ip auth-proxy inactivity-timer minutes
The default absolute timer is 0 and the maximum is 35,791. The default inactivity timer is 60 and the maximum is 2,147,483,647. You cannot set the inactivity timer to 0.
These timers can also be configured on a per-rule basis by adding the absolute-timer and inactivity-timer options to the ip auth-proxy name command as shown here:
ip auth-proxy name auth-proxy-name {http | ftp | telnet} absolute-timer minutes
inactivity-time minutes
You can clear the Authentication Proxy cache using the clear ip auth-proxy cache * command. To remove a single entry from the cache, use the clear ip auth-proxy cache source-ip-address command.
Verifying and Troubleshooting Authentication Proxy
The most common problems with Authentication Proxy relate to the communication between the router and the AAA server as discussed in Chapter 6. For the most part, when communication between the router and the AAA server is working, Authentication Proxy works like a charm; however, you might encounter a few problems with Authentication Proxy itself, which relate to the authentication configuration on the router. You should verify that the following are true:
• The ip auth-proxy commands are configured correctly for the required protocol.
• The ip auth-proxy command is applied to the correct interface(s).
• Ensure that the authentication commands are using the correct server group.
The show ip auth-proxy cache command is very important when verifying and troubleshooting cut-through authentication. The state of the connection in the output is of particular interest because it shows the current state of the connection. Table 11-1 describes some important states seen in the cache.
Table 11-1. Common States in Authentication Proxy Cache
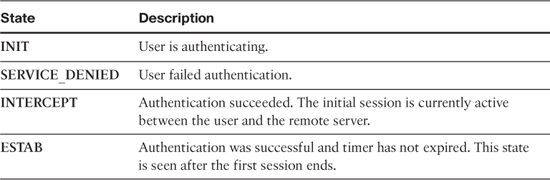
While troubleshooting, if you encounter the SERVICE_DENIED state, you can use debugs on the router and logs on the AAA server to help troubleshoot the authentication failure.
For troubleshooting Authentication Proxy, the following two debug commands are most useful:
• debug ip auth-proxy detailed
• debug {tacacs | radius}
Note
You should remember that debug commands can be very CPU intensive. You should try and use them only during periods when the device is less likely to see traffic. debug ip auth-proxy detailed gives a lot of output.
Authentication Proxy Authorization
As mentioned in the beginning of the chapter, after a successful authentication, access lists can be downloaded from the AAA server and applied on a per-user basis. In addition to that, Telnet and FTP Authentication Proxy requires the privilege level for the user to be set to 15. If the privilege level is not set, or is lower than 15, the session will not be allowed through.
Downloading an access list and setting the privilege level is done in the authorization phase of Authentication Proxy. As with all previous authorizations, most of the configuration has to be done on the AAA servers. Before configuring the AAA server, you do need execute the following command on the router:
aaa authorization auth-proxy default group {tacacs+ | radius | server-group-name}
This command tells the router to use the specified group of servers to authorize auth-proxy sessions.
Note
Upon successful authorization, the router adds the downloadable ACL to the inbound (input) ACL of an input interface and to the outbound (output) ACL of an output interface. If neither of these interface ACLs is present, the downloadable ACLs are discarded. So you should ensure that one of these interface ACLs are configured, before configuring ACS.
You can use both TACACS+ and RADIUS for Authentication Proxy. There is no distinct advantage of using one protocol over the other because authentication and authorization will be done only if an entry does not exist in the cache. If an entry exists in the cache, the AAA server is not queried.
Configuring ACS 4.2 for Authorization Using TACACS+
Configuring ACS for authorizing proxy authentication using TACACS+ requires you to add a custom Attribute-Value pair. Existing attributes and the downloadable ACL feature in ACS do not work with Authentication Proxy.
To add privilege level and downloadable ACL for Authentication Proxy, using TACACS+, in a group or user profile in ACS 4.2, follow these steps:
Step 1. Select Interface Configuration > TACACS+ (Cisco IOS).
Step 2. Under the New Services section, type auth-proxy in the Service field and ip in the protocol field.
Step 3. Select the Group and/or User check box beside the Service text box used in the previous step. For this example, select just the Group check box.
Figure 11-2 shows the configuration mentioned in steps 2 and 3.
Figure 11-2. Adding Auth-Proxy service in ACS 4.2

Step 4. Click Submit.
Step 5. Go to User Setup or Group Setup page of the user or group for which you need to add the privilege level and downloadable ACL. For this example, edit Group 10 from Group Setup.
Step 6. Scroll down to the auth-proxy ip option in the TACACS+ Settings section.
Step 7. Select the auth-proxy ip check box.
Step 8. Select the Custom attributes check box below the auth-proxy ip check box.
Step 9. You can add the privilege level and downloadable ACL in the text box below the Custom attributes check box. To add privilege level, add the following in the text box:
priv-lvl=15
The downloadable ACL can be added in the text box in the following format:
proxyacl#number={standard-acl-entry | extended-acl-entry}
You can add multiple downloadable ACL entries, but each entry should have a different number. The ACL entries should follow the format allowed on IOS.
Note
You can use only permit statements in the downloadable ACL for the Authentication Proxy and the source address on the ACL entry should be kept as any.
For the example, enter the following in the Custom attributes text box:
priv-lvl=15
proxyacl#1=permit tcp any host 172.16.26.1 eq 23
proxyacl#2=permit tcp any host 172.16.26.10 eq 22
Figure 11-3 shows the configuration done in steps 7, 8, and 9.
Figure 11-3. Configuring Auth-Proxy Custom Attributes in ACS 4.2

Step 10. Click Submit + Restart.
Configuring ACS 5.1 for Authorization Using TACACS+
Configuring ACS for authorizing proxy authentication using TACACS+ requires you to add a custom Attribute-Value pair. Existing attributes and the downloadable ACL feature in ACS do not work with Authentication Proxy. To add privilege level and downloadable ACL for Authentication Proxy on ACS 5.1, you will need to create a shell profile containing these attributes. This shell profile can be applied to an authorization rule in the access service used to authenticate the Authentication Proxy request.
Note
Chapter 4 covers Access Services, Authorization Rules, and Policy Elements in detail. Chapter 6 covers Shell Profiles in detail.
To create the shell profile with the privilege level and downloadable ACL for Authentication Proxy, follow these steps:
Step 1. Select Policy Elements > Authorization and Permissions > Device Administration > Shell Profiles.
Step 2. Click Create.
Step 3. Enter a name. For this example, use Auth-Proxy.
Step 4. Select the Custom Attributes tab as shown in Figure 11-4.
Figure 11-4. Adding Authentication Proxy Attributes in ACS 5.1
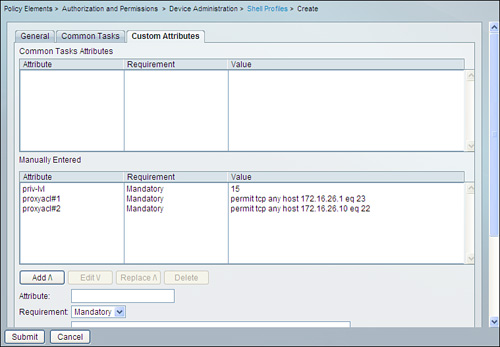
Step 5. In this page, you will need to manually enter the attributes for Privilege level and downloadable ACL.
To add privilege level, follow these steps:
In the Attribute text box, enter priv-lvl, select Mandatory from the Requirement drop-down list, and enter 15 in the Value text box. Click Add to add the attribute.
To add the downloadable ACL entry, follow these steps:
In the Attribute box, enter proxyacl#number. The number should be different for each entry. Select Mandatory from the Requirement drop-down list. In the Value text box, enter the permit statement in the format allowed on IOS. Click Add to add the attribute.
For the example, add the following attributes as shown previously in Figure 11-4:
priv-lvl=15
proxyacl#1=permit tcp any host 172.16.26.1 eq 23
proxyacl#2=permit tcp any host 172.16.26.10 eq 22
Step 6. Click Submit.
The shell profile will be created and available for use in an authorization rule.
Configuring ACS 4.2 for Authorization Using RADIUS
Configuring ACS for authorizing proxy authentication using RADIUS requires you to add privilege level and downloadable ACL as values for the cisco-av-pair attribute. To add privilege level and downloadable ACL in a user or group in ACS 4.2, follow these steps:
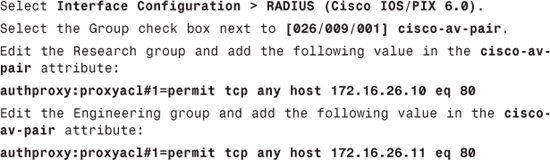
Step 1. Select Interface Configuration > RADIUS (Cisco IOS/PIX 6.0).
Note
The RADIUS (Cisco IOS/PIX 6.0) option will not be available if an AAA client using RAIDUS (Cisco IOS/PIX 6.0) is not present in Network Configuration.
Step 2. Select the Group and/or User check box beside the [026/009/001] cisco-av-pair.
Step 3. Click Submit.
Step 4. Go to the User Setup or Group Setup page of the user or group for which you need to add the privilege level and downloadable ACL. For this, example edit Group 10 from Group Setup.
Step 5. Scroll down to the Cisco IOS/PIX 6.x RADIUS Attributes section as shown in Figure 11-5.
Figure 11-5. Adding Privilege Level and Downloadable ACL as cisco-av-pair in ACS 4.2

Step 6. Select the check box next to [009�01] cisco-av-pair.
Step 7. You can add the privilege level and downloadable ACL in the text box below [009�01] cisco-av-pair. To add the privilege level, enter the following in the text box:
authproxy:priv-lvl=15
You can add the downloadable ACL in the following format in the text box:
authproxy:proxyacl#number={standard-acl-entry | extended-acl-entry}
You can add multiple downloadable ACL entries, but each entry should have a different number. The ACL entries should follow the format allowed on IOS.
Note
You can use only permit statements in the downloadable ACL for Authentication Proxy and the source address on the ACL entry should be kept as any.
For this example, enter the following in the text box as shown in Figure 11-5:
authproxy:priv-lvl=15
authproxy:proxyacl#1=permit tcp any host 172.16.26.1 eq 23
authproxy:proxyacl#2=permit tcp any host 172.16.26.10 eq 22
Step 8. Click Submit+Restart.
Configuring ACS 5.1 for Authorization Using RADIUS
Configuring ACS for authorizing proxy authentication using RADIUS requires you to add privilege level and downloadable ACL as values for cisco-av-pair attribute. On ACS 5.1, you will need to create an authorization profile containing these attributes. This authorization profile can be applied to an authorization rule in the access service used to authenticate the Authentication Proxy request.
Note
Chapter 4 covers access services, authorization rules, and policy elements in detail. Chapter 6 covers authorization profiles in detail.
To create an authorization profile with a privilege level and downloadable ACL for Authentication Proxy, follow these steps:
Step 1. Select Policy Elements > Authorization and Permissions > Network Access > Authorization Profiles.
Step 2. Click Create.
Step 3. Enter a name. For this example, use Auth-Proxy.
Step 4. Select the RADIUS Attributes tab as shown in Figure 11-6.
Figure 11-6. Adding Privilege Level and Downloadable ACLs in ACS 5.1
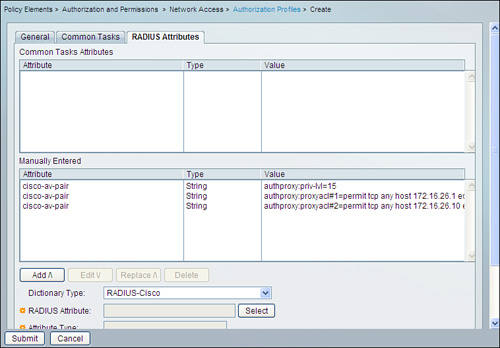
In this page, you need to manually add the cisco-av-pair attributes with the privilege level and downloadable ACLs as values.
Step 5. Select RADIUS-Cisco from the Dictionary Type drop-down list.
Step 6. Click Select next to the RADIUS Attribute field and select cisco-av-pair from the dialog box that opens.
Step 7. Select Static from the Attribute Value drop-down box.
Step 7. In the text box below the Attribute Value field, you can add the privilege level and downloadable ACLs. To add privilege level, enter the following in the text box:
authproxy:priv-lvl=15
You can add the downloadable ACL in the following format in the text box:
authproxy:proxyacl#number={standard-acl-entry | extended-acl-entry}
You can add multiple downloadable ACL entries; however, each entry should have a different number. The ACL entries should follow the format allowed on IOS.
Note
You can use only permit statements in the downloadable ACL for Authentication Proxy.
You will need to repeat steps 6 through 8 after adding the privilege level and for each downloadable ACL entry.
For this example, add the following values for cisco-av-pair as shown previously in Figure 11-6:
authproxy:priv-lvl=15
authproxy:proxyacl#1=permit tcp any host 172.16.26.1 eq 23
authproxy:proxyacl#2=permit tcp any host 172.16.26.10 eq 22
Step 8. Click Submit.
The authorization profile will be created and will be available for use in an authorization rule.
Verifying and Troubleshooting Authentication Proxy Authorization
After authorization is successful, the router will do the following:
• If a downloadable ACL is present in the authorization packet from the server, the router will append it on top of the inbound ACL of the source interface and outbound ACL of the destination interface. The router will replace the source address on the downloadable ACL with the source IP address of the authentication-triggering packet.
• Match the authentication-triggering packet to the interface ACL and route it if the traffic is permitted. If the traffic is not permitted by the interface ACL, the packet is dropped. Any further packets from the source IP address will be checked against the new interface ACL.
You can verify the downloaded ACL using the show access-list [number | name] command. The downloaded access control entries will be shown on top of the interface ACL without any numbers, as shown in Example 11-7.
Example 11-7. show access-list Command Output Displaying Downloaded ACL

With Authentication Proxy authorization, most issues relate to users not being able to access services they are authorized to access or users being able to access services that they are not authorized to access. To troubleshoot cut-through authorization, you should verify the following:
• Interface ACL: You should verify that an inbound ACL in the ingress interface or outbound ACL in the egress interface exists. If one of these is not present, the downloadable ACL will not be applied and all traffic will be permitted.
• Traffic Permitted by Interface ACL: Downloadable ACL is appended on top of the interface ACL. If the interface ACL permits certain traffic, it will be allowed to go through.
• Implicit Deny: There is an implicit deny at the end of the interface ACL. If neither the downloadable ACL nor the interface ACL permits the traffic, it will be dropped.
• ACL Syntax: Verify that the downloadable ACL is appended to the interface ACL. If the syntax of the ACL is incorrect on ACS, the router will not be able to append it to the interface ACL. Also ensure that you do not use a standard ACL on ACS when an extended ACL is applied on the interface of the router or vice versa.
• Wrong Service or Attribute Name: In case of TACACS+, you need to add auth-proxy service/attribute. In case of RADIUS, privilege level and downloadable ACL should be prefixed with the authproxy service name. If the service/attribute name is incorrect, the router will not be able to apply the attributes.
The following debugs are useful for troubleshooting authorization:
• debug {radius | tacacs }
• debug ip auth-proxy detailed
Authentication Proxy Accounting
IOS routers support accounting for Authentication Proxy using both TACACS+ and RADIUS. Apart from the usual information such as username, source address, and so on, the router also sends the duration of the session, input octets, and input packet count. To enable accounting, use the following global configuration command:
aaa accounting auth-proxy default {start-stop | stop-only} group {radius |
tacacs+ | name}
The preceding command will cause accounting information to be sent either at the start and end or only at the end of the Authentication Proxy session to the group mentioned.
As you already know from previous chapters, accounting does not require any configuration on ACS. You must ensure that TACACS+ accounting logs or RADIUS accounting logs are enabled.
Lab Scenario #14: Authentication Proxy
ABC Inc. has two web servers in a network separated from their internal network by a router. These servers contain sensitive data. The company wants access to these servers to be restricted and monitored. The employees who need access to Server1 are members of the Research group on ACS. The employees who need access to Server2 are members of the Engineering group on ACS.
The ACS server is in the internal network. The inbound ACL on the ingress interface of the router denies all traffic to the servers. The company wants the router to authenticate all HTTP sessions and then download ACL from ACS to permit traffic as needed. It also wants the router to send accounting information at the start and end of all authenticated sessions.
The router is added in ACS as a RADIUS client with a shared key of abckey. Your task is to configure the router and add downloadable ACLs on ACS.
Lab Setup
The Lab Scenario requires a router, at least one Layer 2 switch, ACS, and at least one host. Figure 11-7 shows the setup required.
Figure 11-7. Lab setup for Scenario #14

Before proceeding with this lab, add the router as a client in ACS. If you are using ACS 4.2, rename two groups as Research and Engineering. If you are using ACS 5.1, create two identity groups: Research and Engineering. You can use the default RADIUS access service or create a new one. The identity policy can be left as default (Internal Users). You also need to create two authorization rules in the access service. The first rule should match the Research identity group and the second rule should match the Engineering identity group.
This lab focuses on configuration of the router and downloadable ACLs.
Lab Solution
The following solution provides the steps for both ACS version 4.2 and 5.1:
Step 1. Add the ACS server on the router:
Router(config)#aaa new-model
Router(config)#radius-server host 192.168.1.10 key abckey
Step 2. Configure the router to authenticate and authorize HTTP traffic on interface fa0/0:
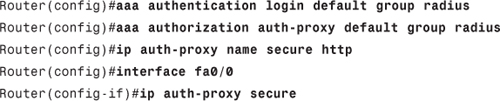
Step 3. Configure the router to account for authenticated traffic:
Router(config)#aaa accounting auth-proxy default start-stop group radius
Step 4. (For ACS 4.2 only) Add downloadable ACL in the groups:
Step 5. (For ACS 5.1 only) Create two authorization profiles.
Authorization profiles can be created from Policy Elements > Authorization and Permissions > Network Access > Authorization Profiles.
The first authorization profile should have the following cisco-av-pair attribute:
authproxy:proxyacl#1=permit tcp any host 172.16.26.10 eq 80
The second authorization profile should have the following cisco-av-pair:
authproxy:proxyacl#1=permit tcp any host 172.16.26.11 eq 80
Step 6. (For ACS 5.1 only) Apply the authorization profiles to authorization rules.
Apply the first authorization profile to the rule that matches the Research identity group. Apply the second profile to the rule which matches the Engineering identity group.
Lab Verification
To verify the solution, create a user in each group/identity group on ACS and initiate an HTTP session to 172.16.26.10 or 172.16.26.11. You will be redirected to an authentication page.
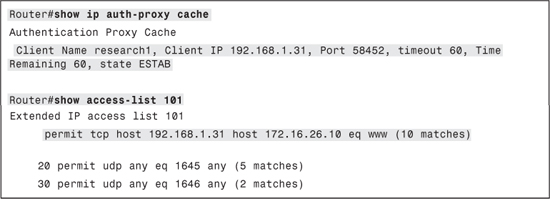
After authentication, the Authentication Proxy cache and the interface ACL will look similar to the output shown in Example 11-8.
Example 11-8. Verification of Lab Scenario #14
You should also try to initiate an HTTP session to 172.16.26.11 after authenticating as a user from the Research group. The router should not allow the session to go through.
Summary
Although Authentication Proxy can be used with only three protocols, it is very useful for restricting access based on the user profile.
Very little goes wrong with Authentication Proxy configuration and usually it has to do with the downloadable ACL configuration on ACS. The interface ACL on the router is important because it can provide more access than a user is entitled to.
This chapter concludes Part IV, “Pass Through Traffic.” Part V, “Remote Access,” looks at authentication, authorization, and accounting of various remote access services.