Chapter 2. The Common Language Runtime
The most important component of the .NET Framework is the Common Language Runtime (CLR). The CLR manages and executes code written in .NET languages and is the basis of the .NET architecture, similar to the Java Virtual Machine. The CLR activates objects, performs security checks on them, lays them out in memory, executes them, and garbage-collects them.
In this chapter, we describe the CLR environment, executables (with examples in several languages), metadata, assemblies, manifests, the CTS, and the CLS.
CLR Environment
The CLR is the underlying .NET infrastructure. Its facilities cover all the goals that we spelled out in Chapter 1. Unlike software libraries such as MFC or ATL, the CLR is built from a clean slate. The CLR manages the execution of code in the .NET Framework.
Tip
An assembly is the basic unit of deployment and versioning, consisting of a manifest, a set of one or more modules, and an optional set of resources.
Figure 2-1 shows the two portions of the .NET environment, with the bottom portion representing the CLR and the top portion representing the CLR executables or Portable Executable (PE) files, which are .NET assemblies or units of deployment. The CLR is the runtime engine that loads required classes, performs just-in-time compilation on needed methods, enforces security checks, and accomplishes a bunch of other runtime functionalities. The CLR executables shown in Figure 2-1 are either EXE or DLL files that consist mostly of metadata and code.

CLR Executables
Microsoft .NET executables are different from typical Windows executables in that they carry not only code and data, but also metadata (see Section 2.3 and Section 2.5 later in this chapter). In this section, we start off with the code for several .NET applications, and discuss the .NET PE format.
Hello, World: Managed C++
Let’s start off by examining a simple Hello, World application written in Managed C++, a Microsoft .NET extension to the C++ language. Managed C++ includes a number of new CLR-specific keywords that permit C++ programs to take advantage of CLR features, including garbage collection. Here’s the Managed C++ version of our program:
               #using <mscorlib.dll>

using namespace System;

void main(  )
{
  Console::WriteLine(L"C++ Hello, World!");
}
As you can see, this is a simple C++ program with an additional
directive, #using
(shown in bold). If you have worked
with the Microsoft Visual C++ compiler support features for COM, you
may be familiar with the
#import directive. While
#import reverse-engineers type information to
generate wrapper classes for COM interfaces,
#using makes all types accessible from the
specified DLL, similar to a #include directive in
C or C++. However, unlike
#include, which
imports C or C++ types, #using imports types for
any .NET assembly, written in any .NET language.
The one and only statement within the main( )
method is self-explanatory—it means that we are invoking a
static or class-level method,
WriteLine( ), on
the Console class. The L
that prefixes the literal string tells the C++ compiler to convert
the literal into a Unicode string. You may have already guessed that
the Console class is a type hosted by
mscorlib.dll, and the WriteLine(
) method takes one string parameter.
One thing that you should also notice is that this code signals to
the compiler that we’re using the types in the
System namespace, as indicated by the
using
namespace statement. This allows us to refer to
Console instead of having to fully qualify this
class as System::Console.
Given this simple program, compile it using the new C++ command-line compiler shipped with the .NET SDK:
cl hello.cpp /CLR /link /entry:main
The /CLR command-line option is extremely
important, because it tells the C++ compiler to generate a .NET PE
file instead of a normal Windows PE file.
When this statement is executed, the C++ compiler generates an executable called hello.exe. When you run hello.exe, the CLR loads, verifies, and executes it.
Hello, World: C#
Because .NET is serious about language integration, we’ll illustrate this same program using C#, a language especially designed for .NET. Borrowing from Java and C++ syntax, C# is a simple and object-oriented language that Microsoft has used to write the bulk of the .NET base classes and tools. If you are a Java (or C++) programmer, you should have no problem understanding C# code. Here’s Hello, World in C#:
using System;

public class MainApp
{
  public static void Main(  )
  {
    Console.WriteLine("C# Hello, World!");
  }
}
C# is similar to Java in that it doesn’t have the
concept of a header file: class definitions and implementations are
stored in the same .cs file. Another similarity
to Java is that
Main( ) is a public, static
function of a particular class, as you can see from the code. This is
different from C++, where main( ) itself is a
global function.
The
using keyword here
functions similar to using
namespace in the previous example, in that it
signals to the C# compiler that we want to use types within the
System namespace. Here’s how to compile this C#
program:
csc hello.cs
In this command, csc is the C# compiler that comes
with the .NET SDK. Again, the result of executing this command is an
executable called hello.exe, which you can
execute like a normal EXE but it’s managed by the
CLR.
Hello, World: VB.NET
Here is the same program in Visual Basic .NET (VB.NET):
Imports System

Public Module MainApp
  Public Sub Main(  )
    Console.WriteLine ("VB Hello, World!")
  End Sub
End Module
If you are a VB programmer, you may be in for a surprise. The syntax
of the language has changed quite a bit, but luckily these changes
make the language mirror other object-oriented languages, such as C#
and C++. Look carefully at this code snippet, and you will see that
you can translate each line of code here into an equivalent in C#.
Whereas C# uses the keywords using and
class, VB.NET uses the keywords
Import and
Module, respectively.
Here’s how to compile this program:
vbc /t:exe /out:hello.exe hello.vb
Microsoft now provides a command-line compiler,
vbc, for VB.NET.
The /t option specifies the type of PE file to be
created. In this case, since we have specified an EXE,
hello.exe will be the output of this command.
Hello, World: J#
And since Microsoft has added the Visual J# compiler, which allows programmers to write Java code that targets the CLR, we’ll show the same program in J# for completeness:
               import System.*;

public class MainApp
{
  public static void main(  )
  {
    Console.WriteLine("J# hello world!");
  }
}
If you carefully compare this simple J# program with the previously
shown C# program, you’ll notice that the two
languages are very similar. For example, the only difference (other
than the obvious literal string) is that the J# version uses the
import directive, instead of the
using directive. Here’s how to
compile this program:
vjc hello.jsl
In this command, vjc is the J# compiler that comes
with the .NET SDK. The result of executing this command is an
executable called hello.exe, targeting the CLR.
Tip
In all four versions of this Hello, World program, the Console class and the WriteLine( ) method have remained constant. That is, no matter which language you’re using, once you know how to do something in one language, you can do it in all other languages that target the CLR. This is an extreme change from traditional Windows programming, in which if you know how to write to a file in C++, you probably won’t know how to do it for VB, Java, or Cobol.
.NET Portable Executable File
A Windows executable, EXE or DLL, must conform to a file format called the PE file format, which is a derivative of the Common Object File Format (COFF). Both of these formats are fully specified and publicly available. The Windows OS knows how to load and execute DLLs and EXEs because it understands the format of a PE file. As a result, any compiler that wants to generate Windows executables must obey the PE/COFF specification.
A standard Windows PE file is divided into a number of sections,
starting off with an MS-DOS header, followed by a PE header, followed
by an optional header, and finally followed by a number of native
image sections, including the .text,
.data, .rdata, and
.rsrc sections. These are the standard sections of
a typical Windows executable, but Microsoft’s C/C++
compiler allows you to add your own custom sections into the PE file
using a compiler
#pragma directive.
For example, you can create your own data section to hold encrypted
data that only you can read.
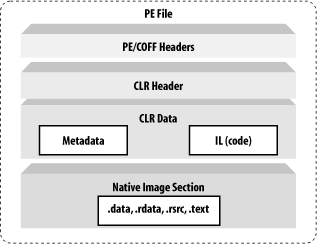
To support the CLR, Microsoft has extended the PE/COFF file format to include metadata and IL code. The CLR uses metadata to determine how to load classes and uses the IL code to turn it into native code for execution. As shown in Figure 2-2, the extensions that Microsoft has added to the normal PE format include the CLR header and CLR data. The CLR header mainly stores relative virtual addresses (RVA) to locations that hold pertinent information to help the CLR manage program execution. The CLR data portion contains metadata and IL code, both of which determine how the program will be executed. Compilers that target the CLR must emit both the CLR header and data information into the generated PE file, otherwise the resulting PE file will not run under the CLR.
If you want to prove to yourself that a .NET executable contains this information, use the dumpbin.exe utility, which dumps the content of a Windows executable in readable text.[1]
For example, running the following command on the command prompt:
dumpbin.exe hello.exe /all
generates the following data (for brevity, we have shown only the main elements that we want to illustrate):
Microsoft (R) COFF/PE Dumper Version 7.10.2292
Copyright (C) Microsoft Corporation.  All rights reserved.

Dump of file hello.exe

PE signature found

File Type: EXECUTABLE IMAGE

FILE HEADER VALUES      /* 128-BYTE MS-DOS/COFF HEADER */
    14C machine (x86)
     . . .

OPTIONAL HEADER VALUES  /* FOLLOWED BY PE AND OPTIONAL HEADERS */
       10B magic # (PE32)
        . . .

SECTION HEADER #1       /* CODE SECTION */
   .text name

    . . .
Looking at this text dump of a .NET PE file, you can see that a PE
file starts off with the MS-DOS/COFF header, which all Windows
programs must include. Following this header, you will find the PE
header that supports Windows 32-bit programs. Immediately after the
PE headers, you can find the code section for this program. The raw
data (RAW DATA #1) of this section stores the CLR
header, as follows:
RAW DATA #1
   . . .

  clr Header:           /* CLR HEADER */
         48 cb
       2.00 runtime version
       207C [     214] RVA [size] of MetaData Directory
          1 flags
    6000001 entry point token
          0 [       0] RVA [size] of Resources Directory
          0 [       0] RVA [size] of StrongNameSignature Directory
          0 [       0] RVA [size] of CodeManagerTable Directory
          0 [       0] RVA [size] of VTableFixups Directory
          0 [       0] RVA [size] of ExportAddressTableJumps Directory

  Section contains the following imports:
    mscoree.dll
         . . .
        0 _CorExeMain
 . . .
As mentioned earlier, the CLR header holds a number of pertinent details required by the runtime, including:
- Runtime version
Indicates the runtime version that is required to run this program
- MetaData directory
Is important because it indicates the location of the metadata needed by the CLR at runtime
- Entry point token
Is even more important because, for a single file assembly, this is the token that signifies the entry point, such as
Main(
)
, that the CLR executes
Below the CLR Header, note that there is an imported function called
_CorExeMain, which is
implemented by mscoree.dll, the core execution
engine of the CLR.[2] At the time of this writing,
Windows 98, 2000, and Me
have an OS loader that knows how to load standard PE files. To
prevent massive changes to these operating systems and still allow
.NET applications to run on them, Microsoft has updated the OS
loaders for all these platforms. The updated loaders know how to
check for the CLR header, and, if this header exists, it executes
_CorExeMain, thus not only jumpstarting the CLR
but also surrendering to it. You can then guess that the CLR will
call Main( ), since it can find the entry point
token within the CLR header.[3]
Now that we’ve looked at the contents of the CLR header, let’s examine the contents of the CLR data, including metadata and code, which are arguably the most important elements in .NET.
Metadata
Metadata is machine-readable information about a resource, or “data about data.” Such information might include details on content, format, size, or other characteristics of a data source. In .NET, metadata includes type definitions, version information, external assembly references, and other standardized information.
In order for two systems, components, or objects to interoperate with one another, at least one must know something about the other. In COM, this “something” is an interface specification, which is implemented by a component provider and used by its consumers. The interface specification contains method prototypes with full signatures, including the type definitions for all parameters and return types.
Only C/C++ developers were able to readily modify or use Interface Definition Language (IDL) type definitions—not so for VB or other developers, and more importantly, not for tools or middleware. So Microsoft invented something other than IDL that everyone could use, called a type library. In COM, type libraries allow a development environment or tool to read, reverse engineer, and create wrapper classes that are most appropriate and convenient for the target developer. Type libraries also allow runtime engines, such as the VB, COM, MTS, or COM+ runtime, to inspect types at runtime and provide the necessary plumbing or intermediary support for applications to use them. For example, type libraries support dynamic invocation and allow the COM runtime to provide universal marshaling[4] for cross-context invocations.
Type libraries are extremely rich in COM, but many developers criticize them for their lack of standardization. The .NET team invented a new mechanism for capturing type information. Instead of using the term “type library,” we call such type information metadata in .NET.
Type Libraries on Steroids
Just as type libraries are C++ header files on steroids, metadata is a type library on steroids. In .NET, metadata is a common mechanism or dialect that the .NET runtime, compilers, and tools can all use. Microsoft .NET uses metadata to describe all types that are used and exposed by a particular .NET assembly. In this sense, metadata describes an assembly in detail, including descriptions of its identity (a combination of an assembly name, version, culture, and public key), the types that it references, the types that it exports, and the security requirements for execution. Much richer than a type library, metadata includes descriptions of an assembly and modules, classes, interfaces, methods, properties, fields, events, global methods, and so forth.
Metadata provides enough information for any runtime, tool, or program to find out literally everything that is needed for component integration. Let’s take a look at a short list of consumers that make intelligent use of metadata in .NET, just to prove that metadata is indeed like type libraries on steroids:
- CLR
The CLR uses metadata for verification, security enforcement, cross- context marshaling, memory layout, and execution. The CLR relies heavily on metadata to support these runtime features, which we will cover in a moment.
- Class loader
A component of the CLR, the class loader uses metadata to find and load .NET classes. This is because metadata records detailed information for a specific class and where the class is located, whether it is in the same assembly, within or outside of a specific namespace, or in a dependent assembly somewhere on the network.
- Just-in-time (JIT) compilers
JIT compilers use metadata to compile IL code. IL is an intermediate representation that contributes significantly to language-integration support, but it is not VB code or bytecode, which must be interpreted. .NET JIT compiles IL into native code prior to execution, and it does this using metadata.
- Tools
Tools use metadata to support integration. For example, development tools can use metadata to generate callable wrappers that allow .NET and COM components to intermingle. Tools such as debuggers, profilers, and object browsers can use metadata to provide richer development support. One example of this is the IntelliSense features that Microsoft Visual Studio .NET supports. As soon as you have typed an object and a dot, the tool displays a list of methods and properties from which you can choose. This way, you don’t have to search header files or documentation to obtain the exact method or property names and calling syntax.
Like the CLR, any application, tool, or utility that can read metadata from a .NET assembly can make use of that assembly. You can use the .NET reflection classes to inspect a .NET PE file and know everything about the data types that the assembly uses and exposes. The CLR uses the same set of reflection classes to inspect and provide runtime features, including memory management, security management, type checking, debugging, remoting, and so on.
Metadata ensures language interoperability, an essential element to .NET, since all languages must use the same types in order to generate a valid .NET PE file. The .NET runtime cannot support features such as memory management, security management, memory layout, type checking, debugging, and so on without the richness of metadata. Therefore, metadata is an extremely important part of .NET—so important that we can safely say that there would be no .NET without metadata.
Examining Metadata
At this point, we introduce an important .NET tool, the IL disassembler (ildasm.exe), which allows you to view both the metadata and IL code within a given .NET PE file. For example, if you execute ildasm.exe and open the hello.exe .NET PE file that you built earlier in this chapter, you will see something similar to Figure 2-3.
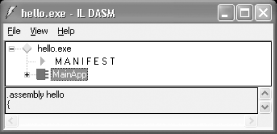
The ildasm.exe tool displays the metadata for your .NET PE file in a tree view, so that you can easily drill down from the assembly, to the classes, to the methods, and so on. To get full details on the contents of a .NET PE file, you can press Ctrl-D to dump the contents out into a text file.[5]
Here’s an example of an ildasm.exe dump, showing only the contents that are relevant to the current discussion:
               .assembly extern mscorlib
{
}

.assembly hello
{
}

.module hello.exe

               .class private auto ansi beforefieldinit MainApp
               extends [mscorlib]System.Object
{
  .method public hidebysig static
               void Main(  ) cil managed
  {
  } // End of method MainApp::Main

  .method public hidebysig specialname rtspecialname
               instance void .ctor(  ) cil managed
  {
  } // End of method MainApp::.ctor

} // End of class MainApp
As you can see, this dump fully describes the type information and
dependencies in a .NET assembly. While the first IL instruction,
.assembly
extern, tells us that
this PE file references (i.e., uses) an external assembly called
mscorlib, the second IL instruction describes
our assembly, the one that is called hello. We
will discuss the contents of the .assembly blocks
later, as these are collectively called a
manifest. Below the manifest, you see an
instruction that tells us the module name,
hello.exe.
Next, you see a definition of a class in IL, starting with the
.class IL instruction. Notice this class, MainApp,
derives from
System.Object,
the mother of all classes in .NET. Although we
didn’t derive MainApp from System.Object when we
wrote this class earlier in Managed C++, C#, J#, or VB.NET, the
compiler automatically added this specification for us because
System.Object is the implicit parent of all classes that omit the
specification of a base class.
Within this class, you see two methods. While the first method,
Main(
)
, is a static method that we wrote earlier, the second
method, .ctor( )
, is automatically generated.
Main( ) serves as the main entry point for our
application, and .ctor( ) is the constructor that
allows anyone to instantiate MainApp.
As this example illustrates, given a .NET PE file, we can examine all the metadata that is embedded within a PE file. The important thing to keep in mind here is that we can do this without the need for source code or header files. If we can do this, imagine the exciting features that the CLR or a third-party tool can offer by simply making intelligent use of metadata. Of course, everyone can now see your code, unless you use different techniques (e.g., obfuscation and encryption) to protect your property rights.
Inspecting and Emitting Metadata
To load and inspect a .NET assembly to determine what types it supports, use a special set of classes provided by the .NET Framework base class library. Unlike API functions, these classes encapsulate a number of methods to give you an easy interface for inspecting and manipulating metadata. In .NET, these classes are collectively called the Reflection API, which includes classes from the System.Reflection and System.Reflection.Emit namespaces. The classes in the System.Reflection namespace allow you to inspect metadata within a .NET assembly, as shown in the following example:
using System;
using System.IO;

using System.Reflection;

public class Meta
{
  public static int Main(  )
  {
    // First, load the assembly.
    Assembly a = Assembly.LoadFrom("hello.exe");

    // Get all the modules that the assembly supports.
    Module[] m = a.GetModules(  );

    // Get all the types in the first module.
    Type[] types = m[0].GetTypes(  );

    // Inspect the first type.
    Type type = types[0];
    Console.WriteLine("Type [{0}] has these methods:", type.Name);

    // Inspect the methods supported by this type.
    MethodInfo[] mInfo = type.GetMethods(  );
    foreach ( MethodInfo mi in mInfo )
    {
      Console.WriteLine("  {0}", mi);
    }

    return 0;
  }
}
Looking at this simple C# program, you’ll notice
that we first tell the compiler that we want to use the classes in
the System.Reflection namespace because we want to inspect metadata.
In Main( ), we load the assembly by a physical
name, hello.exe, so be sure that you have this
PE file in the same directory when you run this program. Next, we ask
the loaded assembly object for an array of modules that it contains.
From this array of modules, we pull off the array of types supported
by the module, and from this array of types, we then pull off the
first type. For hello.exe, the first and only
type happens to be MainApp. Once we have obtained
this type or class, we loop through the list of its exposed methods.
If you compile and execute this simple program, you see the following
result:
Type [MainApp] has these methods:
  Int32 GetHashCode(  )
  Boolean Equals(System.Object)
  System.String ToString(  )
  Void Main(  )
  System.Type GetType(  )
Although we’ve written only the Main( ) function,
our class actually supports four other methods, as is clearly
illustrated by this output. There’s no magic here,
because MainApp inherits these method
implementations from System.Object, which once
again is the root of all classes in .NET.
As you can see, the System.Reflection classes allow you to inspect
metadata, and they are really easy to use. If you have used type
library interfaces in COM before, you know that you can do this in
COM, but with much more effort. However, what you
can’t do with the COM type library interfaces is
create a COM component at runtime—a missing feature in COM but
an awesome feature in .NET. By using the System.Reflection.Emit
classes, you can write a simple program to generate a .NET assembly
dynamically at runtime. Given the existence of
System.Reflection.Emit, anyone can write a custom
.NET compiler.
Interoperability Support
Because it provides a common format for specifying types, metadata allows different components, tools, and runtimes to support interoperability. As demonstrated earlier, you can inspect the metadata of any .NET assembly. You can also ask an object at runtime for its type, methods, properties, events, and so on. Tools can do the same. The Microsoft .NET SDK ships four important tools that assist interoperability, including the .NET assembly registration utility ( RegAsm.exe), the type library exporter (tlbexp.exe), the type library importer (tlbimp.exe), and the XML schema definition tool (xsd.exe).
You can use the .NET assembly registration utility to register a .NET assembly into the registry so COM clients can make use of it. The type library exporter is a tool that generates a type library file ( .tlb) when you pass it a .NET assembly. Once you have generated a type library from a given .NET assembly, you can import the type library into VC++ or VB and use the .NET assembly in exactly the same way as if you were using a COM component. Simply put, the type library exporter makes a .NET assembly look like a COM component. The following command-line invocation generates a type library, called hello.tlb:
tlbexp.exe hello.exe
Microsoft also ships a counterpart to tlbexp.exe, the type library importer; its job is to make a COM component appear as a .NET assembly. So if you are developing a .NET application and want to make use of an older COM component, use the type library importer to convert the type information found in the COM component into .NET equivalents. For example, you can generate a .NET PE assembly using the following command:
tlbimp.exe COMServer.tlb
Executing this command will generate a .NET assembly in the form of a DLL (e.g., COMServer.dll). You can reference this DLL like any other .NET assembly in your .NET code. When your .NET code executes at runtime, all invocations of the methods or properties within this DLL are directed to the original COM component.
Tip
Be aware that the type library importer doesn’t let you reimport a type library that has been previously exported by the type library exporter. In other words, if you try to use tlbimp.exe on hello.tlb, which was generated by tlbexp.exe, tlbimp.exe will barf at you.
Another impressive tool that ships with the .NET SDK is the XML schema definition tool, which allows you to convert an XML schema into a C# class, and vice versa. This XML schema:
<schema xmlns="http://www.w3.org/2001/XMLSchema"
 targetNamespace="urn:book:car"
 xmlns:t="urn:book:car">
  <element name="car" type="t:CCar"/>
  <complexType name="CCar">
    <all>
      <element name="vin" type="string"/>
      <element name="make" type="string"/>
      <element name="model" type="string"/>
      <element name="year" type="int"/>
    </all>
  </complexType>
</schema>
represents a type called CCar. To convert this XML schema into a C# class definition, execute the following:
xsd.exe /c car.xsd
The /c option tells the tool to generate a class
from the given XSD file. If you execute this command, you get
car.cs as the output that contains the C# code
for this type.
The XML schema definition tool can also take a .NET assembly and generate an XSD file that contains representations for the public types within the .NET assembly. For example, if you execute the following, you get an XSD file as output:
xsd.exe somefile.exe
Before we leave this topic, we want to remind you to try out these tools for yourself, because they offer many impressive features that we won’t cover in this introductory book.
Assemblies and Manifests
As we just saw, types must expose their metadata to allow tools and programs to access them and benefit from their services. Metadata for types alone is not enough. To simplify software plug-and-play and configuration or installation of the component or software, we also need metadata about the component that hosts the types. Now we’ll talk about .NET assemblies (deployable units) and manifests (the metadata that describes the assemblies).
Assemblies Versus Components
During the COM era, Microsoft documentation inconsistently used the term component to mean a COM class or a COM module (DLLs or EXEs), forcing readers or developers to consider the context of the term each time they encountered it. In .NET, Microsoft has addressed this confusion by introducing a new concept, assembly, which is a software component that supports plug-and-play, much like a hardware component. Theoretically, a .NET assembly is approximately equivalent to a compiled COM module. In practice, an assembly can contain or refer to a number of types and physical files (including bitmap files, .NET PE files, and so forth) that are needed at runtime for successful execution. In addition to hosting IL code, an assembly is a basic unit of versioning, deployment, security management, side-by-side execution, sharing, and reuse, as we discuss next.
Unique Identities
Type uniqueness is important in RPC, COM, and .NET. Given the vast number of GUIDs in COM (application, library, class, and interface identifiers), development and deployment can be tedious because you must use these magic numbers in your code and elsewhere all the time. In .NET, you refer to a specific type by its readable name and its namespace. Since a readable name and its namespace are not enough to be globally unique, .NET guarantees uniqueness by using unique public/private key pairs. All assemblies that are shared (called shared assemblies) by multiple applications must be built with a public/private key pair. Public/private key pairs are used in public-key cryptography. Since public-key cryptography uses asymmetrical encryption, an assembly creator can sign an assembly with a private key, and anyone can verify that digital signature using the assembly creator’s public key. However, because no one else will have the private key, no other individual can create a similarly signed assembly.
To sign an assembly digitally, you must use a public/private key pair to build your assembly. At build time, the compiler generates a hash of the assembly files, signs the hash with the private key, and stores the resulting digital signature in a reserved section of the PE file. The public key is also stored in the assembly.
To verify the assembly’s digital signature, the CLR uses the assembly’s public key to decrypt the assembly’s digital signature, resulting in the original, calculated hash. In addition, the CLR uses the information in the assembly’s manifest to dynamically generate a hash. This hash value is then compared with the original hash value. These values must match, or we must assume that someone has tampered with the assembly.
Now that we know how to sign and verify an assembly in .NET, let’s talk about how the CLR ensures that a given application loads the trusted assembly with which it was built. When you or someone else builds an application that uses a shared assembly, the application’s assembly manifest will include an 8-byte hash of the shared assembly’s public key. When you run your application, the CLR dynamically derives the 8-byte hash from the shared assembly’s public key and compares this value with the hash value stored in your application’s assembly manifest. If these values match, the CLR assumes that it has loaded the correct assembly for you.[6]
IL Code
An
assembly contains the IL code that the
CLR executes at runtime (see Section 2.5
later in this chapter).
The IL code typically uses types defined within the same assembly,
but it also may use or refer to types in other assemblies. Although
nothing special is required to take advantage of the former, the
assembly must define references to other assemblies to do the latter,
as we will see in a moment. There is one caveat: each assembly can
have at most one entry point, such as DllMain( ),
WinMain( ), or Main( ). You
must follow this rule because when the CLR loads an assembly, it
searches for one of these entry points to start assembly execution.
Versioning
There are four types of assemblies in .NET:
- Static assemblies
These are the .NET PE files that you create at compile time. You can create static assemblies using your favorite compiler: csc, cl, vjc, or vbc.
- Dynamic assemblies
These are PE-formatted, in-memory assemblies that you dynamically create at runtime using the classes in the System.Reflection.Emit namespace.
- Private assemblies
- Shared assemblies
These are static assemblies that must have a unique shared name and can be used by any application.
An application uses a private assembly by referring to the assembly using a static path or through an XML-based application configuration file. Although the CLR doesn’t enforce versioning policies—checking whether the correct version is used—for private assemblies, it ensures that an application uses the correct shared assemblies with which the application was built. Thus, an application uses a specific shared assembly by referring to the specific shared assembly, and the CLR ensures that the correct version is loaded at runtime.
In .NET, an assembly is the smallest unit to which you can associate a version number; it has the following format:
<major_version>.<minor_version>.<build_number>.<revision>
Deployment
Since a client application’s assembly manifest (to be discussed shortly) contains information on external references—including the assembly name and version the application uses—you no longer have to use the registry to store activation and marshaling hints as in COM. Using the version and security information recorded in your application’s manifest, the CLR will load the correct shared assembly for you. The CLR does lazy loading of external assemblies and will retrieve them on demand when you use their types. Because of this, you can create downloadable applications that are small, with many small external assemblies. When a particular external assembly is needed, the runtime downloads it automatically without involving registration or computer restarts.
Security
The concept of a user identity is common in all development and operating platforms, but the concept of a code identity, in which even a piece of code has an identity, is new to the commercial software industry. In .NET, an assembly itself has a code identity, which includes information such as the assembly’s shared name, version number, culture, public key, and where the code came from (local, intranet, or Internet). This information is also referred to as the assembly’s evidence, and it helps to identify and grant permissions to code, particularly mobile code.
To coincide with the concept of a code identity, the CLR supports the concept of code access. Whether code can access resources or use other code is entirely dependent on security policy, which is a set of rules that an administrator configures and the CLR enforces. The CLR inspects the assembly’s evidence and uses security policy to grant the target assembly a set of permissions to be examined during its execution. The CLR checks these permissions and determines whether the assembly has access to resources or to other code. When you create an assembly, you can declaratively specify a set of permissions that the client application must have in order to use your assembly. At runtime, if the client application has code access to your assembly, it can make calls to your assembly’s objects; otherwise, a security exception will ensue. You can also imperatively demand that all code on the call stack has the appropriate permissions to access a particular resource.
Side-by-Side Execution
We have said that an assembly is a unit of versioning and deployment, and we’ve talked briefly about DLL Hell, something that .NET intends to minimize. The CLR allows any versions of the same, shared DLL (shared assembly) to execute at the same time, on the same system, and even in the same process. This concept is known as side-by-side execution. Microsoft .NET accomplishes side-by-side execution by using the versioning and deployment features that are innate to all shared assemblies. This concept allows you to install any versions of the same, shared assembly on the same machine, without versioning conflicts or DLL Hell. The only caveat is that your assemblies must be public or shared assemblies, meaning that you must register them against the GAC using a tool such as the .NET Global Assembly Cache Utility (gacutil.exe). Once you have registered different versions of the same shared assembly into the GAC, the human-readable name of the assembly no longer matters—what’s important is the information provided by .NET’s versioning and deployment features.
Recall that when you build an application that uses a particular shared assembly, the shared assembly’s version information is attached to your application’s manifest. In addition, an 8-byte hash of the shared assembly’s public key is also attached to your application’s manifest. Using these two pieces of information, the CLR can find the exact shared assembly that your application uses, and it will even verify that your 8-byte hash is indeed equivalent to that of the shared assembly. Given that the CLR can identify and load the exact assembly, the end of DLL Hell is in sight.
Sharing and Reuse
When you want to share your assembly with the rest of the world, your assembly must have a shared or strong name, and you must register it in the GAC. Likewise, if you want to use or extend a particular class that is hosted by a particular shared assembly, you don’t just import that specific class, but you import the whole assembly into your application. Therefore, the whole assembly is a unit of sharing.
Assemblies turn out to be an extremely important feature in .NET because they are an essential part of the runtime. An assembly encapsulates all types that are defined within the assembly. For example, although two different assemblies, Personal and Company, can define and expose the same type, Car, Car by itself has no meaning unless you qualify it as [Personal]Car or [Company]Car. Given this, all types are scoped to their containing assembly, and for this reason, the CLR cannot make use of a specific type unless the CLR knows the type’s assembly. In fact, if you don’t have an assembly manifest, which describes the assembly, the CLR will not execute your program.
Manifests: Assembly Metadata
An assembly manifest is metadata that describes everything about the assembly, including its identity, a list of files belonging to the assembly, references to external assemblies, exported types, exported resources, and permission requests. In short, it describes all the details that are required for component plug-and-play. Since an assembly contains all these details, there’s no need for storing this type of information in the registry, as in the COM world.
In COM, when you use a particular COM class, you give the COM library a class identifier. The COM library looks up in the registry to find the COM component that exposes that class, loads the component, tells the component to give it an instance of that class, and returns a reference to this instance. In .NET, instead of looking into the registry, the CLR peers right into the assembly manifest, determines which external assembly is needed, loads the exact assembly that’s required by your application, and creates an instance of the target class.
Let’s examine the manifest for the hello.exe application that we built earlier. Recall that we used the ildasm.exe tool to pick up this information.
.assembly extern mscorlib
{
  .publickeytoken = (B7 7A 5C 56 19 34 E0 89 )
  .ver 1:0:5000:0
}

.assembly hello
{
  .hash algorithm 0x00008004
  .ver 0:0:0:0
}
.module hello.exe
// MVID: {F828835E-3705-4238-BCD7-637ACDD33B78}
You’ll notice that this manifest starts off
identifying an external or referenced assembly, with
mscorlib as the assembly name, which this
particular application references. The keywords
.assembly
extern tell the CLR that this application
doesn’t implement mscorlib, but
makes use of it instead. This external assembly is one that all .NET
applications will use, so you will see this external assembly defined
in the manifest of all assemblies. You’ll notice
that, inside this assembly definition, the compiler has inserted a
special value called the
publickeytoken, which
is basic information about the publisher of
mscorlib. The compiler generates the value for
.publickeytoken by hashing the public key
associated with the
mscorlib assembly.
Another thing to note in the mscorlib block is the
version number of mscorlib.[7]
Now that we’ve covered the first
.assembly
block, let’s examine the second, which describes
this particular assembly. You can tell that this is a manifest block
that describes our application’s assembly because
there’s no extern keyword. The
identity of this assembly is made up of a readable assembly name,
hello, its version information,
0:0:0:0, and an optional culture, which is
missing. Within this block, the first line indicates the hash
algorithm that is used to hash selected contents of this assembly,
the result of which will be encrypted using the private key. However,
since we are not sharing this simple assembly,
there’s no encryption and there’s
no .publickey value.
The last thing to discuss is .module, which simply
identifies the output filename of this assembly,
hello.exe. You’ll notice that a
module is associated with a GUID, which means you get a different
GUID each time you build the module. Given this, a rudimentary test
for exact module equivalence is to compare the GUIDs of two modules.
Because this example is so simple, that’s all we get for our manifest. In a more complicated assembly, you can get all this, including much more in-depth detail about the make up of your assembly.
Creating Assemblies
An assembly can be a single-module assembly or a multi-module assembly. In a single-module assembly, everything in a build is clumped into one EXE or DLL, an example of which is the hello.exe application that we developed earlier. This is easy to create because a compiler takes care of creating the single-module assembly for you.
If you wanted to create a multi-module assembly, one that contains many modules and resource files, you have a few choices. One option is to use the Assembly Linker (al.exe) that is provided by the .NET SDK. This tool takes one or more IL or resource files and spits out a file with an assembly manifest.
Using Assemblies
To use an assembly, first import the assembly into your code, the syntax of which is dependent upon the language that you use. For example, this is how we import an assembly in C#, as we have seen previously in the chapter:
using System;
When you build your assembly, you must tell the compiler that you are referencing an external assembly. Again, how you do this is different depending on the compiler that you use. If you use the C# compiler, here’s how it’s done:
csc /r:mscorlib.dll hello.cs
Earlier, we showed you how to compile hello.cs
without the /r: option, but both techniques are
equivalent. The reference to mscorlib.dll is
inherently assumed because it contains all the base framework
classes.
Intermediate Language (IL)
In software engineering, the concept of abstraction is extremely important. We often use abstraction to hide the complexity of system or application services, providing instead a simple interface to the consumer. As long as we can keep the interface the same, we can change the hideous internals, and different consumers can use the same interface.
In language advances, scientists introduced different incarnations of language-abstraction layers, such as p-code and bytecode. Produced by the Pascal-P compiler, p-code is an intermediate language that supports procedural programming. Generated by Java compilers, bytecode is an intermediate language that supports object-oriented programming. Bytecode is a language abstraction that allows Java code to run on different operating platforms, as long as the platforms have a Java Virtual Machine (JVM) to execute bytecode.
Microsoft calls its own language-abstraction layer the Microsoft Intermediate Language (MSIL) or IL, for short. IL is an implementation of the Common Intermediate Language (CIL), a key element of the EMCA CLI specification. Similar to bytecode, IL supports all object-oriented features, including data abstraction, inheritance, polymorphism, and useful concepts such as exceptions and events. In addition to these features, IL supports other concepts, such as properties, fields, and enumeration. Any .NET language may be converted into IL, so .NET supports multiple languages and multiple platforms, as long as the target platforms have a CLR.
Shipped with the .NET SDK, Partition III CIL.doc describes the important IL instructions that language compilers should use. In addition to this specification, the .NET SDK includes another important document, Partition II Metadata.doc. Both of these documents are intended for developers who write compilers and tools, but you should read them to further understand how IL fits into .NET. Although you can develop a valid .NET assembly using the supported IL instructions and features, you’ll find IL to be very tedious because the instructions are a bit cryptic. However, should you decide to write pure IL code, you could use the IL Assembler (ilasm.exe) to turn your IL code into a .NET PE file.[8]
Enough with the theory: let’s take a look at some IL. Here’s an excerpt of IL code for the hello.exe program that we wrote earlier:[9]
.class private auto ansi beforefieldinit MainApp
  extends [mscorlib]System.Object
{
  .method public hidebysig static
          void Main(  ) cil managed
  {
    .entrypoint
    .maxstack  1
    ldstr "C# hello world!"
    call void [mscorlib]System.Console::WriteLine(string)
    ret
  } // End of method MainApp::Main

  .method public hidebysig specialname rtspecialname
    instance void .ctor(  ) cil managed
  {
    .maxstack  1
    ldarg.0
    call instance void [mscorlib]System.Object::.ctor(  )
    ret
  } // End of method MainApp::.ctor

} // End of class MainApp
Ignoring the weird-looking syntactic details, you can see that IL is
conceptually the same as any other object-oriented language. Clearly,
there is a class that is called
MainApp
that derives from
System.Object.
This class supports a static method called
Main( ), which contains the
code to dump out a text string to the console. Although we
didn’t write a constructor for this class, our C#
compiler has added the default constructor for
MainApp to support object construction.
Since a lengthy discussion of IL is beyond the scope of this book,
let’s just concentrate on the Main(
) method to examine its implementation briefly. First, you
see the following method signature:
.method public hidebysig static
        void Main(  ) cil managed
This signature declares a method that is public (meaning that it can
be called by anyone) and static (meaning it’s a
class-level method). The name of this method is Main(
). Main( ) contains IL code that is to
be managed or executed by the CLR. The
hidebysig attribute
says that this method hides the same methods (with the same
signatures) defined earlier in the class hierarchy. This is simply
the default behavior of most object-oriented languages, such as C++.
Having gone over the method signature, let’s talk
about the method body itself:
{
.entrypoint
.maxstack 1
ldstr "C# hello world!"
call void [mscorlib]System.Console::WriteLine(string)
ret
} // End of method MainApp::MainThis method uses two directives:
.entrypoint and
.maxstack. The
.entrypoint directive specifies that
Main( ) is the one and only entry point for this
assembly. The .maxstack directive specifies the
maximum stack slots needed by this method; in this case, the maximum
number of stack slots required by Main( ) is one.
Stack information is needed for each IL method because IL
instructions are stack-based, allowing language compilers to generate
IL code easily.
In addition to these directives, this method uses three IL
instructions. The first IL instruction,
ldstr, loads our
literal string onto the stack so that the code in the same block can
use it. The next IL instruction, call, invokes the
WriteLine( ) method, which picks up the string from the stack. The
call IL instruction
expects the method’s arguments to be on the stack,
with the first argument being the first object pushed on the stack,
the second argument being the second object pushed onto the stack,
and so forth. In addition, when you use the call
instruction to invoke a method, you must specify the
method’s signature. For example, examine the method
signature of WriteLine( ):
void [mscorlib]System.Console::WriteLine(string)
and you’ll see that WriteLine( )
is a static method of the Console class. The Console class belongs to
the System namespace, which happens to be a part of the
mscorlib assembly.
The WriteLine( ) method takes a string (an
alias for System.String) and returns a void. The
last thing to note in this IL snippet is that the
ret IL instruction simply returns control to the
caller.
The CTS and CLS
Having seen the importance of metadata and IL, let’s examine the CTS and the CLS. Both the CTS and the CLS ensure language compatibility, interoperability, and integration.
The Common Type System (CTS)
Because .NET treats all languages as equal, a class written in C# should be equivalent to a class written in VB.NET, and an interface defined in Managed C++ should be exactly the same as one that is specified in Managed COBOL. Languages must agree on the meanings of these concepts before they can integrate with one another. In order to make language integration a reality, Microsoft has specified a common type system by which every .NET language must abide. In this section, we outline the common types that have the same conceptual semantics in every .NET language. Microsoft .NET supports a rich set of types, but we limit our discussion to the important ones, including value types, reference types, classes, interfaces, and delegates.
Value types
In general, the CLR supports two different types: value types and reference types. Value types represent values allocated on the stack. They cannot be null and must always contain some data. When value types are passed into a function, they are passed by value, meaning that a copy of the value is made prior to function execution. This implies that the original value won’t change, no matter what happens to the copy during the function call. Since intrinsic types are small in size and don’t consume much memory, the resource cost of making a copy is negligible and outweighs the performance drawbacks of object management and garbage collection. Value types include primitives, structures, and enumerations; examples are shown in the following C# code listing:
int i;                     // Primitive
struct Point { int x, y; } // Structure
enum State { Off, On }     // Enumeration
You can also create a value type by deriving a class from
System.ValueType. One thing to note is that a
value type is sealed, meaning that once you have
derived a class from System.ValueType, no one else
can derive from your class.
Reference types
If a type consumes significant memory resources, then a reference type provides more benefits over a value type. Reference types are so called because they contain references to heap-based objects and can be null. These types are passed by reference, meaning that when you pass such an object into a function, an address of or pointer to the object is passed—not a copy of the object, as in the case of a value type. Since you are passing a reference, the caller will see whatever the called function does to your object. The first benefit here is that a reference type can be used as an output parameter, but the second benefit is that you don’t waste extra resources because a copy is not made. If your object is large (consuming lots of memory), than reference types are a better choice. In .NET, one drawback of a reference type is that it must be allocated on the managed heap, which means it requires more CPU cycles because it must be managed and garbage-collected by the CLR. In .NET, the closest concept to destruction is finalization, but unlike destructors in C++, finalization is nondeterministic. In other words, you don’t know when finalization will happen because it occurs when the garbage collector executes (by default, when the system runs out of memory). Since finalization is nondeterministic, another drawback of reference types is that if reference-type objects hold on to expensive resources that will be released during finalization, system performance will degrade because the resources won’t be released until these objects are garbage-collected. Reference types include classes, interfaces, arrays, and delegates, examples of which are shown in the following C# code listing:
class Car {}                   // Class
interface ISteering {}         // Interface
int[] a = new int[5];          // Array
delegate void Process(  );     // Delegate
Classes, interfaces, and delegates will be discussed shortly.
Boxing and unboxing
Microsoft .NET supports value types for
performance reasons, but everything in .NET is ultimately an object.
In fact, all primitive types have corresponding classes in the .NET
Framework. For example, int is, in fact, an alias
of System.Int32, and System.Int32 happens to derive from
System.ValueType, meaning that it is a value type. Value types are
allocated on the stack by default, but they can always be converted
into a heap-based, reference-type object; this is called
boxing. The following code snippet shows that we
can create a box and copy the value of i into it:
int i = 1;         // i - a value type
object box = i;    // box - a reference object
When you box a value, you get an object upon which you can invoke
methods, properties, and events. For example, once you have converted
the integer into an object, as shown in this code snippet, you can
call methods that are defined in System.Object,
including ToString( ), Equals(
), and so forth.
The reverse of boxing is of course unboxing, which means that you can convert a heap-based, reference-type object into its value-type equivalent, as the following shows:
int j = (int)box;
This example simply uses the cast operator to cast
a heap-based object called box into a value-type
integer.
Classes, properties, indexers
The CLR provides full support for object-oriented concepts (such as encapsulation, inheritance, and polymorphism) and class features (such as methods, fields, static members, visibility, accessibility, nested types, and so forth). In addition, the CLR supports new features that are nonexistent in many traditional object-oriented programming languages, including properties, indexers, and events.[10] Events are covered in Chapter 8. For now let’s briefly talk about properties and indexers.
A property is similar to a field (a member variable), with the exception that there is a getter and a setter method, as follows:
using System;

public class Car
{
  private string make;
  public string Make
  {
    get { return make; }
    set { make = value; }
  }

  public static void Main(  )
  {
    Car c = new Car(  );
    c.Make = "Acura";  // Use setter.
    String s = c.Make; // Use getter.
    Console.WriteLine(s);
  }
}
Although this is probably the first time you’ve seen
such syntax, this example is straightforward and really needs no
explanation, with the exception of the keyword
value. This is a
special keyword that represents the one and only argument to the
setter method.
Syntactically similar to a property, an indexer is analogous to
operator[] in C++, as it allows array-like access
to the contents of an object. In other words, it allows you to access
an object like you’re accessing an array, as shown
in the following example:
using System;

public class Car
{
  Car(  )
  {
    wheels = new string[4];
  }

  private string[] wheels;
  public string this[int index]
  {
    get { return wheels[index]; }
    set { wheels[index] = value; }
  }

  public static void Main(  )
  {
    Car c = new Car(  );
    c[0] = "LeftWheel";  // c[0] can be an l-value or an r-value.
    Console.WriteLine(c[0]);
 }
}Interfaces
Interfaces support exactly the same concept as a C++ abstract base class (ABC) with only pure virtual functions. An ABC is a class that declares one or more pure virtual functions and thus cannot be instantiated. If you know COM or Java, interfaces in .NET are conceptually equivalent to a COM or Java interface. You specify them, but you don’t implement them. A class that derives from your interface must implement your interface. An interface may contain methods, properties, indexers, and events. In .NET, a class can derive from multiple interfaces.
Delegates
One of the most powerful features of C is its support for function pointers. Function pointers allow you to build software with hooks that can be implemented by someone else. In fact, function pointers allow many people to build expandable or customizable software. Microsoft .NET supports a type-safe version of function pointers, called delegates. Here’s an example that may take a few minutes to sink in, but once you get it, you’ll realize that it’s really simple:
using System;
class TestDelegate
{
  // 1. Define callback prototype.
  delegate void MsgHandler(string strMsg);

  // 2. Define callback method.
  void OnMsg(string strMsg)
  {
    Console.WriteLine(strMsg);
  }

  public static void Main(  )
  {
    TestDelegate t = new TestDelegate(  );

    // 3. Wire up our callback method.
    MsgHandler f = new MsgHandler(t.OnMsg);

    // 4. Invoke the callback method indirectly.
    f("Hello, Delegate.");
  }
}
The first thing to do is to define a callback function prototype, and
the important keyword here is delegate, which
tells the compiler that you want an object-oriented function pointer.
Under the hood, the compiler generates a nested class, MsgHandler,
which derives from System.MulticastDelegate.[11] A multicast
delegate supports many receivers. Once you’ve
defined your prototype, you must define and implement a method with a
signature that matches your prototype. Then, simply wire up the
callback method by passing the function to the
delegate’s constructor, as shown in this code
listing. Finally, invoke your callback indirectly. Having gone over
delegates, you should note that delegates form the foundation of
events, which are discussed in Chapter 8.
The Common Language Specification (CLS)
A goal of .NET is to support language integration in such a way that programs can be written in any language, yet can interoperate with one another, taking full advantage of inheritance, polymorphism, exceptions, and other features. However, languages are not made equal because one language may support a feature that is totally different from another language. For example, Managed C++ is case-sensitive, but VB.NET is not. In order to bring everyone to the same sheet of music, Microsoft has published the Common Language Specification (CLS). The CLS specifies a series of basic rules that are required for language integration. Since Microsoft provides the CLS that spells out the minimum requirements for being a .NET language, compiler vendors can build their compilers to the specification and provide languages that target .NET. Besides compiler writers, application developers should read the CLS and use its rules to guarantee language interoperation.
CLR Execution
Now that you understand the elements of a .NET executable, let’s talk about the services that the CLR provides to support management and execution of .NET assemblies. There are many fascinating components in the CLR, but for brevity, we will limit our discussions to just the major components, as shown in Figure 2-4.

The major components of the CLR include the class loader, verifier, JIT compilers, and other execution support, such as code management, security management, garbage collection, exception management, debug management, marshaling management, thread management, and so on. As you can see from Figure 2-4, your .NET PE files lay on top of the CLR and execute within the CLR’s Virtual Execution System (VES), which hosts the major components of the runtime. Your .NET PE files will have to go through the class loader, the type verifier, the JIT compilers, and other execution support components before they will execute.
Class Loader
When you run a standard Windows application, the OS loader loads it before it can execute. At the time of this writing, the default loaders in the existing Windows operating systems, such as Windows 98, Windows Me, Windows 2000, and so forth, recognize only the standard Windows PE files. As a result, Microsoft has provided an updated OS loader for each of these operating systems that support the .NET runtime. The updated OS loaders know the .NET PE file format and can handle the file appropriately.
When you run a .NET application on one of these systems that have an
updated OS loader, the OS loader recognizes the .NET application and
thus passes control to the CLR. The CLR then finds the entry point,
which is typically Main( ), and executes it to
jump-start the application. But before Main( ) can
execute, the class loader must find the class that exposes
Main( ) and load the class. In addition, when
Main( ) instantiates an object of a specific
class, the class loader also kicks in. In short, the class loader
performs its magic the first time a type is referenced.
The class loader loads .NET classes into memory and prepares them for execution. Before it can successfully do this, it must locate the target class. To find the target class, the class loader looks in several different places, including the application configuration file (.config) in the current directory, the GAC, and the metadata that is part of the PE file, specifically the manifest. The information that is provided by one or more of these items is crucial to locating the correct target class. Recall that a class can be scoped to a particular namespace, a namespace can be scoped to a particular assembly, and an assembly can be scoped to a specific version. Given this, two classes, both named Car, are treated as different types even if the version information of their assemblies are the same.
Once the class loader has found and loaded the target class, it caches the type information for the class so that it doesn’t have to load the class again for the duration of this process. By caching this information, it will later determine how much memory is needed to allocate for the newly created instance of this class. Once the target class is loaded, the class loader injects a small stub, like a function prolog, into every single method of the loaded class. This stub is used for two purposes: to denote the status of JIT compilation and to transition between managed and unmanaged code. At this point, if the loaded class references other classes, the class loader will also try to load the referenced types. However, if the referenced types have already been loaded, the class loader has to do nothing. Finally, the class loader uses the appropriate metadata to initialize the static variables and instantiate an object of the loaded class for you.
Verifier
Scripting and interpreted languages are very lenient on type usages, allowing you to write code without explicit variable declarations. This flexibility can introduce code that is extremely error-prone and hard to maintain, and that is often a culprit for mysterious program crashes. Unlike scripting and interpreted languages, compiled languages require types to be explicitly defined prior to their use, permitting the compiler to ensure that types are used correctly and the code will execute peacefully at runtime.
The key here is type safety, and it is a fundamental concept for code verification in .NET. Within the VES, the verifier is the component that executes at runtime to verify that the code is type safe. Note that this type verification is done at runtime and that this is a fundamental difference between .NET and other environments. By verifying type safety at runtime, the CLR can prevent the execution of code that is not type safe and ensure that the code is used as intended. In short, type safety means more reliability.
Let’s talk about where the verifier fits within the CLR. After the class loader has loaded a class and before a piece of IL code can execute, the verifier kicks in for code that must be verified. The verifier is responsible for verifying that:
The metadata is well formed, meaning the metadata must be valid.
The IL code is type safe, meaning type signatures are used correctly.
Both of these criteria must be met before the code can be executed because JIT compilation will take place only when code and metadata have been successfully verified. In addition to checking for type safety, the verifier also performs rudimentary control-flow analysis of the code to ensure that the code is using types correctly. You should note that since the verifier is a part of the JIT compilers, it kicks in only when a method is being invoked, not when a class or assembly is loaded. You should also note that verification is an optional step because trusted code will never be verified but will be immediately directed to the JIT compiler for compilation.
JIT Compilers
JIT compilers play a major role in the .NET platform because all .NET PE files contain IL and metadata, not native code. The JIT compilers convert IL to native code so that it can execute on the target operating system. For each method that has been successfully verified for type safety, a JIT compiler in the CLR will compile the method and convert it into native code.
One advantage of a JIT compiler is that it can dynamically compile code that is optimized for the target machine. If you take the same .NET PE file from a one-CPU machine to a two-CPU machine, the JIT compiler on the two-CPU machine knows about the second CPU and may be able to spit out the native code that takes advantage of the second CPU. Another obvious advantage is that you can take the same .NET PE file and run it on a totally different platform, whether it be Windows, Unix, or whatever, as long as that platform has a CLR.
For optimization reasons, JIT compilation occurs only the first time a method is invoked. Recall that the class loader adds a stub to each method during class loading. At the first method invocation, the VES reads the information in this stub, which tells it that the code for the method has not been JIT-compiled. At this indication, the JIT compiler compiles the method and injects the address of the native method into this stub. During subsequent invocations to the same method, no JIT compilation is needed because each time the VES goes to read information in the stub, it sees the address of the native method. Because the JIT compiler only performs its magic the first time a method is invoked, the methods you don’t need at runtime will never be JIT-compiled.
The compiled, native code lies in memory until the process shuts down and until the garbage collector clears off all references and memory associated with the process. This means that the next time you execute the process or component, the JIT compiler will again perform its magic.
If you want to avoid the cost of JIT compilation at runtime, you can use a special tool called ngen.exe, which compiles your IL during installation and setup time. Using ngen, you can JIT-compile the code once and cache it on the machine so that you can avoid JIT compilation at runtime (this process is referred to as pre-JITting). In the event that the PE file has been updated, you must PreJIT the PE file again. Otherwise, the CLR can detect the update and dynamically command the appropriate JIT compiler to compile the assembly.
Execution Support and Management
By now, you should see that every component in the CLR that we’ve covered so far uses metadata and IL in some way to successfully carry out the services that it supports. In addition to the provided metadata and generated managed code, the JIT compiler must generate managed data that the code manager needs to locate and unwind stack frames.[12] The code manager uses managed data to control the execution of code, including performing stack walks that are required for exception handling, security checks, and garbage collection. Besides the code manager, the CLR also provides a number of important execution-support and management services. A detailed discussion of these services is beyond the scope of this book, so we will briefly enumerate a few of them here:
- Garbage collection
Unlike C++, where you must delete all heap-based objects manually, the CLR supports automatic lifetime management for all .NET objects. The garbage collector can detect when your objects are no longer being referenced and perform garbage collection to reclaim the unused memory.
- Exception handling
Prior to .NET, there was no consistent method for error or exception handling, causing lots of pain in error handling and reporting. In .NET, the CLR supports a standard exception-handling mechanism that works across all languages, allowing every program to use a common error-handling mechanism. The CLR exception-handling mechanism is integrated with Windows Structured Exception Handling (SEH).
- Security support
The CLR performs various security checks at runtime to make sure that the code is safe to execute and that the code is not breaching any security requirements. In addition to supporting code access security, the security engine also supports declarative and imperative security checks. Declarative security requires no special security code, but you have to specify the security requirements through attributes or administrative configuration. Imperative security requires that you write the code in your method to specifically cause security checks.
- Debugging support
The CLR provides rich support for debugging and profiling. There is an API that compiler vendors can use to develop a debugger. This API contains support for controlling program execution, breakpoints, exceptions, control flow, and so forth. There is also an API for tools to support the profiling of running programs.
- Interoperation support
The CLR supports interoperation between the managed (CLR) and unmanaged (no CLR) worlds. The COM Interop facility serves as a bridge between COM and the CLR, allowing a COM object to use a .NET object, and vice versa. The Platform Invoke (P/Invoke) facility allows you to call Windows API functions.
This is by no means an exhaustive list. The one thing that we want to reiterate is that like the class loader, verifier, JIT compiler, and just about everything else that deals with .NET, these execution-support and management facilities all use metadata, managed code, and managed data in some way to carry out their services.
Summary
As you can see from this chapter, the .NET architecture strives to
support language integration and componentization in every way that
makes sense. Thanks to metadata, programming becomes much easier
because you no longer have to worry about the registry for component
deployment and other kinks (such as CoCreateInstanceEx, CLSIDs, IIDs,
IUnknown, IDL, and so forth) in order to support componentization.
Thanks to the CTS, CLS, metadata, and IL, you now have real language
integration. Microsoft has shipped a CLR for several flavors of
Windows, and has released their shared-source implementation of the
CLR that will run on FreeBSD and will no doubt be portable to other
Unix-like systems.[13] Non-Microsoft
implementations of the CLR have also appeared, including DotGNU
Portable.NET (for more information, see http://www.southern-storm.com.au/portable_net.html)
and Mono (see http://www.go-mono.com). .NET is thus a
multilanguage and multiplatform architecture.
[1] Note that you can dump the same information, in a more readable format, using the ildasm.exe utility, to be discussed later in this chapter.
[2] We invite you to run
dumpbin.exe and view the exports of
mscoree.dll at your convenience. You will also
find _CorDllMain, _CorExeMain,
_CorImageUnloading, and other interesting exports.
It’s interesting to note that this DLL is an
in-process COM server, attesting that .NET is created using COM
techniques.
[3] For brevity,
we’ve covered only the important content of this
header. If you want to learn the meanings of the rest, see this
chapter’s example code, which you can download from
http://www.oreilly.com/catalog/dotnetfrmess3/.
[4] In COM, universal marshaling is a common way to marshal all data types. A universal marshaler can be used to marshal all types, so you don’t have to provide your own proxy or stub code.
[5] The ildasm.exe tool also supports a command-line interface. You can execute ildasm.exe /h to view the command-line options. As a side note, if you want to view exactly which types are defined and referenced, press Ctrl-M in the ildasm.exe GUI, and it will show you further details.
[6] You can use the .NET Strong (a.k.a., Shared) Name (sn.exe) utility to generate a new key pair for a shared assembly. Before you can share your assembly, you must register it in the Global Assembly Cache, or GAC—you can do this by using the .NET Global Assembly Cache Utility (gacutil.exe). The GAC is simply a directory called Assembly located under the Windows (%windir%) directory.
[7] The fascinating details are explained in Partition II Metadata.doc and Partition III CIL.doc, which come with the .NET SDK. If you really want to understand metadata IL, read these documents.
[8] You can test this utility using the IL disassembler to load a .NET PE file and dump out the IL to a text file. Once you’ve done this, use the IL Assembler to covert the text file into a .NET PE file.
[9] Don’t compile this IL code: it’s incomplete because we’ve extracted unclear details to make it easier to read. If you want to see the complete IL code, use ildasm.exe on hello.exe.
[10] An event is a callback that is implemented using delegates, which is covered shortly.
[11] If you want to see this, use ildasm.exe and view the metadata of the delegate.exe sample that we’ve provided.
[12] By the way, you can write a custom JIT compiler or a custom code manager for the CLR because the CLR supports the plug-and-play of these components.
[13] You can download “The Shared Source CLI 1.0 Release” from Microsoft. The CLR is submitted to ECMA as the Common Language Infrastructure (CLI).